
Use and Care Guide
Page 3
...cloth items, such as cookbooks, plasticware and towels, as well as aluminum foil. FOR YOUR SAFETY: -- WHATTO DO iF YOU SMELL GAS: • Do not try to a range, shall not be used in Canada CSA Standard C22.1, Canadian Electrical Code, Part 1, and local code requirements. For models with the National... CAN/CGA B 149.1, and CAN/CGA B149.2, and the the National Electrical Code ANSI/NFPA No.70-1atest edition, or in conjunction with gas ranges other . NEVER use any phone in your Sears dealer to tip, resulting in serious burns or other flammable vapors and liquids in the vicinity ...
...cloth items, such as cookbooks, plasticware and towels, as well as aluminum foil. FOR YOUR SAFETY: -- WHATTO DO iF YOU SMELL GAS: • Do not try to a range, shall not be used in Canada CSA Standard C22.1, Canadian Electrical Code, Part 1, and local code requirements. For models with the National... CAN/CGA B 149.1, and CAN/CGA B149.2, and the the National Electrical Code ANSI/NFPA No.70-1atest edition, or in conjunction with gas ranges other . NEVER use any phone in your Sears dealer to tip, resulting in serious burns or other flammable vapors and liquids in the vicinity ...

Use and Care Guide
Page 5
... outlet that is located on the left lower REAR (back side) panel of the consumer to Liquefied Petroleum (L.P.) Gas. conversion is the personal responsibility of the range. DO NOT cut , remove, or bypass the grounding prong. important Safety instructions Grounding type wall receptacle Do not..., under any circumstance, cut or remove the grounding prong from this range and is correctly polarized and properly grounded. Power supply cord with this range for your local L,P, gas provider for this warning can cause serious injury, fire or death. Do not use...
... outlet that is located on the left lower REAR (back side) panel of the consumer to Liquefied Petroleum (L.P.) Gas. conversion is the personal responsibility of the range. DO NOT cut , remove, or bypass the grounding prong. important Safety instructions Grounding type wall receptacle Do not..., under any circumstance, cut or remove the grounding prong from this range and is correctly polarized and properly grounded. Power supply cord with this range for your local L,P, gas provider for this warning can cause serious injury, fire or death. Do not use...
Use and Care Guide
Page 8
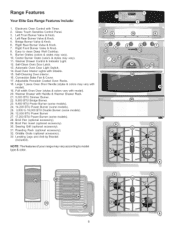
Range Features Your Elite Gas Range Features Include: 1. Right Front Burner Valve & Knob. 8. Burner Grates ... Door Handle (styles & colors may vary). 11. Broil Pan (optional accessory). 29. Broil Pan Insert (optional accessory). 30. Convection Bake Fan & Cover. 17. Warmer Drawer with Handle & Warmer Drawer Rack. 21. 5,000 BTU Simmer Burner... Cooktop. 9. Left Front Burner Valve & Knob. 4. Warmer Drawer Control & Indicator Light. 12. NOTE: The features of your range may vary). 10. Left Rear Burner Valve & Knob. 5. Glass Touch Sensitive Control Panel. 3. Bridge Burner Valve & Knob. ...
Range Features Your Elite Gas Range Features Include: 1. Right Front Burner Valve & Knob. 8. Burner Grates ... Door Handle (styles & colors may vary). 11. Broil Pan (optional accessory). 29. Broil Pan Insert (optional accessory). 30. Convection Bake Fan & Cover. 17. Warmer Drawer with Handle & Warmer Drawer Rack. 21. 5,000 BTU Simmer Burner... Cooktop. 9. Left Front Burner Valve & Knob. 4. Warmer Drawer Control & Indicator Light. 12. NOTE: The features of your range may vary). 10. Left Rear Burner Valve & Knob. 5. Glass Touch Sensitive Control Panel. 3. Bridge Burner Valve & Knob. ...

Use and Care Guide
Page 11
...to a flame. High Flame Medium Flame Start most foods; steaming. Fig. 2 Double Burner (some models): The versatile Double ring burner offers a complete range of the OFF position (See Fig. 1). 3. When set at a particular setting. Note: Although all electronic surface ignitors will spark at the same time,...surface control knob in and turn counterclockwise to extend beyond the outer edge of the range when it is left in the LITE position (The electronic ignitor will continue to rotate the gas control knob counterclockwise somewhere past grey area - When both the inner and outer rings...
...to a flame. High Flame Medium Flame Start most foods; steaming. Fig. 2 Double Burner (some models): The versatile Double ring burner offers a complete range of the OFF position (See Fig. 1). 3. When set at a particular setting. Note: Although all electronic surface ignitors will spark at the same time,...surface control knob in and turn counterclockwise to extend beyond the outer edge of the range when it is left in the LITE position (The electronic ignitor will continue to rotate the gas control knob counterclockwise somewhere past grey area - When both the inner and outer rings...
Use and Care Guide
Page 24
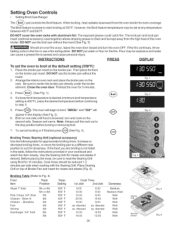
Setting Oven Controls • Setting Broil (Gas Range) The _roilj_ pad controls the Broil feature. DO NOT use the broiler pan without the insert (See Fig. 5). Place the broiler pan insert on one ...
Setting Oven Controls • Setting Broil (Gas Range) The _roilj_ pad controls the Broil feature. DO NOT use the broiler pan without the insert (See Fig. 5). Place the broiler pan insert on one ...

Use and Care Guide
Page 40
...a wire holder. Wear a leather-faced glove for cleaning (see Setting the Clock and Timer in ). Turn power back on top of the gas and the burner ignition ALWAYS keep the burner heads in use a small gauge wire or needle to clean them. The glass shields must be ... before replacing oven light. To replace: Align brass distribution block pin with burner base (see fig. 3) on again at the main source (or plug the range back in this Use & Care Guide. Remove burner grate (not illustrated) and inner burner head. 2. Burner skirt. 3. Use soap & water. Replace bulb...
...a wire holder. Wear a leather-faced glove for cleaning (see Setting the Clock and Timer in ). Turn power back on top of the gas and the burner ignition ALWAYS keep the burner heads in use a small gauge wire or needle to clean them. The glass shields must be ... before replacing oven light. To replace: Align brass distribution block pin with burner base (see fig. 3) on again at the main source (or plug the range back in this Use & Care Guide. Remove burner grate (not illustrated) and inner burner head. 2. Burner skirt. 3. Use soap & water. Replace bulb...


