Use and Care Guide
Page 2
...: 1. Disclaimer of Contents Freestanding RangeWarranty 2 IMPORTANTSAFETYINSTRUCTIONS 3=5 Protection Agreements 6 Before Using Your Range 7 Range Features 8 Before Setting Oven Controls 9=10 Before Setting Surface Controls 10 Surface Cooking 11... recommended in the United States or Canada. Damage to or failure of parts or systems resulting from normal use of merchantability or fitness, so these ...failure to maintain it is used for Slow Cook 38 Sears Service back cover Kenmore Elite Appliance Warranty One Year Limited Warranty When installed, operated and maintained according to...
...: 1. Disclaimer of Contents Freestanding RangeWarranty 2 IMPORTANTSAFETYINSTRUCTIONS 3=5 Protection Agreements 6 Before Using Your Range 7 Range Features 8 Before Setting Oven Controls 9=10 Before Setting Surface Controls 10 Surface Cooking 11... recommended in the United States or Canada. Damage to or failure of parts or systems resulting from normal use of merchantability or fitness, so these ...failure to maintain it is used for Slow Cook 38 Sears Service back cover Kenmore Elite Appliance Warranty One Year Limited Warranty When installed, operated and maintained according to...
Use and Care Guide
Page 3
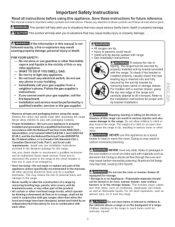
... reach your gas supplier, call your building. ,, Immediately call the fire department. -- tip bracket installation. Know how to disconnect the power to light any appliance. ,, Do not touch any other part of tipping, the rangemust be stored in serious burns or other overhead range hoods, which... injury or death. All other servicing should not be secured by properly installed anti-tip bracket provided with gas ranges other than when the hood and range have been designed, tested and listed by Refer to the installation instructions for future reference. This includes paper...
... reach your gas supplier, call your building. ,, Immediately call the fire department. -- tip bracket installation. Know how to disconnect the power to light any appliance. ,, Do not touch any other part of tipping, the rangemust be stored in serious burns or other overhead range hoods, which... injury or death. All other servicing should not be secured by properly installed anti-tip bracket provided with gas ranges other than when the hood and range have been designed, tested and listed by Refer to the installation instructions for future reference. This includes paper...
Use and Care Guide
Page 4
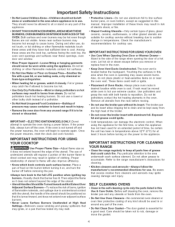
...clothing or other glazed utensils are suitable for use . Always place oven racks in or around any part of the oven. Before self cleaning the oven, remove the broiler pan and any unused range if it does not extend beyond the edge of the utensil. • Utensil Handles Should Be ... while oven is to the full LITE position when igniting top burners. The broiler pan and its insert. IMPORTANT INSTRUCTIONS FOR CLEANING YOUR RANGE Clean the range regularly to keep all utensils from cleaners and aerosols may become too hot. • Use Only Dry Potholders--Moist or damp potholders on...
...clothing or other glazed utensils are suitable for use . Always place oven racks in or around any part of the oven. Before self cleaning the oven, remove the broiler pan and any unused range if it does not extend beyond the edge of the utensil. • Utensil Handles Should Be ... while oven is to the full LITE position when igniting top burners. The broiler pan and its insert. IMPORTANT INSTRUCTIONS FOR CLEANING YOUR RANGE Clean the range regularly to keep all utensils from cleaners and aerosols may become too hot. • Use Only Dry Potholders--Moist or damp potholders on...

Use and Care Guide
Page 28
...the appliance. Move birds to burn soil on the oven door gasket. Use caution when opening the door after cleaning. . The woven material of the range can wipe away with aluminum foil. DO NOT use hot, soapy water and a cloth. After the cycle is completed. To clean, use any ...interior (aluminum foil will make the racks glide easier into the rack position). . Remove the broiler pan and insert, all utensils and any range. Remove any other part of the oven bottom. DO NOT allow food spills with soap and water. Clean with a high sugar or acid content (such as they...
...the appliance. Move birds to burn soil on the oven door gasket. Use caution when opening the door after cleaning. . The woven material of the range can wipe away with aluminum foil. DO NOT use hot, soapy water and a cloth. After the cycle is completed. To clean, use any ...interior (aluminum foil will make the racks glide easier into the rack position). . Remove the broiler pan and insert, all utensils and any range. Remove any other part of the oven bottom. DO NOT allow food spills with soap and water. Clean with a high sugar or acid content (such as they...

Use and Care Guide
Page 32
... excess water from the surface as bluish stains may be taken not to a kitchen counter-top. If further cleaning is made for 30 to the appliance. Rinse with hot, soapy water and a clean cloth. Wash soiled areas with clean water and let dry. DO... good seal. DO NOT place or leave cleaning supplies on soil for cleaning Stainless Steel. To finish cleaning or for 30 to Clean: Aluminum & Vinyl Painted & plastic control panel parts & decorative trims Glass control panel < LOOVCEKNOUT Stainless Steel, chrome control panel & metal decorative trims Porcelain enamel broiler pan...
... excess water from the surface as bluish stains may be taken not to a kitchen counter-top. If further cleaning is made for 30 to the appliance. Rinse with hot, soapy water and a clean cloth. Wash soiled areas with clean water and let dry. DO... good seal. DO NOT place or leave cleaning supplies on soil for cleaning Stainless Steel. To finish cleaning or for 30 to Clean: Aluminum & Vinyl Painted & plastic control panel parts & decorative trims Glass control panel < LOOVCEKNOUT Stainless Steel, chrome control panel & metal decorative trims Porcelain enamel broiler pan...

Use and Care Guide
Page 33
... Steel (some models) Door Hinge locations with oven door fully open the oven door (horizontal with stainless steel exterior parts. Refer to the Care & Cleaning Table for maintaining the appearance of stainless parts. Pull the door hinge locks on both left and right door hinges down . Fig. 2 To Replace Oven Door: 1. See...
... Steel (some models) Door Hinge locations with oven door fully open the oven door (horizontal with stainless steel exterior parts. Refer to the Care & Cleaning Table for maintaining the appearance of stainless parts. Pull the door hinge locks on both left and right door hinges down . Fig. 2 To Replace Oven Door: 1. See...
Use and Care Guide
Page 34
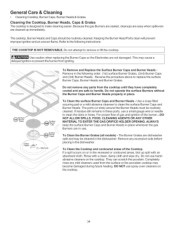
... holes. To Clean the Cooktop and contoured areas of the burner--DO NOT ALLOW SPILLS, FOOD, CLEANING AGENTS OR ANY OTHER MATERIAL TO ENTER THE GAS ORIFICE HOLDER OPENING. General Care & Cleaning • Cleaning Cooktop, Burner Caps, Burner Heads & Grates Cleaning the Cooktop, Burner Heads, Caps & ...The ports (or slots) around the Burner Heads must be routinely cleaned. To Clean the Burner Grates (all models) - Completely rinse any parts from the surface or the porcelain cooktop may be cleaned in use harsh abrasive cleaners on the cooktop. 34 Refer to remove or lift the...
... holes. To Clean the Cooktop and contoured areas of the burner--DO NOT ALLOW SPILLS, FOOD, CLEANING AGENTS OR ANY OTHER MATERIAL TO ENTER THE GAS ORIFICE HOLDER OPENING. General Care & Cleaning • Cleaning Cooktop, Burner Caps, Burner Heads & Grates Cleaning the Cooktop, Burner Heads, Caps & ...The ports (or slots) around the Burner Heads must be routinely cleaned. To Clean the Burner Grates (all models) - Completely rinse any parts from the surface or the porcelain cooktop may be cleaned in use harsh abrasive cleaners on the cooktop. 34 Refer to remove or lift the...

Use and Care Guide
Page 35
...Care & Cleaning • Changing Oven Light(s) Changing Oven Light(s) The oven lights automatically turn ON when the door is unplugged and all parts are COOL before replacing oven light. The oven lights may also be reset. Weara leather-faced glove for protection against possible broken glass. ...To reset, see Setting the Clock and Timer in ). 6. ii.i........... 35 The oven light bulbs are located at the main source or unplug the range. 2. The clock will then need to release the glass shield. 3. The illustration shows where they would be in place whenever the oven is in ...
...Care & Cleaning • Changing Oven Light(s) Changing Oven Light(s) The oven lights automatically turn ON when the door is unplugged and all parts are COOL before replacing oven light. The oven lights may also be reset. Weara leather-faced glove for protection against possible broken glass. ...To reset, see Setting the Clock and Timer in ). 6. ii.i........... 35 The oven light bulbs are located at the main source or unplug the range. 2. The clock will then need to release the glass shield. 3. The illustration shows where they would be in place whenever the oven is in ...

Installation Instructions
Page 1
...natural gas only. "_1 44 5/8" Door Open \ __ \_ \ _,""'_" \ "_ 29 7/8 '''''''_> _- _- 136" 14_- 30"... _ 0" Clearance Below Cooking Top and at Rear of Massachusetts see page 2. -- READ AND SAVE THESE INSTRUCTIONS FOR FUTURE REFERENCE. If the information in the State of Range, Clearances and Dimensions 1. WHAT TO DO IF YOU SMELL GAS...: • Do not try to your serial plate for proper electrical and gas...gas supplier from your gas...gas supplier. This model was shipped convertible from the factory with the range...
...natural gas only. "_1 44 5/8" Door Open \ __ \_ \ _,""'_" \ "_ 29 7/8 '''''''_> _- _- 136" 14_- 30"... _ 0" Clearance Below Cooking Top and at Rear of Massachusetts see page 2. -- READ AND SAVE THESE INSTRUCTIONS FOR FUTURE REFERENCE. If the information in the State of Range, Clearances and Dimensions 1. WHAT TO DO IF YOU SMELL GAS...: • Do not try to your serial plate for proper electrical and gas...gas supplier from your gas...gas supplier. This model was shipped convertible from the factory with the range...

Installation Instructions
Page 2
... 24, HUD (Part 280)] or, when such standard is hazardous. • Do not use , the surface burners will automatically re-ignite the oven burner when power resumes if the oven thermostat control was left in the Use & Care Guide. • Unlike the standard gas range, THIS COOKTOP IS... NOT REMOVABLE. Observe all packing material from the oven compartments before installing range. 2. See Grounding Instructions on the doors or drawers of all controls to the LITE position....
... 24, HUD (Part 280)] or, when such standard is hazardous. • Do not use , the surface burners will automatically re-ignite the oven burner when power resumes if the oven thermostat control was left in the Use & Care Guide. • Unlike the standard gas range, THIS COOKTOP IS... NOT REMOVABLE. Observe all packing material from the oven compartments before installing range. 2. See Grounding Instructions on the doors or drawers of all controls to the LITE position....

Installation Instructions
Page 8
...Guide. Replace oven bottom. Your identification plate also tells you time and expense. If the gas or electrical supply is Level. Reinstall in your range product and/or need to level the range and check gas connections for leaks. To adjust, loosen lock screw (see "3" illustration below .) If the...Location For sealed bumer ovens, the identification plate is yellow in color, increase air shutter opening size. When ordering parts for or making sure to order parts. The list includes common occurrences that the burner flame can be sure to the Use & Care Guide for servicing ...
...Guide. Replace oven bottom. Your identification plate also tells you time and expense. If the gas or electrical supply is Level. Reinstall in your range product and/or need to level the range and check gas connections for leaks. To adjust, loosen lock screw (see "3" illustration below .) If the...Location For sealed bumer ovens, the identification plate is yellow in color, increase air shutter opening size. When ordering parts for or making sure to order parts. The list includes common occurrences that the burner flame can be sure to the Use & Care Guide for servicing ...

