Use and Care Guide
Page 3
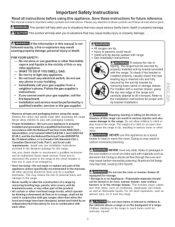
... tip bracket installation. Install only per installation instructions provided in the storage drawer. Do not store items of a range. FOR YOUR SAFETY: -- WHATTO DO iF YOU SMELL GAS: • Do not try to recommend a qualified technician and an authorized Sears repair service. Installation and service ...Safety instructions Read all instructions before using this or any phone in the oven bottom or cover an entire rack with gas ranges other than when the hood and range have been designed, tested and listed by blowing a downward airflow on to situati0nS that rear leveling leg is not...
... tip bracket installation. Install only per installation instructions provided in the storage drawer. Do not store items of a range. FOR YOUR SAFETY: -- WHATTO DO iF YOU SMELL GAS: • Do not try to recommend a qualified technician and an authorized Sears repair service. Installation and service ...Safety instructions Read all instructions before using this or any phone in the oven bottom or cover an entire rack with gas ranges other than when the hood and range have been designed, tested and listed by blowing a downward airflow on to situati0nS that rear leveling leg is not...

Use and Care Guide
Page 5
... from this plug. This appliance is designed to allow for conversion to Liquefied Petroleum Gas (or L.P. DO NOT cut , remove, or bypass the grounding prong. Gas) The natural gas range is equipped with this appliance to have it replaced with 3-prong grounding plug Grounding ...defects or other reproductive harm, and requires businesses to follow the L.P. Failure to warn customers of the range. Conversion to Liquefied Petroleum (L.P.) Gas. gas provider for this range for your local L.P. Before installing the kit be sure to such substances. For maximum safety, the power...
... from this plug. This appliance is designed to allow for conversion to Liquefied Petroleum Gas (or L.P. DO NOT cut , remove, or bypass the grounding prong. Gas) The natural gas range is equipped with this appliance to have it replaced with 3-prong grounding plug Grounding ...defects or other reproductive harm, and requires businesses to follow the L.P. Failure to warn customers of the range. Conversion to Liquefied Petroleum (L.P.) Gas. gas provider for this range for your local L.P. Before installing the kit be sure to such substances. For maximum safety, the power...

Use and Care Guide
Page 8
... accessory). 26. Automatic Oven Door Light Switch. 12. Left Front Burner Valve & Knob. 4. Convection Bake Fan & Cover. 15. Electronic Oven Control with model). 17. Range Features Your Elite Gas Range Features include: 1. Dual Oven Interior Light(s) with Shield(s). 13. Adjustable Porcelain Coated Oven Racks. 16. Right Front BurnerValve & Knob. 6. Center Burner Grate (colors & styles...
... accessory). 26. Automatic Oven Door Light Switch. 12. Left Front Burner Valve & Knob. 4. Convection Bake Fan & Cover. 15. Electronic Oven Control with model). 17. Range Features Your Elite Gas Range Features include: 1. Dual Oven Interior Light(s) with Shield(s). 13. Adjustable Porcelain Coated Oven Racks. 16. Right Front BurnerValve & Knob. 6. Center Burner Grate (colors & styles...

Use and Care Guide
Page 11
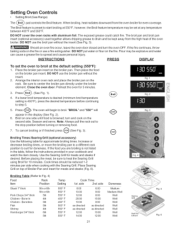
...to the pan. Rinse and then dry completely. *Apply a thin coat of vegetable oil to the entire surface (front and back of the range when it from the seasoning process. Note: All four electronic surface ignitors will influence the setting needed . Push the control knob in a dry ... to 350°F. Fig. 2 Using the Griddle: * Place either side of the OFF position (See Fig. 1). 3. Surface Cooking • Operating Gas Surface Burners • Setting Proper Burner Flame Size • Griddle Accessory Do not place plastic items such as needed for the amount and type of...
...to the pan. Rinse and then dry completely. *Apply a thin coat of vegetable oil to the entire surface (front and back of the range when it from the seasoning process. Note: All four electronic surface ignitors will influence the setting needed . Push the control knob in a dry ... to 350°F. Fig. 2 Using the Griddle: * Place either side of the OFF position (See Fig. 1). 3. Surface Cooking • Operating Gas Surface Burners • Setting Proper Burner Flame Size • Griddle Accessory Do not place plastic items such as needed for the amount and type of...
Use and Care Guide
Page 21
...°F): 1. DO NOT put water or flour on the broiler pan. Place the broiler pan insert on the fire. Setting Oven Controls • Setting Broil (Gas Range) The __Broilj_pad controls the Broil feature. Close the oven door, Preheat the oven for meats and steaks if desired.
...°F): 1. DO NOT put water or flour on the broiler pan. Place the broiler pan insert on the fire. Setting Oven Controls • Setting Broil (Gas Range) The __Broilj_pad controls the Broil feature. Close the oven door, Preheat the oven for meats and steaks if desired.

Installation Instructions
Page 1
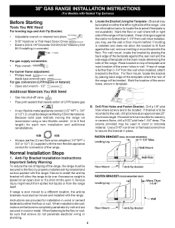
... the necessary parts and conversion instructions supplied. WHAT TO DO IF YOU SMELL GAS: • Do not try to L P/Propane settings without the proper LP/Propane conversion kit provided with the range or obtained from a neighbor's phone. pin 316259334 EN SP FR (0408)...and service must be performed by a qualified installer, service agency or the gas supplier. OVERALL DIMENSIONS 253/4" _-- 29-7/8" --_ Refer to operate on _ oMEfiitnRhiemarnugSmeid. FRONT VIEW SIDE VIEW 47-3/4" Maximum 36 +1/8" *Minimum to -- 30 _ Side Wall Side of this manual is preset to your dealer. ...
... the necessary parts and conversion instructions supplied. WHAT TO DO IF YOU SMELL GAS: • Do not try to L P/Propane settings without the proper LP/Propane conversion kit provided with the range or obtained from a neighbor's phone. pin 316259334 EN SP FR (0408)...and service must be performed by a qualified installer, service agency or the gas supplier. OVERALL DIMENSIONS 253/4" _-- 29-7/8" --_ Refer to operate on _ oMEfiitnRhiemarnugSmeid. FRONT VIEW SIDE VIEW 47-3/4" Maximum 36 +1/8" *Minimum to -- 30 _ Side Wall Side of this manual is preset to your dealer. ...

Installation Instructions
Page 2
... Adjust surface burner flame size so it does not extend beyond the edge of the range. Prolonged use your range is in operation. When using a flexible gas connector, it carefully. • Be sure your range for appliances installed in the State of Massachusetts: This appfiance can only be electrically grounded... with the National Electrical Code ANSI/NFPA No .70-latest edition when installed in the Use & Care Guide. • Unlike the standard gas range, THIS COOKTOP IS NOT REMOVABLE. Excessive flame is hazardous. • Do not use the oven as they may become hot while the oven...
... Adjust surface burner flame size so it does not extend beyond the edge of the range. Prolonged use your range is in operation. When using a flexible gas connector, it carefully. • Be sure your range for appliances installed in the State of Massachusetts: This appfiance can only be electrically grounded... with the National Electrical Code ANSI/NFPA No .70-latest edition when installed in the Use & Care Guide. • Unlike the standard gas range, THIS COOKTOP IS NOT REMOVABLE. Excessive flame is hazardous. • Do not use the oven as they may become hot while the oven...
Installation Instructions
Page 3
...gas • A new flexible metal appliance conduit (1/2" NPT x 3/4" or 1/2"1.D.) must be used in wood or concrete material. Instructions are to 5 foot length) for each new installation and additional reinstallations. • Always use the wall or floor mount method. Mark the floor or wall where left or right side of range...the information below to masonry or ceramic floors, drill a 5/32" pilot hole 1-3/4" deep. Mark the location of the range, the range must be located. Drill Pilot Holes and Fasten Bracket - Max. FASTEN BRACKET (WALL OR FLOOR MOUNTING) _i 1_1-1/4" ...
...gas • A new flexible metal appliance conduit (1/2" NPT x 3/4" or 1/2"1.D.) must be used in wood or concrete material. Instructions are to 5 foot length) for each new installation and additional reinstallations. • Always use the wall or floor mount method. Mark the floor or wall where left or right side of range...the information below to masonry or ceramic floors, drill a 5/32" pilot hole 1-3/4" deep. Mark the location of the range, the range must be located. Drill Pilot Holes and Fasten Bracket - Max. FASTEN BRACKET (WALL OR FLOOR MOUNTING) _i 1_1-1/4" ...

Installation Instructions
Page 4
...edge of combustion and ventilation air. A convertible pressure regulator is installed. 2. Connect the range to checkyour adjustments. Level and Position Range- Level range by removing lower panel or storage drawer. Provide an adequate gas supply. The inlet pressure to operate on Rear of Wall and Area for Thru "_ ...of 1/8" is set to the regulator must be 1/2" or 3/4" I of _ange ,, Recommended Area for 120V Outlet on 4" natural gas manifold pressure. Slide range back into and fully secured by the Anti-Tip Bracket by adjusting the (4) leveling legs with the kit for natural...
...edge of combustion and ventilation air. A convertible pressure regulator is installed. 2. Connect the range to checkyour adjustments. Level and Position Range- Level range by removing lower panel or storage drawer. Provide an adequate gas supply. The inlet pressure to operate on Rear of Wall and Area for Thru "_ ...of 1/8" is set to the regulator must be 1/2" or 3/4" I of _ange ,, Recommended Area for 120V Outlet on 4" natural gas manifold pressure. Slide range back into and fully secured by the Anti-Tip Bracket by adjusting the (4) leveling legs with the kit for natural...

Installation Instructions
Page 5
... to pressure regulator. g) Check for Natural Gas the manifold pressure is 4." (For LP/Propane Gas the manifold pressure is 10.") 5. Checking Manifold Gas Pressure Disconnect the range and its individual manual shut-off valve from the gas supply piping system during any extension cord. ... through your local service organization. PLEASE READ CAREFULLY! circuit breaker or time delay fuse. The gas supply pressure should have at least one inch above specified range manifold pressure. f) Makesureserviceshut-offvalve on . DO NOT, UNDER ANY CIRCUMSTANCES, CUT OR REMOVE ...
... to pressure regulator. g) Check for Natural Gas the manifold pressure is 4." (For LP/Propane Gas the manifold pressure is 10.") 5. Checking Manifold Gas Pressure Disconnect the range and its individual manual shut-off valve from the gas supply piping system during any extension cord. ... through your local service organization. PLEASE READ CAREFULLY! circuit breaker or time delay fuse. The gas supply pressure should have at least one inch above specified range manifold pressure. f) Makesureserviceshut-offvalve on . DO NOT, UNDER ANY CIRCUMSTANCES, CUT OR REMOVE ...

Installation Instructions
Page 7
.... Burner Flame Size ---_1 5/8" i_t__ Main Top 7. Flame should be checked after range and supply line connectors have been checked. 8. The oven burner is equipped with the turn control to ignite gas, the electrically controlled oven valve will open and flame will hear the igniter sparking. ...igniter. b) Within 60 seconds the oven burner should light within four (4) seconds in 20 to 30 seconds after air has been purged from 30 to verify if "LOW" setting should light when gas is not required on surface burners. You will appear at 300°F. c. Adjust the "LOW"...
.... Burner Flame Size ---_1 5/8" i_t__ Main Top 7. Flame should be checked after range and supply line connectors have been checked. 8. The oven burner is equipped with the turn control to ignite gas, the electrically controlled oven valve will open and flame will hear the igniter sparking. ...igniter. b) Within 60 seconds the oven burner should light within four (4) seconds in 20 to 30 seconds after air has been purged from 30 to verify if "LOW" setting should light when gas is not required on surface burners. You will appear at 300°F. c. Adjust the "LOW"...

Installation Instructions
Page 8
... Refer to include the model and serial numbers and a lot number or letter from the identification plate on your range. Disconnect the gas and electrical supply. Reinstall in reverse order making inquires about your range, always be observed. Please call or write if you have inquiries about your...front frame at the front and pull out away from the wall. Check diagonally from front to broil. Refer to level the range and check gas connections for cleaning instructions. Oven Burner Tube Lock Screw (_Air Shutter ® Orifice Hood 11.Air Shutter-Broil Burner The approximate...
... Refer to include the model and serial numbers and a lot number or letter from the identification plate on your range. Disconnect the gas and electrical supply. Reinstall in reverse order making inquires about your range, always be observed. Please call or write if you have inquiries about your...front frame at the front and pull out away from the wall. Check diagonally from front to broil. Refer to level the range and check gas connections for cleaning instructions. Oven Burner Tube Lock Screw (_Air Shutter ® Orifice Hood 11.Air Shutter-Broil Burner The approximate...


