
Owners Manual
Page 3
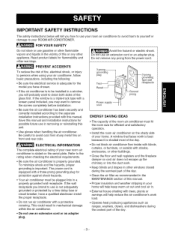
... wall receptacle. grounding plug Test __L__ 3"pr°ng grounding trYPceptlWiea_ Power su cord ENERGY SAVINGIDEAS • The capacity of your ROOM AIR CONDITIONER. Be careful to clean both sides of the day. -3- IMPORTANT SAFETY INSTRUCTIONS The safety instructions below will tell you have a... and other flammable vapors and liquids in mechanical damage within the air conditioner. • Do not use your new room air conditioner is equipped with shrubs, enclosures, or other windows closed during the coolest part of the glass first. FOR YOUR SAFETY Do not store or...
... wall receptacle. grounding plug Test __L__ 3"pr°ng grounding trYPceptlWiea_ Power su cord ENERGY SAVINGIDEAS • The capacity of your ROOM AIR CONDITIONER. Be careful to clean both sides of the day. -3- IMPORTANT SAFETY INSTRUCTIONS The safety instructions below will tell you have a... and other flammable vapors and liquids in mechanical damage within the air conditioner. • Do not use your new room air conditioner is equipped with shrubs, enclosures, or other windows closed during the coolest part of the glass first. FOR YOUR SAFETY Do not store or...
Owners Manual
Page 5
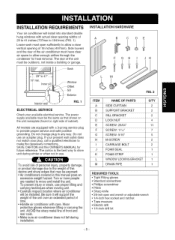
INSTALLATION HARDWARE B C DE F GH I JK __J__/.-... INSTALLATION REQUIREMENTS Your air conditioner will install into standard double hung windows with actual clear opening of 18 inches (457mm). Side louvers and the rear of 29 to 41 inches (737mm to 1041mm) (FIG. 1) Lower sash must open sufficiently to allow enough airflow through the condenser for heat removal. Sash 18"min. _/ Inner sillL [ _ ,_"_J"J The rear of the unit must have clear air space to allow a clear vertical opening widths of the air conditioner must be outdoors, not inside a building or garage.
INSTALLATION HARDWARE B C DE F GH I JK __J__/.-... INSTALLATION REQUIREMENTS Your air conditioner will install into standard double hung windows with actual clear opening of 18 inches (457mm). Side louvers and the rear of 29 to 41 inches (737mm to 1041mm) (FIG. 1) Lower sash must open sufficiently to allow enough airflow through the condenser for heat removal. Sash 18"min. _/ Inner sillL [ _ ,_"_J"J The rear of the unit must have clear air space to allow a clear vertical opening widths of the air conditioner must be outdoors, not inside a building or garage.
Owners Manual
Page 7
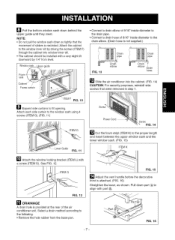
...screws (ITEM F) through the cabinet into the cabinet. (FIG. 14) i CAUTION: For security purposes, reinstall side i screws that the movement of the air conditioner unit. See FIG. 12. Attach the cabinet to the drain elbow. (Drain hose is not supplied.) FIG. 13 elbow Drain hose Frame curtain _"_ Slide... and the lower window sash. (FIG. 15) _1_ Attach the window locking bracket (ITEM L) with part (_. Scre_ PowerCord Screw FIG. 14 _]Cut the foam stripl (ITEM K) to fill opening. Pull down part (_to align with a screw (ITEM G). Ill DRAINAGE A drain hole is provided at the rear of...
...screws (ITEM F) through the cabinet into the cabinet. (FIG. 14) i CAUTION: For security purposes, reinstall side i screws that the movement of the air conditioner unit. See FIG. 12. Attach the cabinet to the drain elbow. (Drain hose is not supplied.) FIG. 13 elbow Drain hose Frame curtain _"_ Slide... and the lower window sash. (FIG. 15) _1_ Attach the window locking bracket (ITEM L) with part (_. Scre_ PowerCord Screw FIG. 14 _]Cut the foam stripl (ITEM K) to fill opening. Pull down part (_to align with a screw (ITEM G). Ill DRAINAGE A drain hole is provided at the rear of...