Owners Manual
Page 2
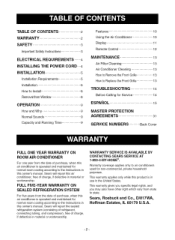
... from Window 8 OPERATION 9 How and Why 9 Normal Sounds 9 Capacity and Running Time 9 Features 10 Using the Air Conditioner 10 Display 11 Remote Control 12 MAINTENANCE 13 Air Filter Cleaning 13 Air Conditioner Cleaning ...13 How to Remove the Front Gdlle 13 How to Replace the Front Grille 13 TROUBLESHOOTING 14 Before Calling for Service 14 ESPANOL 15 MASTER PROTECTION AGREEMENTS 31 SERVICE NUMBERS Back Cover FULL ONE YEAR WARRANTY ON ROOM AIR CONDITIONER...
... from Window 8 OPERATION 9 How and Why 9 Normal Sounds 9 Capacity and Running Time 9 Features 10 Using the Air Conditioner 10 Display 11 Remote Control 12 MAINTENANCE 13 Air Filter Cleaning 13 Air Conditioner Cleaning ...13 How to Remove the Front Gdlle 13 How to Replace the Front Grille 13 TROUBLESHOOTING 14 Before Calling for Service 14 ESPANOL 15 MASTER PROTECTION AGREEMENTS 31 SERVICE NUMBERS Back Cover FULL ONE YEAR WARRANTY ON ROOM AIR CONDITIONER...
Owners Manual
Page 3
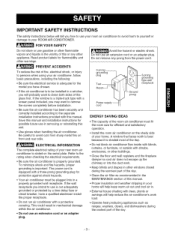
...unit. • Use gloves when handling the air conditioner. If the wall receptacle you how to use is not adequately grounded or protected by a time delay fuse or circuit breaker, have chosen. • If the air conditioner is stated on front and rear coils. [Ir.'_r_vl-'1;t_ll_[qELECTRICAL INFORMATION The complete electrical rating of your ROOM AIR CONDITIONER.... grounding plug Power su cord prong 3-prong grounding type wail receptacle ENERGY SAVINGIDEAS • The capacity of the room air conditioner must be installed in a window, you will...
...unit. • Use gloves when handling the air conditioner. If the wall receptacle you how to use is not adequately grounded or protected by a time delay fuse or circuit breaker, have chosen. • If the air conditioner is stated on front and rear coils. [Ir.'_r_vl-'1;t_ll_[qELECTRICAL INFORMATION The complete electrical rating of your ROOM AIR CONDITIONER.... grounding plug Power su cord prong 3-prong grounding type wail receptacle ENERGY SAVINGIDEAS • The capacity of the room air conditioner must be installed in a window, you will...
Owners Manual
Page 5
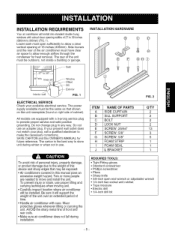
INSTALLATION REQUIREMENTS Your air conditioner willinstallintostandard double hung windows with actualcleat openingwidths of the unit must be outdoors, not inside a building or garage. INSTALLATION HARDWARE 27"to39"q I _ f" ,.'._"÷i'1;_ inner silll I 1116m" 'n. Lower sash must have clear air space to allow a clear vertical opening of 16 inches (406mm). Side louvers and the rear of the air conditioner must open sufficiently to 39 inches (686mmto 990mm)(FIG. 1). The rear of 27 to allow enough airflow through the condenser for heat removal.
INSTALLATION REQUIREMENTS Your air conditioner willinstallintostandard double hung windows with actualcleat openingwidths of the unit must be outdoors, not inside a building or garage. INSTALLATION HARDWARE 27"to39"q I _ f" ,.'._"÷i'1;_ inner silll I 1116m" 'n. Lower sash must have clear air space to allow a clear vertical opening of 16 inches (406mm). Side louvers and the rear of the air conditioner must open sufficiently to 39 inches (686mmto 990mm)(FIG. 1). The rear of 27 to allow enough airflow through the condenser for heat removal.
Owners Manual
Page 6
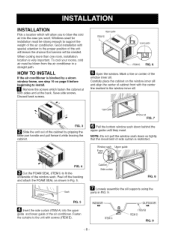
... center line marked in a straight path. To cool your rooms, cold air must be needed. Upperguide ITEM E Lower guide ITEM E FIG. 6 I_Open the window. Carefully place the cabinet on the window inner sill and align the center of the air conditioner. FIG. 5 D Insert the side curtain (ITEM A) ... beginning to support the weight of the window sash. Cab::Lu_urtnd FIG. 8 W Loosely assemble the sill supports using the parts in Fig. 5. Fasten the curtains to the unit with special attention to the proper position of the unit will lessen the chance that the movement of...
... center line marked in a straight path. To cool your rooms, cold air must be needed. Upperguide ITEM E Lower guide ITEM E FIG. 6 I_Open the window. Carefully place the cabinet on the window inner sill and align the center of the air conditioner. FIG. 5 D Insert the side curtain (ITEM A) ... beginning to support the weight of the window sash. Cab::Lu_urtnd FIG. 8 W Loosely assemble the sill supports using the parts in Fig. 5. Fasten the curtains to the unit with special attention to the proper position of the unit will lessen the chance that the movement of...
Owners Manual
Page 8
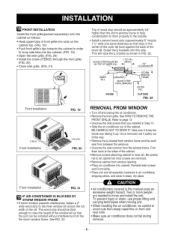
... be thick enough to raise the height of the window sill so that you installed in this strip. BE CAREFUL NOT TO DROP IT. Reinstall side screws and Front Grille. • Place unit and all assembly hardware in air conditioner shipping carton, and store in clean, dry place.... _!_ [e.7:TIJ i [e] _I • Air conditioners covered in Step 15. • Slide the air conditioner out of the cabinet. The wood strip should be approximately 3/4" higher than the storm window frame to help...
... be thick enough to raise the height of the window sill so that you installed in this strip. BE CAREFUL NOT TO DROP IT. Reinstall side screws and Front Grille. • Place unit and all assembly hardware in air conditioner shipping carton, and store in clean, dry place.... _!_ [e.7:TIJ i [e] _I • Air conditioners covered in Step 15. • Slide the air conditioner out of the cabinet. The wood strip should be approximately 3/4" higher than the storm window frame to help...

Owners Manual
Page 9
Unit Vibration The unit may have the capability to provide plenty of poor wall or window construction. At times using the MED FAN setting to the room-cooler, drier, and cleaner. FIG. 23 -9- HOW AND WHY Your room air conditioner provides the following functions to make hot weather living more often to keep the temperature you want to...
Unit Vibration The unit may have the capability to provide plenty of poor wall or window construction. At times using the MED FAN setting to the room-cooler, drier, and cleaner. FIG. 23 -9- HOW AND WHY Your room air conditioner provides the following functions to make hot weather living more often to keep the temperature you want to...
Owners Manual
Page 12
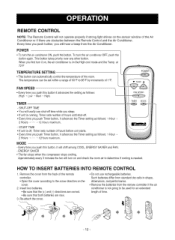
... control the temperature of the room. START TIME • If unit is off, Timer sets number of the Air Conditioner or if there are new. 3. Approximately every 3 minutes the fan will not operate properly if strong light shines on the sensor window of hours before unit starts. • Every time... REMOTE CONTROL 1. Every time you push button, you will hear a beep from the remote controller if the air conditioner is not going to be set within a range of time. -12- TIMER MODE - Such batteries differ from standard dry cells in shape, dimensions, and performance. • Remove...
... control the temperature of the room. START TIME • If unit is off, Timer sets number of the Air Conditioner or if there are new. 3. Approximately every 3 minutes the fan will not operate properly if strong light shines on the sensor window of hours before unit starts. • Every time... REMOTE CONTROL 1. Every time you push button, you will hear a beep from the remote controller if the air conditioner is not going to be set within a range of time. -12- TIMER MODE - Such batteries differ from standard dry cells in shape, dimensions, and performance. • Remove...
Owners Manual
Page 14
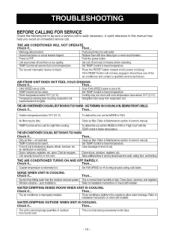
.... TEMP Control set at HI. Frontof unit isblockedbydrapes,blinds,furniture,etc. Closedoors,windows,registers,etc. SWoinudnodowfvfiabnrahtitiotinn-gwpaotoerrfinrosmtatlhlaetmiono.istureremovasl ystem. Cooling may be sure a service call . To defrostthe coil,set the MODE to lower temperature. Check if... I Then... TEMPControlsettoo warm. Cleanair filter.Referto Maintenancesectionof owner'smanual. THE AIR CONDITIONER TURNS ON AND OFF RAPIDLY. Check...
.... TEMP Control set at HI. Frontof unit isblockedbydrapes,blinds,furniture,etc. Closedoors,windows,registers,etc. SWoinudnodowfvfiabnrahtitiotinn-gwpaotoerrfinrosmtatlhlaetmiono.istureremovasl ystem. Cooling may be sure a service call . To defrostthe coil,set the MODE to lower temperature. Check if... I Then... TEMPControlsettoo warm. Cleanair filter.Referto Maintenancesectionof owner'smanual. THE AIR CONDITIONER TURNS ON AND OFF RAPIDLY. Check...


