Owners Manual
Page 2
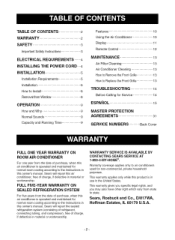
... .......4 INSTALLING THE POWER CORD....4 INSTALLATION 5 Installation Requirements 5 installation 6 How to Install 6 Removal from Window 8 OPERATION 9 How and Why 9 Normal Sounds 9 Capacity and Running Time 9 Features 10 Using the Air Conditioner 10 Display 11 Remote Control 12 MAINTENANCE 13 Air Filter Cleaning 13 Air Conditioner Cleaning... Back Cover FULL ONE YEAR WARRANTY ON ROOM AIR CONDITIONER For one year from the date of purchase, when this air conditioner is operated and maintained for normal room cooling according to the instructions in this owner...
... .......4 INSTALLING THE POWER CORD....4 INSTALLATION 5 Installation Requirements 5 installation 6 How to Install 6 Removal from Window 8 OPERATION 9 How and Why 9 Normal Sounds 9 Capacity and Running Time 9 Features 10 Using the Air Conditioner 10 Display 11 Remote Control 12 MAINTENANCE 13 Air Filter Cleaning 13 Air Conditioner Cleaning... Back Cover FULL ONE YEAR WARRANTY ON ROOM AIR CONDITIONER For one year from the date of purchase, when this air conditioner is operated and maintained for normal room cooling according to the instructions in this owner...
Owners Manual
Page 3
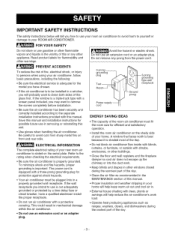
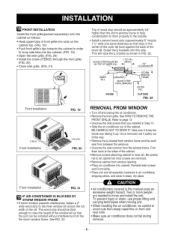
... type wail receptacle ENERGY SAVINGIDEAS • The capacity of the room air conditioner must be installed in a properly grounded wall receptacle. If the window is shaded most of the day. • Do not block air conditioner flow inside with blinds, curtains, or furniture, or outside with... • Be sure the electrical service is stated on the shady side of this manual and installation instructions for efficient and satisfactory operation. • Install the room air conditioner on the serial plate. PREVENT ACCIDENTS To reduce the risk of fire, electrical shock, or injury ...
... type wail receptacle ENERGY SAVINGIDEAS • The capacity of the room air conditioner must be installed in a properly grounded wall receptacle. If the window is shaded most of the day. • Do not block air conditioner flow inside with blinds, curtains, or furniture, or outside with... • Be sure the electrical service is stated on the shady side of this manual and installation instructions for efficient and satisfactory operation. • Install the room air conditioner on the serial plate. PREVENT ACCIDENTS To reduce the risk of fire, electrical shock, or injury ...
Owners Manual
Page 5
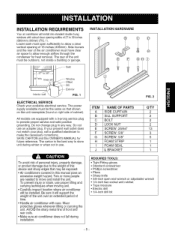
INSTALLATION REQUIREMENTS Your air conditioner willinstallintostandard double hung windows with actualcleat openingwidths of 16 inches (406mm). Lower sash must open sufficiently to 39 inches (686mmto 990mm)(FIG. 1). The rear of the air conditioner must be outdoors, not inside a building or garage. Side louvers and the rear of the unit must have clear air space to allow a clear vertical opening of 27 to allow enough airflow through the condenser for heat removal. inner silll I 1116m" 'n. INSTALLATION HARDWARE 27"to39"q I _ f" ,.'._"÷i'1;_
INSTALLATION REQUIREMENTS Your air conditioner willinstallintostandard double hung windows with actualcleat openingwidths of 16 inches (406mm). Lower sash must open sufficiently to 39 inches (686mmto 990mm)(FIG. 1). The rear of the air conditioner must be outdoors, not inside a building or garage. Side louvers and the rear of the unit must have clear air space to allow a clear vertical opening of 27 to allow enough airflow through the condenser for heat removal. inner silll I 1116m" 'n. INSTALLATION HARDWARE 27"to39"q I _ f" ,.'._"÷i'1;_
Owners Manual
Page 6
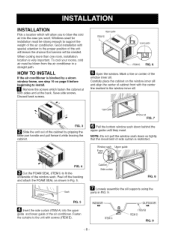
.... Upperguide ITEM E Lower guide ITEM E FIG. 6 I_Open the window. FIG. 5 D Insert the side curtain (ITEM A) into the area you to support the weight of the air conditioner. When cooling more than one room, installation location is restricted. Cab::Lu_urtnd FIG. 8 W Loosely assemble the sill supports using the parts in Fig. 5. Fasten the curtains to...
.... Upperguide ITEM E Lower guide ITEM E FIG. 6 I_Open the window. FIG. 5 D Insert the side curtain (ITEM A) into the area you to support the weight of the air conditioner. When cooling more than one room, installation location is restricted. Cab::Lu_urtnd FIG. 8 W Loosely assemble the sill supports using the parts in Fig. 5. Fasten the curtains to...
Owners Manual
Page 7
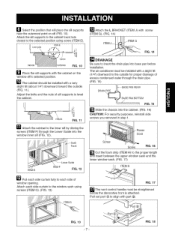
...) _"_ Pull each side curtain fully to each side curtain to insert the drain pipe into the window inner sill (FIG. 12). ITEMG FIG. 13 -7- ..--. -_. i!il !iiili!i!i!¸_¸¸i;¸i;_¸;i¸l¸i ¸;!_ TrackSash _ I_?"_ ITEMB _Lower Guide ITEMF FIG...supports near the outermost point on the window sill's selected position. _1_ The cabinet should be installed with part (_. Adjust the bolts and the nuts of window opening. The air conditioner must be installed with a very slight tilt (about 1/4") downward toward the outside for proper drainage of excess ...
...) _"_ Pull each side curtain fully to each side curtain to insert the drain pipe into the window inner sill (FIG. 12). ITEMG FIG. 13 -7- ..--. -_. i!il !iiili!i!i!¸_¸¸i;¸i;_¸;i¸l¸i ¸;!_ TrackSash _ I_?"_ ITEMB _Lower Guide ITEMF FIG...supports near the outermost point on the window sill's selected position. _1_ The cabinet should be installed with part (_. Adjust the bolts and the nuts of window opening. The air conditioner must be installed with a very slight tilt (about 1/4") downward toward the outside for proper drainage of excess ...
Owners Manual
Page 8
... them back to inner sill. To prevent injury or strain, use proper lifting and carrying techniques when moving unit. • When handling the air conditioner, be installed without interference from the the storm window frame. This will raise the L bracket as first strip) in order to snap side tabs into the... cabinet. The wood strip should be thick enough to raise the height of the window sill so that you installed in Step 15. • Slide the air conditioner out of the cabinet. • Remove screws attaching cabinet to the sides of the cabinet. See HOW TO REMOVE THE FRONT GRILLE. ...
... them back to inner sill. To prevent injury or strain, use proper lifting and carrying techniques when moving unit. • When handling the air conditioner, be installed without interference from the the storm window frame. This will raise the L bracket as first strip) in order to snap side tabs into the... cabinet. The wood strip should be thick enough to raise the height of the window sill so that you installed in Step 15. • Slide the air conditioner out of the cabinet. • Remove screws attaching cabinet to the sides of the cabinet. See HOW TO REMOVE THE FRONT GRILLE. ...
Owners Manual
Page 10
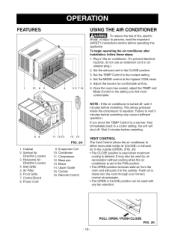
...11 1210 13 16 FIG. 24 9. Compressor 12. If you find most comfortable. NOTE : If the air conditioner is drawn into the room through your home's normal air passages. • The OPEN or CLOSE position can be used for comfortable air flow. 6. Condenser 11. Set the MODE ...unit will shut off , wait 3 minutes before operating this appliance To begin operating the air conditioner after installation, follow these steps: 1. It may cause inefficient operation. Air Filter 6. Control Board 8. Once the room has cooled, adjust the TEMP and Mode Control to the coolest setting. 4. Base ...
...11 1210 13 16 FIG. 24 9. Compressor 12. If you find most comfortable. NOTE : If the air conditioner is drawn into the room through your home's normal air passages. • The OPEN or CLOSE position can be used for comfortable air flow. 6. Condenser 11. Set the MODE ...unit will shut off , wait 3 minutes before operating this appliance To begin operating the air conditioner after installation, follow these steps: 1. It may cause inefficient operation. Air Filter 6. Control Board 8. Once the room has cooled, adjust the TEMP and Mode Control to the coolest setting. 4. Base ...

Owners Manual
Page 32
For Sears professional installation of your home-of Sears, Roebuck and Co. ® Mama Registrada / TM Marca de Fdtbrica / SM Mama de Servicio de Sears, Roebuck and Co. Part ...
For Sears professional installation of your home-of Sears, Roebuck and Co. ® Mama Registrada / TM Marca de Fdtbrica / SM Mama de Servicio de Sears, Roebuck and Co. Part ...