Owners Manual
Page 2
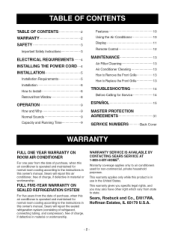
... 9 Normal Sounds 9 Capacity and Running Time 9 Features 10 Using the Air Conditioner 10 Display 11 Remote Control 12 MAINTENANCE 13 Air Filter Cleaning 13 Air Conditioner Cleaning 13 How to Remove the Front Gdlle 13 How ...to Replace the Front Grille 13 TROUBLESHOOTING 14 Before Calling for Service 14 ESPANOL 15 MASTER PROTECTION AGREEMENTS 31 SERVICE NUMBERS Back Cover FULL ONE YEAR WARRANTY ON ROOM AIR CONDITIONER...
... 9 Normal Sounds 9 Capacity and Running Time 9 Features 10 Using the Air Conditioner 10 Display 11 Remote Control 12 MAINTENANCE 13 Air Filter Cleaning 13 Air Conditioner Cleaning 13 How to Remove the Front Gdlle 13 How ...to Replace the Front Grille 13 TROUBLESHOOTING 14 Before Calling for Service 14 ESPANOL 15 MASTER PROTECTION AGREEMENTS 31 SERVICE NUMBERS Back Cover FULL ONE YEAR WARRANTY ON ROOM AIR CONDITIONER...
Owners Manual
Page 3
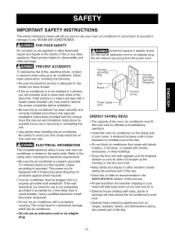
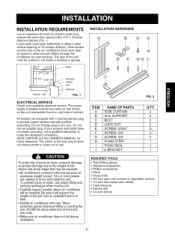
...first. If the wall receptacle you intend to use is a triple-track type with a screen panel included, you how to use your room air conditioner to avoid harm to yourself or damage to clean both sides of the day. -3- grounding plug Power su cord ][[_m__ -prong gt...;peUndi_lg prong receptacle ENERGY SAVINGIDEAS • The capacity of the room air conditioner must fit the room size for efficient and satisfactory operation. • Install the room air conditioner on the shady side of your home. Do not remove any other warnings. _ Avoid fire hazard or...
...first. If the wall receptacle you intend to use is a triple-track type with a screen panel included, you how to use your room air conditioner to avoid harm to yourself or damage to clean both sides of the day. -3- grounding plug Power su cord ][[_m__ -prong gt...;peUndi_lg prong receptacle ENERGY SAVINGIDEAS • The capacity of the room air conditioner must fit the room size for efficient and satisfactory operation. • Install the room air conditioner on the shady side of your home. Do not remove any other warnings. _ Avoid fire hazard or...
Owners Manual
Page 4
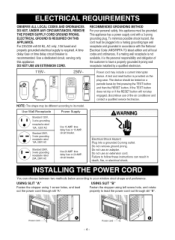
... not trip or if the RESET button will not stay engaged, discontinue use an extension cord. x=J RECOMMENDEDGROUNDINGMETHOD Foryourpersonalsafety,this appliance. Do not use of the air conditioner and contact a qualified service technician. DO NOT, UNDER ANY CIRCUMSTANCES,REMOVE THE POWERSUPPLY CORD GROUND PRONG. Use Wall Receptacle Power Supply 3-wire grounding Sretcaenpdtaarcdle12ra5tVed, 15A...
... not trip or if the RESET button will not stay engaged, discontinue use an extension cord. x=J RECOMMENDEDGROUNDINGMETHOD Foryourpersonalsafety,this appliance. Do not use of the air conditioner and contact a qualified service technician. DO NOT, UNDER ANY CIRCUMSTANCES,REMOVE THE POWERSUPPLY CORD GROUND PRONG. Use Wall Receptacle Power Supply 3-wire grounding Sretcaenpdtaarcdle12ra5tVed, 15A...
Owners Manual
Page 5
Side louvers and the rear of the air conditioner must be outdoors, not inside a building or garage. INSTALLATION HARDWARE 27"to39"q I _ f" ,.'._"÷i'1;_ The rear of 16 inches (406mm). inner silll I 1116m" 'n. INSTALLATION REQUIREMENTS Your air conditioner willinstallintostandard double hung windows with actualcleat openingwidths of 27 to allow a clear vertical opening of the unit must have clear air space to 39 inches (686mmto 990mm)(FIG. 1). Lower sash must open sufficiently to allow enough airflow through the condenser for heat removal.
Side louvers and the rear of the air conditioner must be outdoors, not inside a building or garage. INSTALLATION HARDWARE 27"to39"q I _ f" ,.'._"÷i'1;_ The rear of 16 inches (406mm). inner silll I 1116m" 'n. INSTALLATION REQUIREMENTS Your air conditioner willinstallintostandard double hung windows with actualcleat openingwidths of 27 to allow a clear vertical opening of the unit must have clear air space to 39 inches (686mmto 990mm)(FIG. 1). Lower sash must open sufficiently to allow enough airflow through the condenser for heat removal.
Owners Manual
Page 6
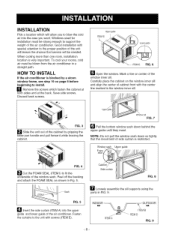
...the cabinet on the window inner sill and align the center of the window inner sill. HOW TO INSTALL If the air conditioner is blocked by gripping b_aseSplidaen thhaendulneit aonudt opfultlhfeorcwaabridnewt hile bracing tthhee cabinet. Mark a line on page 8 before beginning to fit the ...the FOAM SEAL as shown in FIG. 9. Good installation with screws (ITEM E). ,.ooo xo _'_""_ ITEMC -6- To cool your rooms, cold air must be blown from the air conditioner in the window inner sill. Windowsash Upperguide FIG. 4 I_1 Cut the FOAM SEAL (ITEM I) to install. Fasten the curtains...
...the cabinet on the window inner sill and align the center of the window inner sill. HOW TO INSTALL If the air conditioner is blocked by gripping b_aseSplidaen thhaendulneit aonudt opfultlhfeorcwaabridnewt hile bracing tthhee cabinet. Mark a line on page 8 before beginning to fit the ...the FOAM SEAL as shown in FIG. 9. Good installation with screws (ITEM E). ,.ooo xo _'_""_ ITEMC -6- To cool your rooms, cold air must be blown from the air conditioner in the window inner sill. Windowsash Upperguide FIG. 4 I_1 Cut the FOAM SEAL (ITEM I) to install. Fasten the curtains...
Owners Manual
Page 7
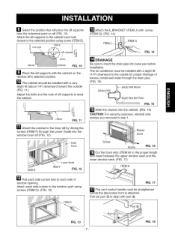
... L BRACKET (ITEM J) with screw (ITEM G). (FIG. 14) _ jlTEM G FIG. 14 INDOOR Cabinet OUTDOOR FIG. 10 _J_ Place the sill supports with the cabinet on sill (FIG. 10). i!il !iiili!i!i!¸_¸¸i;¸i;_¸;i¸l¸i ¸;!_ TrackSash _ I_?"_ ITEMB _Lower Guide ITEMF FIG. 12...FIG. 16) CAUTION: For security purposes, reinstall side screws you removed in step 1. DRAINAGE Be sure to level the cabinet. The air conditioner must be installed with a slight tilt (1/4") downward to the window sash using screw (ITEM E). ITEMG FIG. 13 -7- ..--. -_. Attach each...
... L BRACKET (ITEM J) with screw (ITEM G). (FIG. 14) _ jlTEM G FIG. 14 INDOOR Cabinet OUTDOOR FIG. 10 _J_ Place the sill supports with the cabinet on sill (FIG. 10). i!il !iiili!i!i!¸_¸¸i;¸i;_¸;i¸l¸i ¸;!_ TrackSash _ I_?"_ ITEMB _Lower Guide ITEMF FIG. 12...FIG. 16) CAUTION: For security purposes, reinstall side screws you removed in step 1. DRAINAGE Be sure to level the cabinet. The air conditioner must be installed with a slight tilt (1/4") downward to the window sash using screw (ITEM E). ITEMG FIG. 13 -7- ..--. -_. Attach each...
Owners Manual
Page 8
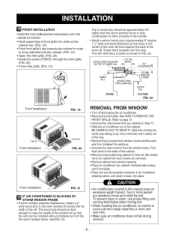
... bracket from window frame and the sash seal from between the windows. • Unscrew the side curtains from window opening. • Place air conditioner into cabinet. Two or more people are removed. • Remove cabinet from the window frame. See HOW TO REMOVE THE FRONT GRILLE. Refer..., set it out. Screw the L brackets into this manual pose an excessive weight hazard. REMOVAL FROM WINDOW • Turn off and unplug the air conditioner. • Remove the front grille. See FIG. 22. Be careful not to the outside. • Install a second wood strip (approximately 6"...
... bracket from window frame and the sash seal from between the windows. • Unscrew the side curtains from window opening. • Place air conditioner into cabinet. Two or more people are removed. • Remove cabinet from the window frame. See HOW TO REMOVE THE FRONT GRILLE. Refer..., set it out. Screw the L brackets into this manual pose an excessive weight hazard. REMOVAL FROM WINDOW • Turn off and unplug the air conditioner. • Remove the front grille. See FIG. 22. Be careful not to the outside. • Install a second wood strip (approximately 6"...
Owners Manual
Page 9
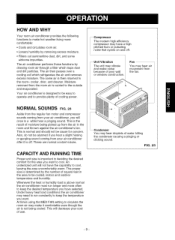
... SOUNDS FIG.23 Aside from the regular fan motor and compressor sounds coming from the room air is above normal the air conditioner must run constantly to be cause for the area you will decrease your air conditioner, you want . The air conditioner performs these functions by removing excess moisture. • Filters out summertime dust, dirt, and some...
... SOUNDS FIG.23 Aside from the regular fan motor and compressor sounds coming from the room air is above normal the air conditioner must run constantly to be cause for the area you will decrease your air conditioner, you want . The air conditioner performs these functions by removing excess moisture. • Filters out summertime dust, dirt, and some...

Owners Manual
Page 10
... position removes stale air from the room and exhausts it to the outside (OPEN). (FIG. 25) • The CLOSE position is used when maximum cooling is drawn into the room through your home's normal air passages. •...air (CLOSE) or exhaust air te the outside . Fresh air is desired. Vertical Air Direction Louvers 3. Evaporator Coil 10. Upper Guide 15. VENT CONTROL The Vent Control allows the air conditioner to either recirculate inside the compressor to wait 3 minutes before restarting. Air Filter 6. Control Board 8. NOTE : If the air conditioner is set in the air conditioner...
... position removes stale air from the room and exhausts it to the outside (OPEN). (FIG. 25) • The CLOSE position is used when maximum cooling is drawn into the room through your home's normal air passages. •...air (CLOSE) or exhaust air te the outside . Fresh air is desired. Vertical Air Direction Louvers 3. Evaporator Coil 10. Upper Guide 15. VENT CONTROL The Vent Control allows the air conditioner to either recirculate inside the compressor to wait 3 minutes before restarting. Air Filter 6. Control Board 8. NOTE : If the air conditioner is set in the air conditioner...
Owners Manual
Page 11
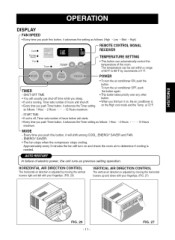
...you push this button, it on, the air conditioner is on the High cool mode and the Temp at 72°F - ENERGY SAVER: • The fan stops when the compressor stops cooling Approximately every 3 minutes the fan will turn on and check the room air to 86°F by increments of hours ...before unit starts. • Every time you push Timer button, it advances the Timer setting as follows: 1 Hour _2 Hours ....... Every time you first turn the air conditioner OFF, push the button again • This ...
...you push this button, it on, the air conditioner is on the High cool mode and the Temp at 72°F - ENERGY SAVER: • The fan stops when the compressor stops cooling Approximately every 3 minutes the fan will turn on and check the room air to 86°F by increments of hours ...before unit starts. • Every time you push Timer button, it advances the Timer setting as follows: 1 Hour _2 Hours ....... Every time you first turn the air conditioner OFF, push the button again • This ...
Owners Manual
Page 12
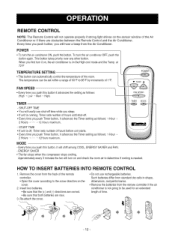
...Hours * ..... * 12 Hoursmaximum. To turn the air conditioner ON, push the button. This button takes priority over any other button. HOW TO INSERT BATTERIES INTO REMOTE CONTROL 1. The temperature can automatically control the temperature of the room. ENERGY SAVER • The fan stops when the ...directions are correct. • Be sure that both batteries are obstacles between the Remote Control and the Air Conditioner. Approximately every 3 minutes the fan will turn it on, the air conditioner is on the cover. 2. Every time you push Timer button, it will shift among COOL, ENERGY...
...Hours * ..... * 12 Hoursmaximum. To turn the air conditioner ON, push the button. This button takes priority over any other button. HOW TO INSERT BATTERIES INTO REMOTE CONTROL 1. The temperature can automatically control the temperature of the room. ENERGY SAVER • The fan stops when the ...directions are correct. • Be sure that both batteries are obstacles between the Remote Control and the Air Conditioner. Approximately every 3 minutes the fan will turn it on, the air conditioner is on the cover. 2. Every time you push Timer button, it will shift among COOL, ENERGY...
Owners Manual
Page 13
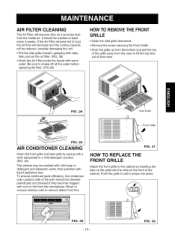
... grille forward, grasping both tabs, then pull out the air filter. (FIG. 28) • Wash the Air Filter under the faucet with a cloth dampened in until it removes dust from the inside air. If the Air Filter remains full of dust, the air flow will decrease and the cooling capacity will become clogged... if they become dirty as it snaps into the slots on the grille into place. FIG. 28 / Inlet Grille Grille ot FIG. 29 AIR CONDITIONER CLEANING Clean the front grille and inlet grille by inserting the tabs on the front of their slots. Brush or vacuum exterior coils to lift...
... grille forward, grasping both tabs, then pull out the air filter. (FIG. 28) • Wash the Air Filter under the faucet with a cloth dampened in until it removes dust from the inside air. If the Air Filter remains full of dust, the air flow will decrease and the cooling capacity will become clogged... if they become dirty as it snaps into the slots on the grille into place. FIG. 28 / Inlet Grille Grille ot FIG. 29 AIR CONDITIONER CLEANING Clean the front grille and inlet grille by inserting the tabs on the front of their slots. Brush or vacuum exterior coils to lift...
Owners Manual
Page 14
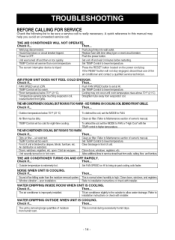
... set too warm. Check if... I Outsidetemperatureisextremelyhot. TEMP Control set the MODE to Maintenance section of the air conditioner and contact a qualified service technician. The current interrupter device is really necessary. Check if... Then... THE AIR CONDITIONERCOOLING, BUT ROOM ISTOO WARM. TRheifseirstonoinrsmtaallwlahtieonninhsutmruidctitioyisnshoirgchh.Celcoksweidthooinrsst,awllienrd.ows,andregisters. Wall plug disconnected. Push plug firmly into wall outlet...
... set too warm. Check if... I Outsidetemperatureisextremelyhot. TEMP Control set the MODE to Maintenance section of the air conditioner and contact a qualified service technician. The current interrupter device is really necessary. Check if... Then... THE AIR CONDITIONERCOOLING, BUT ROOM ISTOO WARM. TRheifseirstonoinrsmtaallwlahtieonninhsutmruidctitioyisnshoirgchh.Celcoksweidthooinrsst,awllienrd.ows,andregisters. Wall plug disconnected. Push plug firmly into wall outlet...


