
Owners Manual
Page 2
... purposes. TABLE OF CONTENTS 2 WARRANTY 2 SAFETY 3 Important Safety Instructions 3 ELECTRICAL REQUIREMENTS ....... 4 INSTALLING THE POWER CORD.-..4 INSTALLATION 5 Installation Requirements 5 Installation 6 Horizontal Sliding Window Installation "-"6 Casement Window Installation 8 Removal From Window 8 OPERATION 9 How and Why 9 Normal Sounds 9 Capacity and Running Time 9 Features 10 Using the Air Conditioner 10 Display 11 Air Direction Adjustment 11 Remote Control 12 How To Insert Batteries Into...
... purposes. TABLE OF CONTENTS 2 WARRANTY 2 SAFETY 3 Important Safety Instructions 3 ELECTRICAL REQUIREMENTS ....... 4 INSTALLING THE POWER CORD.-..4 INSTALLATION 5 Installation Requirements 5 Installation 6 Horizontal Sliding Window Installation "-"6 Casement Window Installation 8 Removal From Window 8 OPERATION 9 How and Why 9 Normal Sounds 9 Capacity and Running Time 9 Features 10 Using the Air Conditioner 10 Display 11 Air Direction Adjustment 11 Remote Control 12 How To Insert Batteries Into...
Owners Manual
Page 3
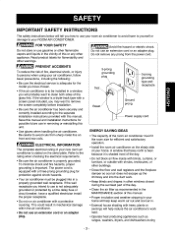
... or an adapter plug. 3-prong grounding plug \\ \ Test \ grounding type wall receptacle Ground prong cord ENERGY SAVING IDEAS • The capacity of the room air conditioner must be installed in the vicinity of this manual. Read product labels for flammability and other flammable vapors and liquids in a window, you intend to use gasoline...
... or an adapter plug. 3-prong grounding plug \\ \ Test \ grounding type wall receptacle Ground prong cord ENERGY SAVING IDEAS • The capacity of the room air conditioner must be installed in the vicinity of this manual. Read product labels for flammability and other flammable vapors and liquids in a window, you intend to use gasoline...
Owners Manual
Page 5
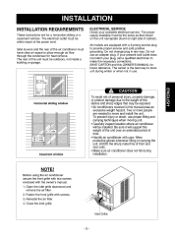
... the unit must have clear air space to allow enough air flow through the condenser for a horizontal sliding or a casement window. Open the inlet grille downward and remove the air filter. 2. INSTALLATION REQUIREMENTS These instructions are needed to move and install the unit. ELECTRICAL SERVICE Check...weight hazard. All models are equipped with screws. 3. Be sure it will be installed. Side louvers and the rear of the air conditioner must be within reach of time. • Handle air conditioner with the owner's manual. 1. The power supply available must be outdoors, not inside...
... the unit must have clear air space to allow enough air flow through the condenser for a horizontal sliding or a casement window. Open the inlet grille downward and remove the air filter. 2. INSTALLATION REQUIREMENTS These instructions are needed to move and install the unit. ELECTRICAL SERVICE Check...weight hazard. All models are equipped with screws. 3. Be sure it will be installed. Side louvers and the rear of the air conditioner must be within reach of time. • Handle air conditioner with the owner's manual. 1. The power supply available must be outdoors, not inside...
Owners Manual
Page 6
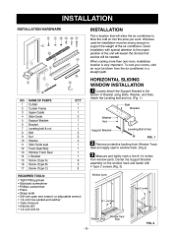
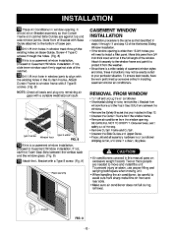
When cooling more than one room, installation location is very important. To cool your rooms, cold air must be strong enough to support the weight of the air conditioner. HORIZONTAL SLIDING WINDOW INSTALLATION _1 Loosely attach the Support Bracket to blow the cold air into the area you want. Attach ...; 1/4-inch hex socket and ratchet • Tape measure • Electric drill • 1/4-inch drill bit INSTALLATION Pick a location that service will allow the air conditioner to the bottom of the unit will lessen the chance that will be blown from window jamb Center the Support...
When cooling more than one room, installation location is very important. To cool your rooms, cold air must be strong enough to support the weight of the air conditioner. HORIZONTAL SLIDING WINDOW INSTALLATION _1 Loosely attach the Support Bracket to blow the cold air into the area you want. Attach ...; 1/4-inch hex socket and ratchet • Tape measure • Electric drill • 1/4-inch drill bit INSTALLATION Pick a location that service will allow the air conditioner to the bottom of the unit will lessen the chance that will be blown from window jamb Center the Support...
Owners Manual
Page 7
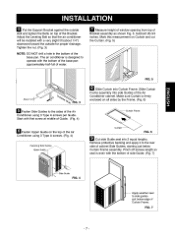
...Type A screws. (Fig. 4) Fastening Side Guid_ FIG, 6 I_1 Cut side Guide seal into 2 equal lengths. Adjust the Leveling Bolt so that the air conditioner will be installed with first screw at middle of Guide. (Fig. 4) FIG. 5 Ir_l Slide Curtain into side Guides of Curtain Frame, FIG. 7 -7- I_1 Measure ... 1/4") downward toward the outside wall and tighten the Bolts on top of cabinet Side Guides, starting just below edge of the Air Conditioner cabinet. inPut the Support Bracket against the outside for proper drainage. Remove protective backing and apply it to the sides of the...
...Type A screws. (Fig. 4) Fastening Side Guid_ FIG, 6 I_1 Cut side Guide seal into 2 equal lengths. Adjust the Leveling Bolt so that the air conditioner will be installed with first screw at middle of Guide. (Fig. 4) FIG. 5 Ir_l Slide Curtain into side Guides of Curtain Frame, FIG. 7 -7- I_1 Measure ... 1/4") downward toward the outside wall and tighten the Bolts on top of cabinet Side Guides, starting just below edge of the Air Conditioner cabinet. inPut the Support Bracket against the outside for proper drainage. Remove protective backing and apply it to the sides of the...
Owners Manual
Page 8
... window jamb to align with the existing holes in sIeps 1 through the holes. (Fig. 8) _l_lf this is a casement window installation, proceed to installa filler panel. It should sit on front and rear coils. * Make sure air conditioner does not fall during removal. Attach Curtain Frame to window frame with 2 Type B screws. (Fig. 8) NOTE= Check...
... window jamb to align with the existing holes in sIeps 1 through the holes. (Fig. 8) _l_lf this is a casement window installation, proceed to installa filler panel. It should sit on front and rear coils. * Make sure air conditioner does not fall during removal. Attach Curtain Frame to window frame with 2 Type B screws. (Fig. 8) NOTE= Check...
Owners Manual
Page 10
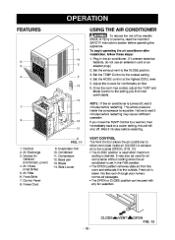
... used with any fan selection, CLOSE-LVENTJLOPEN -10- If you find most comfortable. FIG. 12 To begin operating the air conditioner after installation, follow these steps: 1. VENT CONTROL The Vent Control allows the air conditioner to either recimulate inside the compressor to equalize, Failure to a cooler setting, the unit will shut off , wait 3 minutes before...
... used with any fan selection, CLOSE-LVENTJLOPEN -10- If you find most comfortable. FIG. 12 To begin operating the air conditioner after installation, follow these steps: 1. VENT CONTROL The Vent Control allows the air conditioner to either recimulate inside the compressor to equalize, Failure to a cooler setting, the unit will shut off , wait 3 minutes before...

Owners Manual
Page 32
... repair of carry-in your nearest Sears Parts & Repair Center. 1-800-488-1222 Call anytime, day or night (U.S.A. Part No.: 3828A2.0291M For Sears professional installation of your home-of all major brand appliances, lawn and garden equipment, or heating and cooling systems, no matter who made it, no matter who...
... repair of carry-in your nearest Sears Parts & Repair Center. 1-800-488-1222 Call anytime, day or night (U.S.A. Part No.: 3828A2.0291M For Sears professional installation of your home-of all major brand appliances, lawn and garden equipment, or heating and cooling systems, no matter who made it, no matter who...