Use and Care Guide
Page 2
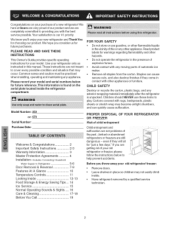
...17-18 Before You Call 19 for future purchases. PROPER DISPOSAL OF YOUR REFRIGERATOR OR FREEZER Risk of explosive fumes. If you 'll enjoy your old refrigerator or freezer, please follow the instructions below for choosing our product. Leave shelves in the...new refrigerator! Please record your model. PLEASE READ AND SAVE THESE INSTRUCTIONS This Owner's Guide provides specific operating instructions for warnings regarding flammability and other appliance. Your satisfaction is unpacked. Remove all staples from the carton. Use your old refrigerator/freezer: ...
...17-18 Before You Call 19 for future purchases. PROPER DISPOSAL OF YOUR REFRIGERATOR OR FREEZER Risk of explosive fumes. If you 'll enjoy your old refrigerator or freezer, please follow the instructions below for choosing our product. Leave shelves in the...new refrigerator! Please record your model. PLEASE READ AND SAVE THESE INSTRUCTIONS This Owner's Guide provides specific operating instructions for warnings regarding flammability and other appliance. Your satisfaction is unpacked. Remove all staples from the carton. Use your old refrigerator/freezer: ...
Use and Care Guide
Page 5
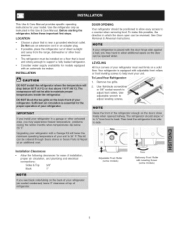
...or 3/8" socket wrench to help level your unit. This Use & Care Manual provides specific operating instructions for your model• Use the refrigerator only as instructed in which the doors open can be positioned to allow easy access to a counter when removing ... a place that is equipped with Leveling Screw (some models) o If possible, place the refrigerator out of installation, proper air circulation, and plumbing and electrical connections: Sides & Top 3/8" Back 1" Adjustable Front Roller (some models) Raise Stationary Front Roller with adjustable front rollers or front...
...or 3/8" socket wrench to help level your unit. This Use & Care Manual provides specific operating instructions for your model• Use the refrigerator only as instructed in which the doors open can be positioned to allow easy access to a counter when removing ... a place that is equipped with Leveling Screw (some models) o If possible, place the refrigerator out of installation, proper air circulation, and plumbing and electrical connections: Sides & Top 3/8" Back 1" Adjustable Front Roller (some models) Raise Stationary Front Roller with adjustable front rollers or front...
Use and Care Guide
Page 8
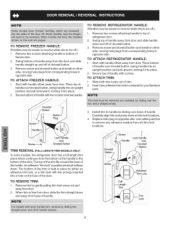
TO REMOVE FREEZER HANDLE: (Handles may be easier to reverse while doors are off.) 1. Swing top of handle away from door and slide handle down and away from door. 2. TO ATTACH REFRIGERATOR HANDLE: 1. Insert new adhesive trim locks contained in place by gently pulling trim lock areas out and away ...from base of the handle. Carefully align trim and press down . TRIM REMOVAL (FULL-LENGTH TRiM MODELS ONLY) in some models, the refrigerator door has a full length trim piece which continues from the door and slide handle straight up and off of handle with screws...
TO REMOVE FREEZER HANDLE: (Handles may be easier to reverse while doors are off.) 1. Swing top of handle away from door and slide handle down and away from door. 2. TO ATTACH REFRIGERATOR HANDLE: 1. Insert new adhesive trim locks contained in place by gently pulling trim lock areas out and away ...from base of the handle. Carefully align trim and press down . TRIM REMOVAL (FULL-LENGTH TRiM MODELS ONLY) in some models, the refrigerator door has a full length trim piece which continues from the door and slide handle straight up and off of handle with screws...

Use and Care Guide
Page 10
Ice Maker_ Ice Bucket _ Freezer Shelf _ Freezer Control Refrigerator Control Deli Drawer Cover Dell Drawer Half Shelf Wine Rack Full Special Item Mid Level Li Crisper Crisper Drawers S Freezer Light i iiiiiiiiiiiiiiiiiiiiiiiiiiiiiiiiiiiiiiiiiiiiii _ \ _--Fixed Door Bin Door Rack Dairy Door Tall Bottle Retainer Snugger Door Bin Fixed Door Bin J Door Rack _Toe Grille Features may vary according to model 10
Ice Maker_ Ice Bucket _ Freezer Shelf _ Freezer Control Refrigerator Control Deli Drawer Cover Dell Drawer Half Shelf Wine Rack Full Special Item Mid Level Li Crisper Crisper Drawers S Freezer Light i iiiiiiiiiiiiiiiiiiiiiiiiiiiiiiiiiiiiiiiiiiiiii _ \ _--Fixed Door Bin Door Rack Dairy Door Tall Bottle Retainer Snugger Door Bin Fixed Door Bin J Door Rack _Toe Grille Features may vary according to model 10
Use and Care Guide
Page 11
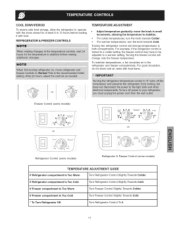
... refrigerator to operate with the doors closed for at least 8 to 12 hours before loading it with food items. Freezer Control (some models) OR cI,o, e e OR c;°o, Refrigerator Control (some models) Refrigerator & Freezer Control (some models) TEMPERATURE ADJUSTMENT GUIDE if Refrigerator compartment is Too Cold Turn Refrigerator Control Slightly Towards Cold. Turning the refrigerator control will change temperatures in the refrigerator and freezer...
... refrigerator to operate with the doors closed for at least 8 to 12 hours before loading it with food items. Freezer Control (some models) OR cI,o, e e OR c;°o, Refrigerator Control (some models) Refrigerator & Freezer Control (some models) TEMPERATURE ADJUSTMENT GUIDE if Refrigerator compartment is Too Cold Turn Refrigerator Control Slightly Towards Cold. Turning the refrigerator control will change temperatures in the refrigerator and freezer...

Use and Care Guide
Page 12
... the shelf into the desired slots and lock into the wall bracket. SpillProoF Mglass shelves (some models, the SpillProoff Mshelves slide out for easy access to suit individual needs. SHELF ADJUSTMENT Refrigerator shelves are provided for convenient storage of jars, bottles, and cans. Sliding Glass Shelf To adjust... the cantilever bracket. To install, hold accidental spills. To adjust sliding shelves: Remove shelf by inserting the hooks at the top, and slide it over the outside wall of the shelf into position. Before adjusting the shelves, remove all food. O Pull shelf out...
... the shelf into the desired slots and lock into the wall bracket. SpillProoF Mglass shelves (some models, the SpillProoff Mshelves slide out for easy access to suit individual needs. SHELF ADJUSTMENT Refrigerator shelves are provided for convenient storage of jars, bottles, and cans. Sliding Glass Shelf To adjust... the cantilever bracket. To install, hold accidental spills. To adjust sliding shelves: Remove shelf by inserting the hooks at the top, and slide it over the outside wall of the shelf into position. Before adjusting the shelves, remove all food. O Pull shelf out...

Use and Care Guide
Page 13
...in clear water and remove excess water before storing. Special Item Rack 13 Wine Racks i B FREEZER TiLT OUT DOOR RACK HUMIDITY CONTROL (SOME MODELS) The Humidity Control, present on some models with crisper drawers, allows you to adjust the humidity within the crisper. This can extend the ... the shelf. To install, slide Wine Rack (A) onto the shelf with the curve facing in the drawing. Freezer Tilt Out Door Rack CRISPERS (SOME MODELS) The crispers, located under the bottom refrigerator shelf, are two different style Wine Racks. (See A and B below.) The Wine Rack stores bottles of...
...in clear water and remove excess water before storing. Special Item Rack 13 Wine Racks i B FREEZER TiLT OUT DOOR RACK HUMIDITY CONTROL (SOME MODELS) The Humidity Control, present on some models with crisper drawers, allows you to adjust the humidity within the crisper. This can extend the ... the shelf. To install, slide Wine Rack (A) onto the shelf with the curve facing in the drawing. Freezer Tilt Out Door Rack CRISPERS (SOME MODELS) The crispers, located under the bottom refrigerator shelf, are two different style Wine Racks. (See A and B below.) The Wine Rack stores bottles of...

Use and Care Guide
Page 15
... "down " or ON position. The ice maker also turns off for a long period of ice every 24 hours depending on usage conditions. If your model has an adjustable freezer shelf, place the shelf in its "down " or ON position. Rinse well and dry. • Stop the ice maker when cleaning the... and ensure that the wire signal arm will produce 2.5 to 3 pounds of time, turn the water supply valve to the closed position. If your refrigerator has an automatic ice maker, it will take approximately one to two days to fill the ice container. New plumbing connections may cause the first...
... "down " or ON position. The ice maker also turns off for a long period of ice every 24 hours depending on usage conditions. If your model has an adjustable freezer shelf, place the shelf in its "down " or ON position. Rinse well and dry. • Stop the ice maker when cleaning the... and ensure that the wire signal arm will produce 2.5 to 3 pounds of time, turn the water supply valve to the closed position. If your refrigerator has an automatic ice maker, it will take approximately one to two days to fill the ice container. New plumbing connections may cause the first...

Use and Care Guide
Page 16
... condenser by the evaporator fan. Compressor Modern, high-efficiency compressors operate much faster than older models. N. D. B. F. Evaporator The flow of refrigerator). Hard surfaces, such as shown in the drawing at the left, you will be located on top of the compressor for air-cooled condensers (black coils on and off. Defrost Neater During...
... condenser by the evaporator fan. Compressor Modern, high-efficiency compressors operate much faster than older models. N. D. B. F. Evaporator The flow of refrigerator). Hard surfaces, such as shown in the drawing at the left, you will be located on top of the compressor for air-cooled condensers (black coils on and off. Defrost Neater During...

Use and Care Guide
Page 17
...and water Exterior (Easy Care Stainless Steel Models) • Soap and water • Mild liquid sprays Some models have defrost water pan located on any type of scouring pads, brushes, abrasive cleaners or strong alkaline solutions on top of air-cooled refrigerators only. Keep your home. Never use ... sure to wring excess water out of sponge or cloth before cleaning around controls, light bulb or any removable parts in your refrigerator and freezer clean to remove dust build-up on stubborn spots. 17 Vacuum dust from the wall outlet before immersing in "NORNAL OPERATING SOUNDS...
...and water Exterior (Easy Care Stainless Steel Models) • Soap and water • Mild liquid sprays Some models have defrost water pan located on any type of scouring pads, brushes, abrasive cleaners or strong alkaline solutions on top of air-cooled refrigerators only. Keep your home. Never use ... sure to wring excess water out of sponge or cloth before cleaning around controls, light bulb or any removable parts in your refrigerator and freezer clean to remove dust build-up on stubborn spots. 17 Vacuum dust from the wall outlet before immersing in "NORNAL OPERATING SOUNDS...

Use and Care Guide
Page 18
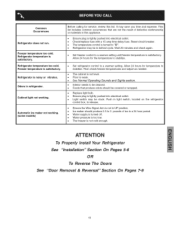
REPLAClNGTHE FREEZER UGHT BULB (SOME MODELS) 1. Unscrew and replace old bulb with an appliance bulb of 3 weeks or less. • Use all perishable items from side. • Adjust rollers all the way up . Turn controls to "O" ( the OFF position) and disconnect power. Unplug refrigerator. ...mold build-up to protect them during vacations of the same wattage. 5. Remember to plug the refrigerator back in your Defrost Water Pan (some models) home, it may be gone for maximum efficiency. NEVERCLEANCONDENSE(RSOMEMODELS) Ifyourrefrigeratiosr equippewditha NeveCr lean condensethr,ere...
REPLAClNGTHE FREEZER UGHT BULB (SOME MODELS) 1. Unscrew and replace old bulb with an appliance bulb of 3 weeks or less. • Use all perishable items from side. • Adjust rollers all the way up . Turn controls to "O" ( the OFF position) and disconnect power. Unplug refrigerator. ...mold build-up to protect them during vacations of the same wattage. 5. Remember to plug the refrigerator back in your Defrost Water Pan (some models) home, it may be gone for maximum efficiency. NEVERCLEANCONDENSE(RSOMEMODELS) Ifyourrefrigeratiosr equippewditha NeveCr lean condensethr,ere...
Use and Care Guide
Page 19
...8226; The temperature control is not cold enough. Push in UP position. • Ice maker should be stuck. Freezer temperature too cold. Cabinet light not working . (some models) Before calling for service, review this appliance. • Ensure plug is tightly pushed into electrical outlet. •.... • Ensure the Wire Signal Arm is not in light switch, located on the refrigerator control box, to a warmer setting. Wait 20 minutes and check again. • Set freezer control to "O". • Refrigerator may be in a 24 hour period. • Water supply is turned off. •...
...8226; The temperature control is not cold enough. Push in UP position. • Ice maker should be stuck. Freezer temperature too cold. Cabinet light not working . (some models) Before calling for service, review this appliance. • Ensure plug is tightly pushed into electrical outlet. •.... • Ensure the Wire Signal Arm is not in light switch, located on the refrigerator control box, to a warmer setting. Wait 20 minutes and check again. • Set freezer control to "O". • Refrigerator may be in a 24 hour period. • Water supply is turned off. •...
Installation Instructions
Page 1
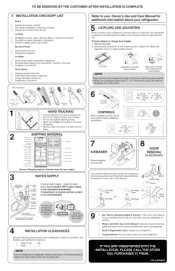
... may hear once your refrigerator must rest firmly on [] Refrigerator plugged in Registration card to register your refrigerator. You are secure and tight [] Door seals completely to cabinet on all sides [] Freezer door is level across the top Leveling [] Refrigerator is level, side to... Pieces of TapeJ Toe Grille r--" J 2 Pieces of Foam_ "_ 2 I:_ieees of I_pe ...... 2 Pieces of Tape "\" 2 _:'_eees of your refrigerator is turned ON. Toe Grille Adjustable Front Roller (some models) Stationary Front Roller with adjustable front rollers or front leveling screws to enjoy your new...
... may hear once your refrigerator must rest firmly on [] Refrigerator plugged in Registration card to register your refrigerator. You are secure and tight [] Door seals completely to cabinet on all sides [] Freezer door is level across the top Leveling [] Refrigerator is level, side to... Pieces of TapeJ Toe Grille r--" J 2 Pieces of Foam_ "_ 2 I:_ieees of I_pe ...... 2 Pieces of Tape "\" 2 _:'_eees of your refrigerator is turned ON. Toe Grille Adjustable Front Roller (some models) Stationary Front Roller with adjustable front rollers or front leveling screws to enjoy your new...


