
Use and Care Guide
Page 2
...Inc. TABLE OF CONTENTS KENMORE APPLIANCE WARRANTY 2 REFRIGERATOR SAFETY 3 Proper Disposal of Your Old Refrigerator 3 INSTALLATION INSTRUCTIONS 4 Unpack the Refrigerator 4 Location Requirements 4 Electrical Requirements 5 Base Grille 5 Refrigerator Doors 6 Adjust the Doors 7 Connect Water Supply 7 Normal Sounds 8 REFRIGERATOR USE 8 Ensuring Proper Air..., Canada M5B 2B8 PRODUCT RECORD In the space below, record your sales receipt for future reference. Model number Serial number Purchase date Save these exclusions or limitations may also have other than its intended purpose...
...Inc. TABLE OF CONTENTS KENMORE APPLIANCE WARRANTY 2 REFRIGERATOR SAFETY 3 Proper Disposal of Your Old Refrigerator 3 INSTALLATION INSTRUCTIONS 4 Unpack the Refrigerator 4 Location Requirements 4 Electrical Requirements 5 Base Grille 5 Refrigerator Doors 6 Adjust the Doors 7 Connect Water Supply 7 Normal Sounds 8 REFRIGERATOR USE 8 Ensuring Proper Air..., Canada M5B 2B8 PRODUCT RECORD In the space below, record your sales receipt for future reference. Model number Serial number Purchase date Save these exclusions or limitations may also have other than its intended purpose...
Use and Care Guide
Page 3
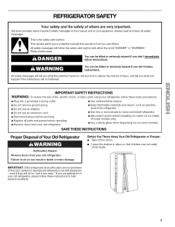
... adapter. • Do not use an extension cord. • Disconnect power before installing ice maker (on ice maker kit ready models only). • Use a sturdy glass when dispensing ice (on your refrigerator, follow instructions. All safety messages will follow instructions. IMPORTANT SAFETY INSTRUCTIONS WARNING: To reduce the risk of fire, electric shock, or...
... adapter. • Do not use an extension cord. • Disconnect power before installing ice maker (on ice maker kit ready models only). • Use a sturdy glass when dispensing ice (on your refrigerator, follow instructions. All safety messages will follow instructions. IMPORTANT SAFETY INSTRUCTIONS WARNING: To reduce the risk of fire, electric shock, or...
Use and Care Guide
Page 4
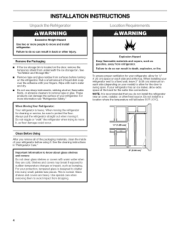
INSTALLATION INSTRUCTIONS LO(,,
INSTALLATION INSTRUCTIONS LO(,,

Use and Care Guide
Page 5
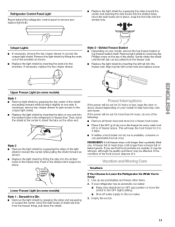
...electrical connection. Do not remove ground prong. Do not use an extension cord. Use an outlet that a separate circuit serving only your refrigerator into its final location, it into a grounded 3 prong outlet. Open both doors. 2. Push in death, fire, or electrical shock...removing a light bulb, turn the control (Thermostat, Refrigerator or Freezer Control depending on the model) to the electrical source and reset the control (Thermostat, Refrigerator or Freezer Control depending on the model) OFF and then disconnect the refrigerator from the electrical source. Line up on the top...
...electrical connection. Do not remove ground prong. Do not use an extension cord. Use an outlet that a separate circuit serving only your refrigerator into its final location, it into a grounded 3 prong outlet. Open both doors. 2. Push in death, fire, or electrical shock...removing a light bulb, turn the control (Thermostat, Refrigerator or Freezer Control depending on the model) to the electrical source and reset the control (Thermostat, Refrigerator or Freezer Control depending on the model) OFF and then disconnect the refrigerator from the electrical source. Line up on the top...
Use and Care Guide
Page 9
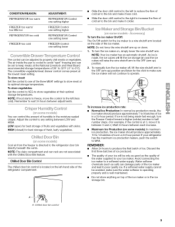
... to the OFF (arm up) position. 2. Remember to wait 24 hours between LOW and HIGH. Cu sp@" (.m dty Cont o You can rack are not associated with skins. LOW (open) for best...lift the wire shutoff arm to the OFF (arm up or down. 1. Maximum Ice Production (on some models): In maximum ice production, the ice maker should produce approximately 7 to 9 batches of ice in half number... wire shutoff arm. Water softener chemicals (such as the quality of the water supplied to your refrigerator has the maximum ice production feature, push the switch to MAX. Chilled door bin control NIGH...
... to the OFF (arm up) position. 2. Remember to wait 24 hours between LOW and HIGH. Cu sp@" (.m dty Cont o You can rack are not associated with skins. LOW (open) for best...lift the wire shutoff arm to the OFF (arm up or down. 1. Maximum Ice Production (on some models): In maximum ice production, the ice maker should produce approximately 7 to 9 batches of ice in half number... wire shutoff arm. Water softener chemicals (such as the quality of the water supplied to your refrigerator has the maximum ice production feature, push the switch to MAX. Chilled door bin control NIGH...

Use and Care Guide
Page 10
REFRIGERATOR FEATURES Your model may have glass or wire shelves. Shelves and covers may have some or all models. This is open and saves energy. Tilt the front of these features. Replace the shelf/frame by aligning the shelf with the word "... 3. If you are interested in position. Store similar foods together and adjust the shelves to replace the crisper cover. This reduces the time the refrigerator door is normal. Pull the shelf forward to remove from dropping. To Remove and Replace Covers: 1. Repeat steps to fit different heights. Lift the...
REFRIGERATOR FEATURES Your model may have glass or wire shelves. Shelves and covers may have some or all models. This is open and saves energy. Tilt the front of these features. Replace the shelf/frame by aligning the shelf with the word "... 3. If you are interested in position. Store similar foods together and adjust the shelves to replace the crisper cover. This reduces the time the refrigerator door is normal. Pull the shelf forward to remove from dropping. To Remove and Replace Covers: 1. Repeat steps to fit different heights. Lift the...

Use and Care Guide
Page 12
...or soft cloth and a mild detergent in refrigerator or reconnect power. The dispenser light requires a heavy duty 10-watt bulb. Unplug refrigerator or disconnect power. 2. To Clean Your Refrigerator: 1. Determine whether your stainless steel refrigerator looking like new and to clean the grille... sprays, scouring cleansers, flammable fluids, cleaning waxes, concentrated detergents, bleaches or cleansers containing petroleum products on some models) Reach through the dispenser area to clean the condenser: • Remove the base grille. IMPORTANT: This cleaner is no need to ...
...or soft cloth and a mild detergent in refrigerator or reconnect power. The dispenser light requires a heavy duty 10-watt bulb. Unplug refrigerator or disconnect power. 2. To Clean Your Refrigerator: 1. Determine whether your stainless steel refrigerator looking like new and to clean the grille... sprays, scouring cleansers, flammable fluids, cleaning waxes, concentrated detergents, bleaches or cleansers containing petroleum products on some models) Reach through the dispenser area to clean the condenser: • Remove the base grille. IMPORTANT: This cleaner is no need to ...
Use and Care Guide
Page 13
...crystals, it may be refrozen, although the quality and flavor may be pulled from the freezer lining, pull down the shield. If your model) to Leave the Refrigerator On While You're Away:. 1. If necessary, replace the top crisper drawer. If the power will be out for every cubic foot...(right) setting. • Shut off water supply to the crisper light shield. • Replace the light shield by inserting the tabs on your refrigerator has an automatic ice maker: • Raise wire shutoff arm to OFF (up any perishables and freeze other end. Then, bend the shield at...
...crystals, it may be refrozen, although the quality and flavor may be pulled from the freezer lining, pull down the shield. If your model) to Leave the Refrigerator On While You're Away:. 1. If necessary, replace the top crisper drawer. If the power will be out for every cubic foot...(right) setting. • Shut off water supply to the crisper light shield. • Replace the light shield by inserting the tabs on your refrigerator has an automatic ice maker: • Raise wire shutoff arm to OFF (up any perishables and freeze other end. Then, bend the shield at...

Use and Care Guide
Page 14
... to see if the outlet is working ? Unplug refrigerator. 6. Empty water from items placed on the model, turn the Temperature Control or Refrigerator Control to the OFF (right) setting. 3. Depending on the model, turn the Temperature Control or Refrigerator Control to follow these instructions can result in a lamp... the switch to the back of water lines, or from the defrost pan. 7. Depending on the model, raise the front of the refrigerator. • Popping - Also, if your refrigerator has an automatic ice maker: • Turn off the water supply to the ice maker at least...
... to see if the outlet is working ? Unplug refrigerator. 6. Empty water from items placed on the model, turn the Temperature Control or Refrigerator Control to the OFF (right) setting. 3. Depending on the model, turn the Temperature Control or Refrigerator Control to follow these instructions can result in a lamp... the switch to the back of water lines, or from the defrost pan. 7. Depending on the model, raise the front of the refrigerator. • Popping - Also, if your refrigerator has an automatic ice maker: • Turn off the water supply to the ice maker at least...


