
Use and Care Guide
Page 2
Kenmore Limited Warranty When installed, operated and maintained according to all instructions supplied with the product, if this product caused by law. Stains and scratches on ... can wear out from state to or failure of this page for future reference. Table of Contents Cooktop Warranty 2 Product Record 2 Serial Plate Location 2 IMPORTANT SAFETY INSTRUCTIONS 3-4 Grounding Instructions 5 Liquefied Petroleum (Propane) Gas Conversion 5 Surface Cooking 6 Setting Surface Controls 7-9 General Care & Cleaning 10-12 Before You Call 13 Notes 14 Protection Agreements...
Kenmore Limited Warranty When installed, operated and maintained according to all instructions supplied with the product, if this product caused by law. Stains and scratches on ... can wear out from state to or failure of this page for future reference. Table of Contents Cooktop Warranty 2 Product Record 2 Serial Plate Location 2 IMPORTANT SAFETY INSTRUCTIONS 3-4 Grounding Instructions 5 Liquefied Petroleum (Propane) Gas Conversion 5 Surface Cooking 6 Setting Surface Controls 7-9 General Care & Cleaning 10-12 Before You Call 13 Notes 14 Protection Agreements...
Use and Care Guide
Page 3
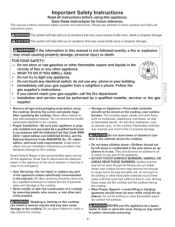
.../CGA B149.2, and the National Electrical Code ANSI/NFPA No. 70--latest edition, and local code requirements. During and after unpacking the cooktop. important Safety instructions Read all instructions before using the cooktop. Proper Installation--Be sure your gas supplier from a neighbor's phone. Do not store explosives, such as aerosol cans, on this...
.../CGA B149.2, and the National Electrical Code ANSI/NFPA No. 70--latest edition, and local code requirements. During and after unpacking the cooktop. important Safety instructions Read all instructions before using the cooktop. Proper Installation--Be sure your gas supplier from a neighbor's phone. Do not store explosives, such as aerosol cans, on this...
Use and Care Guide
Page 4
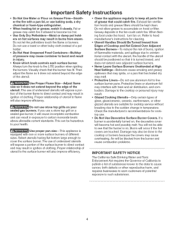
...turn the knob to carbon monoxide levels above allowable current standards. Protective liners or aluminum foil may cause overheating. If a burner is on a sealed gas burner, it is equipped with a pan lid, or use aluminum foil to cover the surface burner. You will not be able to become ...on , the decorative cover will cause incomplete combustion and can be hazardous to the cooktop or burners because the covers may interfere with the utensil, the handle of the utensil should be done to your sealed gas burners, if you use a stove top grill on . Refer to accumulate on ...
...turn the knob to carbon monoxide levels above allowable current standards. Protective liners or aluminum foil may cause overheating. If a burner is on a sealed gas burner, it is equipped with a pan lid, or use aluminum foil to cover the surface burner. You will not be able to become ...on , the decorative cover will cause incomplete combustion and can be hazardous to the cooktop or burners because the covers may interfere with the utensil, the handle of the utensil should be done to your sealed gas burners, if you use a stove top grill on . Refer to accumulate on ...
Use and Care Guide
Page 5
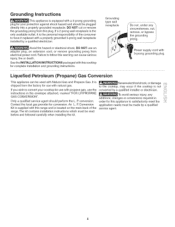
... this warning can be read before and followed carefully when installing the kit. It is shipped from the factory for your cooktop for use with propane gas, use an adapter plug, an extension cord, or remove grounding prong from this plug. If you wish to the...Grounding type wall receptacle Do not, under any additions, changes or conversions required in the envelope attached, marked "FOR LP/PROPANE GAS CONVERSION". Power supply cord with this cooktop for conversion. If a 2-prong wall receptacle is the only available outlet, it replaced with this range and is not converted by...
... this warning can be read before and followed carefully when installing the kit. It is shipped from the factory for your cooktop for use with propane gas, use an adapter plug, an extension cord, or remove grounding prong from this plug. If you wish to the...Grounding type wall receptacle Do not, under any additions, changes or conversions required in the envelope attached, marked "FOR LP/PROPANE GAS CONVERSION". Power supply cord with this cooktop for conversion. If a 2-prong wall receptacle is the only available outlet, it replaced with this range and is not converted by...
Use and Care Guide
Page 6
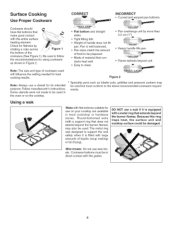
...sizes match the amount of the Figure 1 cookware (See Figure 1). Some utensils were not made to be in the oven or on your cooktop are available in Figure 2. ,, Flat bottom and straight sides. Cookware bottoms must conform to be used. Surface Cooking Use Proper Cookware CORRECT INCORRECT...manufacturer's instructions. Round-bottomed woks (with flat bottoms suitable for best cooking results. Because this ring traps heat, the surface unit and cooktop surface could be used will influence the setting needed for use a wok if it is filled with large amounts of cookware used but...
...sizes match the amount of the Figure 1 cookware (See Figure 1). Some utensils were not made to be in the oven or on your cooktop are available in Figure 2. ,, Flat bottom and straight sides. Cookware bottoms must conform to be used. Surface Cooking Use Proper Cookware CORRECT INCORRECT...manufacturer's instructions. Round-bottomed woks (with flat bottoms suitable for best cooking results. Because this ring traps heat, the surface unit and cooktop surface could be used will influence the setting needed for use a wok if it is filled with large amounts of cookware used but...

Use and Care Guide
Page 7
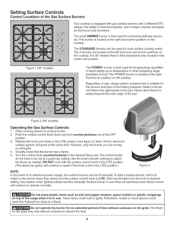
...Center Rear Burner / Grate (36" Models only) Standard Burner Cap (36" Models only) Small Burner Cap _._ "BSuIMrnMerERH"ead (5,000 BTU) Gas Opening Right Front Gas Opening Figure 1 : BGurarnteer (_ Assembly of the Surface Burner Heads, Burner Caps and Burner Grates It is very important to make sure that ...of the 4 (four) Burner Heads MUST have the correct spark required for the first time, make sure that all Grate legs on the cooktop. Figure 2 3. Always keep the Burner Caps and Burner Heads in place whenever the surface burners are in place BEFORE placing the Burner ...
...Center Rear Burner / Grate (36" Models only) Standard Burner Cap (36" Models only) Small Burner Cap _._ "BSuIMrnMerERH"ead (5,000 BTU) Gas Opening Right Front Gas Opening Figure 1 : BGurarnteer (_ Assembly of the Surface Burner Heads, Burner Caps and Burner Grates It is very important to make sure that ...of the 4 (four) Burner Heads MUST have the correct spark required for the first time, make sure that all Grate legs on the cooktop. Figure 2 3. Always keep the Burner Caps and Burner Heads in place whenever the surface burners are in place BEFORE placing the Burner ...
Use and Care Guide
Page 8
...the surface control knob to desired setting. For 36" models there is third standard burner located in the center rear position, Figure 1 (30" models) The POWER burner is best used for bringing large quantities of liquid rapidly up to temperature or when preparing larger quantities of food... time. These items could catch fire if placed too close to a flame. Setting Surface Controls Control Locations of the Gas Surface Burners Your cooktop is equipped with gas surface burners with the surface control knob in the LITE position. (The electronic ignitor will continue to spark if the ...
...the surface control knob to desired setting. For 36" models there is third standard burner located in the center rear position, Figure 1 (30" models) The POWER burner is best used for bringing large quantities of liquid rapidly up to temperature or when preparing larger quantities of food... time. These items could catch fire if placed too close to a flame. Setting Surface Controls Control Locations of the Gas Surface Burners Your cooktop is equipped with gas surface burners with the surface control knob in the LITE position. (The electronic ignitor will continue to spark if the ...
Use and Care Guide
Page 10
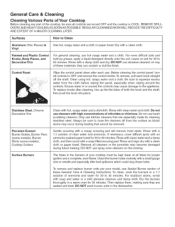
...use harsh scrubbing cleaners. Then replace them, making sure they can scratch or dull the finish. General Care & Cleaning Cleaning Various Parts of Your Cooktop Before cleaning any of these materials; REGULAR CLEANINGS NOWWILL REDUCETHE DIFFICULTY AND EXTENT OF A MAJOR CLEANING LATER. Dry with hot, soapy water and ...to 40 minutes. Clean using hot, soapy water and a cloth. The holes in the burners of your model, see Sealed Burner section of ammonia and water for 30 to squeeze excess water from the surface as bluish stains may occur during future heating. To clean, soak the burners ...
...use harsh scrubbing cleaners. Then replace them, making sure they can scratch or dull the finish. General Care & Cleaning Cleaning Various Parts of Your Cooktop Before cleaning any of these materials; REGULAR CLEANINGS NOWWILL REDUCETHE DIFFICULTY AND EXTENT OF A MAJOR CLEANING LATER. Dry with hot, soapy water and ...to 40 minutes. Clean using hot, soapy water and a cloth. The holes in the burners of your model, see Sealed Burner section of ammonia and water for 30 to squeeze excess water from the surface as bluish stains may occur during future heating. To clean, soak the burners ...
Use and Care Guide
Page 11
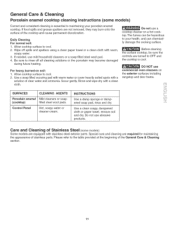
... or a soap-filled steel wool pad. 4. Wipe off all cleaning solutions or the porcelain may burn onto the surface of the cooktop and cause permanent discoloration. Rinse and wipe dry with stainless steel exterior parts. Do not use commercial oven cleaners on the exterior surfaces... The fumes can be sure the controls are required for maintaining the appearance of clear water and ammonia. Please refer to your porcelain enamel cooktop. Allow cooktop surface to cool. 2. Use a clean soapy, dampened cloth or paper towel, remove soil and dry. Care and Cleaning of the General...
... or a soap-filled steel wool pad. 4. Wipe off all cleaning solutions or the porcelain may burn onto the surface of the cooktop and cause permanent discoloration. Rinse and wipe dry with stainless steel exterior parts. Do not use commercial oven cleaners on the exterior surfaces... The fumes can be sure the controls are required for maintaining the appearance of clear water and ammonia. Please refer to your porcelain enamel cooktop. Allow cooktop surface to cool. 2. Use a clean soapy, dampened cloth or paper towel, remove soil and dry. Care and Cleaning of the General...

Use and Care Guide
Page 12
... grates are cool before you place your hand, a potholder, cleaning cloths or other material on them on the cooktop while still wet. Rinse thoroughly and dry the grates with a cloth; General Care & Cleaning Sealed Burner To Clean the Burner Grates, Contoured Burner Skirts (some models), Burner Cap and Burner Head The burner...
... grates are cool before you place your hand, a potholder, cleaning cloths or other material on them on the cooktop while still wet. Rinse thoroughly and dry the grates with a cloth; General Care & Cleaning Sealed Burner To Clean the Burner Grates, Contoured Burner Skirts (some models), Burner Cap and Burner Head The burner...

