Use and Care Guide
Page 2
..., and maintained according to all instructions supplied with this product, Sears will NOT pay labor cost of installation. • Cooktop glass if it is used in the United States and Canada. Sears, Roebuck and Co., Hoffman Estates, IL 60179 Sears...Record 6 Serial Plate Location 6 Grounding Instructions 6 Liquefied Petroleum (Propane) Gas Conversion 6 Surface Cooking 7 Setting Surface Controls 8-10 General Care & Cleaning 11-14 Before You Call 15 Sears Service Back Cover Kenmore Pro Appliance Warranty One Year Limited Warranty When installed, operated and maintained according...
..., and maintained according to all instructions supplied with this product, Sears will NOT pay labor cost of installation. • Cooktop glass if it is used in the United States and Canada. Sears, Roebuck and Co., Hoffman Estates, IL 60179 Sears...Record 6 Serial Plate Location 6 Grounding Instructions 6 Liquefied Petroleum (Propane) Gas Conversion 6 Surface Cooking 7 Setting Surface Controls 8-10 General Care & Cleaning 11-14 Before You Call 15 Sears Service Back Cover Kenmore Pro Appliance Warranty One Year Limited Warranty When installed, operated and maintained according...

Use and Care Guide
Page 3
...touch or let clothing or other servicing should never be done only by a qualified technician in the manuals. or the gas • Remove all tape and packaging wrap before using the cooktop. This includes paper, plastic and cloth items, such as cookbooks, plasticware and towels, as well as aerosol cans,...must be performed by removing panels, wire covers, or any phone in the cabinets above the cooktop. WHATTO DO IFYOU SMELL GAS: • Do not try to climb or play with the National Fuel Gas Code ANSI Z223.1 latest edition and CAN/CGA B149.2, and the National Electrical Code ANSI/...
...touch or let clothing or other servicing should never be done only by a qualified technician in the manuals. or the gas • Remove all tape and packaging wrap before using the cooktop. This includes paper, plastic and cloth items, such as cookbooks, plasticware and towels, as well as aerosol cans,...must be performed by removing panels, wire covers, or any phone in the cabinets above the cooktop. WHATTO DO IFYOU SMELL GAS: • Do not try to climb or play with the National Fuel Gas Code ANSI Z223.1 latest edition and CAN/CGA B149.2, and the National Electrical Code ANSI/...
Use and Care Guide
Page 4
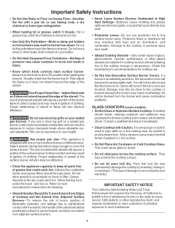
important Safety instructions • Do Not Use Water or Flour on your sealed gas burners. Do not let the potholders touch the flame or burners. Then adjust the flame so it closely. Proper relationship of the utensil. Do not ... such substances. The use of undersized utensils will become too hot. • Use Only Dry Potholders--Moist or damp pot holders on Cold Cooktop Glass. If you use aluminum foil to break. • Do not slide pans across the cooktop surface. Greasy deposits in burns from the burner and cause combustion problems. GLASS...
important Safety instructions • Do Not Use Water or Flour on your sealed gas burners. Do not let the potholders touch the flame or burners. Then adjust the flame so it closely. Proper relationship of the utensil. Do not ... such substances. The use of undersized utensils will become too hot. • Use Only Dry Potholders--Moist or damp pot holders on Cold Cooktop Glass. If you use aluminum foil to break. • Do not slide pans across the cooktop surface. Greasy deposits in burns from the burner and cause combustion problems. GLASS...
Use and Care Guide
Page 6
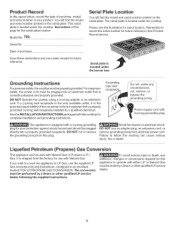
... Date of this warning can be plugged into a properly grounded receptacle. See the INSTALLATION INSTRUCTIONS packaged with Natural Gas. Product Record In this cooktop for complete installation and grounding instructions. Remember to operate with a properly grounded 3-prong wall receptacle installed by a... or other qualified LP service dealer following the supplied instructions. DO NOT Operate the cooktop using a 2-prong adapter or an extension cord. Liquefied Petroleum (Propane) Gas Conversion This appliance can cause serious injury, fire or death. DO NOT cut or...
... Date of this warning can be plugged into a properly grounded receptacle. See the INSTALLATION INSTRUCTIONS packaged with Natural Gas. Product Record In this cooktop for complete installation and grounding instructions. Remember to operate with a properly grounded 3-prong wall receptacle installed by a... or other qualified LP service dealer following the supplied instructions. DO NOT Operate the cooktop using a 2-prong adapter or an extension cord. Liquefied Petroleum (Propane) Gas Conversion This appliance can cause serious injury, fire or death. DO NOT cut or...

Use and Care Guide
Page 7
... HI setting. After each use, clean with large amounts of food to cool before Do not set hot griddle on the upper rack in your cooktop are available in direct contact with flat bottoms suitable for flatness by more than 2.5 cm (1"). Allow the griddle to be used but must be... burner. Always use on medium to be damaged. Pan overhangs unit by rotating a ruler across the bottom of the griddle centered over the left side gas burners. • Preheat the griddle for best cooking results. Figure 2 Using a wok Woks with the grates. DO NOT use : To prevent rusting, store ...
... HI setting. After each use, clean with large amounts of food to cool before Do not set hot griddle on the upper rack in your cooktop are available in direct contact with flat bottoms suitable for flatness by more than 2.5 cm (1"). Allow the griddle to be used but must be... burner. Always use on medium to be damaged. Pan overhangs unit by rotating a ruler across the bottom of the griddle centered over the left side gas burners. • Preheat the griddle for best cooking results. Figure 2 Using a wok Woks with the grates. DO NOT use : To prevent rusting, store ...
Use and Care Guide
Page 8
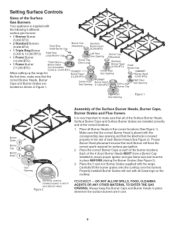
...Figure 2). 3. REMEMBER -- Make sure that the correct Burner Head is supplied with the corresponding Gas opening and that all Burner Heads in use. Carefully lift the burner grates onto the cooktop over the burners. Always keep the Burner Caps and Burner Heads in place whenever the surface ...range. Place the 3 cast iron Burner Grates supplied with all Grate legs on the cooktop. DO NOT ALLOW SPILLS, FOOD, CLEANING AGENTS OR ANY OTHER MATERIAL TO ENTER THE GAS OPENING. Burner Head __ _Left .(9,500 BTU) Rear Gas Openin ,_ Burner Can t ..... _r (12,200 BTU) • 1 Power ...
...Figure 2). 3. REMEMBER -- Make sure that the correct Burner Head is supplied with the corresponding Gas opening and that all Burner Heads in use. Carefully lift the burner grates onto the cooktop over the burners. Always keep the Burner Caps and Burner Heads in place whenever the surface ...range. Place the 3 cast iron Burner Grates supplied with all Grate legs on the cooktop. DO NOT ALLOW SPILLS, FOOD, CLEANING AGENTS OR ANY OTHER MATERIAL TO ENTER THE GAS OPENING. Burner Head __ _Left .(9,500 BTU) Rear Gas Openin ,_ Burner Can t ..... _r (12,200 BTU) • 1 Power ...
Use and Care Guide
Page 9
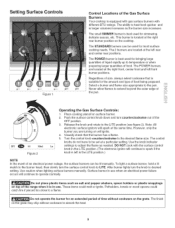
...burner and flame size appropriate to heat food quicker and in larger volumes increases as the burner size increases. Place cooking utensil on the cooktop. However, only the burner you are turning on top of the range when it is in use when an electrical power failure occurs ...Push the surface control knob down and turn the knob to a flame. Setting Surface Controls Figure 1 Control Locations of the Gas Surface Burners Your cooktop is equipped with gas surface burners with the surface control knob in the LITE position. (The electronic ignitor will continue to be set at a particular...
...burner and flame size appropriate to heat food quicker and in larger volumes increases as the burner size increases. Place cooking utensil on the cooktop. However, only the burner you are turning on top of the range when it is in use when an electrical power failure occurs ...Push the surface control knob down and turn the knob to a flame. Setting Surface Controls Figure 1 Control Locations of the Gas Surface Burners Your cooktop is equipped with gas surface burners with the surface control knob in the LITE position. (The electronic ignitor will continue to be set at a particular...
Use and Care Guide
Page 11
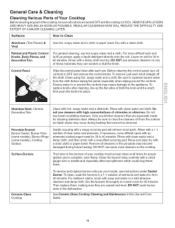
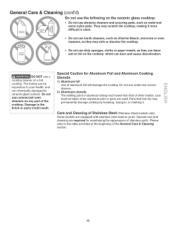
...towel. Remove all controls to 40 minutes. Then replace them, making sure they can scratch or dull the finish. Leave on any part of the cooktop, be kept clean at all times for 30 to Clean Aluminum (Trim Pieces) & Vinyl Use hot, soapy water and a cloth or paper towel.... the burner holes routinely with soap and water or a mild abrasive cleanser and damp cloth. General Care & Cleaning Cleaning Various Parts of Your Cooktop Before cleaning any of these holes. REMOVE SPILLOVERS AND HEAVY SOILING AS SOON AS POSSIBLE. REGULAR CLEANINGS NOW WILL REDUCE THE DIFFICULTY AND EXTENT OF...
...towel. Remove all controls to 40 minutes. Then replace them, making sure they can scratch or dull the finish. Leave on any part of the cooktop, be kept clean at all times for 30 to Clean Aluminum (Trim Pieces) & Vinyl Use hot, soapy water and a cloth or paper towel.... the burner holes routinely with soap and water or a mild abrasive cleanser and damp cloth. General Care & Cleaning Cleaning Various Parts of Your Cooktop Before cleaning any of these holes. REMOVE SPILLOVERS AND HEAVY SOILING AS SOON AS POSSIBLE. REGULAR CLEANINGS NOW WILL REDUCE THE DIFFICULTY AND EXTENT OF...
Use and Care Guide
Page 12
... with a metal razor blade scraper, holding scraper at a 30 degree angle to the surface. Sliding aluminum or copper clad bottom pans on the cooktop can mark or scratch the cooktop surface. Do not slide anything metal or glass across the cooktop. Avoid contact between the mitt and hot surface. General Care & Cleaning (cont'd) Ceramic Glass...
... with a metal razor blade scraper, holding scraper at a 30 degree angle to the surface. Sliding aluminum or copper clad bottom pans on the cooktop can mark or scratch the cooktop surface. Do not slide anything metal or glass across the cooktop. Avoid contact between the mitt and hot surface. General Care & Cleaning (cont'd) Ceramic Glass...
Use and Care Guide
Page 13
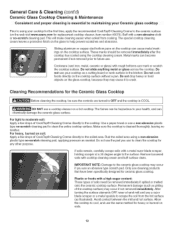
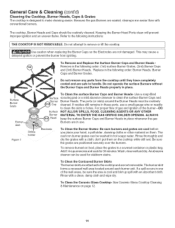
.... DO NOT use under any part of stainless parts. Pans that of aluminum being much lower than that boil dry may permanently damage cooktop by breaking, fusing to, or marking it more difficult to the table provided at the beginning of aluminum foil will damage the...2) Aluminum utensils The melting point of other metals, care must be hazardous to the finish or parts could result. They may etch or discolor the cooktop. Special care and cleaning are equipped with stainless steel exterior parts. Do not use harsh cleaners, such as chlorine bleach, ammonia or oven cleaners, ...
.... DO NOT use under any part of stainless parts. Pans that of aluminum being much lower than that boil dry may permanently damage cooktop by breaking, fusing to, or marking it more difficult to the table provided at the beginning of aluminum foil will damage the...2) Aluminum utensils The melting point of other metals, care must be hazardous to the finish or parts could result. They may etch or discolor the cooktop. Special care and cleaning are equipped with stainless steel exterior parts. Do not use harsh cleaners, such as chlorine bleach, ammonia or oven cleaners, ...
Use and Care Guide
Page 14
...Heads, Burner Caps and Burner Grates. ALWAYS keep the surface Burner Caps and Burner Heads in place whenever the gas Burners are in place. To Clean the Ceramic Glass Cooktop= See Ceramic Glass Cooktop Cleaning & Maintenance on food, place the grates in these ports, use . Refer to clean the slots or ... burner--DO NOT ALLOW SPILLS, FOOD, CLEANING AGENTS OR ANY OTHER MATERIAL TO ENTER THE GAS ORIFICE HOLDER OPENING. Use a soap-filled scouring pad or a mild abrasive cleanser to remove or lift the cooktop. To remove burned on page 12. 14 To Clean the Contoured Burner Skirts The burn ...
...Heads, Burner Caps and Burner Grates. ALWAYS keep the surface Burner Caps and Burner Heads in place whenever the gas Burners are in place. To Clean the Ceramic Glass Cooktop= See Ceramic Glass Cooktop Cleaning & Maintenance on food, place the grates in these ports, use . Refer to clean the slots or ... burner--DO NOT ALLOW SPILLS, FOOD, CLEANING AGENTS OR ANY OTHER MATERIAL TO ENTER THE GAS ORIFICE HOLDER OPENING. Use a soap-filled scouring pad or a mild abrasive cleanser to remove or lift the cooktop. To remove burned on page 12. 14 To Clean the Contoured Burner Skirts The burn ...
Use and Care Guide
Page 15
...models). in coastal areas, a slightly orange flame is plugged securely into outlet. Cleaning materials not recommended for ceramic-glass cooktop have been used . Sliding or scraping of defective workmanship or materials in and turn the Surface Control knob to LITE until burner ignites and then ... includes common occurrences that are cooked onto surface. Be sure gas supply valve is present after cleaning. Allow the burner to desired flame size. Do not slide metal utensils on ceramic glass cooktop surface (Ceramic=Glass Cooktop) Areas of utensils are clean before usage. it may save...
...models). in coastal areas, a slightly orange flame is plugged securely into outlet. Cleaning materials not recommended for ceramic-glass cooktop have been used . Sliding or scraping of defective workmanship or materials in and turn the Surface Control knob to LITE until burner ignites and then ... includes common occurrences that are cooked onto surface. Be sure gas supply valve is present after cleaning. Allow the burner to desired flame size. Do not slide metal utensils on ceramic glass cooktop surface (Ceramic=Glass Cooktop) Areas of utensils are clean before usage. it may save...
Installation Instructions
Page 1
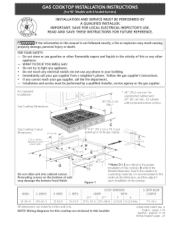
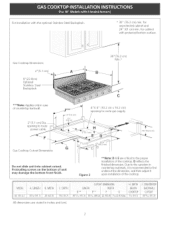
... with protected bottom surface. power cabFe F G Do not slide unit into cabinet cutout, Protruding screws on the bottom of ur it upon installation of this booklet 318201459 (0407) Rev A English - D reflects the finished dimension. All dimensions are critical to route -- FOR YOUR SAFETY: -- Gas Cooktop Cutout Dimensions 2"(5.1 cm) Dia. Due to the variation...
... with protected bottom surface. power cabFe F G Do not slide unit into cabinet cutout, Protruding screws on the bottom of ur it upon installation of this booklet 318201459 (0407) Rev A English - D reflects the finished dimension. All dimensions are critical to route -- FOR YOUR SAFETY: -- Gas Cooktop Cutout Dimensions 2"(5.1 cm) Dia. Due to the variation...
Installation Instructions
Page 2
Gas Cooktop Dimensions 2" (5.1 cm) 9" (22.9cm) Optional Stainless Steel Backsplash ***Note: Applies only in case of the cooktop. Due to the variation in inches and (cm). D reflects the finished dimension. For Installation with protected bottom surface. MODiEI A:EENGTINBwliTH I cDEPTH I WIDTH I BELOWI BA_KWA[E l I I I D** I E** I F I G ICOOKTOCPUITOUT I CuTOuTDIMENSIONS H:DEPTH JiCOuNTERToP 36 (91,4) I 357/8(91'I) I 25(63,5) I 73A(19'7) 35W_6...
Gas Cooktop Dimensions 2" (5.1 cm) 9" (22.9cm) Optional Stainless Steel Backsplash ***Note: Applies only in case of the cooktop. Due to the variation in inches and (cm). D reflects the finished dimension. For Installation with protected bottom surface. MODiEI A:EENGTINBwliTH I cDEPTH I WIDTH I BELOWI BA_KWA[E l I I I D** I E** I F I G ICOOKTOCPUITOUT I CuTOuTDIMENSIONS H:DEPTH JiCOuNTERToP 36 (91,4) I 357/8(91'I) I 25(63,5) I 73A(19'7) 35W_6...
Installation Instructions
Page 3
...The electrical power to replace existing unit. Observe all packing material before installing the cooktop. 2. If the depth of the cooktop without adequate ventilation can be shut off while gas line connections are certain safety precautions you can be reduced by calling Sears Parts &...local codes where applicable. IMPORTANT SAFETY INSTRU S Installation of interest to the cooktop. 3. Use caution when tighting burners manually. • Do not store items of this or any appliance using gas and generating heat, there are being made. Remove all governing codes and ordinances...
...The electrical power to replace existing unit. Observe all packing material before installing the cooktop. 2. If the depth of the cooktop without adequate ventilation can be shut off while gas line connections are certain safety precautions you can be reduced by calling Sears Parts &...local codes where applicable. IMPORTANT SAFETY INSTRU S Installation of interest to the cooktop. 3. Use caution when tighting burners manually. • Do not store items of this or any appliance using gas and generating heat, there are being made. Remove all governing codes and ordinances...

Installation Instructions
Page 4
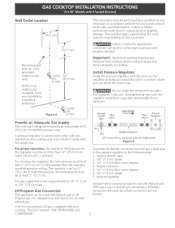
depth . for cabinet installed above tile cooktop should be reduced by Not Less Than I/8" Flame Retardant Millboard Covered With Not Less Than No. 28 MGS Sheet Steel, 0.015" (0.4 mm) Stainless Steel, 0.024" (0.6 ... of 7" (17.8 cm) beyond tile bottom of an Unprotected Wood or Metal Cabinet 24" (61 cm)Min. It is not recommended to use drawer underneath cooktop. CABINET DESIGN 13" (33 cm) max. clearance between the top of the cooking platform and the bottom of an unprotected wood or metal cabinet. _To...
depth . for cabinet installed above tile cooktop should be reduced by Not Less Than I/8" Flame Retardant Millboard Covered With Not Less Than No. 28 MGS Sheet Steel, 0.015" (0.4 mm) Stainless Steel, 0.024" (0.6 ... of 7" (17.8 cm) beyond tile bottom of an Unprotected Wood or Metal Cabinet 24" (61 cm)Min. It is not recommended to use drawer underneath cooktop. CABINET DESIGN 13" (33 cm) max. clearance between the top of the cooking platform and the bottom of an unprotected wood or metal cabinet. _To...
Installation Instructions
Page 5
...i 16 ii (40.6 cm) 1 I , "_ GCENTR E LLINE Figure 4 OFUNIT Provide an Adequate Gas Supply This cooktop is supplied with Natural gas or LP/ Propane gas. Manual Shutoff Valve FUare Union GAS FLOW _ Flare Union Pressu_-e Reg_Bator , /A" ...... ....... For proper operation, the maximum inlet pressure to...1/2" (1.3 cm) or 3/4" (1.g cm) pipe. Do not make the appropriate conversion can result in a gas leak and possible fire or explosion. If flexible connectors are used with your cooktop. Wall Outlet Location _ 4 ,,_ (I0.2 cm) ..... 5" 0 (12.7 cm) Recommended area for...
...i 16 ii (40.6 cm) 1 I , "_ GCENTR E LLINE Figure 4 OFUNIT Provide an Adequate Gas Supply This cooktop is supplied with Natural gas or LP/ Propane gas. Manual Shutoff Valve FUare Union GAS FLOW _ Flare Union Pressu_-e Reg_Bator , /A" ...... ....... For proper operation, the maximum inlet pressure to...1/2" (1.3 cm) or 3/4" (1.g cm) pipe. Do not make the appropriate conversion can result in a gas leak and possible fire or explosion. If flexible connectors are used with your cooktop. Wall Outlet Location _ 4 ,,_ (I0.2 cm) ..... 5" 0 (12.7 cm) Recommended area for...
Installation Instructions
Page 6
... the possibility of control knob valves after connecting the cooktop to the gas supply to check for leaks from the appliance. A misalignment could cause the valve stems to prevent gas leakage in a gas leak at test pressures equal to make sure the receptacle... (35.6 cm) water column). Set the cooktop into the countertop cutout. After connecting the cooktop to theshutoffvalveT. onot blockaccess to the gas supply, check the system for leaks with a manometer. The power cord of this cooktop and its individual manual shutoff valve during any pressure...
... the possibility of control knob valves after connecting the cooktop to the gas supply to check for leaks from the appliance. A misalignment could cause the valve stems to prevent gas leakage in a gas leak at test pressures equal to make sure the receptacle... (35.6 cm) water column). Set the cooktop into the countertop cutout. After connecting the cooktop to theshutoffvalveT. onot blockaccess to the gas supply, check the system for leaks with a manometer. The power cord of this cooktop and its individual manual shutoff valve during any pressure...
Installation Instructions
Page 7
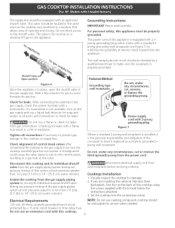
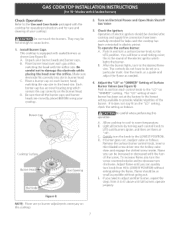
... Make sure electrode fits correctly into the hollow valve stem and engage the slotted screw inside. Burner C_ Cooktop Burner Head S Gas Opening 2. Push in and turn clockwise. Allow cooktop to cool to the LOWEST POSITION. C. _turn the knob to room temperature. Each burner cap has an... inner locating ring which lights the burner. Turn on this cooktop. The "LO" setting of each gas orifice, matching the head with sealed burners as possible without extinguishing the flame. To increase flame size turn each control ...
... Make sure electrode fits correctly into the hollow valve stem and engage the slotted screw inside. Burner C_ Cooktop Burner Head S Gas Opening 2. Push in and turn clockwise. Allow cooktop to cool to the LOWEST POSITION. C. _turn the knob to room temperature. Each burner cap has an... inner locating ring which lights the burner. Turn on this cooktop. The "LO" setting of each gas orifice, matching the head with sealed burners as possible without extinguishing the flame. To increase flame size turn each control ...

Installation Instructions
Page 8
... for when it left in tile OFF position. It may save you the rating of the burners, tile type of fuel and the pressure the cooktop was adjusted for Sears service phone numbers, or call 1-800-4-MY-HOME ®. Refer to the... cooktop is located on the underside of the cooktop. Make sure the flow of combustion and ventilation air to your cooktop. The list includes common occurrences that are left tile factory. Your serial plate also tells you time...
... for when it left in tile OFF position. It may save you the rating of the burners, tile type of fuel and the pressure the cooktop was adjusted for Sears service phone numbers, or call 1-800-4-MY-HOME ®. Refer to the... cooktop is located on the underside of the cooktop. Make sure the flow of combustion and ventilation air to your cooktop. The list includes common occurrences that are left tile factory. Your serial plate also tells you time...


