Owners Manual
Page 2
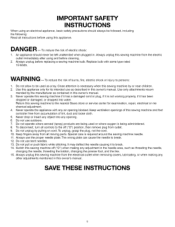
...2. Keep ventilation openings of this owner's manual. Special care is not working properly, if it has been dropped or damaged, or dropped into any adjustment in this sewing machine from outlet. 9. SAVE THESE INSTRUCTIONS Always unplug this appliance. Do not use bent needles. 13. To disconnect... electric outlet immediately after using this sewing machine from all controls to the nearest Sears store or service center for its intended use the proper needle plate. Always use as threading the needle, changing the needle, threading the bobbin, changing the presser foot, and ...
...2. Keep ventilation openings of this owner's manual. Special care is not working properly, if it has been dropped or damaged, or dropped into any adjustment in this sewing machine from outlet. 9. SAVE THESE INSTRUCTIONS Always unplug this appliance. Do not use bent needles. 13. To disconnect... electric outlet immediately after using this sewing machine from all controls to the nearest Sears store or service center for its intended use the proper needle plate. Always use as threading the needle, changing the needle, threading the bobbin, changing the presser foot, and ...
Owners Manual
Page 11
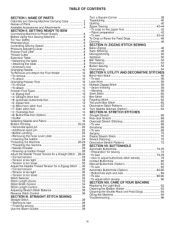
...pin 20 • Additional spool pin 20 • Bobbin winding 22 • Removing the hook cover plate 24 • Inserting the bobbin 24 Threading the Machine 26-28 • Threading the machine 26 • Needle threader 26 • Drawing up bobbin thread 28 Adjust the Needle Thread Tension for a Straight... Machine to sew 38 • Finishing sewing 38 Use the Seam Guides 38 Turn a Square Corner 38 Topstitching 40 Quilting 40 Zipper Sewing 42-44 • To snap on the zipper foot 42 • Fabric preparation 42 • To sew 42-44 To Drop or Raise the Feed Dogs...
...pin 20 • Additional spool pin 20 • Bobbin winding 22 • Removing the hook cover plate 24 • Inserting the bobbin 24 Threading the Machine 26-28 • Threading the machine 26 • Needle threader 26 • Drawing up bobbin thread 28 Adjust the Needle Thread Tension for a Straight... Machine to sew 38 • Finishing sewing 38 Use the Seam Guides 38 Turn a Square Corner 38 Topstitching 40 Quilting 40 Zipper Sewing 42-44 • To snap on the zipper foot 42 • Fabric preparation 42 • To sew 42-44 To Drop or Raise the Feed Dogs...
Owners Manual
Page 16
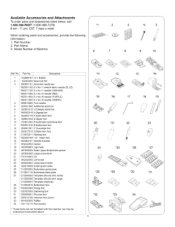
No. Part No. Part Name 3. J 4 Description *102869107 10 x Bobbin 102403202 Spool pin felt 650807101 Assorted needle set *993001100 5 x No.... Hemmer foot (2mm) ; *941620000 Ruffler • 031119115 Foot control * These items are not furnished with the machine, but may be ordered per instructions above• 12 13 "14 .16 17 18 19 2O "21 22...23 // // 24 *25 *26 *27 *29 *3O "31 *32 *33 34 i- Part Number 2. Model Number of Machine 6 7 8 9 10 Ref. Available Accessories and Attachments To order parts and accessories listed below, call: 1-800-366-PART ...
No. Part No. Part Name 3. J 4 Description *102869107 10 x Bobbin 102403202 Spool pin felt 650807101 Assorted needle set *993001100 5 x No.... Hemmer foot (2mm) ; *941620000 Ruffler • 031119115 Foot control * These items are not furnished with the machine, but may be ordered per instructions above• 12 13 "14 .16 17 18 19 2O "21 22...23 // // 24 *25 *26 *27 *29 *3O "31 *32 *33 34 i- Part Number 2. Model Number of Machine 6 7 8 9 10 Ref. Available Accessories and Attachments To order parts and accessories listed below, call: 1-800-366-PART ...
Owners Manual
Page 32
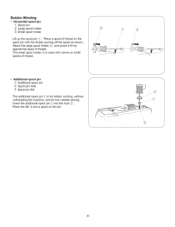
... pin \/Additional spool pin _2_Spool pin hole ,(3_S, pool pin felt The additional spool pin _1_is for bobbin winding, without unthreading the machine, and for twin needle sewing. Insert the additional spool pin_l_, into the hole _Z'. Bobbin Winding • Horizontal spool pin _(1_S'pool pin (2_,Large spool holder _3_Small spool holder f / / Lift...
... pin \/Additional spool pin _2_Spool pin hole ,(3_S, pool pin felt The additional spool pin _1_is for bobbin winding, without unthreading the machine, and for twin needle sewing. Insert the additional spool pin_l_, into the hole _Z'. Bobbin Winding • Horizontal spool pin _(1_S'pool pin (2_,Large spool holder _3_Small spool holder f / / Lift...
Owners Manual
Page 34
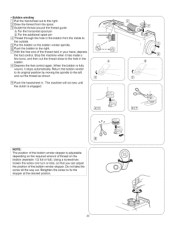
... a screwdriver, loosen the screw one turn or less, so that you can adjust the position of thread on the bobbin winder spindle. [] Push the bobbin to the left, and cut the thread close to fix the stopper at the desired positon. _ J 22 Retighten the..., depress the foot control. The machine will not sew until the clutch is engaged. [] °Z!........ [] ......... []% %% [] J NOTE: / The position of the thread held in the bobbin. [] Depress the foot control again. Stop the machine when it stops automatically. When the bobbin is adjustable depending on the required ...
... a screwdriver, loosen the screw one turn or less, so that you can adjust the position of thread on the bobbin winder spindle. [] Push the bobbin to the left, and cut the thread close to fix the stopper at the desired positon. _ J 22 Retighten the..., depress the foot control. The machine will not sew until the clutch is engaged. [] °Z!........ [] ......... []% %% [] J NOTE: / The position of the thread held in the bobbin. [] Depress the foot control again. Stop the machine when it stops automatically. When the bobbin is adjustable depending on the required ...

Owners Manual
Page 36
... into notch _2_,onthe front side of thread. / []Attach the hook cover plate. Pull out about 6" (15.0 cm) of [] the bobbin holder. Check the threading by [] referring to the diagram _4_,shownon the hook cover plate. Removing the hook cover plate f _1_Hook cover plate ... hook cover plate release button _l_'to the right, / and remove the cover plate _2_. / J Inserting the bobbin f \ LI_ End of thread (2_ Notch [] (3_.Notch (47Threading diagram [] Place a bobbin in the bobbin holder with the thread running off counterclockwise. / / [] Guide the thread into notch _%.
... into notch _2_,onthe front side of thread. / []Attach the hook cover plate. Pull out about 6" (15.0 cm) of [] the bobbin holder. Check the threading by [] referring to the diagram _4_,shownon the hook cover plate. Removing the hook cover plate f _1_Hook cover plate ... hook cover plate release button _l_'to the right, / and remove the cover plate _2_. / J Inserting the bobbin f \ LI_ End of thread (2_ Notch [] (3_.Notch (47Threading diagram [] Place a bobbin in the bobbin holder with the thread running off counterclockwise. / / [] Guide the thread into notch _%.

Owners Manual
Page 40
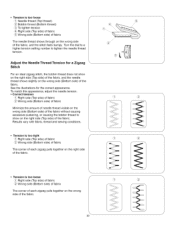
...Needle thread (Top thread) _2_Bobbin thread (Bottom thread) _3_To loosen tension @ Right side (Top side) of fabric @ Wrong side (Bottom side) of fabric The bobbin thread shows through on : - • Drawing up . [_Pull both threads 4" to 6" (10.0 to 15.0 cm) under and behind the presser foot.... Adjust the Needle Thread Tension for one complete turn. [] Bring the bobbin thread up by pulling the needle thread [] up bobbin thread [] Raise the presser foot. number of fabric, as illustrated (magnified to loosen the needle thread tension. ,. j ...
...Needle thread (Top thread) _2_Bobbin thread (Bottom thread) _3_To loosen tension @ Right side (Top side) of fabric @ Wrong side (Bottom side) of fabric The bobbin thread shows through on : - • Drawing up . [_Pull both threads 4" to 6" (10.0 to 15.0 cm) under and behind the presser foot.... Adjust the Needle Thread Tension for one complete turn. [] Bring the bobbin thread up by pulling the needle thread [] up bobbin thread [] Raise the presser foot. number of fabric, as illustrated (magnified to loosen the needle thread tension. ,. j ...
Owners Manual
Page 42
... fabric The corner of each zigzag pulls together on the wrong side (Bottom side) of the fabric without causing excessive puckering, or causing the bobbin thread to tighten the needle thread tension. Turn the dial to a higher tension setting number to show on the right side (Top side) of... fabric ,_5_Wrong side (Bottom side) of fabric The needle thread shows through on the wrong side of the fabric. Results vary with fabric, thread and sewing conditions. J Tension is too tight _, Right side (Top side) of fabric ,,2)Wrong side (Bottom side) of fabric ? '\ j f The corner of each zigzag ...
... fabric The corner of each zigzag pulls together on the wrong side (Bottom side) of the fabric without causing excessive puckering, or causing the bobbin thread to tighten the needle thread tension. Turn the dial to a higher tension setting number to show on the right side (Top side) of... fabric ,_5_Wrong side (Bottom side) of fabric The needle thread shows through on the wrong side of the fabric. Results vary with fabric, thread and sewing conditions. J Tension is too tight _, Right side (Top side) of fabric ,,2)Wrong side (Bottom side) of fabric ? '\ j f The corner of each zigzag ...
Owners Manual
Page 64
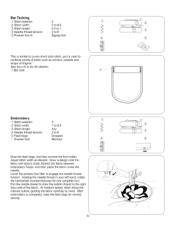
...needle. Holding the needle thread in your left hand, rotate the handwheel counterclockwise for normal sewing. 52 0,--1 _--2--3=4=_5_6.5 WIDTH ) X J "x Pull the needle thread to draw the bobbin thread to Y reinforce points of strain such as desired. After embroidery is used to ... At medium speed, stitch along the marked outline, guiding the fabric carefully by hand. Lower the presser foot lifter to 6 Dropped Remove f fJ-\ ) S_ _4_, Drop the feed dogs, and then remove the foot holder. titch selector: _2_Stitch width: _3_S' titch length: _4_Needle thread tension: _5_Presser...
...needle. Holding the needle thread in your left hand, rotate the handwheel counterclockwise for normal sewing. 52 0,--1 _--2--3=4=_5_6.5 WIDTH ) X J "x Pull the needle thread to draw the bobbin thread to Y reinforce points of strain such as desired. After embroidery is used to ... At medium speed, stitch along the marked outline, guiding the fabric carefully by hand. Lower the presser foot lifter to 6 Dropped Remove f fJ-\ ) S_ _4_, Drop the feed dogs, and then remove the foot holder. titch selector: _2_Stitch width: _3_S' titch length: _4_Needle thread tension: _5_Presser...
Owners Manual
Page 80
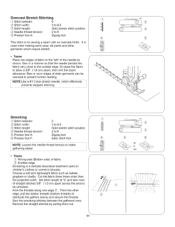
...the needle thread tension to allow a 5/8" (1.6 cm) seam, then trim the seam allowance. Choose a soft and lightweight fabric such as shown. Sew the smocking stitches between the gathered rows. J 68 J Tosew f Place raw edges of fabric to the "left" of straight stitches 3/8" (1.0 ...worn edges of fabric _2_Knotted edge Smocking is a delicate decorative treatment used when making swim wear, ski pants and other edge, pull the bobbin threads (bottom threads) to prevent further raveling. From the other garments which effectively prevents skipped stitching. or o ou J Tosew / _....
...the needle thread tension to allow a 5/8" (1.6 cm) seam, then trim the seam allowance. Choose a soft and lightweight fabric such as shown. Sew the smocking stitches between the gathered rows. J 68 J Tosew f Place raw edges of fabric to the "left" of straight stitches 3/8" (1.0 ...worn edges of fabric _2_Knotted edge Smocking is a delicate decorative treatment used when making swim wear, ski pants and other edge, pull the bobbin threads (bottom threads) to prevent further raveling. From the other garments which effectively prevents skipped stitching. or o ou J Tosew / _....
Owners Manual
Page 98
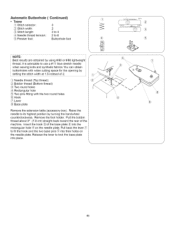
Automatic Buttonhole (Continued) • Tosew _!_'Stitch selector: 3 _2_S, titch width: 2 _3_Stitch length: 3 to 4
Automatic Buttonhole (Continued) • Tosew _!_'Stitch selector: 3 _2_S, titch width: 2 _3_Stitch length: 3 to 4

Owners Manual
Page 100
... buttonhole foot _3_.Adjust the position of the gear(4_, so it is aligned with the starting point of the guide plate. Place the bobbin and needle threads to the left side of the template_6_. Release the catch to 10.0 cm) of the buttonhole guide plate by turning the... handwheel counterclockwise while holding the needle thread. J 88 Pull the bobbin thread up through the guide slot of thread. Leave 3" to 4" (7.0 to lock the template into the center of the guide slot. Insert the gear_7_of...
... buttonhole foot _3_.Adjust the position of the gear(4_, so it is aligned with the starting point of the guide plate. Place the bobbin and needle threads to the left side of the template_6_. Release the catch to 10.0 cm) of the buttonhole guide plate by turning the... handwheel counterclockwise while holding the needle thread. J 88 Pull the bobbin thread up through the guide slot of thread. Leave 3" to 4" (7.0 to lock the template into the center of the guide slot. Insert the gear_7_of...
Owners Manual
Page 104
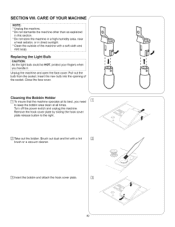
... the hook cover plate release button to keep the bobbin area clean at all times. Insert the new bulb into the opening of the machine with a lint [] brush or a vacuum cleaner. I , Cleaning the Bobbin Holder [] To insure that the machine operates at its best, you handle it. Close ...be HOT, protect your fingers when you need to the right. [] Take out the bobbin. CARE OFYOUR MACHINE F NOTE: * Unplug the machine. * Do not dismantle the machine other than as explained in this section. * Do not store the machine in a high-humidity area, near a heat radiator, or in direct sunlight. * ...
... the hook cover plate release button to keep the bobbin area clean at all times. Insert the new bulb into the opening of the machine with a lint [] brush or a vacuum cleaner. I , Cleaning the Bobbin Holder [] To insure that the machine operates at its best, you handle it. Close ...be HOT, protect your fingers when you need to the right. [] Take out the bobbin. CARE OFYOUR MACHINE F NOTE: * Unplug the machine. * Do not dismantle the machine other than as explained in this section. * Do not store the machine in a high-humidity area, near a heat radiator, or in direct sunlight. * ...

Owners Manual
Page 106
... One or two drops of oil is sufficient. In case the machine has not been used for a long period, oil it may stain the fabric. Open the face cover to allow room to remove the needle plate screw with a soft, dry cloth. _3_Feed dogs f_X ; Use quality sewing machine oil. 94 ...\\\\\\ J Open the face cover and oil the two points, as shown, at least once a year. Remove excess oil, otherwise it before sewing. Cleaning the Shuttle Race and Feed Dogs [] Unplug the machine and remove the presser foot and needle. Remove the needle plate_l_ and take out the bobbin...
... One or two drops of oil is sufficient. In case the machine has not been used for a long period, oil it may stain the fabric. Open the face cover to allow room to remove the needle plate screw with a soft, dry cloth. _3_Feed dogs f_X ; Use quality sewing machine oil. 94 ...\\\\\\ J Open the face cover and oil the two points, as shown, at least once a year. Remove excess oil, otherwise it before sewing. Cleaning the Shuttle Race and Feed Dogs [] Unplug the machine and remove the presser foot and needle. Remove the needle plate_l_ and take out the bobbin...
Owners Manual
Page 108
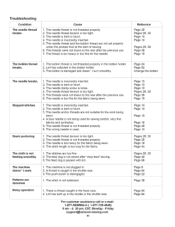
... Page 6 Page 94 Page 22 Page 36 Page 94 Page 94 The thread is bent or blunt. 3. Lint has collected in the hook race. 2. The machine doesn' t work being sewn. 1. The needle is packed with lint. 1. The threads were not drawn to the rear after the previous use . 6. The feed..., very fine fabrics and synthetics. 5. The needle is not threaded properly. 6. The threads were not drawn to the rear after "drop feed" sewing. 3. The bobbin thread is used for the fabric being used . 1. The needle thread is bent or blunt. 4. The wrong needle is not threaded properly in the shuttle...
... Page 6 Page 94 Page 22 Page 36 Page 94 Page 94 The thread is bent or blunt. 3. Lint has collected in the hook race. 2. The machine doesn' t work being sewn. 1. The needle is packed with lint. 1. The threads were not drawn to the rear after the previous use . 6. The feed..., very fine fabrics and synthetics. 5. The needle is not threaded properly. 6. The threads were not drawn to the rear after "drop feed" sewing. 3. The bobbin thread is used for the fabric being used . 1. The needle thread is bent or blunt. 4. The wrong needle is not threaded properly in the shuttle...


