Owners Manual
Page 1
® SEWING MACHINE Owner's Manual MAQUINA DE COSER Manual de Instrucciones MACHINE .ikCOUDRE Manuel d'instructions Model, Modelo, Modele 385.18221 I 0 505-800-226 Sears, Roebuck and Co., Hoffman Estates, IL 60179 U.S.A. www.sears.com
® SEWING MACHINE Owner's Manual MAQUINA DE COSER Manual de Instrucciones MACHINE .ikCOUDRE Manuel d'instructions Model, Modelo, Modele 385.18221 I 0 505-800-226 Sears, Roebuck and Co., Hoffman Estates, IL 60179 U.S.A. www.sears.com
Owners Manual
Page 2
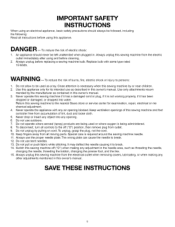
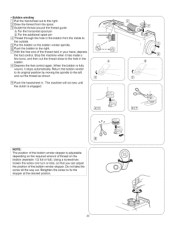
... use bent needles. 13. Do not use the proper needle plate. It may deflect the needle causing it has been dropped or damaged, or dropped into any opening blocked. An appliance should always be followed, including the following: Read all moving parts. WARNING- Always ... as threading the needle, changing the needle, threading the bobbin, changing the presser foot, and the like. 15. Special care is being used as contained in this owner's manual. Always unplug before using this sewing machine to break. 14. SAVE THESE INSTRUCTIONS Always unplug this appliance...
... use bent needles. 13. Do not use the proper needle plate. It may deflect the needle causing it has been dropped or damaged, or dropped into any opening blocked. An appliance should always be followed, including the following: Read all moving parts. WARNING- Always ... as threading the needle, changing the needle, threading the bobbin, changing the presser foot, and the like. 15. Special care is being used as contained in this owner's manual. Always unplug before using this sewing machine to break. 14. SAVE THESE INSTRUCTIONS Always unplug this appliance...
Owners Manual
Page 5
... the owner's manual free replacement of purchase. This 10 year warranty does not include belts, which are expendable parts. If this sewing machine is used for commercial or rental purposes, warranty service is defective in material or workmanship. V Full 10 Year Warranty on Internal...Warranty service is defective in material or workmanship. Sears, Roebuck and Co., D/817WA, Hoffman Estates, IL 60179 U.S.A. Kenmore Sewing Machine Warranty Full 25Year Warranty on Sewing Machine Die-Cast Metal Frame For 25 years from the date of purchase, Sears will provide free repair for the die-cast...
... the owner's manual free replacement of purchase. This 10 year warranty does not include belts, which are expendable parts. If this sewing machine is used for commercial or rental purposes, warranty service is defective in material or workmanship. V Full 10 Year Warranty on Internal...Warranty service is defective in material or workmanship. Sears, Roebuck and Co., D/817WA, Hoffman Estates, IL 60179 U.S.A. Kenmore Sewing Machine Warranty Full 25Year Warranty on Sewing Machine Die-Cast Metal Frame For 25 years from the date of purchase, Sears will provide free repair for the die-cast...
Owners Manual
Page 11
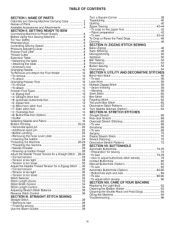
... Seam Guides 38 Turn a Square Corner 38 Topstitching 40 Quilting 40 Zipper Sewing 42-44 • To snap on the zipper foot 42 • Fabric preparation 42 • To sew 42-44 To Drop or Raise the Feed Dogs 46 Darning 46 SECTION IV. STRETCH STITCHES Straight... 36 SECTION III. TABLE OF CONTENTS SECTION I. CARE OFYOUR MACHINE Replacing the Light Bulb 92 Cleaning the Bobbin Holder 92 Cleaning the Shuttle Race and Feed Dogs 94 Oiling the Machine 94 Troubleshooting 96 XI STRAIGHT STITCH SEWING Straight Stitch 38 • Starting to adjust buttonhole stitch density...
... Seam Guides 38 Turn a Square Corner 38 Topstitching 40 Quilting 40 Zipper Sewing 42-44 • To snap on the zipper foot 42 • Fabric preparation 42 • To sew 42-44 To Drop or Raise the Feed Dogs 46 Darning 46 SECTION IV. STRETCH STITCHES Straight... 36 SECTION III. TABLE OF CONTENTS SECTION I. CARE OFYOUR MACHINE Replacing the Light Bulb 92 Cleaning the Bobbin Holder 92 Cleaning the Shuttle Race and Feed Dogs 94 Oiling the Machine 94 Troubleshooting 96 XI STRAIGHT STITCH SEWING Straight Stitch 38 • Starting to adjust buttonhole stitch density...
Owners Manual
Page 14
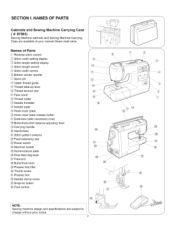
... pitch balance adjusting lever _9_Carrying handle @0H_andwheel @ Stitch pattern selector @ Feed balancing dial @ Power switch @ Machine socket @_Nomenclature plate @_Drop feed dog lever @_Free-arm @ Buttonhole lever @_Presser foot lifter _0_Thumb screw @...Needle clamp screw @ Snap-on button @ Foot control NOTE: Sewing machine design and specifications are available at your nearest Sears retail store. NAMES OF PARTS f Cabinets and Sewing Machine Carrying Case ( # 97503) Sewing Machine cabinets and Sewing Machine Carrying Case are subject to change without prior notice. \ ...
... pitch balance adjusting lever _9_Carrying handle @0H_andwheel @ Stitch pattern selector @ Feed balancing dial @ Power switch @ Machine socket @_Nomenclature plate @_Drop feed dog lever @_Free-arm @ Buttonhole lever @_Presser foot lifter _0_Thumb screw @...Needle clamp screw @ Snap-on button @ Foot control NOTE: Sewing machine design and specifications are available at your nearest Sears retail store. NAMES OF PARTS f Cabinets and Sewing Machine Carrying Case ( # 97503) Sewing Machine cabinets and Sewing Machine Carrying Case are subject to change without prior notice. \ ...
Owners Manual
Page 18
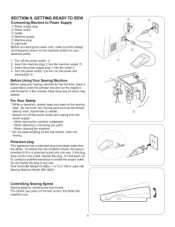
... YC-482J -1 or TJ C-150 is used with thread for the first time, place a waste fabric under the presser foot and run the machine with Sewing Machine Model 385.18221. / Controlling Sewing Speed Sewing speed is intended to your sewing machine for a few minutes. Turn off the power switch and unplug from the power supply: - Before Using Your...
... YC-482J -1 or TJ C-150 is used with thread for the first time, place a waste fabric under the presser foot and run the machine with Sewing Machine Model 385.18221. / Controlling Sewing Speed Sewing speed is intended to your sewing machine for a few minutes. Turn off the power switch and unplug from the power supply: - Before Using Your...

Owners Manual
Page 20
...8226; Detaching the table Pull the table away from the machine, as illustrated, for easy removal of the presser foot, or to help you . Set the pressure at "1". m _i_ Presser foot lifter _2_Normal up position for "free-arm" sewing of cuffs and sleeves. • Attaching the table Push ...the extension table until it snaps into the machine. _i_ Extension table _2_Pin _3_Holes _4_Tab _5_Free-arm • Accessory box Open the cover of ...
...8226; Detaching the table Pull the table away from the machine, as illustrated, for easy removal of the presser foot, or to help you . Set the pressure at "1". m _i_ Presser foot lifter _2_Normal up position for "free-arm" sewing of cuffs and sleeves. • Attaching the table Push ...the extension table until it snaps into the machine. _i_ Extension table _2_Pin _3_Holes _4_Tab _5_Free-arm • Accessory box Open the cover of ...

Owners Manual
Page 24
... 40) Straight stretch (page 66) Automatic buttonhole foot ( Foot R) Use this foot for straight stitching only with the center needle position. For: Zipper sewing (page 42) Foot E: Prensatelas E: Pied E: Blind hem stitch foot ( Foot G) Use this foot for both straight and zigzag stitching. The foot...control. For: Automatic buttonhole (page 74) ! Foot H: Prensatelas H: Pied H: Foot R: Prensatelas R: Pied R: Zipper foot ( Foot E) This foot can sew exactly the same length of the foot guide the zipper and keep the fabric from slipping, and a screw on each side of the zipper. For...
... 40) Straight stretch (page 66) Automatic buttonhole foot ( Foot R) Use this foot for straight stitching only with the center needle position. For: Zipper sewing (page 42) Foot E: Prensatelas E: Pied E: Blind hem stitch foot ( Foot G) Use this foot for both straight and zigzag stitching. The foot...control. For: Automatic buttonhole (page 74) ! Foot H: Prensatelas H: Pied H: Foot R: Prensatelas R: Pied R: Zipper foot ( Foot E) This foot can sew exactly the same length of the foot guide the zipper and keep the fabric from slipping, and a screw on each side of the zipper. For...

Owners Manual
Page 26
... (B) (Option) Use this foot for satin stitch and outlining applique. For: Manual buttonhole (page 82) Quilter The quilter helps keep it from puckering, especially when sewing on knit fabrics. For: Quilting (page 40) !Foot B: Prensatelas B: Pied B IQuilter: Acolchador: Guide a matelasser: J 1 1 14 Presser Foot Types (continued) S • Satin stitch foot ( Foot F) Use...
... (B) (Option) Use this foot for satin stitch and outlining applique. For: Manual buttonhole (page 82) Quilter The quilter helps keep it from puckering, especially when sewing on knit fabrics. For: Quilting (page 40) !Foot B: Prensatelas B: Pied B IQuilter: Acolchador: Guide a matelasser: J 1 1 14 Presser Foot Types (continued) S • Satin stitch foot ( Foot F) Use...

Owners Manual
Page 28
In the needle set, there is one each of sizes 11, 14, 16, and 18, and a blue needle. Special needles should be used for sewing lightweight fabrics, so the fabric will not be marred. Snags and runs in thickness. Always purchase a good quality thread. A denim needle with a larger... and are often caused by damaged needles. Leather needles punch small holes in leather and suede, allowing the thread to eliminate skipped stitches when sewing knits and synthetic fabrics. Use the blue needle to follow through the hole. Heavy fabrics require a needle large enough to pierce the fabric ...
In the needle set, there is one each of sizes 11, 14, 16, and 18, and a blue needle. Special needles should be used for sewing lightweight fabrics, so the fabric will not be marred. Snags and runs in thickness. Always purchase a good quality thread. A denim needle with a larger... and are often caused by damaged needles. Leather needles punch small holes in leather and suede, allowing the thread to eliminate skipped stitches when sewing knits and synthetic fabrics. Use the blue needle to follow through the hole. Heavy fabrics require a needle large enough to pierce the fabric ...
Owners Manual
Page 32
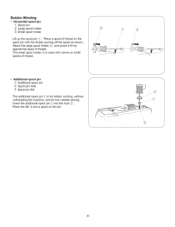
... as shown. j Additional spool pin \/Additional spool pin _2_Spool pin hole ,(3_S, pool pin felt The additional spool pin _1_is for bobbin winding, without unthreading the machine, and for twin needle sewing. Place the felt _3_and a spool on the spool pin with narrow or small spools of thread. Insert the additional spool pin_l_...
... as shown. j Additional spool pin \/Additional spool pin _2_Spool pin hole ,(3_S, pool pin felt The additional spool pin _1_is for bobbin winding, without unthreading the machine, and for twin needle sewing. Place the felt _3_and a spool on the spool pin with narrow or small spools of thread. Insert the additional spool pin_l_...
Owners Manual
Page 34
... it stops automatically. The machine will not sew until the clutch is engaged. [] °Z!........ [] ......... []% %% [] J NOTE: / The position of the bobbin winder stopper is fully wound, it has made a few turns, and then cut the thread as shown. [] Push the handwheel in the bobbin. [] Depress the foot control ...and cut the thread close to the hole in . Retighten the screw to the right. [] With the free end of the bobbin winder stopper. • Bobbin winding f [] Pull the handwheel out to the right. [] Draw the thread from the spool. [] Guide the thread around the...
... it stops automatically. The machine will not sew until the clutch is engaged. [] °Z!........ [] ......... []% %% [] J NOTE: / The position of the bobbin winder stopper is fully wound, it has made a few turns, and then cut the thread as shown. [] Push the handwheel in the bobbin. [] Depress the foot control ...and cut the thread close to the hole in . Retighten the screw to the right. [] With the free end of the bobbin winder stopper. • Bobbin winding f [] Pull the handwheel out to the right. [] Draw the thread from the spool. [] Guide the thread around the...
Owners Manual
Page 42
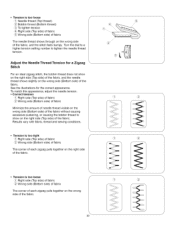
...of fabric Minimize the amount of needle thread visible on the wrong side (Bottom side) of the fabric without causing excessive puckering, or causing the bobbin thread to tighten the needle thread tension. J Tension is too tight _, Right side (Top side) of fabric ,,2)Wrong side (Bottom side) of...the needle thread shows slightly on the wrong side of the fabric. Results vary with fabric, thread and sewing conditions. Tension is too loose f _1_Needle thread (Top thread) {2_ Bobbin thread (Bottom thread) _3_To tighten tension _4_Right side (Top side) of fabric ,_5_Wrong side (Bottom ...
...of fabric Minimize the amount of needle thread visible on the wrong side (Bottom side) of the fabric without causing excessive puckering, or causing the bobbin thread to tighten the needle thread tension. J Tension is too tight _, Right side (Top side) of fabric ,,2)Wrong side (Bottom side) of...the needle thread shows slightly on the wrong side of the fabric. Results vary with fabric, thread and sewing conditions. Tension is too loose f _1_Needle thread (Top thread) {2_ Bobbin thread (Bottom thread) _3_To tighten tension _4_Right side (Top side) of fabric ,_5_Wrong side (Bottom ...

Owners Manual
Page 44
...length control is set at S.S.. Use the color in the sewing guide display. Set the stitch width control at the stretch stitch position. Recommended stitch width, stitch length are color-coded to select stitches) / _i_ Sewing guide display _2}Red indicator _3}Stitch selector Turn the stitch... selector until the red indicator reaches the desired stitch. Stitch patterns are shown in the sewing guide display which corresponds to the color of the fabric while selecting a stitch. When you turn the stitch selector, the information in...
...length control is set at S.S.. Use the color in the sewing guide display. Set the stitch width control at the stretch stitch position. Recommended stitch width, stitch length are color-coded to select stitches) / _i_ Sewing guide display _2}Red indicator _3}Stitch selector Turn the stitch... selector until the red indicator reaches the desired stitch. Stitch patterns are shown in the sewing guide display which corresponds to the color of the fabric while selecting a stitch. When you turn the stitch selector, the information in...

Owners Manual
Page 46
The mark shows the adjustment range when using a stretch stitch. The blue zone is the appropriate adjustment range for buttonhole sewing. * Before sliding the stitch width control, be sure to raise the needle above the fabric. _!__Stitch width control ,_ _ _ /-/'/ 0--1 --2--3_-----5-----6.5 / ... Set the stitch length control at S.S. The higher the number, the greater the stitch width. The _ mark shows the adjustment range when sewing the buttonhole. * Raise the presser foot before sliding the stitch length control. /,\Jj Sti,tch length control STRETCH T 0_1_2m3m4 LENGTH \\\ J...
The mark shows the adjustment range when using a stretch stitch. The blue zone is the appropriate adjustment range for buttonhole sewing. * Before sliding the stitch width control, be sure to raise the needle above the fabric. _!__Stitch width control ,_ _ _ /-/'/ 0--1 --2--3_-----5-----6.5 / ... Set the stitch length control at S.S. The higher the number, the greater the stitch width. The _ mark shows the adjustment range when sewing the buttonhole. * Raise the presser foot before sliding the stitch length control. /,\Jj Sti,tch length control STRETCH T 0_1_2m3m4 LENGTH \\\ J...

Owners Manual
Page 48
To adjust the distorted patterns: [] If the patterns are drawn out, correct them by turning the dial in the "-" direction. [] If the patterns are uneven when you sew on a particular fabric, adjust them by turning the dial in the "+" direction. [] [] J Reverse Stitch Control S Press the stitch control to sew in reverse. 36 Adjusting Stretch Stitch Balance f _1_Feed balancing dial If the stretch stitch patterns are compressed, correct them with the feed balancing dial_l_.
To adjust the distorted patterns: [] If the patterns are drawn out, correct them by turning the dial in the "-" direction. [] If the patterns are uneven when you sew on a particular fabric, adjust them by turning the dial in the "+" direction. [] [] J Reverse Stitch Control S Press the stitch control to sew in reverse. 36 Adjusting Stretch Stitch Balance f _1_Feed balancing dial If the stretch stitch patterns are compressed, correct them with the feed balancing dial_l_.
Owners Manual
Page 50
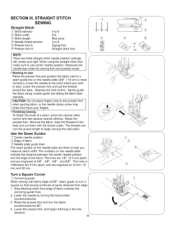
... seam guide, to turn the fabric counterclockwise 90 ° . 4. l Turn a Square Corner ? (1_C' ornering guide When sewing with the thread cutter. Gently guide the fabric along a seam guide line letting the fabric feed naturally. Lower the needle to start... are 5 mm apart, and are engraved at 3/8", 4/8", 5/8", and 6/8". Lower the needle by turning the hand wheel counterclockwise. 3. STRAIGHT STITCH SEWING Straight Stitch _I)Stitch selector: 4to6 ,fl X III III _p 0--1 --2--3-4-5_6,5 STRETCH V--0_1_2--3--4 WIDTH $2"_ LENGTH _2_Stitch width: 6.5 '_3_Stitch ...
... seam guide, to turn the fabric counterclockwise 90 ° . 4. l Turn a Square Corner ? (1_C' ornering guide When sewing with the thread cutter. Gently guide the fabric along a seam guide line letting the fabric feed naturally. Lower the needle to start... are 5 mm apart, and are engraved at 3/8", 4/8", 5/8", and 6/8". Lower the needle by turning the hand wheel counterclockwise. 3. STRAIGHT STITCH SEWING Straight Stitch _I)Stitch selector: 4to6 ,fl X III III _p 0--1 --2--3-4-5_6,5 STRETCH V--0_1_2--3--4 WIDTH $2"_ LENGTH _2_Stitch width: 6.5 '_3_Stitch ...

Owners Manual
Page 52
... foot A: Zigzag foot _6_P' resser foot H: Straight foot '\ j, NOTE: When using the straight stitch foot, make sure to the desired width and tighten the screw. [] Sew, guiding the quilter over the previous row of garments and keeps /- Slide the quilter in the hole to use the center needle position, otherwise the...
... foot A: Zigzag foot _6_P' resser foot H: Straight foot '\ j, NOTE: When using the straight stitch foot, make sure to the desired width and tighten the screw. [] Sew, guiding the quilter over the previous row of garments and keeps /- Slide the quilter in the hole to use the center needle position, otherwise the...
Owners Manual
Page 54
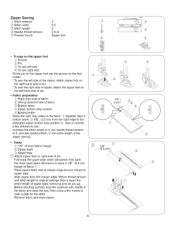
...margin of zipper tape, removing pins as you go. Fold back the upper layer seam allowance. Sew a seam the entire length of fabric _1_,. Before reaching pull-tab, stop the machine with margin edge. Sew a bottom seam ,_3_5/8" (2.2 cm) from the right edge to the estimated zipper bottom stop ...in reverse a few inches to clear a path for the stitch. Return thread tension and stitch length to 0, and sew basting stitch _5_t.he entire length of the zipper sewing. • Tosew / _1_1/8" (0.4cm) fabric margin [] _2_Zipper teeth _3_Zipper tape [] Attach zipper foot on the ...
...margin of zipper tape, removing pins as you go. Fold back the upper layer seam allowance. Sew a seam the entire length of fabric _1_,. Before reaching pull-tab, stop the machine with margin edge. Sew a bottom seam ,_3_5/8" (2.2 cm) from the right edge to the estimated zipper bottom stop ...in reverse a few inches to clear a path for the stitch. Return thread tension and stitch length to 0, and sew basting stitch _5_t.he entire length of the zipper sewing. • Tosew / _1_1/8" (0.4cm) fabric margin [] _2_Zipper teeth _3_Zipper tape [] Attach zipper foot on the ...
Owners Manual
Page 56
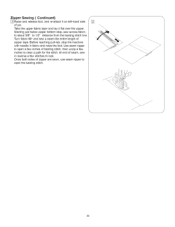
Starting just below zipper bottom stop the machine with needle in reverse a few inches of seam, sew in fabric and raise the foot. At end of basting stitch, then unzip a few inches to 1/2" distance from the basting stitch line. Before reaching pull-tab, stop , sew across fabric to about 3/8" to clear a path for ... and lay it on left-hand side of zipper tape. Use seam ripper to lock. Zipper Sewing (Continued) []Raise and release foot, and re-attach it flat over the zipper. Turn fabric 90 ° and sew a seam the entire length of pin. Once both sides of zipper are sewn, use seam...
Starting just below zipper bottom stop the machine with needle in reverse a few inches of seam, sew in fabric and raise the foot. At end of basting stitch, then unzip a few inches to 1/2" distance from the basting stitch line. Before reaching pull-tab, stop , sew across fabric to about 3/8" to clear a path for ... and lay it on left-hand side of zipper tape. Use seam ripper to lock. Zipper Sewing (Continued) []Raise and release foot, and re-attach it flat over the zipper. Turn fabric 90 ° and sew a seam the entire length of pin. Once both sides of zipper are sewn, use seam...


