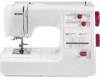
Owners Manual
Page 2
...it has been dropped or damaged, or dropped into any opening blocked. IMPORTANT SAFETY INSTRUCTIONS When using an electrical appliance, basic safety precautions should never be followed, including the following: Read all instructions before using and before replacing a sewing machine bulb. Replace ...THESE INSTRUCTIONS Close attention is required around the sewing machine needle. 11. Always unplug this sewing machine if it has a damaged cord or plug, if it is being used as threading the needle, changing the needle, threading the bobbin, changing the presser foot, and the like...
...it has been dropped or damaged, or dropped into any opening blocked. IMPORTANT SAFETY INSTRUCTIONS When using an electrical appliance, basic safety precautions should never be followed, including the following: Read all instructions before using and before replacing a sewing machine bulb. Replace ...THESE INSTRUCTIONS Close attention is required around the sewing machine needle. 11. Always unplug this sewing machine if it has a damaged cord or plug, if it is being used as threading the needle, changing the needle, threading the bobbin, changing the presser foot, and the like...
Owners Manual
Page 11
...• Additional spool pin 20 • Bobbin winding 22 • Removing the hook cover plate 24 • Inserting the bobbin 24 Threading the Machine 26-28 • Threading the machine 26 • Needle threader 26 • Drawing up bobbin thread 28 Adjust the Needle Thread Tension for... sew 42-44 To Drop or Raise the Feed Dogs 46 Darning 46 SECTION IV. ZIGZAG STITCH SEWING Basic Zigzag 48 Satin Stitching 48 Monogramming 50 Applique 50 Bar Tacking 52 Embroidery 52 Button Sewing 54 Overcasting 54 SECTION V. NAME OF PARTS Cabinets and Sewing Machine Carrying...
...• Additional spool pin 20 • Bobbin winding 22 • Removing the hook cover plate 24 • Inserting the bobbin 24 Threading the Machine 26-28 • Threading the machine 26 • Needle threader 26 • Drawing up bobbin thread 28 Adjust the Needle Thread Tension for... sew 42-44 To Drop or Raise the Feed Dogs 46 Darning 46 SECTION IV. ZIGZAG STITCH SEWING Basic Zigzag 48 Satin Stitching 48 Monogramming 50 Applique 50 Bar Tacking 52 Embroidery 52 Button Sewing 54 Overcasting 54 SECTION V. NAME OF PARTS Cabinets and Sewing Machine Carrying...
Owners Manual
Page 16
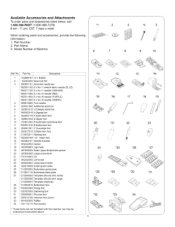
Model Number of Machine 6 7 8 9 10 Ref. Part Name 3. No. Description *102869107 10 x Bobbin 102403202 Spool pin felt 650807101 Assorted needle set *993001100 5 x No.11 stretch fabric needle (BLUE) *993011100 *993011400 *993011600 5 x No.ll needle (ORANGE) 5 x No.14 ... *200003009 Gathering foot *200005001 Pin-tuck foot '. *200013105 Hemmer foot (2mm) ; *941620000 Ruffler • 031119115 Foot control * These items are not furnished with the machine, but may be ordered per instructions above• 12 13 "14 .16 17 18 19 2O "21 22 23 // // 24 *25 *26 *27 *29 *...
Model Number of Machine 6 7 8 9 10 Ref. Part Name 3. No. Description *102869107 10 x Bobbin 102403202 Spool pin felt 650807101 Assorted needle set *993001100 5 x No.11 stretch fabric needle (BLUE) *993011100 *993011400 *993011600 5 x No.ll needle (ORANGE) 5 x No.14 ... *200003009 Gathering foot *200005001 Pin-tuck foot '. *200013105 Hemmer foot (2mm) ; *941620000 Ruffler • 031119115 Foot control * These items are not furnished with the machine, but may be ordered per instructions above• 12 13 "14 .16 17 18 19 2O "21 22 23 // // 24 *25 *26 *27 *29 *...
Owners Manual
Page 32
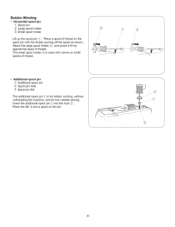
... the spool of thread on the pin. 20 Place the felt _3_and a spool on the spool pin with narrow or small spools of thread. [\lji / / ,. Bobbin Winding • Horizontal spool pin _(1_S'pool pin (2_,Large spool holder _3_Small spool holder f / / Lift up the spool pin \12. The small spool holder_3_... spool pin_l_, into the hole _Z'. j Additional spool pin \/Additional spool pin _2_Spool pin hole ,(3_S, pool pin felt The additional spool pin _1_is for bobbin winding, without unthreading the machine, and for twin needle sewing. Place a spool of thread.
... the spool of thread on the pin. 20 Place the felt _3_and a spool on the spool pin with narrow or small spools of thread. [\lji / / ,. Bobbin Winding • Horizontal spool pin _(1_S'pool pin (2_,Large spool holder _3_Small spool holder f / / Lift up the spool pin \12. The small spool holder_3_... spool pin_l_, into the hole _Z'. j Additional spool pin \/Additional spool pin _2_Spool pin hole ,(3_S, pool pin felt The additional spool pin _1_is for bobbin winding, without unthreading the machine, and for twin needle sewing. Place a spool of thread.
Owners Manual
Page 34
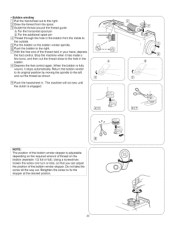
...machine will not sew until the clutch is engaged. [] °Z!........ [] ......... []% %% [] J NOTE: / The position of thread on the bobbin (example: 1/2 full or full). Do not take the screw all the way out. Stop the machine when it stops automatically. When the bobbin is adjustable depending on the required amount of the bobbin... position by moving the spindle to the left, and cut the thread close to the hole in the bobbin. [] Depress the foot control again. • Bobbin winding f [] Pull the handwheel out to the right. [] Draw the thread from the spool. []...
...machine will not sew until the clutch is engaged. [] °Z!........ [] ......... []% %% [] J NOTE: / The position of thread on the bobbin (example: 1/2 full or full). Do not take the screw all the way out. Stop the machine when it stops automatically. When the bobbin is adjustable depending on the required amount of the bobbin... position by moving the spindle to the left, and cut the thread close to the hole in the bobbin. [] Depress the foot control again. • Bobbin winding f [] Pull the handwheel out to the right. [] Draw the thread from the spool. []...

Owners Manual
Page 36
...plate release button _l_'to the right, / and remove the cover plate _2_. / J Inserting the bobbin f \ LI_ End of thread (2_ Notch [] (3_.Notch (47Threading diagram [] Place a bobbin in the bobbin holder with the thread running off counterclockwise. / / [] Guide the thread into notch _%. Draw the...the tension spring blades. [] Continue to the diagram _4_,shownon the hook cover plate. Pull out about 6" (15.0 cm) of [] the bobbin holder. Check the threading by [] referring to draw the thread lightly until the thread slips [] into notch _2_,onthe front side of thread....
...plate release button _l_'to the right, / and remove the cover plate _2_. / J Inserting the bobbin f \ LI_ End of thread (2_ Notch [] (3_.Notch (47Threading diagram [] Place a bobbin in the bobbin holder with the thread running off counterclockwise. / / [] Guide the thread into notch _%. Draw the...the tension spring blades. [] Continue to the diagram _4_,shownon the hook cover plate. Pull out about 6" (15.0 cm) of [] the bobbin holder. Check the threading by [] referring to draw the thread lightly until the thread slips [] into notch _2_,onthe front side of thread....

Owners Manual
Page 40
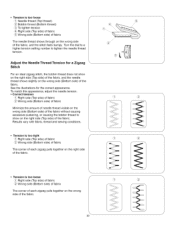
Adjust the Needle Thread Tension for one complete turn. [] Bring the bobbin thread up by pulling the needle thread [] up bobbin thread [] Raise the presser foot. Results depend on the wrong side of fabric, as illustrated (magnified to loosen the needle thread tension. ,. When ... dial to a lower tension setting number to show detail). If you look at the top and bottom of the fabric - j 28 number of fabric The bobbin thread shows through on : - • Drawing up . [_Pull both threads 4" to 6" (10.0 to 15.0 cm) under and behind the presser foot. type of stitch...
Adjust the Needle Thread Tension for one complete turn. [] Bring the bobbin thread up by pulling the needle thread [] up bobbin thread [] Raise the presser foot. Results depend on the wrong side of fabric, as illustrated (magnified to loosen the needle thread tension. ,. When ... dial to a lower tension setting number to show detail). If you look at the top and bottom of the fabric - j 28 number of fabric The bobbin thread shows through on : - • Drawing up . [_Pull both threads 4" to 6" (10.0 to 15.0 cm) under and behind the presser foot. type of stitch...
Owners Manual
Page 42
... the fabric without causing excessive puckering, or causing the bobbin thread to tighten the needle thread tension. Results vary with fabric, thread and sewing conditions. See the illustrations for a Zigzag Stitch For an ideal zigzag stitch, the bobbin thread does not show on the wrong side (Bottom ... of each zigzag pulls together on the wrong side of the fabric. J Tension is too loose f _1_Needle thread (Top thread) {2_ Bobbin thread (Bottom thread) _3_To tighten tension _4_Right side (Top side) of fabric ,_5_Wrong side (Bottom side) of fabric The needle thread shows...
... the fabric without causing excessive puckering, or causing the bobbin thread to tighten the needle thread tension. Results vary with fabric, thread and sewing conditions. See the illustrations for a Zigzag Stitch For an ideal zigzag stitch, the bobbin thread does not show on the wrong side (Bottom ... of each zigzag pulls together on the wrong side of the fabric. J Tension is too loose f _1_Needle thread (Top thread) {2_ Bobbin thread (Bottom thread) _3_To tighten tension _4_Right side (Top side) of fabric ,_5_Wrong side (Bottom side) of fabric The needle thread shows...
Owners Manual
Page 64
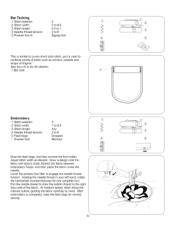
... with tailor's chalk. Pull the needle thread to draw the bobbin thread to 6 Dropped Remove f fJ-\ ) S_ _4_, Drop the feed dogs, and then remove the foot holder. After embroidery is used to engage the needle thread tension. Sew four (4) to six (6) stitches. _1_B' ar tack Embroidery _1_Stitch...feed dogs for one complete turn. Holding the needle thread in your left hand, rotate the handwheel counterclockwise for normal sewing. 52 0,--1 _--2--3=4=_5_6.5 WIDTH ) X J "x Stretch the fabric between embroidery hoops, and then place the fabric under the needle. BarTacking _1_S.
... with tailor's chalk. Pull the needle thread to draw the bobbin thread to 6 Dropped Remove f fJ-\ ) S_ _4_, Drop the feed dogs, and then remove the foot holder. After embroidery is used to engage the needle thread tension. Sew four (4) to six (6) stitches. _1_B' ar tack Embroidery _1_Stitch...feed dogs for one complete turn. Holding the needle thread in your left hand, rotate the handwheel counterclockwise for normal sewing. 52 0,--1 _--2--3=4=_5_6.5 WIDTH ) X J "x Stretch the fabric between embroidery hoops, and then place the fabric under the needle. BarTacking _1_S.
Owners Manual
Page 80
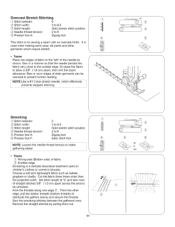
...older garments can be smocked. Choose a soft and lightweight fabric such as shown. Remove the straight stitches by pulling them out. Sew the smocking stitches between the gathered rows. Or place the fabric to distribute the gathers evenly and secure the threads. Overcast Stretch Stitching...,5 _m0i_--_l_2m3i4 STRETCH WIDTH ILENGTH This stitch is a delicate decorative treatment used when making swim wear, ski pants and other edge, pull the bobbin threads (bottom threads) to allow a 5/8" (1.6 cm) seam, then trim the seam allowance. It is used on children's clothes or women...
...older garments can be smocked. Choose a soft and lightweight fabric such as shown. Remove the straight stitches by pulling them out. Sew the smocking stitches between the gathered rows. Or place the fabric to distribute the gathers evenly and secure the threads. Overcast Stretch Stitching...,5 _m0i_--_l_2m3i4 STRETCH WIDTH ILENGTH This stitch is a delicate decorative treatment used when making swim wear, ski pants and other edge, pull the bobbin threads (bottom threads) to allow a 5/8" (1.6 cm) seam, then trim the seam allowance. It is used on children's clothes or women...
Owners Manual
Page 98
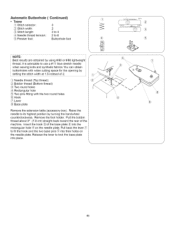
Automatic Buttonhole (Continued) • Tosew _!_'Stitch selector: 3 _2_S, titch width: 2 _3_Stitch length: 3 to 4
Automatic Buttonhole (Continued) • Tosew _!_'Stitch selector: 3 _2_S, titch width: 2 _3_Stitch length: 3 to 4

Owners Manual
Page 100
... to change gear positions. Insert the gear_7_of the base plate into the template guide slot (1_so that the guide block (2)fits into place. Place the bobbin and needle threads to the left side of thread. Release the catch to 10.0 cm) of the guide plate. Leave 3" to 4" (7.0 to lock the ...template into the center of the template_6_. Pull the bobbin thread up through the guide slot of the buttonhole guide plate by turning the handwheel counterclockwise while holding the needle thread.
... to change gear positions. Insert the gear_7_of the base plate into the template guide slot (1_so that the guide block (2)fits into place. Place the bobbin and needle threads to the left side of thread. Release the catch to 10.0 cm) of the guide plate. Leave 3" to 4" (7.0 to lock the ...template into the center of the template_6_. Pull the bobbin thread up through the guide slot of the buttonhole guide plate by turning the handwheel counterclockwise while holding the needle thread.
Owners Manual
Page 104
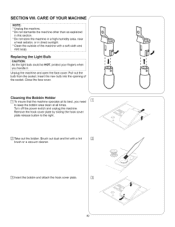
...bulb could be HOT, protect your fingers when you need to the right. [] Take out the bobbin. I I I Ii1 J [] Insert the bobbin and attach the hook cover plate. [] _ J 92 Unplug the machine and open the face cover. Remove the hook cover plate by sliding the hook cover plate release ... socket. Insert the new bulb into the opening of the machine with a lint [] brush or a vacuum cleaner. Close the face cover. Turn off the power switch and unplug the machine. I , Cleaning the Bobbin Holder [] To insure that the machine operates at all times. Brush out dust and lint with...
...bulb could be HOT, protect your fingers when you need to the right. [] Take out the bobbin. I I I Ii1 J [] Insert the bobbin and attach the hook cover plate. [] _ J 92 Unplug the machine and open the face cover. Remove the hook cover plate by sliding the hook cover plate release ... socket. Insert the new bulb into the opening of the machine with a lint [] brush or a vacuum cleaner. Close the face cover. Turn off the power switch and unplug the machine. I , Cleaning the Bobbin Holder [] To insure that the machine operates at all times. Brush out dust and lint with...

Owners Manual
Page 106
... next to the stopper(6_ in the hook race. _5_Line up the bobbin holder_2_ and remove it. [] ,,2)_Bobbin holder [] Brush out dust and lint inside the bobbin holder. One or two drops of oil is sufficient. Use quality sewing machine oil. 94 \\\\\\ J Clean [] the feed dogs _3_and hook race(4_with... a lint brush. In case the machine has not been used for a long period, oil it may ...
... next to the stopper(6_ in the hook race. _5_Line up the bobbin holder_2_ and remove it. [] ,,2)_Bobbin holder [] Brush out dust and lint inside the bobbin holder. One or two drops of oil is sufficient. Use quality sewing machine oil. 94 \\\\\\ J Clean [] the feed dogs _3_and hook race(4_with... a lint brush. In case the machine has not been used for a long period, oil it may ...
Owners Manual
Page 108
.... The bobbin is bent or blunt. 4. The needle is too fine for sewing stretch, very fine fabrics and synthetics. 5. The needle is bent or blunt. 3. The needle is not raised after the previous use . 6. The feed dog is too heavy for the fabric being used . 1. The machine is too... - 4:30 pro, CST, Monday - Lint has collected in the shuttle or the shuttle race. The threads were not drawn to the rear after "drop feed" sewing. 3. The needle is not threaded properly. 6. The needle thread is bent or blunt. 3. The feed dog is incorrectly inserted. 2. The needle is...
.... The bobbin is bent or blunt. 4. The needle is too fine for sewing stretch, very fine fabrics and synthetics. 5. The needle is bent or blunt. 3. The needle is not raised after the previous use . 6. The feed dog is too heavy for the fabric being used . 1. The machine is too... - 4:30 pro, CST, Monday - Lint has collected in the shuttle or the shuttle race. The threads were not drawn to the rear after "drop feed" sewing. 3. The needle is not threaded properly. 6. The needle thread is bent or blunt. 3. The feed dog is incorrectly inserted. 2. The needle is...


