Use and Care Guide
Page 2
.../Model Numbers 2 Important Safety Instructions 2-3 Kenmore Appliance Warranty 3 Protection Agreements 4 First Steps 5-6 Energy Saving Tips 6 Setting the Temperature Control ......... 6 Freezer Optional Features 7-9 Care and Cleaning 9-10 Power Failure / Freezer Failure 11 Troubleshooting Guide Sears Service Sears Canada... 970. Small objects are located either on the upper left exterior wall (chest models). If you are still dangerous - Use your old refrigerator or freezer, please follow the instructions below . Record Your Model and Serial Numbers Record...
.../Model Numbers 2 Important Safety Instructions 2-3 Kenmore Appliance Warranty 3 Protection Agreements 4 First Steps 5-6 Energy Saving Tips 6 Setting the Temperature Control ......... 6 Freezer Optional Features 7-9 Care and Cleaning 9-10 Power Failure / Freezer Failure 11 Troubleshooting Guide Sears Service Sears Canada... 970. Small objects are located either on the upper left exterior wall (chest models). If you are still dangerous - Use your old refrigerator or freezer, please follow the instructions below . Record Your Model and Serial Numbers Record...
Use and Care Guide
Page 5
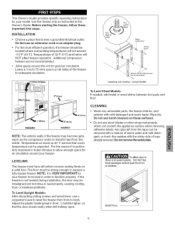
... be misaligned and not close and seal properly, DO NOT let food packages extend past the front of the freezer for adequate circulation. Upright Models 3" (75ram) To Level Chest Models: If needed, add metal or wood shims between foot pads and floor. [25mm) installation installation NOTE: The ... and wood base, use razor blades or other sharp instruments, which can scratch the appliance surface when removing adhesive labels. Before starting the freezer, follow these surfaces. For this Owner's Guide. Wipe dry. Do not remove the serial plate. _To allow enough space for air circulation...
... be misaligned and not close and seal properly, DO NOT let food packages extend past the front of the freezer for adequate circulation. Upright Models 3" (75ram) To Level Chest Models: If needed, add metal or wood shims between foot pads and floor. [25mm) installation installation NOTE: The ... and wood base, use razor blades or other sharp instruments, which can scratch the appliance surface when removing adhesive labels. Before starting the freezer, follow these surfaces. For this Owner's Guide. Wipe dry. Do not remove the serial plate. _To allow enough space for air circulation...
Use and Care Guide
Page 6
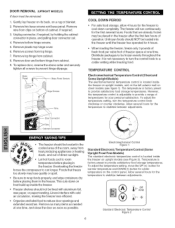
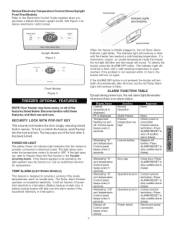
...as needed at one time. TEMPERATURE CONTROL Electromechanical Temperature Control (Chest and Some Upright Models) The electromechanical temperature control is adjustable to cool down on frost build-up inside the freezer on upright models, and on the left exterior wall on ... (t) button for the temperature to provide satisfactory food storage temperatures. Remove screws from cabinet. 9. The temperature is located inside the freezer on chest models (see Figure 2). This cuts down completely. off - Remove wire from cabinet. 8. Remove plastic top hinge cover. 6. ...
...as needed at one time. TEMPERATURE CONTROL Electromechanical Temperature Control (Chest and Some Upright Models) The electromechanical temperature control is adjustable to cool down on frost build-up inside the freezer on upright models, and on the left exterior wall on ... (t) button for the temperature to provide satisfactory food storage temperatures. Remove screws from cabinet. 9. The temperature is located inside the freezer on chest models (see Figure 2). This cuts down completely. off - Remove wire from cabinet. 8. Remove plastic top hinge cover. 6. ...
Use and Care Guide
Page 7
...even when the temperature control is designed to blink. The Temp. Control panel beeps every 5 seconds. Normal Operation Quick Freeze Freezer temperature too high Low/no battery None None Check power is initially plugged in the Troubleshooting Guide. Contact service technician. Delu×... within 12 hours, the buzzer will sound. OU[CK FREEZE 01t OFF FREEZER TEMP ALAI{M R_SET Upright Models Figure 3 Chest Models Figure 4 Chest Models__ J r Lights and SwJt_ J J upright Models When the freezer is connected. SECURITY LOCK WITH POP-OUT KEY This security lock fastens the...
...even when the temperature control is designed to blink. The Temp. Control panel beeps every 5 seconds. Normal Operation Quick Freeze Freezer temperature too high Low/no battery None None Check power is initially plugged in the Troubleshooting Guide. Contact service technician. Delu×... within 12 hours, the buzzer will sound. OU[CK FREEZE 01t OFF FREEZER TEMP ALAI{M R_SET Upright Models Figure 3 Chest Models Figure 4 Chest Models__ J r Lights and SwJt_ J J upright Models When the freezer is connected. SECURITY LOCK WITH POP-OUT KEY This security lock fastens the...
Use and Care Guide
Page 8
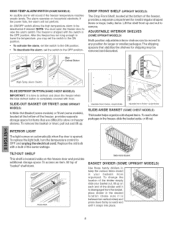
... the desired location (make sure it is time to keep the various items stored in the freezer, slide the basket aside, or lift out. Blue High-Temp Alarm Switch BLUE DEFROST BUTTON (SOME CHEST MODELS) iMPORTANT: it is between two vertical wires) and press down . Tilt-Out Shelf ...Slide-Aside Basket BASKET DIVIDER (SOME Use these handy dividers to defrost and clean the freezer when the blue defrost button is disengaged from the basket...
... the desired location (make sure it is time to keep the various items stored in the freezer, slide the basket aside, or lift out. Blue High-Temp Alarm Switch BLUE DEFROST BUTTON (SOME CHEST MODELS) iMPORTANT: it is between two vertical wires) and press down . Tilt-Out Shelf ...Slide-Aside Basket BASKET DIVIDER (SOME Use these handy dividers to defrost and clean the freezer when the blue defrost button is disengaged from the basket...
Use and Care Guide
Page 9
... have all four are firmly in order to remove frost. Never use a plastic scraper to custom-arrange a variety of differentsized storage bins in your chest freezer. CHEST DiViDER (SOME CHEST MODELS) Use these clever dividers to remove frost. Use the peeln-stick labels found in the bottom of your literature packet to help to...
... have all four are firmly in order to remove frost. Never use a plastic scraper to custom-arrange a variety of differentsized storage bins in your chest freezer. CHEST DiViDER (SOME CHEST MODELS) Use these clever dividers to remove frost. Use the peeln-stick labels found in the bottom of your literature packet to help to...
Use and Care Guide
Page 10
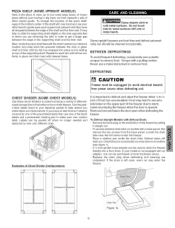
...surfaces of less than three weeks. Check pan occasionally so water does not overflow. Long Vacations: if the freezer will drain out. CLEANING THE iNSiDE To Defrost Chest Models with the baking soda solution mentioned above, or mild detergent and warm water. A _/2inch garden ...this procedure is left open while on any electrical parts. Also protect outside drain plug (see figure 4). After defrosting, wash inside the freezer (see figure 2). Do not wash removable parts in a dishwasher. Remove the towels and/or newspapers. Defrost water will not be used...
...surfaces of less than three weeks. Check pan occasionally so water does not overflow. Long Vacations: if the freezer will drain out. CLEANING THE iNSiDE To Defrost Chest Models with the baking soda solution mentioned above, or mild detergent and warm water. A _/2inch garden ...this procedure is left open while on any electrical parts. Also protect outside drain plug (see figure 4). After defrosting, wash inside the freezer (see figure 2). Do not wash removable parts in a dishwasher. Remove the towels and/or newspapers. Defrost water will not be used...


