Use and Care Guide
Page 2
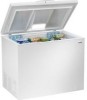
... instructions are located either on the upper left exterior wall (chest models). The serial plates are not meant to play. Serial Number: Purchase Date: READ ALL INSTRUCTIONS FREEZER. Read product labels for your model. Cartons covered with other... Safety Instructions 2-3 Kenmore Appliance Warranty 3 Protection Agreements 4 First Steps 5-6 Energy Saving Tips 6 Setting the Temperature Control ......... 6 Freezer Optional Features 7-9 Care and Cleaning 9-10 Power Failure / Freezer Failure 11 Troubleshooting Guide Sears Service Sears Canada Customers 12-13 14 14 READ ...
... instructions are located either on the upper left exterior wall (chest models). The serial plates are not meant to play. Serial Number: Purchase Date: READ ALL INSTRUCTIONS FREEZER. Read product labels for your model. Cartons covered with other... Safety Instructions 2-3 Kenmore Appliance Warranty 3 Protection Agreements 4 First Steps 5-6 Energy Saving Tips 6 Setting the Temperature Control ......... 6 Freezer Optional Features 7-9 Care and Cleaning 9-10 Power Failure / Freezer Failure 11 Troubleshooting Guide Sears Service Sears Canada Customers 12-13 14 14 READ ...
Use and Care Guide
Page 5
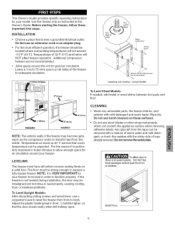
...-to transfer heat from the inside. Leave a 3 inch (75 mm) space on these important first steps. Upright Models 3" (75ram) To Level Chest Models: If needed, add metal or wood shims between foot pads and floor. [25mm) installation installation NOTE: The exterior walls of 32°F (0&#... this reason it is not leveled during installation, the door may become quite warm as instructed in hotter climates to support a fully loaded freezer. Do Not use harsh cleaners on all bottom corners resting firmly on a solid floor. Additional compressor heaters are not recommended. • ...
...-to transfer heat from the inside. Leave a 3 inch (75 mm) space on these important first steps. Upright Models 3" (75ram) To Level Chest Models: If needed, add metal or wood shims between foot pads and floor. [25mm) installation installation NOTE: The exterior walls of 32°F (0&#... this reason it is not leveled during installation, the door may become quite warm as instructed in hotter climates to support a fully loaded freezer. Do Not use harsh cleaners on all bottom corners resting firmly on a solid floor. Additional compressor heaters are not recommended. • ...
Use and Care Guide
Page 6
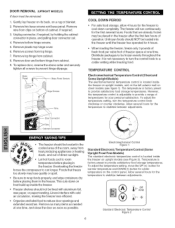
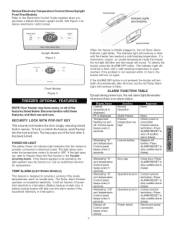
... reduce door openings and extended searches. Remove wire from clips on a rug or blanket. 2. TEMPERATURE CONTROL Electromechanical Temperature Control (Chest and Some Upright Models) The electromechanical temperature control is located inside the freezer on frost build-up inside the freezer on upright models, and on the left exterior wall on the control panel...
... reduce door openings and extended searches. Remove wire from clips on a rug or blanket. 2. TEMPERATURE CONTROL Electromechanical Temperature Control (Chest and Some Upright Models) The electromechanical temperature control is located inside the freezer on frost build-up inside the freezer on upright models, and on the left exterior wall on the control panel...
Use and Care Guide
Page 7
... will continue to blink. Display off audible alarm (beep). Reconnect power connection. OU[CK FREEZE 01t OFF FREEZER TEMP ALAI{M R_SET Upright Models Figure 3 Chest Models Figure 4 Chest Models__ J r Lights and SwJt_ J J upright Models When the freezer is turned to OFR If the light goes out, refer to stop audible alarm (beep). Become familiar...
... will continue to blink. Display off audible alarm (beep). Reconnect power connection. OU[CK FREEZE 01t OFF FREEZER TEMP ALAI{M R_SET Upright Models Figure 3 Chest Models Figure 4 Chest Models__ J r Lights and SwJt_ J J upright Models When the freezer is turned to OFR If the light goes out, refer to stop audible alarm (beep). Become familiar...
Use and Care Guide
Page 8
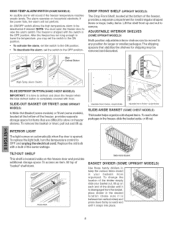
...discarded. INTERIOR LIGHT The light comes on household electricity. Replace the old bulb with a bulb of "basket" shelf down firmly on the freezer door and provides additional storage space. UPRIGHT MODELS) _iill iii_i Tilt-Out Shelf Slide-Aside Basket BASKET DIVIDER (SOME Use these handy dividers ...the OFF position. Blue High-Temp Alarm Switch BLUE DEFROST BUTTON (SOME CHEST MODELS) iMPORTANT: it is opened. To remove the basket or trivet, pull out and lift up and out to store on freezer shelves. The alarm operates on automatically when the door is time to ...
...discarded. INTERIOR LIGHT The light comes on household electricity. Replace the old bulb with a bulb of "basket" shelf down firmly on the freezer door and provides additional storage space. UPRIGHT MODELS) _iill iii_i Tilt-Out Shelf Slide-Aside Basket BASKET DIVIDER (SOME Use these handy dividers ...the OFF position. Blue High-Temp Alarm Switch BLUE DEFROST BUTTON (SOME CHEST MODELS) iMPORTANT: it is opened. To remove the basket or trivet, pull out and lift up and out to store on freezer shelves. The alarm operates on automatically when the door is time to ...
Use and Care Guide
Page 9
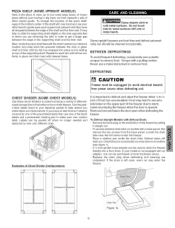
...A V2inch garden hose adapter can be cleaned occasionally. Figure la Next, locate the pizza shelf beneath the shelf nearest your chest freezer. BETWEEN DEFROSTINGS To avoid frequent defrosting, occasionally use a metal instrument to remove frost. Never use a plastic scraper to remove frost. Examples ...the shelf with Defrost Drain: Remove the drain plug on top of frost has accumulated. CHEST DiViDER (SOME CHEST MODELS) Use these clever dividers to warm, moist air entering the freezer when the door is not equipped with a base panel, first remove the two screws from...
...A V2inch garden hose adapter can be cleaned occasionally. Figure la Next, locate the pizza shelf beneath the shelf nearest your chest freezer. BETWEEN DEFROSTINGS To avoid frequent defrosting, occasionally use a metal instrument to remove frost. Never use a plastic scraper to remove frost. Examples ...the shelf with Defrost Drain: Remove the drain plug on top of frost has accumulated. CHEST DiViDER (SOME CHEST MODELS) Use these clever dividers to warm, moist air entering the freezer when the door is not equipped with a base panel, first remove the two screws from...
Use and Care Guide
Page 10
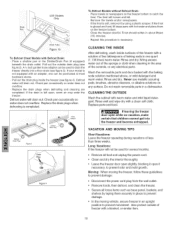
...months: • Remove all loose items such as base panel, baskets, and shelves by using a plastic scraper. CLEANING THE iNSiDE To Defrost Chest Models with a clean soft cloth. Wash the removable parts and door basket with a blanket, or similar item. 10 Drain Pan U09 Models...: Place towels or newspapers on vacation, make Hose certain that children cannot get into a floor drain (see figure 3). Moving: When moving the freezer, follow these guidelines to prevent damage: Figure 4 • Disconnect the power cord plug from the wall outlet. • Remove foods, then defrost...
...months: • Remove all loose items such as base panel, baskets, and shelves by using a plastic scraper. CLEANING THE iNSiDE To Defrost Chest Models with a clean soft cloth. Wash the removable parts and door basket with a blanket, or similar item. 10 Drain Pan U09 Models...: Place towels or newspapers on vacation, make Hose certain that children cannot get into a floor drain (see figure 3). Moving: When moving the freezer, follow these guidelines to prevent damage: Figure 4 • Disconnect the power cord plug from the wall outlet. • Remove foods, then defrost...


