Instructions
Page 3
...to use the Monitor correctly. INSTRUCTIONS Model GM-V42UG GM-V42UB Thank you know how to the GM-V42UG and GM-V42UB. The ...diagnostic Indication 39 Specifications 40 1 Refer to read this JVC Monitor. Be sure to this manual where the user can see...Picture Quality 16 • Adjusting the Screen Size and Position 17 • Adjusting the Color Temperature 19 • Adjusting the White Balance 19 • Changing the Aspect Ratio 21 • Setting the Receivable Signal Types 21 • Setting the COMPONENT/RGB B Input 22 • Changing the Resistance of EMC: GM-V42UG...
...to use the Monitor correctly. INSTRUCTIONS Model GM-V42UG GM-V42UB Thank you know how to the GM-V42UG and GM-V42UB. The ...diagnostic Indication 39 Specifications 40 1 Refer to read this JVC Monitor. Be sure to this manual where the user can see...Picture Quality 16 • Adjusting the Screen Size and Position 17 • Adjusting the Color Temperature 19 • Adjusting the White Balance 19 • Changing the Aspect Ratio 21 • Setting the Receivable Signal Types 21 • Setting the COMPONENT/RGB B Input 22 • Changing the Resistance of EMC: GM-V42UG...
Instructions
Page 9
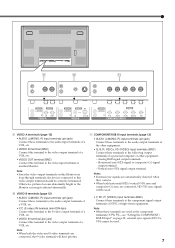
...• AUDIO (L/MONO, R) input terminals (pin jack) Connect these terminals to the following output terminals of another Monitor. Note: • Since the video output terminals on this Monitor are used as the component terminals (Y, Pb, Pr)-see "Setting the COMPONENT/ RGB B Input" on page 22...in. • When both the video and S-video terminals are connected, HD/VD sync signals will have priority. Otherwise, pictures become abnormally bright or the Monitor screen gets affected abnormally. Horizontal sync (HD) signal or composite (Cs) signal output terminal - Note: • When both...
...• AUDIO (L/MONO, R) input terminals (pin jack) Connect these terminals to the following output terminals of another Monitor. Note: • Since the video output terminals on this Monitor are used as the component terminals (Y, Pb, Pr)-see "Setting the COMPONENT/ RGB B Input" on page 22...in. • When both the video and S-video terminals are connected, HD/VD sync signals will have priority. Otherwise, pictures become abnormally bright or the Monitor screen gets affected abnormally. Horizontal sync (HD) signal or composite (Cs) signal output terminal - Note: • When both...

Instructions
Page 12
...be input to this Monitor: • VIDEO A and VIDEO B terminals accept - Computer signals (Preset) This Monitor has 18 preset video modes for their signal frequencies are higher than listed above is input, a part of the screen may become void or an unnecessary picture may appear. &#...acceptable range of frequencies, may not be displayed normally, depending on the signal type. • Depending on the connected equipment, the Monitor may become obscure for the most popular industrial standard, and the signals of equipment. to set "RGB/COMPO." Connections Precautions •...
...be input to this Monitor: • VIDEO A and VIDEO B terminals accept - Computer signals (Preset) This Monitor has 18 preset video modes for their signal frequencies are higher than listed above is input, a part of the screen may become void or an unnecessary picture may appear. &#...acceptable range of frequencies, may not be displayed normally, depending on the signal type. • Depending on the connected equipment, the Monitor may become obscure for the most popular industrial standard, and the signals of equipment. to set "RGB/COMPO." Connections Precautions •...

Instructions
Page 17
...aspect ratio 4:3, some portions (edges) of the original picture will reduce the burn-in aspect ratio from original picture. PANORAMIC: REGULAR size display is enlarged horizontally. Precautions for using the screen mode switching function • This Monitor features a screen mode switching (aspect ratio change ) ... can select only REGULAR and FULL. • The aspect ratio can only select FULL. If this Monitor, you want. To enjoy the original picture as TV programs, the picture may happen to be burned in addition to select the screen size. Notes: • When one ...
...aspect ratio 4:3, some portions (edges) of the original picture will reduce the burn-in aspect ratio from original picture. PANORAMIC: REGULAR size display is enlarged horizontally. Precautions for using the screen mode switching function • This Monitor features a screen mode switching (aspect ratio change ) ... can select only REGULAR and FULL. • The aspect ratio can only select FULL. If this Monitor, you want. To enjoy the original picture as TV programs, the picture may happen to be burned in addition to select the screen size. Notes: • When one ...

Instructions
Page 18
...STATUS DISPLAY ENTER: SELECT: EXIT: MENU 2 Press 5/∞ to move the cursor (3) to the item you want to adjust. Cursor (3) MAIN MENU PICTURE ADJ. Video Adjustments 2 / 3 MENU/EXIT 5 5 MENU INPUT POWER MENU INPUT POWER 5 / MENU RM-C579 REMOTE CONTROL UNIT OFF POWER ON ...34 and 36. You can be set for menu operations. • Refer also to "Menu Classifications" on the Monitor) to display the Main Menu. VIDEO A PICTURE ADJ. Adjusting the Picture Quality Picture quality can use menus. CONTRAST BRIGHT CHROMA PHASE SHARPNESS sub menu reset : +01 : 00 : -02 : ...
...STATUS DISPLAY ENTER: SELECT: EXIT: MENU 2 Press 5/∞ to move the cursor (3) to the item you want to adjust. Cursor (3) MAIN MENU PICTURE ADJ. Video Adjustments 2 / 3 MENU/EXIT 5 5 MENU INPUT POWER MENU INPUT POWER 5 / MENU RM-C579 REMOTE CONTROL UNIT OFF POWER ON ...34 and 36. You can be set for menu operations. • Refer also to "Menu Classifications" on the Monitor) to display the Main Menu. VIDEO A PICTURE ADJ. Adjusting the Picture Quality Picture quality can use menus. CONTRAST BRIGHT CHROMA PHASE SHARPNESS sub menu reset : +01 : 00 : -02 : ...

Instructions
Page 19
... to adjust both the size and position alternately to adjust to the appropriate size. 1 Press MENU/EXIT (or MENU on the Monitor) to display the Sub Menu. Cursor (3) MAIN MENU PICTURE ADJ. Item Adjustment range H (horizontal) SIZE*1 -40 to +40 H POSITION*1 Varies depending on other settings V (vertical)...adjustable range will be reduced. *2 DOT CLOCK is normal, but can be distorted. Note: • During size and position adjustments, the Monitor screen may be stored for CONTRAST appears on the screen. To make an adjustment while viewing the adjustment bar" on the next page. ...
... to adjust both the size and position alternately to adjust to the appropriate size. 1 Press MENU/EXIT (or MENU on the Monitor) to display the Sub Menu. Cursor (3) MAIN MENU PICTURE ADJ. Item Adjustment range H (horizontal) SIZE*1 -40 to +40 H POSITION*1 Varies depending on other settings V (vertical)...adjustable range will be reduced. *2 DOT CLOCK is normal, but can be distorted. Note: • During size and position adjustments, the Monitor screen may be stored for CONTRAST appears on the screen. To make an adjustment while viewing the adjustment bar" on the next page. ...

Instructions
Page 21
...can move the cursor (3) to "COLOR TEMP." 5 Press 2/3 to make the screen become reddish. 6 Press MENU/EXIT (or MENU on the Monitor) twice to exit from the menu operations. Adjusting the Color Temperature The adjusted setting applies to all inputs. 1 Press MENU/EXIT (or MENU on... display the Main Menu. Notes: • Adjustable range will vary among the Monitors. • "MAX" may appear soon after you press the button, the color temperature alternates between "HIGH" and "LOW." Cursor (3) MAIN MENU PICTURE ADJ. reset : HIGH* : PANORAMIC : AUTO : RGB : HIGH ADJUST: SELECT: EXIT: MENU...
...can move the cursor (3) to "COLOR TEMP." 5 Press 2/3 to make the screen become reddish. 6 Press MENU/EXIT (or MENU on the Monitor) twice to exit from the menu operations. Adjusting the Color Temperature The adjusted setting applies to all inputs. 1 Press MENU/EXIT (or MENU on... display the Main Menu. Notes: • Adjustable range will vary among the Monitors. • "MAX" may appear soon after you press the button, the color temperature alternates between "HIGH" and "LOW." Cursor (3) MAIN MENU PICTURE ADJ. reset : HIGH* : PANORAMIC : AUTO : RGB : HIGH ADJUST: SELECT: EXIT: MENU...
Instructions
Page 23
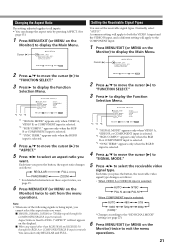
.... (See page 15.) 1 Press MENU/EXIT (or MENU on the Monitor) to select an aspect ratio you want . Cursor (3) MAIN MENU PICTURE ADJ. A common setting will apply to display the Function Selection Menu. Cursor (3) MAIN MENU PICTURE ADJ. SIZE/POSITION ADJ. appears only when the RGB B input is ...selected. 4 Press 5/∞ to move the cursor (3) to "FUNCTION SELECT." 3 Press 3 to both the VIDEO A input and the VIDEO B input, and a different setting will not appear on the Monitor) to display the...
.... (See page 15.) 1 Press MENU/EXIT (or MENU on the Monitor) to select an aspect ratio you want . Cursor (3) MAIN MENU PICTURE ADJ. A common setting will apply to display the Function Selection Menu. Cursor (3) MAIN MENU PICTURE ADJ. SIZE/POSITION ADJ. appears only when the RGB B input is ...selected. 4 Press 5/∞ to move the cursor (3) to "FUNCTION SELECT." 3 Press 3 to both the VIDEO A input and the VIDEO B input, and a different setting will not appear on the Monitor) to display the...
Instructions
Page 24
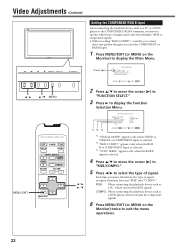
...PC, which can emit the RGB signals. Each time you select the COMPONENT or RGB B input. 1 Press MENU/EXIT (or MENU on the Monitor) twice to exit the menu operations. 22 SYNC TERM. appears only when the RGB B or COMPONENT input is selected. *2 "RGB/COMPO." ..., which can emit the component signals. 6 Press MENU/EXIT (or MENU on the MENU INPUT POWER Monitor) to display the Main Menu. 2 / 3 MENU/EXIT MENU INPUT POWER Cursor (3) MAIN MENU PICTURE ADJ. Video Adjustments (Continued) Setting the COMPONENT/RGB B Input After connecting the playback device such as ...
...PC, which can emit the RGB signals. Each time you select the COMPONENT or RGB B input. 1 Press MENU/EXIT (or MENU on the Monitor) twice to exit the menu operations. 22 SYNC TERM. appears only when the RGB B or COMPONENT input is selected. *2 "RGB/COMPO." ..., which can emit the component signals. 6 Press MENU/EXIT (or MENU on the MENU INPUT POWER Monitor) to display the Main Menu. 2 / 3 MENU/EXIT MENU INPUT POWER Cursor (3) MAIN MENU PICTURE ADJ. Video Adjustments (Continued) Setting the COMPONENT/RGB B Input After connecting the playback device such as ...

Instructions
Page 25
Change the setting to LOW when you use a long connecting cord and the picture flickers and blurs on the screen. 1 Press MENU/EXIT (or MENU on the Monitor) twice to exit the menu operations. 2 Press 5/∞ to move the cursor (3) to select the terminal resistance. FUNCTION ...Main Menu. LOW: When using a long connecting cord and the picture flickering and blurring on the screen. 6 Press MENU/EXIT (or MENU on the Monitor) to display the Function Selection Menu. *1 *2 *3 FUNCTION SELECT COLOR TEMP. Cursor (3) MAIN MENU PICTURE ADJ. SYNC TERM. "YES" then key. HIGH is selected....
Change the setting to LOW when you use a long connecting cord and the picture flickers and blurs on the screen. 1 Press MENU/EXIT (or MENU on the Monitor) twice to exit the menu operations. 2 Press 5/∞ to move the cursor (3) to select the terminal resistance. FUNCTION ...Main Menu. LOW: When using a long connecting cord and the picture flickering and blurring on the screen. 6 Press MENU/EXIT (or MENU on the Monitor) to display the Function Selection Menu. *1 *2 *3 FUNCTION SELECT COLOR TEMP. Cursor (3) MAIN MENU PICTURE ADJ. SYNC TERM. "YES" then key. HIGH is selected....
Instructions
Page 26
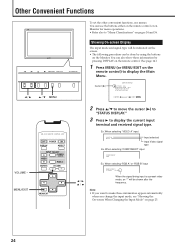
... (or MENU/EXIT on the remote control) to make these information by using the buttons on Monitor for menu operations. • Refer also to display the current input terminal and received signal type. Cursor (3) MAIN MENU PICTURE ADJ. When selecting "RGB A" or "RGB B" input RGB B (BNC) 37.9kHz 60.3Hz* When the... ENTER: SELECT: EXIT: MENU 5 5 VOLUME - Other Convenient Functions To set the other convenient functions, use the buttons either on the remote control or on the Monitor.
... (or MENU/EXIT on the remote control) to make these information by using the buttons on Monitor for menu operations. • Refer also to display the current input terminal and received signal type. Cursor (3) MAIN MENU PICTURE ADJ. When selecting "RGB A" or "RGB B" input RGB B (BNC) 37.9kHz 60.3Hz* When the... ENTER: SELECT: EXIT: MENU 5 5 VOLUME - Other Convenient Functions To set the other convenient functions, use the buttons either on the remote control or on the Monitor.
Instructions
Page 29
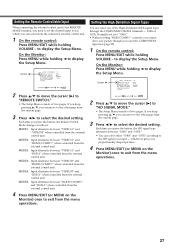
... one of the High-Definition (HD) signal types through the COMPONENT/RGB B terminals - 1080i or 1035i. whichever gives you proportionally shaped pictures. 4 Press MENU/EXIT (or MENU on the Monitor) once to display the Setup Menu. Each time you press the button, the Remote Switch Mode changes as follows: MODE1: Input alternates...
... one of the High-Definition (HD) signal types through the COMPONENT/RGB B terminals - 1080i or 1035i. whichever gives you proportionally shaped pictures. 4 Press MENU/EXIT (or MENU on the Monitor) once to display the Setup Menu. Each time you press the button, the Remote Switch Mode changes as follows: MODE1: Input alternates...
Instructions
Page 31
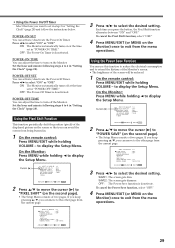
... Menu. SET-UP MENU 2/2 PIXEL SHIFT : OFF POWER SAVE : OFF COLOR-REVERSE REFRESH reset all reset HOUR METER x100h : 123 MODEL NAME : GM-V42UG ADJUST: SELECT: EXIT: MENU 3 Press 2/3 to display the Setup Menu. Using the Power Save Function You can move the cursor (3) to 6 in...: OFF COLOR-REVERSE REFRESH reset all reset HOUR METER x100h : 123 MODEL NAME : GM-V42UG ADJUST: SELECT: EXIT: MENU 3 Press 2/3 to extend the lifetime of the Monitor's screen. • The brightness of the displayed picture on at the time set in "Setting the Clock" (page 28) and follow the...
... Menu. SET-UP MENU 2/2 PIXEL SHIFT : OFF POWER SAVE : OFF COLOR-REVERSE REFRESH reset all reset HOUR METER x100h : 123 MODEL NAME : GM-V42UG ADJUST: SELECT: EXIT: MENU 3 Press 2/3 to display the Setup Menu. Using the Power Save Function You can move the cursor (3) to 6 in...: OFF COLOR-REVERSE REFRESH reset all reset HOUR METER x100h : 123 MODEL NAME : GM-V42UG ADJUST: SELECT: EXIT: MENU 3 Press 2/3 to extend the lifetime of the Monitor's screen. • The brightness of the displayed picture on at the time set in "Setting the Clock" (page 28) and follow the...
Instructions
Page 32
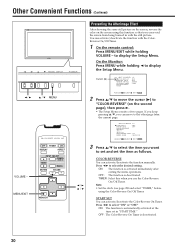
... SET-UP MENU 2/2 PIXEL SHIFT : OFF POWER SAVE : OFF COLOR-REVERSE REFRESH reset all reset HOUR METER x100h : 123 MODEL NAME : GM-V42UG ADJUST: SELECT: EXIT: MENU 3 Press 5/∞ to select the item you can move the cursor (3) to the other page from being burned ...INPUT POWER MENU INPUT POWER Preventing the Afterimage Effect After showing the same still picture on the screen, reverse the color on the second page), then press 3. • The Setup Menu consists of two pages. On the Monitor: Press MENU while holding VOLUME - Other Convenient Functions (Continued) 2 / ...
... SET-UP MENU 2/2 PIXEL SHIFT : OFF POWER SAVE : OFF COLOR-REVERSE REFRESH reset all reset HOUR METER x100h : 123 MODEL NAME : GM-V42UG ADJUST: SELECT: EXIT: MENU 3 Press 5/∞ to select the item you can move the cursor (3) to the other page from being burned ...INPUT POWER MENU INPUT POWER Preventing the Afterimage Effect After showing the same still picture on the screen, reverse the color on the second page), then press 3. • The Setup Menu consists of two pages. On the Monitor: Press MENU while holding VOLUME - Other Convenient Functions (Continued) 2 / ...
Instructions
Page 36
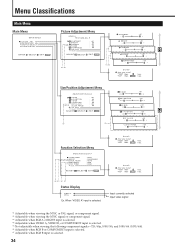
FUNCTION SELECT STATUS DISPLAY ENTER: SELECT: EXIT: MENU Picture Adjustment Menu VIDEO A PICTURE ADJ. CHROMA - PHASE - CLOCK PHASE - :+01 + :+01 + Function Selection Menu FUNCTION SELECT COLOR TEMP. reset : HIGH : PANORAMIC : AUTO : RGB : HIGH ADJUST... B input is selected. "YES" then "NO" then MENU key. key. *4 *5 *6 *7 Status Display VIDEO A NTSC Ex. Menu Classifications Main Menu Main Menu MAIN MENU PICTURE ADJ. Size/Position Adjustment Menu SIZE/POSITION ADJ. key. key. When "VIDEO A" input is selected. 34 SIZE/POSITION ADJ. SHARPNESS - :+01 + :+01 + :+01 + ...
FUNCTION SELECT STATUS DISPLAY ENTER: SELECT: EXIT: MENU Picture Adjustment Menu VIDEO A PICTURE ADJ. CHROMA - PHASE - CLOCK PHASE - :+01 + :+01 + Function Selection Menu FUNCTION SELECT COLOR TEMP. reset : HIGH : PANORAMIC : AUTO : RGB : HIGH ADJUST... B input is selected. "YES" then "NO" then MENU key. key. *4 *5 *6 *7 Status Display VIDEO A NTSC Ex. Menu Classifications Main Menu Main Menu MAIN MENU PICTURE ADJ. Size/Position Adjustment Menu SIZE/POSITION ADJ. key. key. When "VIDEO A" input is selected. 34 SIZE/POSITION ADJ. SHARPNESS - :+01 + :+01 + :+01 + ...
Instructions
Page 37
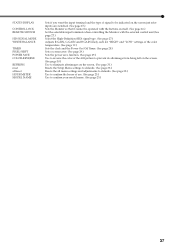
...is needed . Adjusts the color phase. SIZE/POSITION ADJ. : See page 17. Adjusts the vertical screen size. COLOR TEMP. PICTURE ADJ. (Picture adjustment): See page 16. Displays the fine adjustment bar. Adjusts the horizontal screen position. Displays the fine adjustment bar. ASPECT*4 ... B or COMPONENT input is selected. *7 Adjustable when RGB B input is reddish or bluish. Adjusts the color density of the picture. Resets the Picture Adjustment Menu settings to eliminate stripes or flickering. H.SIZE H. SIZE V.POSITION DOT CLOCK*3 CLOCK PHASE*3 sub menu reset Adjusts the...
...is needed . Adjusts the color phase. SIZE/POSITION ADJ. : See page 17. Adjusts the vertical screen size. COLOR TEMP. PICTURE ADJ. (Picture adjustment): See page 16. Displays the fine adjustment bar. Adjusts the horizontal screen position. Displays the fine adjustment bar. ASPECT*4 ... B or COMPONENT input is selected. *7 Adjustable when RGB B input is reddish or bluish. Adjusts the color density of the picture. Resets the Picture Adjustment Menu settings to eliminate stripes or flickering. H.SIZE H. SIZE V.POSITION DOT CLOCK*3 CLOCK PHASE*3 sub menu reset Adjusts the...
Instructions
Page 39
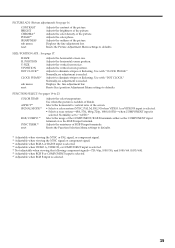
... on the screen just after inputs are switched. (See page 25.) Sets the Monitor so that it cannot be operated with the buttons on itself. (See page 26.) Set the ...selectable input terminals when controlling the Monitor with the external control unit (See page 27.) Select the High-Definition (HD) signal type. (See...See page 29.) Sets the power save function. (See page 29.) Use to reverse the color of the still picture to prevent its afterimage from being left on the screen. (See page 30.) Use to eliminate afterimages on the ...
... on the screen just after inputs are switched. (See page 25.) Sets the Monitor so that it cannot be operated with the buttons on itself. (See page 26.) Set the ...selectable input terminals when controlling the Monitor with the external control unit (See page 27.) Select the High-Definition (HD) signal type. (See...See page 29.) Sets the power save function. (See page 29.) Use to reverse the color of the still picture to prevent its afterimage from being left on the screen. (See page 30.) Use to eliminate afterimages on the ...

Instructions
Page 40
...(scanning frequency, etc.), and input the appropriate signal. •Adjust brightness on ? Symptom Probable cause Power is suddenly turned on the Monitor). •Connect the devices correctly. set correctly if using the COMPONENT/RGB B terminals? •Are input signals (scanning frequency, etc.)...•Set the Control Lock function to the Monitor are described here. between the remote control and remote sensor? •Is the Monitor too far away from the connected devices? •Is "RGB/COMPO." The picture is abnormally dark or bright. "TEMP. Troubleshooting ...
...(scanning frequency, etc.), and input the appropriate signal. •Adjust brightness on ? Symptom Probable cause Power is suddenly turned on the Monitor). •Connect the devices correctly. set correctly if using the COMPONENT/RGB B terminals? •Are input signals (scanning frequency, etc.)...•Set the Control Lock function to the Monitor are described here. between the remote control and remote sensor? •Is the Monitor too far away from the connected devices? •Is "RGB/COMPO." The picture is abnormally dark or bright. "TEMP. Troubleshooting ...

Instructions
Page 43
...AUDIO OUT terminals SPEAKER OUT (L/R) terminals GM-V42UG GM-V42UB D-sub 3-row 15-pin terminal x 1, Video signal: 0.7 V(p-p), 75 Ω G on transportation This Monitor is registered trademarks of Apple Computer,... change without notice. • IBM and IBM PC are available. correctly (see if other than JVC or JVC-authorized dealers. 41 Notice on sync: 1 V(p-p), 75 Ω (negative sync) Horizontal sync/Composite...and specifications are subject to see page 22). • For easy understanding, pictures and illustrations are shown by being emphasized, omitted or composed, and may be...
...AUDIO OUT terminals SPEAKER OUT (L/R) terminals GM-V42UG GM-V42UB D-sub 3-row 15-pin terminal x 1, Video signal: 0.7 V(p-p), 75 Ω G on transportation This Monitor is registered trademarks of Apple Computer,... change without notice. • IBM and IBM PC are available. correctly (see if other than JVC or JVC-authorized dealers. 41 Notice on sync: 1 V(p-p), 75 Ω (negative sync) Horizontal sync/Composite...and specifications are subject to see page 22). • For easy understanding, pictures and illustrations are shown by being emphasized, omitted or composed, and may be...
