Owners Manual
Page 3
... Interference (EMI) From Radio Wave Sources...22 Powered Wheelchair Electromagnetic Interference (EMI)...23 3 LABEL LOCATIONS 24 All Wheelchairs ...24 TDX® SP with Vent Tray Option ...25 Part No 1143155 3 Invacare® Formula™ CG Seating Wheelchair Tie-Down Restraints and Seat Restraints (Trro or TRBKTS 15 Powered Seating...16 Repair or Service Information...
... Interference (EMI) From Radio Wave Sources...22 Powered Wheelchair Electromagnetic Interference (EMI)...23 3 LABEL LOCATIONS 24 All Wheelchairs ...24 TDX® SP with Vent Tray Option ...25 Part No 1143155 3 Invacare® Formula™ CG Seating Wheelchair Tie-Down Restraints and Seat Restraints (Trro or TRBKTS 15 Powered Seating...16 Repair or Service Information...
Owners Manual
Page 8
... SPJ+ w/ACC Joysticks ...116 CMPJ™+, PSR+, PSF+ Joysticks or Displays ...118 NOTES 121 Invacare® Formula™ CG Seating 8 Part No 1143155 FDX with Elevating Seat Only 102 Using the Proper Batteries ...103 Battery Wiring Harness - TDX SP and TDX SR with Elevating Seat...93 Removing the Batteries ...93 Installing the Batteries...94 Actuator...
... SPJ+ w/ACC Joysticks ...116 CMPJ™+, PSR+, PSF+ Joysticks or Displays ...118 NOTES 121 Invacare® Formula™ CG Seating 8 Part No 1143155 FDX with Elevating Seat Only 102 Using the Proper Batteries ...103 Battery Wiring Harness - TDX SP and TDX SR with Elevating Seat...93 Removing the Batteries ...93 Installing the Batteries...94 Actuator...
Owners Manual
Page 17
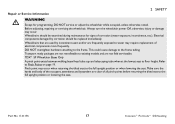
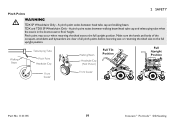
...occur. Wheelchairs should be examined during maintenance for programming, DO NOT service or adjust the wheelchair while occupied, unless otherwise noted. TDX® SP Wheelchair Bases Only A pinch point exists between walking beam/head tube cap and telescoping tube when at the lowest seat to ...the frame tubing. Part No 1143155 17 Invacare® Formula™ CG Seating Before adjusting, repairing or servicing the wheelchair, Always turn the wheelchair ...
...occur. Wheelchairs should be examined during maintenance for programming, DO NOT service or adjust the wheelchair while occupied, unless otherwise noted. TDX® SP Wheelchair Bases Only A pinch point exists between walking beam/head tube cap and telescoping tube when at the lowest seat to ...the frame tubing. Part No 1143155 17 Invacare® Formula™ CG Seating Before adjusting, repairing or servicing the wheelchair, Always turn the wheelchair ...
Owners Manual
Page 19
... Only - A pinch point exists between head tube cap and walking beam. TDX and TDX SP Wheelchairs Only - Pinch point may occur when returning the tilted seat to the full upright position. Make sure the hands and body of the occupant, ... Tube Pinch Point Headtube Cap Walking Beam Headtube Cap (Not Shown) Full Tilt Position Full Upright Position Front Caster Front Caster Part No 1143155 19 Invacare® Formula™ CG Seating
... Only - A pinch point exists between head tube cap and walking beam. TDX and TDX SP Wheelchairs Only - Pinch point may occur when returning the tilted seat to the full upright position. Make sure the hands and body of the occupant, ... Tube Pinch Point Headtube Cap Walking Beam Headtube Cap (Not Shown) Full Tilt Position Full Upright Position Front Caster Front Caster Part No 1143155 19 Invacare® Formula™ CG Seating
Owners Manual
Page 25
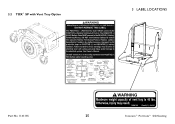
3.2 TDX® SP with Vent Tray Option 3 LABEL LOCATIONS Part No 1143155 25 Invacare® Formula™ CG Seating
3.2 TDX® SP with Vent Tray Option 3 LABEL LOCATIONS Part No 1143155 25 Invacare® Formula™ CG Seating
Owners Manual
Page 26
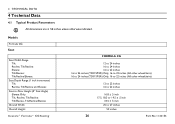
...Typical Product Parameters All dimensions are ± .50 inches unless otherwise indicated. Models Formula CG Seat Seat Width Range Tilt: Recline, Tilt/Recline: Elevate: Tilt/Elevate: Tilt/Recline/Elevate: Seat.../Recline/Elevate: Overall Width Overall Height: Invacare® Formula™ CG Seating FORMULA CG 12 to 24 inches 16 to 24 inches 16 to 22 inches 16 to 24 inches (TDX SP/SR) Only, 16 to 22 inches ...(All other wheelchairs) 16 to 24 inches (TDX SP/SR...
...Typical Product Parameters All dimensions are ± .50 inches unless otherwise indicated. Models Formula CG Seat Seat Width Range Tilt: Recline, Tilt/Recline: Elevate: Tilt/Elevate: Tilt/Recline/Elevate: Seat.../Recline/Elevate: Overall Width Overall Height: Invacare® Formula™ CG Seating FORMULA CG 12 to 24 inches 16 to 24 inches 16 to 22 inches 16 to 24 inches (TDX SP/SR) Only, 16 to 22 inches ...(All other wheelchairs) 16 to 24 inches (TDX SP/SR...
Owners Manual
Page 92
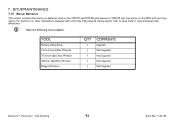
...batteries used on other wheelchairs equipped with a Formula CG powered seating system refer to base owner's manual shipped with vent tray option. For batteries on the TDX SP and TDX SR with elevate or TDX SP vent tray option or the FDX with wheelchair.... Have the following tools available: TOOL Battery Lifting Strap 1/2-inch (6 pt) Box Wrench 7/16-inch (6pt) Box Wrench 3/8-inch (6pt) Box Wrench Diagonal Cutters QTY 1 1 1 1 1 COMMENTS Supplied Not Supplied Not Supplied Not Supplied Not Supplied Invacare® Formula™ CG...
...batteries used on other wheelchairs equipped with a Formula CG powered seating system refer to base owner's manual shipped with vent tray option. For batteries on the TDX SP and TDX SR with elevate or TDX SP vent tray option or the FDX with wheelchair.... Have the following tools available: TOOL Battery Lifting Strap 1/2-inch (6 pt) Box Wrench 7/16-inch (6pt) Box Wrench 3/8-inch (6pt) Box Wrench Diagonal Cutters QTY 1 1 1 1 1 COMMENTS Supplied Not Supplied Not Supplied Not Supplied Not Supplied Invacare® Formula™ CG...
Owners Manual
Page 93
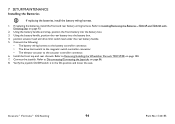
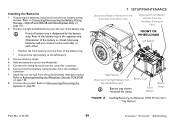
... • The drive limit switch from the magnetic switch controller connector. • The elevate actuator form the actuator controller connector. 6. TDX SP and TDX SR with Elevating Seat 7 SETUP/MAINTENANCE For this procedure, refer to elevate the seat, perform of the following : i. .... Refer to Removing/Installing the Seat Assembly (TDX SP and TDX SR with wheelchair. • If there is not available to remove the rear battery from the wheelchair. 11. Refer to Installing/Removing the Batteries - Part No 1143155 93 Invacare® Formula™ CG Seating
... • The drive limit switch from the magnetic switch controller connector. • The elevate actuator form the actuator controller connector. 6. TDX SP and TDX SR with Elevating Seat 7 SETUP/MAINTENANCE For this procedure, refer to elevate the seat, perform of the following : i. .... Refer to Removing/Installing the Seat Assembly (TDX SP and TDX SR with wheelchair. • If there is not available to remove the rear battery from the wheelchair. 11. Refer to Installing/Removing the Batteries - Part No 1143155 93 Invacare® Formula™ CG Seating
Owners Manual
Page 94
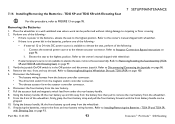
TDX SP and TDX SR with Elevating Seat on page 86. 8. Using the battery handle, position the rear battery into the battery box. 3. Verify the joystick On/Off switch ... switch lead under the rear battery handle. 5. Refer to Removing/Installing the Wheelchair Shrouds TDX SP/SR on page 100. 7. Install the front top and rear shrouds. Refer to Disconnecting/Connecting the Joysticks on page 93. 2. Invacare® Formula™ CG Seating 94 Part No 1143155 Connect the following: • The battery wiring harness...
TDX SP and TDX SR with Elevating Seat on page 86. 8. Using the battery handle, position the rear battery into the battery box. 3. Verify the joystick On/Off switch ... switch lead under the rear battery handle. 5. Refer to Removing/Installing the Wheelchair Shrouds TDX SP/SR on page 100. 7. Install the front top and rear shrouds. Refer to Disconnecting/Connecting the Joysticks on page 93. 2. Invacare® Formula™ CG Seating 94 Part No 1143155 Connect the following: • The battery wiring harness...
Owners Manual
Page 95
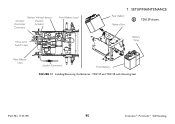
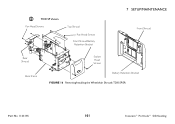
Battery Strap Rear Battery Lead Joystick Connector Front Battery FIGURE 13 Installing/Removing the Batteries - Battery Wiring Harness Actuator Elevator Controller Actuator Connector Front Battery Lead Drive Limit Switch Lead 7 SETUP/MAINTENANCE Rear Battery Battery Box TDX SP shown. TDX SP and TDX SR with Elevating Seat Part No 1143155 95 Invacare® Formula™ CG Seating
Battery Strap Rear Battery Lead Joystick Connector Front Battery FIGURE 13 Installing/Removing the Batteries - Battery Wiring Harness Actuator Elevator Controller Actuator Connector Front Battery Lead Drive Limit Switch Lead 7 SETUP/MAINTENANCE Rear Battery Battery Box TDX SP shown. TDX SP and TDX SR with Elevating Seat Part No 1143155 95 Invacare® Formula™ CG Seating

Owners Manual
Page 97
...mounting bolts and locknuts, secure the seat assembly to the seat frame. 4. TDX SP shown. Removing/Installing the Seat Assembly (TDX SP and TDX SR with Elevating Seat) Part No 1143155 97 Invacare® Formula™ CG Seating Remove the seat cushion. 3. Position the seat pan onto the seat frame... post. Install the seat cushion. 6. Mounting Bolts Seat Assembly Actuator Post Locknuts FIGURE 14 Removing/Installing the Seat Assembly (TDX SP and TDX SR with Elevating Seat) 7 SETUP/MAINTENANCE It is strongly recommended that two assistants lift the seat assembly when ...
...mounting bolts and locknuts, secure the seat assembly to the seat frame. 4. TDX SP shown. Removing/Installing the Seat Assembly (TDX SP and TDX SR with Elevating Seat) Part No 1143155 97 Invacare® Formula™ CG Seating Remove the seat cushion. 3. Position the seat pan onto the seat frame... post. Install the seat cushion. 6. Mounting Bolts Seat Assembly Actuator Post Locknuts FIGURE 14 Removing/Installing the Seat Assembly (TDX SP and TDX SR with Elevating Seat) 7 SETUP/MAINTENANCE It is strongly recommended that two assistants lift the seat assembly when ...
Owners Manual
Page 98
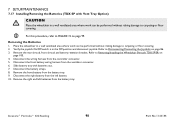
Refer to Removing/Installing the Wheelchair Shrouds TDX SP/SR on page 100. 4. Remove the rear shroud, front shroud and battery retention bracket. Disconnect the wiring harness from the ventilator connector. 6. Disconnect the front .... For this procedure, refer to carpeting or floor covering. 2. Disconnect the right battery from the battery tray. 9. Remove the right and left battery. 10. Invacare® Formula™ CG Seating 98 Part No 1143155 7 SETUP/MAINTENANCE 7.17 Installing/Removing the Batteries (TDX SP with batteries out. 7.
Refer to Removing/Installing the Wheelchair Shrouds TDX SP/SR on page 100. 4. Remove the rear shroud, front shroud and battery retention bracket. Disconnect the wiring harness from the ventilator connector. 6. Disconnect the front .... For this procedure, refer to carpeting or floor covering. 2. Disconnect the right battery from the battery tray. 9. Remove the right and left battery. 10. Invacare® Formula™ CG Seating 98 Part No 1143155 7 SETUP/MAINTENANCE 7.17 Installing/Removing the Batteries (TDX SP with batteries out. 7.
Owners Manual
Page 99
TDX SP and TDX SR with Vent Tray Option) Part No 1143155 99 Invacare® Formula™ CG Seating Connect battery straps. 4. Refer to the left batteries onto the rear of the battery tray. Front of battery tray is designated by the ...battery stop. Orientation of the battery tray. • Connect the right battery to Removing/Installing the Wheelchair Shrouds TDX SP/SR on...
TDX SP and TDX SR with Vent Tray Option) Part No 1143155 99 Invacare® Formula™ CG Seating Connect battery straps. 4. Refer to the left batteries onto the rear of the battery tray. Front of battery tray is designated by the ...battery stop. Orientation of the battery tray. • Connect the right battery to Removing/Installing the Wheelchair Shrouds TDX SP/SR on...

Owners Manual
Page 100
... retention bracket. 7 SETUP/MAINTENANCE 7.18 Removing/Installing the Wheelchair Shrouds TDX SP/SR For this procedure, refer to the base frame. 3. Remove the two socket head screws securing the front shroud/battery retention bracket to the base frame. 2. Invacare® Formula™ CG Seating 100 Part No 1143155 Remove the three pan head...
... retention bracket. 7 SETUP/MAINTENANCE 7.18 Removing/Installing the Wheelchair Shrouds TDX SP/SR For this procedure, refer to the base frame. 3. Remove the two socket head screws securing the front shroud/battery retention bracket to the base frame. 2. Invacare® Formula™ CG Seating 100 Part No 1143155 Remove the three pan head...
Owners Manual
Page 101
TDX SP shown. Pan Head Screws Top Shroud Pan Head Screws Front Shroud/Battery Retention Bracket 7 SETUP/MAINTENANCE Front Shroud Rear Shroud Base Frame Socket Head Screws Battery Retention Bracket FIGURE 16 Removing/Installing the Wheelchair Shrouds TDX SP/SR Part No 1143155 101 Invacare® Formula™ CG Seating
TDX SP shown. Pan Head Screws Top Shroud Pan Head Screws Front Shroud/Battery Retention Bracket 7 SETUP/MAINTENANCE Front Shroud Rear Shroud Base Frame Socket Head Screws Battery Retention Bracket FIGURE 16 Removing/Installing the Wheelchair Shrouds TDX SP/SR Part No 1143155 101 Invacare® Formula™ CG Seating

Owners Manual
Page 102
...injury or damage may result. 22NF batteries weigh 37 pounds each. 7 SETUP/MAINTENANCE 7.19 Connecting/Disconnecting the Battery Wiring Harness - TDX SP and TDX SR with batteries. When tightening the clamps, ALWAYS use , make sure all attaching hardware is OFF before performing these areas to...installation and battery replacement ALWAYS be done by a qualified technician. DO NOT tip the batteries. Pliers will not spill. Invacare® Formula™ CG Seating 102 Part No 1143155 Use proper lifting techniques (lift with a cracked or otherwise damaged case. It is battery ...
...injury or damage may result. 22NF batteries weigh 37 pounds each. 7 SETUP/MAINTENANCE 7.19 Connecting/Disconnecting the Battery Wiring Harness - TDX SP and TDX SR with batteries. When tightening the clamps, ALWAYS use , make sure all attaching hardware is OFF before performing these areas to...installation and battery replacement ALWAYS be done by a qualified technician. DO NOT tip the batteries. Pliers will not spill. Invacare® Formula™ CG Seating 102 Part No 1143155 Use proper lifting techniques (lift with a cracked or otherwise damaged case. It is battery ...
Owners Manual
Page 103
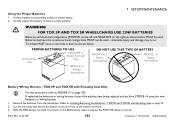
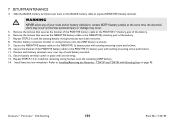
.../Post POSITIVE (+) Battery Terminal/Post Battery Wiring Harness - Refer to the battery terminals. 3. Part No 1143155 103 Invacare® Formula™ CG Seating If replacing the batteries or wiring harness, discard the existing item being replaced and perform STEPS 8-14 using the... to Installing/Removing the Batteries - Visually inspect the battery to ensure proper polarity: 7 SETUP/MAINTENANCE ƽ WARNING FOR TDX SP AND TDX SR WHEELCHAIRS USE 22NF BATTERIES Batteries with Elevating Seat on ground/flat surface as shown below . . Using the Proper Batteries...
.../Post POSITIVE (+) Battery Terminal/Post Battery Wiring Harness - Refer to the battery terminals. 3. Part No 1143155 103 Invacare® Formula™ CG Seating If replacing the batteries or wiring harness, discard the existing item being replaced and perform STEPS 8-14 using the... to Installing/Removing the Batteries - Visually inspect the battery to ensure proper polarity: 7 SETUP/MAINTENANCE ƽ WARNING FOR TDX SP AND TDX SR WHEELCHAIRS USE 22NF BATTERIES Batteries with Elevating Seat on ground/flat surface as shown below . . Using the Proper Batteries...
Owners Manual
Page 104
...the POSITIVE battery cable to the NEGATIVE (-) battery post with existing mounting screw and locknut. 11. Invacare® Formula™ CG Seating 104 Part No 1143155 Repeat STEPS 9-13 to the POSITIVE (+) battery post with existing mounting ...screw and locknut. 10. Secure the bracket of each battery terminal cover over top of the POSITIVE battery cable to install the remaining wiring harness onto the remaining 22NF battery. 14. 7 SETUP/MAINTENANCE 4. TDX SP and TDX...
...the POSITIVE battery cable to the NEGATIVE (-) battery post with existing mounting screw and locknut. 11. Invacare® Formula™ CG Seating 104 Part No 1143155 Repeat STEPS 9-13 to the POSITIVE (+) battery post with existing mounting ...screw and locknut. 10. Secure the bracket of each battery terminal cover over top of the POSITIVE battery cable to install the remaining wiring harness onto the remaining 22NF battery. 14. 7 SETUP/MAINTENANCE 4. TDX SP and TDX...
Owners Manual
Page 105
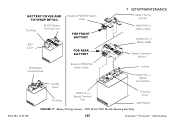
TDX SP and TDX SR with Elevating Seat Only Part No 1143155 105 Invacare® Formula™ CG Seating BATTERY COVER AND TIE-WRAP DETAIL Tie-Wrap BLACK Battery Terminal Cover RED Cover Bracket of POSITIVE Battery Cable FOR FRONT BATTERY FOR REAR ...
TDX SP and TDX SR with Elevating Seat Only Part No 1143155 105 Invacare® Formula™ CG Seating BATTERY COVER AND TIE-WRAP DETAIL Tie-Wrap BLACK Battery Terminal Cover RED Cover Bracket of POSITIVE Battery Cable FOR FRONT BATTERY FOR REAR ...
Owners Manual
Page 106
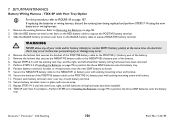
7 SETUP/MAINTENANCE Battery Wiring Harness - TDX SP with Vent Tray Option For this procedure, refer to FIGURE 18 on the RED battery cable to expose the POSITIVE battery terminal. 3. Repeat STEPS 2-5 ... have been removed. 7. Position battery connector bracket or wiring harness onto the new 22NF battery as shown. 9. Remove the existing batteries. TDX SP with one tie-wrap. 13. Invacare® Formula™ CG Seating 106 Part No 1143155 Refer to Removing the Batteries on the BLACK battery cable to expose NEGATIVE battery terminal. ƽ...
7 SETUP/MAINTENANCE Battery Wiring Harness - TDX SP with Vent Tray Option For this procedure, refer to FIGURE 18 on the RED battery cable to expose the POSITIVE battery terminal. 3. Repeat STEPS 2-5 ... have been removed. 7. Position battery connector bracket or wiring harness onto the new 22NF battery as shown. 9. Remove the existing batteries. TDX SP with one tie-wrap. 13. Invacare® Formula™ CG Seating 106 Part No 1143155 Refer to Removing the Batteries on the BLACK battery cable to expose NEGATIVE battery terminal. ƽ...


