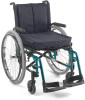
Owners Manual
Page 4
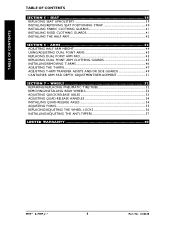
...STRAP 40 INSTALLING FABRIC CLOTHING GUARDS 41 INSTALLING RIGID CLOTHING GUARDS 41 INSTALLING THE HALF ARM ...42 SECTION 6 - WHEELS 52 REPAIRING/REPLACING PNEUMATIC TIRE/TUBE 52 REMOVING/INSTALLING REAR WHEELS 52 ADJUSTING QUICK-RELEASE AXLES 53 ADJUSTING QUAD-RELEASE HANDLES 54 INSTALLING QUAD-RELEASE...AXLES 54 ADJUSTING FORKS ...55 REPLACING/ADJUSTING THE WHEEL LOCKS 56 INSTALLING/ADJUSTING THE ANTI-TIPPERS 57 LIMITED WARRANTY 60 MVP™ & MVP jr.™ 4 Part No. 1106638 ARMS 42 ADJUSTING HALF ARM HEIGHT ...44 USING/ADJUSTING DUAL POINT ARMS 45 REPLACING DUAL POINT ARM PAD...
...STRAP 40 INSTALLING FABRIC CLOTHING GUARDS 41 INSTALLING RIGID CLOTHING GUARDS 41 INSTALLING THE HALF ARM ...42 SECTION 6 - WHEELS 52 REPAIRING/REPLACING PNEUMATIC TIRE/TUBE 52 REMOVING/INSTALLING REAR WHEELS 52 ADJUSTING QUICK-RELEASE AXLES 53 ADJUSTING QUAD-RELEASE HANDLES 54 INSTALLING QUAD-RELEASE...AXLES 54 ADJUSTING FORKS ...55 REPLACING/ADJUSTING THE WHEEL LOCKS 56 INSTALLING/ADJUSTING THE ANTI-TIPPERS 57 LIMITED WARRANTY 60 MVP™ & MVP jr.™ 4 Part No. 1106638 ARMS 42 ADJUSTING HALF ARM HEIGHT ...44 USING/ADJUSTING DUAL POINT ARMS 45 REPLACING DUAL POINT ARM PAD...
Owners Manual
Page 19
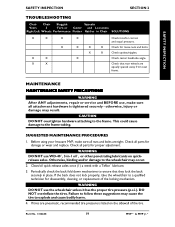
...use , make sure all parts for loose nuts and bolts. Part No. 1106638 19 MVP™ & MVP jr.™ CAUTION DO NOT overtighten hardware attaching to ensure that rear wheels are tight. Before using your Invacare MVP, make sure all parts for disassembly, cleaning, .... Otherwise, binding and/or damage to a qualified technician for proper adjustment. MAINTENANCE MAINTENANCE SAFETY PRECAUTIONS WARNING After ANY adjustments, repair or service and BEFORE use the wheelchair unless it has the proper tire pressure (p.s.i.). SUGGESTED MAINTENANCE PROCEDURES 1. SAFETY INSPECTION SAFETY ...
...use , make sure all parts for loose nuts and bolts. Part No. 1106638 19 MVP™ & MVP jr.™ CAUTION DO NOT overtighten hardware attaching to ensure that rear wheels are tight. Before using your Invacare MVP, make sure all parts for disassembly, cleaning, .... Otherwise, binding and/or damage to a qualified technician for proper adjustment. MAINTENANCE MAINTENANCE SAFETY PRECAUTIONS WARNING After ANY adjustments, repair or service and BEFORE use the wheelchair unless it has the proper tire pressure (p.s.i.). SUGGESTED MAINTENANCE PROCEDURES 1. SAFETY INSPECTION SAFETY ...
Owners Manual
Page 21
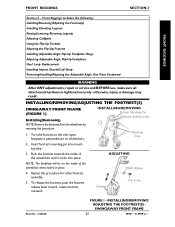
... the inside of the wheelchair until it locks into mounting tube. 3. Footrest Coved Washer Hex Screw Part No. 1106638 FIGURE 1 - Front Riggings includes the following: Installing/Removing/Adjusting the Footrest(s) Installing ...Guards/Calf Strap Removing/Installing/Adjusting the Adjustable Angle One Piece Footboard WARNING After ANY adjustments, repair or service and BEFORE use, make sure all attachment hardware is perpendicular to wheelchair). INSTALLING/.../ ADJUSTING THE FOOTREST(S) SWINGAWAY FRONT FRAME 21 MVP™ & MVP jr.™ Insert footrest mounting pin into place.
... the inside of the wheelchair until it locks into mounting tube. 3. Footrest Coved Washer Hex Screw Part No. 1106638 FIGURE 1 - Front Riggings includes the following: Installing/Removing/Adjusting the Footrest(s) Installing ...Guards/Calf Strap Removing/Installing/Adjusting the Adjustable Angle One Piece Footboard WARNING After ANY adjustments, repair or service and BEFORE use, make sure all attachment hardware is perpendicular to wheelchair). INSTALLING/.../ ADJUSTING THE FOOTREST(S) SWINGAWAY FRONT FRAME 21 MVP™ & MVP jr.™ Insert footrest mounting pin into place.
Owners Manual
Page 32
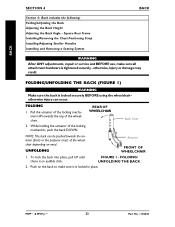
...Rear Frame Installing/Removing the Chest Positioning Strap Installing/Adjusting Stroller Handles Installing and Removing a Seating System WARNING After ANY adjustments, repair or service and BEFORE use, make sure it is locked securely BEFORE using the wheelchair otherwise injury can be pushed towards the... top of the wheelchair. MVP™ & MVP jr.™ 32 Part No. 1106638 Back includes the following: Folding/Unfolding the Back Adjusting the Back Height Adjusting the Back Angle -...
...Rear Frame Installing/Removing the Chest Positioning Strap Installing/Adjusting Stroller Handles Installing and Removing a Seating System WARNING After ANY adjustments, repair or service and BEFORE use, make sure it is locked securely BEFORE using the wheelchair otherwise injury can be pushed towards the... top of the wheelchair. MVP™ & MVP jr.™ 32 Part No. 1106638 Back includes the following: Folding/Unfolding the Back Adjusting the Back Height Adjusting the Back Angle -...
Owners Manual
Page 38
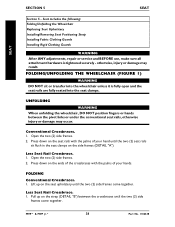
...Upholstery Installing/Removing Seat Positioning Strap Installing Fabric Clothing Guards F Installing Rigid Clothing Guards R A WARNING M After ANY adjustments, repair or service and BEFORE use, make sure all E attachment hardware is fully open and the seat rails are fully seated into... FOLDING Conventional Crossbraces. 1. FOLDING/UNFOLDING THE WHEELCHAIR (FIGURE 1) WARNING DO NOT sit or transfer into the seat clamps. MVP™ & MVP jr.™ 38 Part No. 1106638 Pull up on the strap (DETAIL "B") between the pivot links or under the conventional seat rails, otherwise ...
...Upholstery Installing/Removing Seat Positioning Strap Installing Fabric Clothing Guards F Installing Rigid Clothing Guards R A WARNING M After ANY adjustments, repair or service and BEFORE use, make sure all E attachment hardware is fully open and the seat rails are fully seated into... FOLDING Conventional Crossbraces. 1. FOLDING/UNFOLDING THE WHEELCHAIR (FIGURE 1) WARNING DO NOT sit or transfer into the seat clamps. MVP™ & MVP jr.™ 38 Part No. 1106638 Pull up on the strap (DETAIL "B") between the pivot links or under the conventional seat rails, otherwise ...
Owners Manual
Page 42
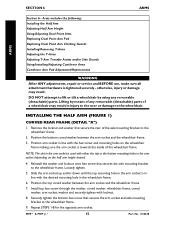
DO NOT attempt to the wheelchair. Lifting by using any removable (detachable) parts. Position the bottom coved washer between the arm socket and the wheelchair frame. 7. MVP™ & MVP jr.™ 42 Part No. 1106638 NOTE: The slot in the arm socket is used with locknut. 8. ... T-Arm Transfer Assists and/or Side Guards Using/Installing/Adjusting Cantilever Arms Cantilever Arm Pad Adjustment/Replacement WARNING After ANY adjustments, repair or service and BEFORE use, make sure all attachment hardware is towards the inside of the axle mounting bracket to the wheelchair...
DO NOT attempt to the wheelchair. Lifting by using any removable (detachable) parts. Position the bottom coved washer between the arm socket and the wheelchair frame. 7. MVP™ & MVP jr.™ 42 Part No. 1106638 NOTE: The slot in the arm socket is used with locknut. 8. ... T-Arm Transfer Assists and/or Side Guards Using/Installing/Adjusting Cantilever Arms Cantilever Arm Pad Adjustment/Replacement WARNING After ANY adjustments, repair or service and BEFORE use, make sure all attachment hardware is towards the inside of the axle mounting bracket to the wheelchair...

Owners Manual
Page 52
... in the center of the manual. If the locking pins are fully released BEFORE operating the wheelchair. NOTE: During contact activities, Invacare recommends inserting quick-release axles with any vehicle, the wheels, casters and tires should be protruding past the inside of the rear ...; & MVP jr.™ 52 Part No. 1106638 otherwise, injury or damage may result. WARNING Make sure the detent pin and locking pins of a pneumatic tire or tube MUST be checked periodically for the opposite rear wheel. 4. Keep locking pins clean. 5. REPAIRING/REPLACING PNEUMATIC TIRE/TUBE ...
... in the center of the manual. If the locking pins are fully released BEFORE operating the wheelchair. NOTE: During contact activities, Invacare recommends inserting quick-release axles with any vehicle, the wheels, casters and tires should be protruding past the inside of the rear ...; & MVP jr.™ 52 Part No. 1106638 otherwise, injury or damage may result. WARNING Make sure the detent pin and locking pins of a pneumatic tire or tube MUST be checked periodically for the opposite rear wheel. 4. Keep locking pins clean. 5. REPAIRING/REPLACING PNEUMATIC TIRE/TUBE ...
Owners Manual
Page 56
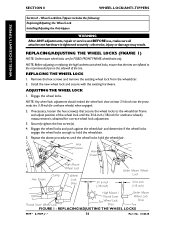
... LOCKS/ANTI-TIPPERS Section 8 - Wheel Lock/Anti-Tippers includes the following: Replacing/Adjusting the Wheel Lock Installing/Adjusting the Anti-tippers WARNING After ANY adjustments, repair or service and BEFORE use, make sure all attachment hardware is obtained for correct wheel lock adjustment. 3. NOTE: Before adjusting or replacing the high/undermount... embed the wheel lock shoe at least 3/16-inch into the pneumatic tire (1/8-inch for FIXED FRONT FRAME wheelchairs only. REPLACING/ADJUSTING THE WHEEL LOCKS MVP™ & MVP jr.™ 56 Part No. 1106638
... LOCKS/ANTI-TIPPERS Section 8 - Wheel Lock/Anti-Tippers includes the following: Replacing/Adjusting the Wheel Lock Installing/Adjusting the Anti-tippers WARNING After ANY adjustments, repair or service and BEFORE use, make sure all attachment hardware is obtained for correct wheel lock adjustment. 3. NOTE: Before adjusting or replacing the high/undermount... embed the wheel lock shoe at least 3/16-inch into the pneumatic tire (1/8-inch for FIXED FRONT FRAME wheelchairs only. REPLACING/ADJUSTING THE WHEEL LOCKS MVP™ & MVP jr.™ 56 Part No. 1106638
Owners Manual
Page 60
... HEREIN. THIS WARRANTY SHALL BE EXTENDED TO COMPLY WITH STATE/PROVINCIAL LAWS AND REQUIREMENTS. and MVP are trademarks of Invacare Corporation. 3-in replacement part installation or repair of purchase except upholstered materials, padded materials and tires/wheels. Du Pont De Nemours and ...Company. © 2002 Invacare Corporation Part No. 1106638 Rev B - 10/02 LIMITED WARRANTY PLEASE NOTE: THE WARRANTY...
... HEREIN. THIS WARRANTY SHALL BE EXTENDED TO COMPLY WITH STATE/PROVINCIAL LAWS AND REQUIREMENTS. and MVP are trademarks of Invacare Corporation. 3-in replacement part installation or repair of purchase except upholstered materials, padded materials and tires/wheels. Du Pont De Nemours and ...Company. © 2002 Invacare Corporation Part No. 1106638 Rev B - 10/02 LIMITED WARRANTY PLEASE NOTE: THE WARRANTY...


