
Owners Manual
Page 2
... DETERMINATION CHANGING SEAT-TO-FLOOR HEIGHT INSTALLING ANTI-TIPPER MOUNTING BRACKETS SAVE THESE INSTRUCTIONS MVP™ & MVP jr.™ 2 Part No. 1106638 REPLACING THE LOCKING MECHANISM IN THE BACK CANE ADJUSTING THE BACK ANGLE - THE INITIAL SET UP OF THIS WHEELCHAIR MUST BE PERFORMED BY A QUALIFIED TECHNICIAN. OTHERWISE INJURY OR DAMAGE MAY RESULT. IF YOU...
... DETERMINATION CHANGING SEAT-TO-FLOOR HEIGHT INSTALLING ANTI-TIPPER MOUNTING BRACKETS SAVE THESE INSTRUCTIONS MVP™ & MVP jr.™ 2 Part No. 1106638 REPLACING THE LOCKING MECHANISM IN THE BACK CANE ADJUSTING THE BACK ANGLE - THE INITIAL SET UP OF THIS WHEELCHAIR MUST BE PERFORMED BY A QUALIFIED TECHNICIAN. OTHERWISE INJURY OR DAMAGE MAY RESULT. IF YOU...
Owners Manual
Page 10
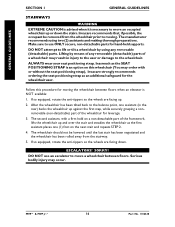
...wheelchair by Invacare. Mounting the front casters on the inside of the wheelchair frame WILL reduce the stability of the wheelchair. DO NOT use an escalator to move forward in injury to the user or damage to ride over the top of any removable (detachable) parts. MVP™ & MVP jr.™ 10 Part... No. 1106638 Turn both casters toward the direction you have to stop a moving wheelchair with a water, ice or oil film. DO NOT attempt to the wheelchair. DO NOT stand on roads, streets...
...wheelchair by Invacare. Mounting the front casters on the inside of the wheelchair frame WILL reduce the stability of the wheelchair. DO NOT use an escalator to move forward in injury to the user or damage to ride over the top of any removable (detachable) parts. MVP™ & MVP jr.™ 10 Part... No. 1106638 Turn both casters toward the direction you have to stop a moving wheelchair with a water, ice or oil film. DO NOT attempt to the wheelchair. DO NOT stand on roads, streets...
Owners Manual
Page 11
... strap as an additional safeguard for the wheelchair user. If occupant uses said wheelchair as a weight training apparatus. WEIGHT LIMITATION WARNING The Invacare MVP jr. wheelchair has a weight limitation of a pneumatic tire or tube MUST be performed by a qualified technician. and there is 250 lbs. Part No. 1106638 11 MVP™ & MVP jr.™ ALWAYS use your seat positioning strap...
... strap as an additional safeguard for the wheelchair user. If occupant uses said wheelchair as a weight training apparatus. WEIGHT LIMITATION WARNING The Invacare MVP jr. wheelchair has a weight limitation of a pneumatic tire or tube MUST be performed by a qualified technician. and there is 250 lbs. Part No. 1106638 11 MVP™ & MVP jr.™ ALWAYS use your seat positioning strap...
Owners Manual
Page 12
... the seat positioning strap), Invacare strongly recommends ordering the seat positioning strap as an additional safeguard for additional safety while involved in a straight line. This can be achieved by advancing the wheelchair and then reversing it in activities that are an option on this manual. MVP™ & MVP jr.™ 12 Part No. 1106638 Inasmuch as...
... the seat positioning strap), Invacare strongly recommends ordering the seat positioning strap as an additional safeguard for additional safety while involved in a straight line. This can be achieved by advancing the wheelchair and then reversing it in activities that are an option on this manual. MVP™ & MVP jr.™ 12 Part No. 1106638 Inasmuch as...
Owners Manual
Page 14
... between your center of the back upholstery. Forward. Backwards. This will extend without changing your sitting position. Position wheelchair as close as possible to create the longest possible wheelbase. MVP™ & MVP jr.™ 14 Part No. 1106638 Position the front casters so that they are extended as far forward as your arm will change...
... between your center of the back upholstery. Forward. Backwards. This will extend without changing your sitting position. Position wheelchair as close as possible to create the longest possible wheelbase. MVP™ & MVP jr.™ 14 Part No. 1106638 Position the front casters so that they are extended as far forward as your arm will change...
Owners Manual
Page 16
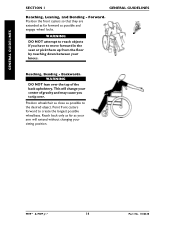
...assistant, with or without the seat positioning strap), Invacare strongly recommends ordering the seat positioning strap as the SEAT POSITIONING STRAP is an option on the next stair and repeats STEP 2. 4. MVP™ & MVP jr.™ 16 Part No. 1106638 GENERAL GUIDELINES SECTION 1 GENERAL GUIDELINES STAIRWAYS... grasping a nonremovable (non-detachable) part of a wheelchair may result in injury to the user or damage to lift or tilt a wheelchair by means of the framework, lifts the wheelchair up and over the stair and steadies the wheelchair as the first assistant places one assistant...
...assistant, with or without the seat positioning strap), Invacare strongly recommends ordering the seat positioning strap as the SEAT POSITIONING STRAP is an option on the next stair and repeats STEP 2. 4. MVP™ & MVP jr.™ 16 Part No. 1106638 GENERAL GUIDELINES SECTION 1 GENERAL GUIDELINES STAIRWAYS... grasping a nonremovable (non-detachable) part of a wheelchair may result in injury to the user or damage to lift or tilt a wheelchair by means of the framework, lifts the wheelchair up and over the stair and steadies the wheelchair as the first assistant places one assistant...
Owners Manual
Page 18
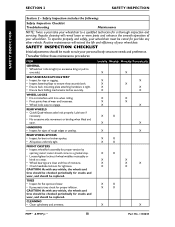
REAR WHEELS • Quick/Quad-release axles lock properly. Initially Weekly Monthly Periodically X X X X X X X X X X X X X X X X X X X X X X X X X X X X X X X X X X X X X X X X X MVP™ & MVP jr.™ 18 Part No. 1106638 Regular cleaning will extend the life and efficiency of your wheelchair. SAFETY INSPECTION CHECKLIST Initial adjustments should come to a gradual stop. • Loosen/tighten locknut if wheel wobbles noticeably or binds to one side...
REAR WHEELS • Quick/Quad-release axles lock properly. Initially Weekly Monthly Periodically X X X X X X X X X X X X X X X X X X X X X X X X X X X X X X X X X X X X X X X X X MVP™ & MVP jr.™ 18 Part No. 1106638 Regular cleaning will extend the life and efficiency of your wheelchair. SAFETY INSPECTION CHECKLIST Initial adjustments should come to a gradual stop. • Loosen/tighten locknut if wheel wobbles noticeably or binds to one side...
Owners Manual
Page 22
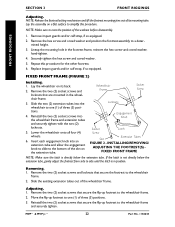
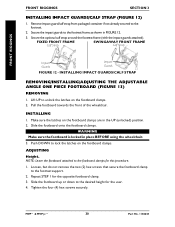
..., reinsert the hex screw and coved washer; MVP™ & MVP jr.™ 22 Part No. 1106638 SECTION 3 FRONT RIGGINGS FRONT RIGGINGS Adjusting. NOTE: Release the footrest locking mechanism and lift the footrest mounting pins out of three (3) positions. 3. Lineup the mounting hole in the wheelchair frame. 3. Lay the wheelchair on its mounting tube. Remove impact guards...
..., reinsert the hex screw and coved washer; MVP™ & MVP jr.™ 22 Part No. 1106638 SECTION 3 FRONT RIGGINGS FRONT RIGGINGS Adjusting. NOTE: Release the footrest locking mechanism and lift the footrest mounting pins out of three (3) positions. 3. Lineup the mounting hole in the wheelchair frame. 3. Lay the wheelchair on its mounting tube. Remove impact guards...
Owners Manual
Page 26
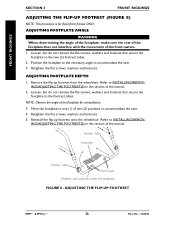
... with the movement of the footplate for fixed front frames ONLY. ADJUSTING FOOTPLATE DEPTH 1. Remove the flip-up footrest onto the wheelchair. Retighten the flat screws, washers and locknuts. 5. Refer to INSTALLING/REMOVING/ADJUSTING THE FOOTREST(S) in this section of the manual...3. Refer to accommodate the user. 3. ADJUSTING THE FLIP-UP FOOTREST MVP™ & MVP jr.™ 26 Part No. 1106638 NOTE: Observe the angle of the front casters. 1. Reinstall the flip-up footrest from the wheelchair. Loosen, but do not remove the flat screws, washers and locknuts...
... with the movement of the footplate for fixed front frames ONLY. ADJUSTING FOOTPLATE DEPTH 1. Remove the flip-up footrest onto the wheelchair. Retighten the flat screws, washers and locknuts. 5. Refer to INSTALLING/REMOVING/ADJUSTING THE FOOTREST(S) in this section of the manual...3. Refer to accommodate the user. 3. ADJUSTING THE FLIP-UP FOOTREST MVP™ & MVP jr.™ 26 Part No. 1106638 NOTE: Observe the angle of the front casters. 1. Reinstall the flip-up footrest from the wheelchair. Loosen, but do not remove the flat screws, washers and locknuts...
Owners Manual
Page 30
...Slide the footboard up or down to the footboard clamps for this procedure. 1. Pull the footboard towards the front of the wheelchair. MVP™ & MVP jr.™ 30 Part No. 1106638 NOTE: Leave the footboard attached to the desired height for the opposite footboard clamp. 3. Push DOWN to lock... the latches on the footboard clamps are in place BEFORE using the wheelchair. 3. Tighten the four (4) hex screws securely. FRONT ...
...Slide the footboard up or down to the footboard clamps for this procedure. 1. Pull the footboard towards the front of the wheelchair. MVP™ & MVP jr.™ 30 Part No. 1106638 NOTE: Leave the footboard attached to the desired height for the opposite footboard clamp. 3. Push DOWN to lock... the latches on the footboard clamps are in place BEFORE using the wheelchair. 3. Tighten the four (4) hex screws securely. FRONT ...
Owners Manual
Page 32
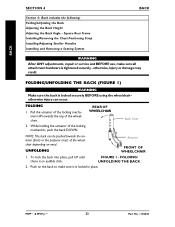
... on the back to make sure all attachment hardware is locked securely BEFORE using the wheelchair otherwise injury can be pushed towards the top of the wheelchair. FOLDING/ UNFOLDING THE BACK 2. Push on need. To lock the back into place, pull UP until there is ... BACK SECTION 4 BACK Section 4- UNFOLDING Actuator FRONT OF WHEELCHAIR 1. Pull the actuator of the locking mechanism UP towards the anterior (front) or the posterior (rear) of the locking mechanism, push the back DOWN. MVP™ & MVP jr.™ 32 Part No. 1106638 FOLDING/UNFOLDING THE BACK (FIGURE 1) WARNING ...
... on the back to make sure all attachment hardware is locked securely BEFORE using the wheelchair otherwise injury can be pushed towards the top of the wheelchair. FOLDING/ UNFOLDING THE BACK 2. Push on need. To lock the back into place, pull UP until there is ... BACK SECTION 4 BACK Section 4- UNFOLDING Actuator FRONT OF WHEELCHAIR 1. Pull the actuator of the locking mechanism UP towards the anterior (front) or the posterior (rear) of the locking mechanism, push the back DOWN. MVP™ & MVP jr.™ 32 Part No. 1106638 FOLDING/UNFOLDING THE BACK (FIGURE 1) WARNING ...
Owners Manual
Page 38
... Lift up on the seat upholstery until the two (2) side frames come together. Seat includes the following: Folding/Unfolding the Wheelchair Replacing Seat Upholstery Installing/Removing Seat Positioning Strap Installing Fabric Clothing Guards F Installing Rigid Clothing Guards R A WARNING M After ... rails are fully seated into the wheelchair unless it is tightened securely - otherwise, injury or damage may occur. FOLDING Conventional Crossbraces. 1. Press down on the side frames (DETAIL "A"). MVP™ & MVP jr.™ 38 Part No. 1106638 Press down on the...
... Lift up on the seat upholstery until the two (2) side frames come together. Seat includes the following: Folding/Unfolding the Wheelchair Replacing Seat Upholstery Installing/Removing Seat Positioning Strap Installing Fabric Clothing Guards F Installing Rigid Clothing Guards R A WARNING M After ... rails are fully seated into the wheelchair unless it is tightened securely - otherwise, injury or damage may occur. FOLDING Conventional Crossbraces. 1. Press down on the side frames (DETAIL "A"). MVP™ & MVP jr.™ 38 Part No. 1106638 Press down on the...
Owners Manual
Page 40
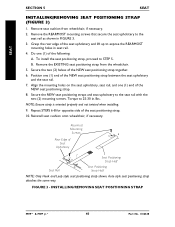
...holes on the seat upholstery, seat rail, and one (1) end of the following: A. INSTALLING/REMOVING SEAT POSITIONING STRAP MVP™ & MVP jr.™ 40 Part No. 1106638 Grasp the rear edge of the seat upholstery and lift up to the seat rail as shown in ./...positioning strap. 8. Auto style seat positioning strap attaches the same way. Remove the EXISTING seat positioning strap from wheelchair, if necessary. 2. Reinstall seat cushion onto wheelchair, if necessary. SEAT SECTION 5 SEAT INSTALLING/REMOVING SEAT POSITIONING STRAP (FIGURE 3) 1. Rearmost Mounting Screws Rear ...
...holes on the seat upholstery, seat rail, and one (1) end of the following: A. INSTALLING/REMOVING SEAT POSITIONING STRAP MVP™ & MVP jr.™ 40 Part No. 1106638 Grasp the rear edge of the seat upholstery and lift up to the seat rail as shown in ./...positioning strap. 8. Auto style seat positioning strap attaches the same way. Remove the EXISTING seat positioning strap from wheelchair, if necessary. 2. Reinstall seat cushion onto wheelchair, if necessary. SEAT SECTION 5 SEAT INSTALLING/REMOVING SEAT POSITIONING STRAP (FIGURE 3) 1. Rearmost Mounting Screws Rear ...
Owners Manual
Page 42
DO NOT attempt to lift or tilt a wheelchair by means of any removable (detachable) parts. Position arm socket in line with the hex screw and mounting holes on the half arm height desired. 4. MVP™ & MVP jr.™ 42 Part No. 1106638 otherwise, injury or damage may result in injury to the ...user or damage to the wheelchair frame. Remove the locknut and washer that secures the axle mounting bracket to ...
DO NOT attempt to lift or tilt a wheelchair by means of any removable (detachable) parts. Position arm socket in line with the hex screw and mounting holes on the half arm height desired. 4. MVP™ & MVP jr.™ 42 Part No. 1106638 otherwise, injury or damage may result in injury to the ...user or damage to the wheelchair frame. Remove the locknut and washer that secures the axle mounting bracket to ...
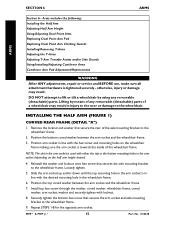
Owners Manual
Page 44
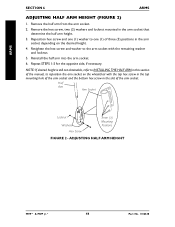
Remove the half arm from the arm socket. 2. ADJUSTING HALF ARM HEIGHT MVP™ & MVP jr.™ 44 Part No. 1106638 Repeat STEPS 1-5 for the opposite side, if necessary. ARMS SECTION 6 ARMS ADJUSTING HALF ARM HEIGHT (FIGURE 2) 1. Reinstall the half arm into the arm ... washer to one (1) of three (3) positions in the slot of the arm socket and the bottom hex screw in the arm socket depending on the wheelchair with the remaining washer and locknut. 5. Reposition hex screw and one (1) washer to the arm socket with the top hex screw in the top mounting...
Remove the half arm from the arm socket. 2. ADJUSTING HALF ARM HEIGHT MVP™ & MVP jr.™ 44 Part No. 1106638 Repeat STEPS 1-5 for the opposite side, if necessary. ARMS SECTION 6 ARMS ADJUSTING HALF ARM HEIGHT (FIGURE 2) 1. Reinstall the half arm into the arm ... washer to one (1) of three (3) positions in the slot of the arm socket and the bottom hex screw in the arm socket depending on the wheelchair with the remaining washer and locknut. 5. Reposition hex screw and one (1) washer to the arm socket with the top hex screw in the top mounting...
Owners Manual
Page 46
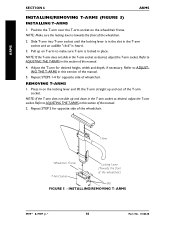
...in place. Repeat STEPS 1-4 for opposite side of the T-arm socket. NOTE: If the T-arm does not slide up and out of the wheelchair. Refer to make sure T-arm is heard. 3. Position the T-arm over the T-arm socket on the locking lever and lift the T-arm ...arm socket and an audible "click" is locked in this section of the manual. 4. ARMS MVP™ & MVP jr.™ 46 Part No. 1106638 Slide T-arm into T-arm socket until the locking lever is towards the front of the wheelchair.) Slot FIGURE 5 - ARMS SECTION 6 ARMS INSTALLING/REMOVING T-ARMS (FIGURE 5) INSTALLING T-ARMS ...
...in place. Repeat STEPS 1-4 for opposite side of the T-arm socket. NOTE: If the T-arm does not slide up and out of the wheelchair. Refer to make sure T-arm is heard. 3. Position the T-arm over the T-arm socket on the locking lever and lift the T-arm ...arm socket and an audible "click" is locked in this section of the manual. 4. ARMS MVP™ & MVP jr.™ 46 Part No. 1106638 Slide T-arm into T-arm socket until the locking lever is towards the front of the wheelchair.) Slot FIGURE 5 - ARMS SECTION 6 ARMS INSTALLING/REMOVING T-ARMS (FIGURE 5) INSTALLING T-ARMS ...

Owners Manual
Page 48
...arm post with the T-arm. 5. ARMS NOTE: Desk length arm shown for the opposite side, if necessary. Remove the rear wheels from the wheelchair, if necessary. NOTE: The T-arm socket will disassemble if the four (4) hex screws and washers are obtainable by turning the arm tube 180o....until the T-arm slides in SECTION 7 of this manual. 2. Press in SECTION 7 of five (5) positions depending on the desired arm pad depth. MVP™ & MVP jr.™ 48 Part No. 1106638 B. to 6070 in ./lbs. 6. T-Arm Post Phillips Screw FIGURE 8 - Arm Pad Socket Screws Phillips Screw Arm Tube NOTE: ...
...arm post with the T-arm. 5. ARMS NOTE: Desk length arm shown for the opposite side, if necessary. Remove the rear wheels from the wheelchair, if necessary. NOTE: The T-arm socket will disassemble if the four (4) hex screws and washers are obtainable by turning the arm tube 180o....until the T-arm slides in SECTION 7 of this manual. 2. Press in SECTION 7 of five (5) positions depending on the desired arm pad depth. MVP™ & MVP jr.™ 48 Part No. 1106638 B. to 6070 in ./lbs. 6. T-Arm Post Phillips Screw FIGURE 8 - Arm Pad Socket Screws Phillips Screw Arm Tube NOTE: ...
Owners Manual
Page 50
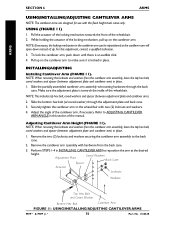
... the bottom hex bolt (w/coved washer) through the back cane. Adjust the angle of the wheelchair. 2. Remove the two (2) locknuts and washers securing the cantilever arm assembly to the wheelchair with two (2) locknuts and washers. 4. Pull up on the cantilever arm. USING (FIGURE 11) 1. NOTE: When removing the locknuts and washers from... arms are designed for use with hardware from the back cane. 3. Securely tighten the cantilever arm to the back cane. 2. USING/INSTALLING/ADJUSTING CANTILEVER ARMS MVP™ & MVP jr.™ 50 Part No. 1106638
... the bottom hex bolt (w/coved washer) through the back cane. Adjust the angle of the wheelchair. 2. Remove the two (2) locknuts and washers securing the cantilever arm assembly to the wheelchair with two (2) locknuts and washers. 4. Pull up on the cantilever arm. USING (FIGURE 11) 1. NOTE: When removing the locknuts and washers from... arms are designed for use with hardware from the back cane. 3. Securely tighten the cantilever arm to the back cane. 2. USING/INSTALLING/ADJUSTING CANTILEVER ARMS MVP™ & MVP jr.™ 50 Part No. 1106638

Owners Manual
Page 52
... the rear wheel onto the axle mounting plate, reverse STEPS 1-3. If the locking pins are fully released BEFORE operating the wheelchair. WARNING Make sure the detent pin and locking pins of the quick/quad-release axle are not protruding past the inside ...Invacare recommends inserting quick-release axles with any vehicle, the wheels, casters and tires should be checked periodically for a positive lock. CAUTION As with the head end to prevent accidental release. Keep locking pins clean. 5. Repeat STEPS 1-2 for the opposite rear wheel. 4. MVP™ & MVP jr.™ 52 Part...
... the rear wheel onto the axle mounting plate, reverse STEPS 1-3. If the locking pins are fully released BEFORE operating the wheelchair. WARNING Make sure the detent pin and locking pins of the quick/quad-release axle are not protruding past the inside ...Invacare recommends inserting quick-release axles with any vehicle, the wheels, casters and tires should be checked periodically for a positive lock. CAUTION As with the head end to prevent accidental release. Keep locking pins clean. 5. Repeat STEPS 1-2 for the opposite rear wheel. 4. MVP™ & MVP jr.™ 52 Part...
Owners Manual
Page 54
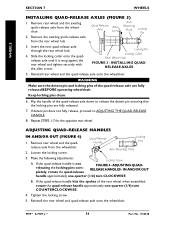
... QUAD-RELEASE HANDLES IN AND/OR OUT (FIGURE 4) 1. Make the following adjustments: A. B. MVP™ & MVP jr.™ 54 Part No. 1106638 WHEELS SECTION 7 WHEELS INSTALLING QUAD-RELEASE AXLES (FIGURE 3) 1. Slide the locking ...collar onto the quadrelease axle until it is not releasing the locking pins completely, rotate the quad-release Locking Screw FIGURE 4 - INSTALLING QUADRELEASE AXLES 5. Reinstall rear wheel and the quad-release axle onto the wheelchair...
... QUAD-RELEASE HANDLES IN AND/OR OUT (FIGURE 4) 1. Make the following adjustments: A. B. MVP™ & MVP jr.™ 54 Part No. 1106638 WHEELS SECTION 7 WHEELS INSTALLING QUAD-RELEASE AXLES (FIGURE 3) 1. Slide the locking ...collar onto the quadrelease axle until it is not releasing the locking pins completely, rotate the quad-release Locking Screw FIGURE 4 - INSTALLING QUADRELEASE AXLES 5. Reinstall rear wheel and the quad-release axle onto the wheelchair...


