
Owners Manual
Page 2
...ARM REPLACING/REPOSITIONING/INSTALLING FRONT CASTER ASSEMBLIES INSTALLING/REPLACING FRONT CASTER FORKS ADJUSTING CASTER HEADTUBES REPOSITIONING CASTER HEADTUBES ON WHEELCHAIR FRAME INSTALLING QUICK-RELEASE CASTERS HANDRIMS ADJUSTING REAR WHEEL CAMBER ADJUSTING WHEELBASE LENGTH ADJUSTING WHEELBASE LENGTH TOE-IN/...-TIPPER MOUNTING BRACKETS SAVE THESE INSTRUCTIONS MVP™ & MVP jr.™ 2 Part No. 1106638 WARNING WARNING WARNING DO NOT OPERATE THIS EQUIPMENT WITHOUT FIRST READING AND UNDERSTANDING THIS MANUAL. THE INITIAL SET UP OF THIS WHEELCHAIR MUST BE PERFORMED BY A QUALIFIED ...
...ARM REPLACING/REPOSITIONING/INSTALLING FRONT CASTER ASSEMBLIES INSTALLING/REPLACING FRONT CASTER FORKS ADJUSTING CASTER HEADTUBES REPOSITIONING CASTER HEADTUBES ON WHEELCHAIR FRAME INSTALLING QUICK-RELEASE CASTERS HANDRIMS ADJUSTING REAR WHEEL CAMBER ADJUSTING WHEELBASE LENGTH ADJUSTING WHEELBASE LENGTH TOE-IN/...-TIPPER MOUNTING BRACKETS SAVE THESE INSTRUCTIONS MVP™ & MVP jr.™ 2 Part No. 1106638 WARNING WARNING WARNING DO NOT OPERATE THIS EQUIPMENT WITHOUT FIRST READING AND UNDERSTANDING THIS MANUAL. THE INITIAL SET UP OF THIS WHEELCHAIR MUST BE PERFORMED BY A QUALIFIED ...
Owners Manual
Page 3
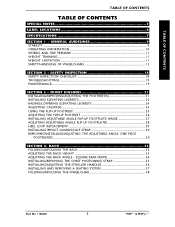
... 34 INSTALLING/REMOVING THE CHEST POSITIONING STRAP 35 INSTALLING/ADJUSTING THE STROLLER HANDLES 36 INSTALLING AND REMOVING A SEATING SYSTEM 37 FOLDING/UNFOLDING THE WHEELCHAIR 38 Part No. 1106638 3 MVP™ & MVP jr.™ TABLE OF CONTENTS TABLE OF CONTENTS TABLE OF CONTENTS SPECIAL NOTES 5 LABEL LOCATIONS 6 SPECIFICATIONS 7 SECTION 1 - GENERAL GUIDELINES 9 STABILITY ...9 OPERATING INFORMATION ...10...
... 34 INSTALLING/REMOVING THE CHEST POSITIONING STRAP 35 INSTALLING/ADJUSTING THE STROLLER HANDLES 36 INSTALLING AND REMOVING A SEATING SYSTEM 37 FOLDING/UNFOLDING THE WHEELCHAIR 38 Part No. 1106638 3 MVP™ & MVP jr.™ TABLE OF CONTENTS TABLE OF CONTENTS TABLE OF CONTENTS SPECIAL NOTES 5 LABEL LOCATIONS 6 SPECIFICATIONS 7 SECTION 1 - GENERAL GUIDELINES 9 STABILITY ...9 OPERATING INFORMATION ...10...
Owners Manual
Page 5
... transportation and use be used in personal injury or property damage. Part No. 1106638 5 MVP™ & MVP jr.™ WHEELCHAIR TIE-DOWN RESTRAINTS AND SEAT POSITIONING STRAPS Invacare recommends that users of wheelchairs should be transported in vehicles of any kind while in a moving... vehicle of any wheelchair transportation systems. AS REGARDS TO RESTRAINTS - IT IS THE...
... transportation and use be used in personal injury or property damage. Part No. 1106638 5 MVP™ & MVP jr.™ WHEELCHAIR TIE-DOWN RESTRAINTS AND SEAT POSITIONING STRAPS Invacare recommends that users of wheelchairs should be transported in vehicles of any kind while in a moving... vehicle of any wheelchair transportation systems. AS REGARDS TO RESTRAINTS - IT IS THE...
Owners Manual
Page 9
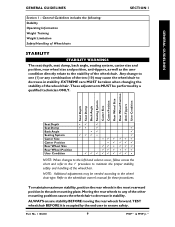
... wheels to any combination of the ten (10) may be performed by the end user to decrease in stability. NOTE: Additional adjustments may cause the wheelchair to ensure safety. Part No. 1106638 9 MVP™ & MVP jr.™ EXTREME care MUST be taken when changing the stability of the other mounting positions causes the...
... wheels to any combination of the ten (10) may be performed by the end user to decrease in stability. NOTE: Additional adjustments may cause the wheelchair to ensure safety. Part No. 1106638 9 MVP™ & MVP jr.™ EXTREME care MUST be taken when changing the stability of the other mounting positions causes the...
Owners Manual
Page 10
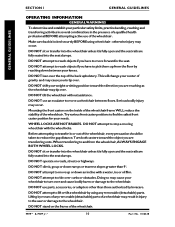
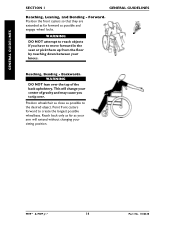
...Doing so may cause your knees. MVP™ & MVP jr.™ 10 Part No. 1106638 DO NOT attempt to reach objects if you have to stop a moving wheelchair with a water, ice or oil film. DO NOT tilt the wheelchair without assistance. DO NOT use parts, accessories, or adapters other than... 9o. WHEEL LOCKS ARE NOT BRAKES. DO NOT use an escalator to lift or tilt a wheelchair by Invacare. DO NOT attempt to move a wheelchair between your wheelchair to turn over and cause ...
...Doing so may cause your knees. MVP™ & MVP jr.™ 10 Part No. 1106638 DO NOT attempt to reach objects if you have to stop a moving wheelchair with a water, ice or oil film. DO NOT tilt the wheelchair without assistance. DO NOT use parts, accessories, or adapters other than... 9o. WHEEL LOCKS ARE NOT BRAKES. DO NOT use an escalator to lift or tilt a wheelchair by Invacare. DO NOT attempt to move a wheelchair between your wheelchair to turn over and cause ...
Owners Manual
Page 11
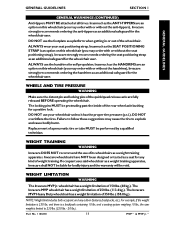
... NOT been designed or tested as an additional safeguard for the wheelchair user. WEIGHT LIMITATION WARNING The Invacare MVP jr. wheelchair has a weight limitation of 250 lbs. (113.4 kg.). NOTE: Weight limit includes both occupant and any kind of the wheelchair. Part No. 1106638 11 MVP™ & MVP jr.™ ALWAYS use your seat positioning strap. Failure to...
... NOT been designed or tested as an additional safeguard for the wheelchair user. WEIGHT LIMITATION WARNING The Invacare MVP jr. wheelchair has a weight limitation of 250 lbs. (113.4 kg.). NOTE: Weight limit includes both occupant and any kind of the wheelchair. Part No. 1106638 11 MVP™ & MVP jr.™ ALWAYS use your seat positioning strap. Failure to...
Owners Manual
Page 12
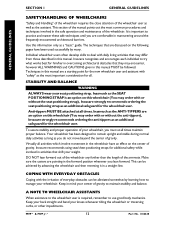
...until you must at all activities which involve movement in the wheelchair have been used successfully by advancing the wheelchair and then reversing it in mind your seat positioning strap. MVP™ & MVP jr.™ 12 Part No. 1106638 It is important to deal with “safety...Make sure the casters are comfortable in the safe operation and maintenance of gravity. A NOTE TO WHEELCHAIR ASSISTANTS When assistance to use good body mechanics. Invacare recognizes and encourages each individual to remain upright and stable during normal daily activities as long as ...
...until you must at all activities which involve movement in the wheelchair have been used successfully by advancing the wheelchair and then reversing it in mind your seat positioning strap. MVP™ & MVP jr.™ 12 Part No. 1106638 It is important to deal with “safety...Make sure the casters are comfortable in the safe operation and maintenance of gravity. A NOTE TO WHEELCHAIR ASSISTANTS When assistance to use good body mechanics. Invacare recognizes and encourages each individual to remain upright and stable during normal daily activities as long as ...
Owners Manual
Page 13
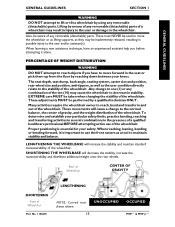
... GENERAL GUIDELINES SECTION 1 WARNING DO NOT attempt to lift or tilt a wheelchair by using any removable (detachable) parts of a wheelchair may cause the wheelchair to decrease in stability. UNOCCUPIED 13 OCCUPIED MVP™ & MVP jr.™ Rear of Wheelchair CENTER OF GRAVITY SHORTENING Front of the wheelchair. EXTREME care MUST be inadvertently released, resulting in the presence of...
... GENERAL GUIDELINES SECTION 1 WARNING DO NOT attempt to lift or tilt a wheelchair by using any removable (detachable) parts of a wheelchair may cause the wheelchair to decrease in stability. UNOCCUPIED 13 OCCUPIED MVP™ & MVP jr.™ Rear of Wheelchair CENTER OF GRAVITY SHORTENING Front of the wheelchair. EXTREME care MUST be inadvertently released, resulting in the presence of...
Owners Manual
Page 14
Position wheelchair as close as possible to create the longest possible wheelbase. Point front casters forward to the desired object. Position the front casters so that they are extended as far forward as your arm will change your sitting position. WARNING DO NOT lean over . MVP™ & MVP jr.™ 14 Part No. 1106638 GENERAL...
Position wheelchair as close as possible to create the longest possible wheelbase. Point front casters forward to the desired object. Position the front casters so that they are extended as far forward as your arm will change your sitting position. WARNING DO NOT lean over . MVP™ & MVP jr.™ 14 Part No. 1106638 GENERAL...
Owners Manual
Page 15
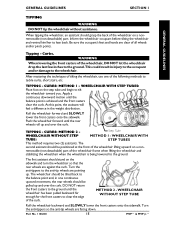
TIPPING - CURBS: METHOD 2 - Turn the anti-tippers to lean back. Part No. 1106638 15 MVP™ & MVP jr.™ Inform the wheelchair occupant before tilting the wheelchair and remind him/her to the anti-tip wheels are clear of the curb. Tipping - This could ...When lowering the front casters of the wheelchair frame when lifting the wheelchair and stabilizing the wheelchair when the wheelchair is achieved and the front casters clear the curb. CURBS: METHOD 1 - removable (non-detachable) part of the wheelchair, DO NOT let the wheelchair drop the last few inches to the...
TIPPING - CURBS: METHOD 2 - Turn the anti-tippers to lean back. Part No. 1106638 15 MVP™ & MVP jr.™ Inform the wheelchair occupant before tilting the wheelchair and remind him/her to the anti-tip wheels are clear of the curb. Tipping - This could ...When lowering the front casters of the wheelchair frame when lifting the wheelchair and stabilizing the wheelchair when the wheelchair is achieved and the front casters clear the curb. CURBS: METHOD 1 - removable (non-detachable) part of the wheelchair, DO NOT let the wheelchair drop the last few inches to the...
Owners Manual
Page 16
... positioning strap. The second assistant, with or without the seat positioning strap), Invacare strongly recommends ordering the seat positioning strap as an additional safeguard for the wheelchair user. Follow this procedure for moving . MVP™ & MVP jr.™ 16 Part No. 1106638 Invacare recommends that, if possible, the occupant be lowered until the last stair has...
... positioning strap. The second assistant, with or without the seat positioning strap), Invacare strongly recommends ordering the seat positioning strap as an additional safeguard for the wheelchair user. Follow this procedure for moving . MVP™ & MVP jr.™ 16 Part No. 1106638 Invacare recommends that, if possible, the occupant be lowered until the last stair has...
Owners Manual
Page 17
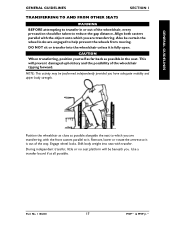
... wheels from moving. NOTE: This activity may be certain the wheel locks are transferring, with transfer. Part No. 1106638 17 MVP™ & MVP jr.™ Position the wheelchair as close as possible in or out of the way. During independent transfer, little or no seat ...platform will prevent damaged upholstery and the possibility of the wheelchair tipping forward. Also be performed independently provided you ...
... wheels from moving. NOTE: This activity may be certain the wheel locks are transferring, with transfer. Part No. 1106638 17 MVP™ & MVP jr.™ Position the wheelchair as close as possible in or out of the way. During independent transfer, little or no seat ...platform will prevent damaged upholstery and the possibility of the wheelchair tipping forward. Also be performed independently provided you ...
Owners Manual
Page 18
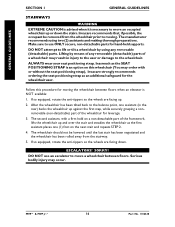
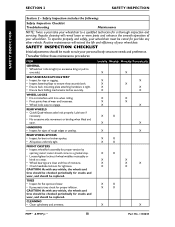
...X X X X X X X X X X X X X X X X X X X X X X X X X X X X X X X X X X X X X X X X X MVP™ & MVP jr.™ 18 Part No. 1106638 SAFETY INSPECTION CHECKLIST Initial adjustments should be replaced. WHEEL LOCKS • Do not interfere with tires when rolling. • Pivot points free of ... your personal body structure needs and preference. Routine maintenance will reveal loose or worn parts and enhance the smooth operation of your wheelchair. caster should be checked periodically for a thorough inspection and servicing. HANDRIMS •...
...X X X X X X X X X X X X X X X X X X X X X X X X X X X X X X X X X X X X X X X X X MVP™ & MVP jr.™ 18 Part No. 1106638 SAFETY INSPECTION CHECKLIST Initial adjustments should be replaced. WHEEL LOCKS • Do not interfere with tires when rolling. • Pivot points free of ... your personal body structure needs and preference. Routine maintenance will reveal loose or worn parts and enhance the smooth operation of your wheelchair. caster should be checked periodically for a thorough inspection and servicing. HANDRIMS •...
Owners Manual
Page 19
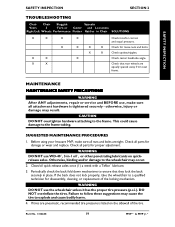
CAUTION DO NOT overtighten hardware attaching to the wheelchair may occur. 2. Check all parts for damage or wear and replace. Check all parts for proper adjustment. Part No. 1106638 19 MVP™ & MVP jr.™ X X Check that they lock the back securely in -1 oil®, ...nuts and bolts. X X Check spokes/nipples. Clean/oil quick-release axles once (1) a week with a Teflon® lubricant. 3. Before using your Invacare MVP, make sure all nuts and bolts are tight. DO NOT overinflate the tires. X X X Check caster headtube angle. otherwise, injury or damage may ...
CAUTION DO NOT overtighten hardware attaching to the wheelchair may occur. 2. Check all parts for damage or wear and replace. Check all parts for proper adjustment. Part No. 1106638 19 MVP™ & MVP jr.™ X X Check that they lock the back securely in -1 oil®, ...nuts and bolts. X X Check spokes/nipples. Clean/oil quick-release axles once (1) a week with a Teflon® lubricant. 3. Before using your Invacare MVP, make sure all nuts and bolts are tight. DO NOT overinflate the tires. X X X Check caster headtube angle. otherwise, injury or damage may ...
Owners Manual
Page 21
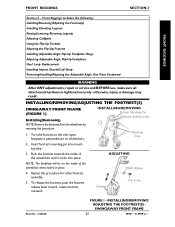
INSTALLING/REMOVING/ADJUSTING THE FOOTREST(S) SWINGAWAY FRONT FRAME (FIGURE 1) Installing/Removing. Footrest Coved Washer Hex Screw Part No. 1106638 FIGURE 1 - Insert footrest mounting pin into place. Front Riggings includes the following: Installing/...the side (open footplate is tightened securely - INSTALLING/REMOVING/ ADJUSTING THE FOOTREST(S) SWINGAWAY FRONT FRAME 21 MVP™ & MVP jr.™ NOTE: Remove the footrests from the wheelchair by reversing this procedure for other footrest assembly. 5. INSTALLING/REMOVING Footrest Mounting Pin Footrest Release Lever ...
INSTALLING/REMOVING/ADJUSTING THE FOOTREST(S) SWINGAWAY FRONT FRAME (FIGURE 1) Installing/Removing. Footrest Coved Washer Hex Screw Part No. 1106638 FIGURE 1 - Insert footrest mounting pin into place. Front Riggings includes the following: Installing/...the side (open footplate is tightened securely - INSTALLING/REMOVING/ ADJUSTING THE FOOTREST(S) SWINGAWAY FRONT FRAME 21 MVP™ & MVP jr.™ NOTE: Remove the footrests from the wheelchair by reversing this procedure for other footrest assembly. 5. INSTALLING/REMOVING Footrest Mounting Pin Footrest Release Lever ...
Owners Manual
Page 22
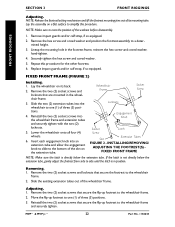
..., reinsert the hex screw and coved washer; Lay the wheelchair on its mounting tube. Wheelchair Frame Socket Screw Locknuts Engagement Knob Socket Latch Screw Slot Extension Tubes FIGURE 2 - If the latch is not directly below the extension tube. MVP™ & MVP jr.™ 22 Part No. 1106638 Lay the assembly on the extension tube. NOTE...
..., reinsert the hex screw and coved washer; Lay the wheelchair on its mounting tube. Wheelchair Frame Socket Screw Locknuts Engagement Knob Socket Latch Screw Slot Extension Tubes FIGURE 2 - If the latch is not directly below the extension tube. MVP™ & MVP jr.™ 22 Part No. 1106638 Lay the assembly on the extension tube. NOTE...
Owners Manual
Page 23
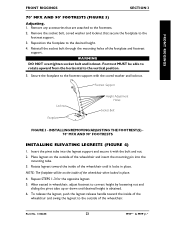
... legrest. 5. To release the legrest, push the legrest release handle toward the inside of the wheelchair until desired height is obtained. 6. After seated in place. Part No. 1106638 23 MVP™ & MVP jr.™ Remove the socket bolt, coved washer and locknut that are attached to the desired ... 70° MFX AND 90° FOOTRESTS (FIGURE 3) Adjusting. 1. Place legrest on the inside of the wheelchair and swing the legrest to the outside of the wheelchair. Remove any accessories that secure the footplate to the footrest support with the bolt and nut. 2. Reposition the...
... legrest. 5. To release the legrest, push the legrest release handle toward the inside of the wheelchair until desired height is obtained. 6. After seated in place. Part No. 1106638 23 MVP™ & MVP jr.™ Remove the socket bolt, coved washer and locknut that are attached to the desired ... 70° MFX AND 90° FOOTRESTS (FIGURE 3) Adjusting. 1. Place legrest on the inside of the wheelchair and swing the legrest to the outside of the wheelchair. Remove any accessories that secure the footplate to the footrest support with the bolt and nut. 2. Reposition the...
Owners Manual
Page 24
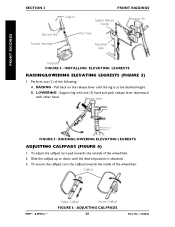
...calfpad up or down until the leg is obtained. 3. LOWERING - To adjust the calfpad, turn the calfpad towards the outside of the wheelchair. Calfpad MVP™ & MVP jr.™ Adjust Calfpad Secure Calfpad FIGURE 6 - Release Lever FIGURE 5 - FRONT RIGGINGS SECTION 3 Bolt and Nut Footrest Assembly FRONT .../LOWERING ELEVATING LEGRESTS ADJUSTING CALFPADS (FIGURE 6) 1. RAISING - B. To secure the calfpad, turn pad towards the inside of the wheelchair. 2. ADJUSTING CALFPADS 24 Part No. 1106638 INSTALLING ELEVATING LEGRESTS RAISING/LOWERING ELEVATING LEGRESTS (FIGURE 5) 1.
...calfpad up or down until the leg is obtained. 3. LOWERING - To adjust the calfpad, turn the calfpad towards the outside of the wheelchair. Calfpad MVP™ & MVP jr.™ Adjust Calfpad Secure Calfpad FIGURE 6 - Release Lever FIGURE 5 - FRONT RIGGINGS SECTION 3 Bolt and Nut Footrest Assembly FRONT .../LOWERING ELEVATING LEGRESTS ADJUSTING CALFPADS (FIGURE 6) 1. RAISING - B. To secure the calfpad, turn pad towards the inside of the wheelchair. 2. ADJUSTING CALFPADS 24 Part No. 1106638 INSTALLING ELEVATING LEGRESTS RAISING/LOWERING ELEVATING LEGRESTS (FIGURE 5) 1.
Owners Manual
Page 25
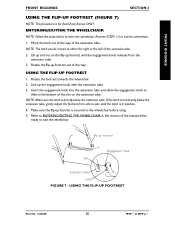
...-up footrest out of the manual when ready to exit the wheelchair. Rotate the flip-up Footrest Engagement Knob Slot Extension Tube Latch FIGURE 7 - USING THE FLIP-UP FOOTREST Part No. 1106638 25 MVP™ & MVP jr.™ FRONT RIGGINGS FRONT RIGGINGS SECTION 3 USING THE FLIP-UP ...FOOTREST (FIGURE 7) NOTE: This procedure is secured to the wheelchair before using. 5. USING THE FLIP-UP FOOTREST 1. ENTERING/EXITING THE WHEELCHAIR NOTE: Follow the steps ...
...-up footrest out of the manual when ready to exit the wheelchair. Rotate the flip-up Footrest Engagement Knob Slot Extension Tube Latch FIGURE 7 - USING THE FLIP-UP FOOTREST Part No. 1106638 25 MVP™ & MVP jr.™ FRONT RIGGINGS FRONT RIGGINGS SECTION 3 USING THE FLIP-UP ...FOOTREST (FIGURE 7) NOTE: This procedure is secured to the wheelchair before using. 5. USING THE FLIP-UP FOOTREST 1. ENTERING/EXITING THE WHEELCHAIR NOTE: Follow the steps ...
Owners Manual
Page 26
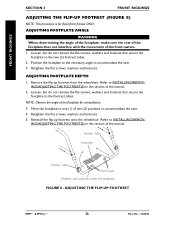
Position the footplate to the necessary angle to the footrest tubes. Reinstall the flip-up footrest from the wheelchair. FRONT RIGGINGS FRONT RIGGINGS SECTION 3 FRONT RIGGINGS ADJUSTING THE FLIP-UP FOOTREST (FIGURE 8) NOTE: This procedure is for reinstallation. 3. Loosen... remove the flat screws, washers and locknuts that secure the footplate to accommodate the user. 3. ADJUSTING THE FLIP-UP FOOTREST MVP™ & MVP jr.™ 26 Part No. 1106638 Retighten the flat screws, washers and locknuts. ADJUSTING FOOTPLATE ANGLE WARNING When determining the angle of the footplate, make...
Position the footplate to the necessary angle to the footrest tubes. Reinstall the flip-up footrest from the wheelchair. FRONT RIGGINGS FRONT RIGGINGS SECTION 3 FRONT RIGGINGS ADJUSTING THE FLIP-UP FOOTREST (FIGURE 8) NOTE: This procedure is for reinstallation. 3. Loosen... remove the flat screws, washers and locknuts that secure the footplate to accommodate the user. 3. ADJUSTING THE FLIP-UP FOOTREST MVP™ & MVP jr.™ 26 Part No. 1106638 Retighten the flat screws, washers and locknuts. ADJUSTING FOOTPLATE ANGLE WARNING When determining the angle of the footplate, make...


