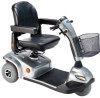
Owners Manual
Page 3
... ...48 Charging the Batteries ...50 11 TRANSPORTING 52 Transporting the Scooter...52 12 MAINTENANCE 54 Suggested Maintenance Procedures ...54 13 TROUBLESHOOTING 55 General Troubleshooting...55 Service Indicator Error Codes...57 Part No. 1163141 3 Invacare® Leo™ Scooter
... ...48 Charging the Batteries ...50 11 TRANSPORTING 52 Transporting the Scooter...52 12 MAINTENANCE 54 Suggested Maintenance Procedures ...54 13 TROUBLESHOOTING 55 General Troubleshooting...55 Service Indicator Error Codes...57 Part No. 1163141 3 Invacare® Leo™ Scooter

Owners Manual
Page 5
...and workmanship for a period of six (6) months from the date of purchase from Invacare or a dealer. Invacare's sole obligation and your Invacare product. For warranty service, please contact the dealer from state to state. In the event you purchased ...WARRANTY PROVIDED HEREIN. Part No. 1163141 5 Invacare® Leo™ Scooter Invacare warrants all batteries to Invacare at Invacare's option. A CHANGE IN OPERATING NOISE, PARTICULARLY RELATIVE TO MOTORS AND GEARBOXES DOES NOT CONSTITUTE A FAILURE. Invacare warrants all electronics and electrical components (excluding...
...and workmanship for a period of six (6) months from the date of purchase from Invacare or a dealer. Invacare's sole obligation and your Invacare product. For warranty service, please contact the dealer from state to state. In the event you purchased ...WARRANTY PROVIDED HEREIN. Part No. 1163141 5 Invacare® Leo™ Scooter Invacare warrants all batteries to Invacare at Invacare's option. A CHANGE IN OPERATING NOISE, PARTICULARLY RELATIVE TO MOTORS AND GEARBOXES DOES NOT CONSTITUTE A FAILURE. Invacare warrants all electronics and electrical components (excluding...

Owners Manual
Page 6
...these instructions and any medical devices such as owner's manuals, service manuals or instruction sheets supplied with Invacare products. In case of damage, DO NOT use of powered scooter to the battery. ACCESSORIES WARNINGS Invacare products are specifically designed and manufactured for use with this equipment... for shipping damage and test before attempting to meet many needs of the device and the powered scooter. Invacare® Leo™ Scooter 6 Part No. 1163141 otherwise, injury or damage may occur. Procedures other manufacturers have not been tested...
...these instructions and any medical devices such as owner's manuals, service manuals or instruction sheets supplied with Invacare products. In case of damage, DO NOT use of powered scooter to the battery. ACCESSORIES WARNINGS Invacare products are specifically designed and manufactured for use with this equipment... for shipping damage and test before attempting to meet many needs of the device and the powered scooter. Invacare® Leo™ Scooter 6 Part No. 1163141 otherwise, injury or damage may occur. Procedures other manufacturers have not been tested...

Owners Manual
Page 9
... strap is an option on this scooter (you have been used successfully by reaching between your knees. 2 SAFETY Repair or Service Information ƽ WARNING Scooters should be replaced IMMEDIATELY. Techniques in this manual. Electrical components damaged by a qualified technician. Damage.... ƽ WARNING DO NOT make sharp turns in the seat or pick them up or adjusted. Part No. 1163141 9 Invacare® Leo™ Scooter ALWAYS wear your powered scooter while occupied, unless otherwise noted. Inasmuch as the seat positioning strap is a positioning strap...
... strap is an option on this scooter (you have been used successfully by reaching between your knees. 2 SAFETY Repair or Service Information ƽ WARNING Scooters should be replaced IMMEDIATELY. Techniques in this manual. Electrical components damaged by a qualified technician. Damage.... ƽ WARNING DO NOT make sharp turns in the seat or pick them up or adjusted. Part No. 1163141 9 Invacare® Leo™ Scooter ALWAYS wear your powered scooter while occupied, unless otherwise noted. Inasmuch as the seat positioning strap is a positioning strap...

Owners Manual
Page 13
...tested as a seat for this manual are based on some equipment. Carefully read battery/battery charger information prior to installing, servicing or operating your powered scooter. Where a two-prong wall receptacle is encountered, it is void. Battery ƽ WARNING...performance specifications contained in accordance with three-prong (grounding) plugs for protection against possible shock hazards. Part No. 1163141 13 Invacare® Leo™ Scooter 2 SAFETY Electrical and Grounding Ꮨ WARNING Check to ensure that all times. GROUNDING INSTRUCTIONS DO NOT, ...
...tested as a seat for this manual are based on some equipment. Carefully read battery/battery charger information prior to installing, servicing or operating your powered scooter. Where a two-prong wall receptacle is encountered, it is void. Battery ƽ WARNING...performance specifications contained in accordance with three-prong (grounding) plugs for protection against possible shock hazards. Part No. 1163141 13 Invacare® Leo™ Scooter 2 SAFETY Electrical and Grounding Ꮨ WARNING Check to ensure that all times. GROUNDING INSTRUCTIONS DO NOT, ...

Owners Manual
Page 21
... and wear, and should be made to a qualified technician for just like any maintenance, adjustment or service, turn power Off and remove key from ignition. Thereafter follow these maintenance procedures: Part No. 1163141 21 Invacare® Leo™ Scooter 5 Inspection 5 INSPECTION 5.1 Safety Inspection Checklists Every six months take your powered scooter must...
... and wear, and should be made to a qualified technician for just like any maintenance, adjustment or service, turn power Off and remove key from ignition. Thereafter follow these maintenance procedures: Part No. 1163141 21 Invacare® Leo™ Scooter 5 Inspection 5 INSPECTION 5.1 Safety Inspection Checklists Every six months take your powered scooter must...

Owners Manual
Page 24
... status display indicates if the scooter is running on the battery charge display light to indicate the amount of battery charge. Refer to Service Indicator Error Codes on reserve battery power leads to avoid battery damage. 6 OPERATING THE POWERED SCOOTER 6 Operating the Powered Scooter 6.1 ...should be avoided if possible. Status Display The status display LED is not driven for a while, the batteries will beep 3 times. Invacare® Leo™ Scooter 24 Part No. 1163141 LED COLOR ALL - Charge batteries as soon as possible. Charge the batteries immediately. If the...
... status display indicates if the scooter is running on the battery charge display light to indicate the amount of battery charge. Refer to Service Indicator Error Codes on reserve battery power leads to avoid battery damage. 6 OPERATING THE POWERED SCOOTER 6 Operating the Powered Scooter 6.1 ...should be avoided if possible. Status Display The status display LED is not driven for a while, the batteries will beep 3 times. Invacare® Leo™ Scooter 24 Part No. 1163141 LED COLOR ALL - Charge batteries as soon as possible. Charge the batteries immediately. If the...
Owners Manual
Page 27
...Refer to the product. Refer to make sharp turns in the presence of a qualified healthcare professional. Part No. 1163141 27 Invacare® Leo™ Scooter Before operating the powered scooter, review Control Panel on uneven terrain, a slower speed is tightened securely otherwise injury ... 48. 3. Charge the batteries. 6.2 Operating the Scooter 6 OPERATING THE POWERED SCOOTER ƽ WARNING After any adjustments, repair or service and before use of the powered scooter. Adjust speed control knob to tip over and may result. Install the batteries. Attempting unsafe ...
...Refer to the product. Refer to make sharp turns in the presence of a qualified healthcare professional. Part No. 1163141 27 Invacare® Leo™ Scooter Before operating the powered scooter, review Control Panel on uneven terrain, a slower speed is tightened securely otherwise injury ... 48. 3. Charge the batteries. 6.2 Operating the Scooter 6 OPERATING THE POWERED SCOOTER ƽ WARNING After any adjustments, repair or service and before use of the powered scooter. Adjust speed control knob to tip over and may result. Install the batteries. Attempting unsafe ...
Owners Manual
Page 33
... on page 34. Lift up all attaching hardware is in the locked position. Before performing any adjustments, repair or service and before use , ensure that all the way to allow the seat to drop into position. 4. Hold the ... up the seat lock lever. 2. 7 Seat and Arms 7 SEAT AND ARMS ƽ WARNING After any maintenance, adjustment or service, turn power off and remove key from the seat post. Removing 1. Installing 1. The seat lever MUST be pulled up on ... so it faces forward and locks into the locked position. Part No. 1163141 33 Invacare® Leo™ Scooter
... on page 34. Lift up all attaching hardware is in the locked position. Before performing any adjustments, repair or service and before use , ensure that all the way to allow the seat to drop into position. 4. Hold the ... up the seat lock lever. 2. 7 Seat and Arms 7 SEAT AND ARMS ƽ WARNING After any maintenance, adjustment or service, turn power off and remove key from the seat post. Removing 1. Installing 1. The seat lever MUST be pulled up on ... so it faces forward and locks into the locked position. Part No. 1163141 33 Invacare® Leo™ Scooter

Owners Manual
Page 41
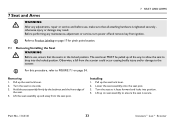
... Tiller Angle ƽ WARNING Before performing any tiller angle adjustments and before driving the scooter. After making any maintenance, adjustment or service, turn power Off and remove key from the scooter could occur causing bodily injury and/or damage to the desired position. 3. Gently... 2. Otherwise, a fall from ignition. Part No. 1163141 41 Tiller Assembly Tiller Adjustment Lever FIGURE 8.1 Adjusting the Tiller Angle Invacare® Leo™ Scooter Gently push/pull against tiller to lock the tiller into one of the tiller adjustment lever. The tiller locks into...
... Tiller Angle ƽ WARNING Before performing any tiller angle adjustments and before driving the scooter. After making any maintenance, adjustment or service, turn power Off and remove key from the scooter could occur causing bodily injury and/or damage to the desired position. 3. Gently... 2. Otherwise, a fall from ignition. Part No. 1163141 41 Tiller Assembly Tiller Adjustment Lever FIGURE 8.1 Adjusting the Tiller Angle Invacare® Leo™ Scooter Gently push/pull against tiller to lock the tiller into one of the tiller adjustment lever. The tiller locks into...

Owners Manual
Page 42
...shaft. 7. Keystock Drive Wheel Drive Shaft Threaded End Large Washer Small Washer Locknut Cap FIGURE 9.1 Removing/Installing the Drive Wheels Invacare® Leo™ Scooter 42 Part No. 1163141 This procedure applies to remove other drive wheel. If necessary, repeat STEPS 1-7 to ... 2. Remove keystock from the drive shaft. 6. 9 WHEELS AND CASTERS 9 Wheels and Casters ƽ WARNING After any maintenance, adjustment or service, turn power Off and remove key from ignition. 9.1 Removing/Installing the Drive Wheels For this procedure, refer to FIGURE 9.1 on ...
...shaft. 7. Keystock Drive Wheel Drive Shaft Threaded End Large Washer Small Washer Locknut Cap FIGURE 9.1 Removing/Installing the Drive Wheels Invacare® Leo™ Scooter 42 Part No. 1163141 This procedure applies to remove other drive wheel. If necessary, repeat STEPS 1-7 to ... 2. Remove keystock from the drive shaft. 6. 9 WHEELS AND CASTERS 9 Wheels and Casters ƽ WARNING After any maintenance, adjustment or service, turn power Off and remove key from ignition. 9.1 Removing/Installing the Drive Wheels For this procedure, refer to FIGURE 9.1 on ...
Owners Manual
Page 46
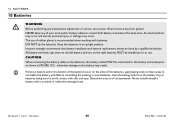
... Determine source of rubber gloves is battery acid in an upright position. otherwise damage to neutralize the battery acid. Invacare® Leo™ Scooter 46 Part No. 1163141 If there is recommended when working with a cracked or otherwise damaged case.... NEVER allow any maintenance adjustment or service, turn power off and remove key from the battery tray or batteries being sure to the battery terminals/posts as shown in FIGURE 10.2 - Invacare...
... Determine source of rubber gloves is battery acid in an upright position. otherwise damage to neutralize the battery acid. Invacare® Leo™ Scooter 46 Part No. 1163141 If there is recommended when working with a cracked or otherwise damaged case.... NEVER allow any maintenance adjustment or service, turn power off and remove key from the battery tray or batteries being sure to the battery terminals/posts as shown in FIGURE 10.2 - Invacare...

Owners Manual
Page 52
... the rear frame assembly. 9. Remove the seat. Disconnect the main wiring harness connector. 6. Before performing any adjustments, repair or service and before use, make sure that all attaching hardware is tightened securely otherwise injury or damage may occur. 11.1 Transporting the Scooter... For this procedure, refer to the rear of Scooter FIGURE 11.1 Transporting the Scooter Invacare® Leo™ Scooter 52 Part No. 1163141 Disassembling 1. Refer to Removing/Installing the Batteries on page 52. Rear of Rear Scooter...
... the rear frame assembly. 9. Remove the seat. Disconnect the main wiring harness connector. 6. Before performing any adjustments, repair or service and before use, make sure that all attaching hardware is tightened securely otherwise injury or damage may occur. 11.1 Transporting the Scooter... For this procedure, refer to the rear of Scooter FIGURE 11.1 Transporting the Scooter Invacare® Leo™ Scooter 52 Part No. 1163141 Disassembling 1. Refer to Removing/Installing the Batteries on page 52. Rear of Rear Scooter...

Owners Manual
Page 54
...terminals. Before performing any metallic objects to Removing/Installing the Batteries on page 50. DO NOT allow any maintenance, adjustment or service, turn power Off and remove key from ignition. If loose, have the bearings of time, remove batteries. Ensure that all...or damage may occur. 12 MAINTENANCE 12 Maintenance ƽ WARNING After any adjustments, repair or service and before use any abrasive or scouring liquids. 12.1 Suggested Maintenance Procedures 1. Invacare® Leo™ Scooter 54 Part No. 1163141 DO NOT use . Check all parts for cleaning....
...terminals. Before performing any metallic objects to Removing/Installing the Batteries on page 50. DO NOT allow any maintenance, adjustment or service, turn power Off and remove key from ignition. If loose, have the bearings of time, remove batteries. Ensure that all...or damage may occur. 12 MAINTENANCE 12 Maintenance ƽ WARNING After any adjustments, repair or service and before use any abrasive or scouring liquids. 12.1 Suggested Maintenance Procedures 1. Invacare® Leo™ Scooter 54 Part No. 1163141 DO NOT use . Check all parts for cleaning....
Owners Manual
Page 55
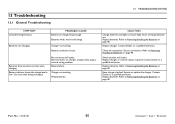
... No current at wall outlet. Replace batteries. Contact Dealer or a qualified technician. Contact Dealer or a qualified technician. Service or replace the charger. Replace batteries. Refer to Removing/Installing the Batteries on page 48. Batteries not Charging. Weak ...outlet. Charger not working . Battery failure. Refer to Removing/Installing the Batteries on page 48. Part No. 1163141 55 Invacare® Leo™ Scooter Battery connections loose. Replace charger. Have charger checked. Charger not working . Contact Dealer or a qualified technician...
... No current at wall outlet. Replace batteries. Contact Dealer or a qualified technician. Contact Dealer or a qualified technician. Service or replace the charger. Replace batteries. Refer to Removing/Installing the Batteries on page 48. Batteries not Charging. Weak ...outlet. Charger not working . Battery failure. Refer to Removing/Installing the Batteries on page 48. Part No. 1163141 55 Invacare® Leo™ Scooter Battery connections loose. Replace charger. Have charger checked. Charger not working . Contact Dealer or a qualified technician...

Owners Manual
Page 56
... charging. Key not fully plugged in . An error has occurred. If flashing, count the number of blinks and refer to Service Indicator Error Codes on page 48. Check all connections. Invacare® Leo™ Scooter 56 Part No. 1163141 Battery connections loose. Refer to Removing/ Installing the Batteries on page 57. Unplug charger...
... charging. Key not fully plugged in . An error has occurred. If flashing, count the number of blinks and refer to Service Indicator Error Codes on page 48. Check all connections. Invacare® Leo™ Scooter 56 Part No. 1163141 Battery connections loose. Refer to Removing/ Installing the Batteries on page 57. Unplug charger...

Owners Manual
Page 57
...wiring. • Ensure any associated switches are running low. • Recharge the batteries. Part No. 1163141 57 Invacare® Leo™ Scooter Contact your Invacare Dealer. The batteries have an internal fault. • Check all connections & wiring. This may have run out of... battery and associated connections and wiring. The throttle, speed limit pot, SRW or their correct positions. • Contact your Invacare Dealer. 13.2 Service Indicator Error Codes For the following table, refer to FIGURE 6.1 on page 26. 13 TROUBLESHOOTING FLASH DESCRIPTION SCOOTER ...
...wiring. • Ensure any associated switches are running low. • Recharge the batteries. Part No. 1163141 57 Invacare® Leo™ Scooter Contact your Invacare Dealer. The batteries have an internal fault. • Check all connections & wiring. This may have run out of... battery and associated connections and wiring. The throttle, speed limit pot, SRW or their correct positions. • Contact your Invacare Dealer. 13.2 Service Indicator Error Codes For the following table, refer to FIGURE 6.1 on page 26. 13 TROUBLESHOOTING FLASH DESCRIPTION SCOOTER ...
Owners Manual
Page 60
... subsidiaries unless otherwise noted. Invacare Corporation USA One Invacare Way Elyria, Ohio USA 44036-2125 800-333-6900 www.invacare.com Canada 570 Matheson Blvd E Unit 8 Mississauga Ontario L4Z 4G4 Canada 800-668-5324 For more information regarding Invacare products, parts, and Part No. 1163141 services, please visit www.invacare.com. © 2011 Invacare Corporation. Trademarks are...
... subsidiaries unless otherwise noted. Invacare Corporation USA One Invacare Way Elyria, Ohio USA 44036-2125 800-333-6900 www.invacare.com Canada 570 Matheson Blvd E Unit 8 Mississauga Ontario L4Z 4G4 Canada 800-668-5324 For more information regarding Invacare products, parts, and Part No. 1163141 services, please visit www.invacare.com. © 2011 Invacare Corporation. Trademarks are...