
User Guide
Page 31
..., it from the server. 4. Discard used batteries according to disengage it loses voltage, and the server settings stored in CMOS RAM in the absence of power. ADVARSEL Lithiumbatteri - Ved utskifting benyttes kun batteri som anbefalt av apparatfabrikanten. VARNING Explosionsfara vid felaktigt batteribyte....10 years in the RTC (for a list of approved devices. Disconnect the AC power cord from the battery. 20 Intel® Server Board SE7520AF2 User Guide Udskiftning må kun ske med batteri af samme fabrikat og type. Använd samma batterityp eller en...
..., it from the server. 4. Discard used batteries according to disengage it loses voltage, and the server settings stored in CMOS RAM in the absence of power. ADVARSEL Lithiumbatteri - Ved utskifting benyttes kun batteri som anbefalt av apparatfabrikanten. VARNING Explosionsfara vid felaktigt batteribyte....10 years in the RTC (for a list of approved devices. Disconnect the AC power cord from the battery. 20 Intel® Server Board SE7520AF2 User Guide Udskiftning må kun ske med batteri af samme fabrikat og type. Använd samma batterityp eller en...

User Guide
Page 37
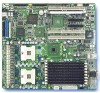
...Force Erase position, covering pins 2 and 3 as indicated in the following diagram. Open the server. 3. Clearing the CMOS Jumper 4. Intel® Server Board SE7520AF2 User Guide 27 Reconnect the AC power and power up the system. 5. Clearing the CMOS If you are not able to access ...CLEAR Protect 6 Erase 7 RECOVERY 9 BOOT Normal Boot 10 Recovery Boot 11 TP00818 Figure 18. Return the Password Clear jumper to reset the configuration RAM. Close the server chassis, reconnect the AC power and power up the system. Upgrading the BIOS 4. Power down the system and disconnect the AC...
...Force Erase position, covering pins 2 and 3 as indicated in the following diagram. Open the server. 3. Clearing the CMOS Jumper 4. Intel® Server Board SE7520AF2 User Guide 27 Reconnect the AC power and power up the system. 5. Clearing the CMOS If you are not able to access ...CLEAR Protect 6 Erase 7 RECOVERY 9 BOOT Normal Boot 10 Recovery Boot 11 TP00818 Figure 18. Return the Password Clear jumper to reset the configuration RAM. Close the server chassis, reconnect the AC power and power up the system. Upgrading the BIOS 4. Power down the system and disconnect the AC...


