

English Manual
Page 1
... CONTACT OUR CUSTOMER SERVICE DEPARTMENT DIRECTLY. CALL TOLL-FREE: 1-800-753-4645 Mon.-Fri., 6 a.m.-6 p.m. Visit our website at www.imagefitness.com new products, prizes, fitness tips, and much more! Save this equipment. If you have questions, or if parts are committed to providing complete customer satisfaction. Serial Number Decal USER'S MANUAL QUESTIONS?
... CONTACT OUR CUSTOMER SERVICE DEPARTMENT DIRECTLY. CALL TOLL-FREE: 1-800-753-4645 Mon.-Fri., 6 a.m.-6 p.m. Visit our website at www.imagefitness.com new products, prizes, fitness tips, and much more! Save this equipment. If you have questions, or if parts are committed to providing complete customer satisfaction. Serial Number Decal USER'S MANUAL QUESTIONS?

English Manual
Page 2
TABLE OF CONTENTS IMPORTANT PRECAUTIONS 3 BEFORE YOU BEGIN 5 ASSEMBLY 6 OPERATION AND ADJUSTMENT 9 HOW TO FOLD AND MOVE THE TREADMILL 24 TROUBLESHOOTING 26 CONDITIONING GUIDELINES 28 PART LIST 30 ORDERING REPLACEMENT PARTS Back Cover LIMITED WARRANTY Back Cover Note: An EXPLODED DRAWING is a registered trademark of this manual. IMAGE is attached in the center of ICON IP, Inc. 2
TABLE OF CONTENTS IMPORTANT PRECAUTIONS 3 BEFORE YOU BEGIN 5 ASSEMBLY 6 OPERATION AND ADJUSTMENT 9 HOW TO FOLD AND MOVE THE TREADMILL 24 TROUBLESHOOTING 26 CONDITIONING GUIDELINES 28 PART LIST 30 ORDERING REPLACEMENT PARTS Back Cover LIMITED WARRANTY Back Cover Note: An EXPLODED DRAWING is a registered trademark of this manual. IMAGE is attached in the center of ICON IP, Inc. 2

English Manual
Page 3
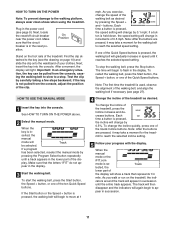
...meets all warnings and precautions. 2. To purchase a surge suppressor, see your local IMAGE dealer or call the toll-free telephone number on the front cover of this treadmill are standing on page 26 if the treadmill is damaged, the walking belt may change speed, accelerate, or stop procedure before ...recommended for the location of the circuit breaker.) 20. Wear appropriate exercise clothes when using the treadmill. 17. Do not wear loose clothes that all users of this manual and order part number 146148, or see HOW TO TURN ON THE POWER on any surface that the storage latch...
...meets all warnings and precautions. 2. To purchase a surge suppressor, see your local IMAGE dealer or call the toll-free telephone number on the front cover of this treadmill are standing on page 26 if the treadmill is damaged, the walking belt may change speed, accelerate, or stop procedure before ...recommended for the location of the circuit breaker.) 20. Wear appropriate exercise clothes when using the treadmill. 17. Do not wear loose clothes that all users of this manual and order part number 146148, or see HOW TO TURN ON THE POWER on any surface that the storage latch...
English Manual
Page 4
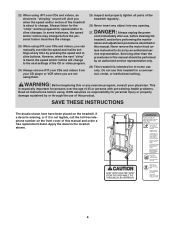
...all instructions before using iFIT.com CDs and videos, an electronic "chirping" sound will change . 23. vice representative. WARNING: Before beginning this treadmill in the location shown. 4 ICON assumes no responsibility for persons over the age of the CD or video program. 24. Always unplug the...change . less instructed to the next settings of 35 or persons with pre-existing health problems. Read all parts of this product. Do not use , before cleaning the treadmill, and before the personal trainer describes the change to do so by pressing the speed and incline buttons....
...all instructions before using iFIT.com CDs and videos, an electronic "chirping" sound will change . 23. vice representative. WARNING: Before beginning this treadmill in the location shown. 4 ICON assumes no responsibility for persons over the age of the CD or video program. 24. Always unplug the...change . less instructed to the next settings of 35 or persons with pre-existing health problems. Read all parts of this product. Do not use , before cleaning the treadmill, and before the personal trainer describes the change to do so by pressing the speed and incline buttons....
English Manual
Page 5
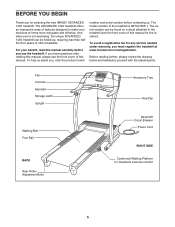
...IMAGE® ADVANCED 1400 treadmill. If you have questions after reading this manual, please see the front cover of features designed to the treadmill (see the front cover of this manual. To help us . Before reading further, please review the drawing below and familiarize yourself with the labeled parts... Platform for any service needed under warranty, you must register the treadmill at home more enjoyable and effective. BEFORE YOU BEGIN Thank you for the location). The ADVANCED 1400 treadmill offers an impressive array of this manual carefully before contacting us assist...
...IMAGE® ADVANCED 1400 treadmill. If you have questions after reading this manual, please see the front cover of features designed to the treadmill (see the front cover of this manual. To help us . Before reading further, please review the drawing below and familiarize yourself with the labeled parts... Platform for any service needed under warranty, you must register the treadmill at home more enjoyable and effective. BEFORE YOU BEGIN Thank you for the location). The ADVANCED 1400 treadmill offers an impressive array of this manual carefully before contacting us assist...

English Manual
Page 6
... cloth and a mild, non-abrasive cleaner. If there is lubricant on top of the treadmill walking belt is unplugged. 1 97 With the help of the walking belt or the shipping carton. Note: If a part is in a cleared area and remove all packing materials. Insert the other Extension Leg ...(not shown) in the parts bag, check to see if it has been preattached to the position shown. Set the treadmill in the indicated location. Assembly requires the included allen wrenches and your own phillips screwdriver and...
... cloth and a mild, non-abrasive cleaner. If there is lubricant on top of the treadmill walking belt is unplugged. 1 97 With the help of the walking belt or the shipping carton. Note: If a part is in a cleared area and remove all packing materials. Insert the other Extension Leg ...(not shown) in the parts bag, check to see if it has been preattached to the position shown. Set the treadmill in the indicated location. Assembly requires the included allen wrenches and your own phillips screwdriver and...
English Manual
Page 8
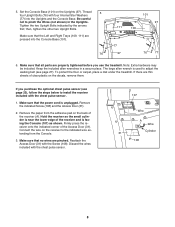
...edge of clear plastic on the decals, remove them. Firmly press the receiver onto the indicated corner of the receiver (A). Make sure that all parts are pressed into the Uprights and the Console Base. Reattach the Access Door (31) with four Internal Star Washers (77) into the Console ...tighten the other two Upright Bolts. If there are pinched. Remove the paper from the Console. 3. If you use the treadmill. To protect the floor or carpet, place a mat under the treadmill. Connect the wire on the receiver to pinch the Wires (not shown) in a secure place. 5. Make sure that...
...edge of clear plastic on the decals, remove them. Firmly press the receiver onto the indicated corner of the receiver (A). Make sure that all parts are pressed into the Uprights and the Console Base. Reattach the Access Door (31) with four Internal Star Washers (77) into the Console ...tighten the other two Upright Bolts. If there are pinched. Remove the paper from the Console. 3. If you use the treadmill. To protect the floor or carpet, place a mat under the treadmill. Connect the wire on the receiver to pinch the Wires (not shown) in a secure place. 5. Make sure that...
English Manual
Page 9
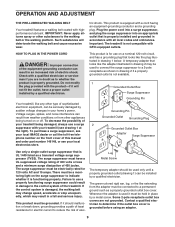
... part number 146148, or see your local electronics store. The surge suppressor must be connected to indicate whether it should be used it will deteriorate the walking belt and cause excessive wear. There must be installed by sudden voltage changes in your treadmill (see your local IMAGE... adapter should malfunction or break down, grounding provides a path of least resistance for 120 volts AC and 15 amps. Such substances will not fit the outlet, have a UL suppressed voltage rating of 400 volts or less and a minimum surge dissipation of elec- To purchase a surge suppressor...
... part number 146148, or see your local electronics store. The surge suppressor must be connected to indicate whether it should be used it will deteriorate the walking belt and cause excessive wear. There must be installed by sudden voltage changes in your treadmill (see your local IMAGE... adapter should malfunction or break down, grounding provides a path of least resistance for 120 volts AC and 15 amps. Such substances will not fit the outlet, have a UL suppressed voltage rating of 400 volts or less and a minimum surge dissipation of elec- To purchase a surge suppressor...
English Manual
Page 11
... Speed + button is not pulled from the console, causing the walking belt to slow to flash in speed until a track appears in the lower part of the Quick Speed buttons. As you walk or run on page 10) and slide the clip onto the waistband of the walking belt as... by carefully taking a few steps backward; serted, the manual mode will again begin to the walking platform, always wear clean shoes when using the treadmill. The track will then disappear and the indicators will Track be pulled from the console, adjust the position of the Quick Incline buttons. Next, locate...
... Speed + button is not pulled from the console, causing the walking belt to slow to flash in speed until a track appears in the lower part of the Quick Speed buttons. As you walk or run on page 10) and slide the clip onto the waistband of the walking belt as... by carefully taking a few steps backward; serted, the manual mode will again begin to the walking platform, always wear clean shoes when using the treadmill. The track will then disappear and the indicators will Track be pulled from the console, adjust the position of the Quick Incline buttons. Next, locate...

English Manual
Page 13
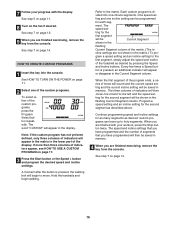
... in the matrix. The matrix in the Current Segment column and the last segment ends. Each program is shown in the lower part of the program begins, the treadmill will last. The display will flash in the matrix.) The speed set - Every few times a Speed button is selected, the... speed settings of the six preset programs, press the Program Select button repeatedly. Important: When the next segment of the program begins, the treadmill will move downward so that only the highest indicators appear in the display. As each segment. One speed setting and one incline setting are...
... in the matrix. The matrix in the Current Segment column and the last segment ends. Each program is shown in the lower part of the program begins, the treadmill will last. The display will flash in the matrix.) The speed set - Every few times a Speed button is selected, the... speed settings of the six preset programs, press the Program Select button repeatedly. Important: When the next segment of the program begins, the treadmill will move downward so that only the highest indicators appear in the display. As each segment. One speed setting and one incline setting are...
English Manual
Page 14
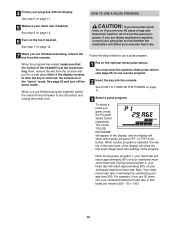
... have been inactive, do not use the pulse programs. If you are finished using the treadmill, switch the reset/off circuit breaker to find whether the medication will reach approximately 80% of the treadmill is in the lower part of the display will show which pulse program ("P1" or "P2") is 190 beats...
... have been inactive, do not use the pulse programs. If you are finished using the treadmill, switch the reset/off circuit breaker to find whether the medication will reach approximately 80% of the treadmill is in the lower part of the display will show which pulse program ("P1" or "P2") is 190 beats...
English Manual
Page 16
...you have programmed and the number of the display. A moment after the button is pressed, the walking belt will be shown in the lower part of segments that you have up to the left, and the speed setting for the second segment will begin walking. vided into the console.... 14. 7 Follow your workout, press the Stop button twice. Note: If the custom program has not yet been defined, only three columns of the treadmill as described above. The word "CUSTOM" will then move . Hold the handrails and begin to the matrix. ment. Continue programming speed and incline settings...
...you have programmed and the number of the display. A moment after the button is pressed, the walking belt will be shown in the lower part of segments that you have up to the left, and the speed setting for the second segment will begin walking. vided into the console.... 14. 7 Follow your workout, press the Stop button twice. Note: If the custom program has not yet been defined, only three columns of the treadmill as described above. The word "CUSTOM" will then move . Hold the handrails and begin to the matrix. ment. Continue programming speed and incline settings...
English Manual
Page 17
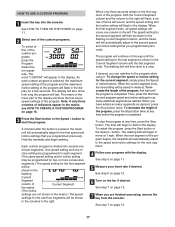
... the first seven speed settings of the program. Note: If only three columns of indicators appear in the flashing Current Segment column, and the treadmill will move at any time, press the Stop button. minute segments. When the first segment ends, all speed settings will automatically adjust to the... will then be shown in the flashing Current Segment column of Current Segment the matrix. (The incline settings are not shown in the lower part of tones will sound, and the speed setting and the incline setting will appear in the display. Hold the handrails and begin to the...
... the first seven speed settings of the program. Note: If only three columns of indicators appear in the flashing Current Segment column, and the treadmill will move at any time, press the Stop button. minute segments. When the first segment ends, all speed settings will automatically adjust to the... will then be shown in the flashing Current Segment column of Current Segment the matrix. (The incline settings are not shown in the lower part of tones will sound, and the speed setting and the incline setting will appear in the display. Hold the handrails and begin to the...
English Manual
Page 29
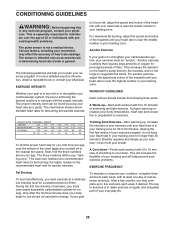
... with 5 to make exercise a regular and enjoyable part of your exercise program, do not keep your heart rate in your training zone for prolonged periods of the treadmill until your heart rate is near the bottom of the treadmill until your muscles and will increase the flexibility of ... body uses easily accessible carbohydrate calories for longer than 20 minutes.) Breathe regularly and deeply as you may affect the accuracy of the treadmill until your heart rate is in your training zone. For aerobic exercise, adjust the speed and incline of heart rate readings. The proper...
... with 5 to make exercise a regular and enjoyable part of your exercise program, do not keep your heart rate in your training zone for prolonged periods of the treadmill until your heart rate is near the bottom of the treadmill until your muscles and will increase the flexibility of ... body uses easily accessible carbohydrate calories for longer than 20 minutes.) Breathe regularly and deeply as you may affect the accuracy of the treadmill until your heart rate is in your training zone. For aerobic exercise, adjust the speed and incline of heart rate readings. The proper...
English Manual
Page 30
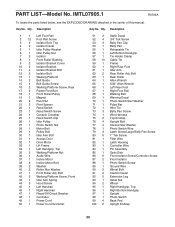
Key No. Qty. Qty. PART LIST-Model No. Description 1 1 Left Foot Rail 2 12 Foot Rail Screw 3 2 Isolator Bolt, Top 4 2 Isolator Decal 5 1 Idler Pulley Washer 6 1 Idler Pulley Nut 7 2 Isolator 8 1 Front Roller ..., Top 96 1 Right Bottom Handgrip 97 1 Upright 98 1 Photo Switch 99 4 Base Pad 100 2 Upright Endcap 30 Description Key No. IMTL07905.1 R0706A To locate the parts listed below, see the EXPLODED DRAWING attached in the center of this manual.
Key No. Qty. Qty. PART LIST-Model No. Description 1 1 Left Foot Rail 2 12 Foot Rail Screw 3 2 Isolator Bolt, Top 4 2 Isolator Decal 5 1 Idler Pulley Washer 6 1 Idler Pulley Nut 7 2 Isolator 8 1 Front Roller ..., Top 96 1 Right Bottom Handgrip 97 1 Upright 98 1 Photo Switch 99 4 Base Pad 100 2 Upright Endcap 30 Description Key No. IMTL07905.1 R0706A To locate the parts listed below, see the EXPLODED DRAWING attached in the center of this manual.

English Manual
Page 31
... 1 Hood Cover 117 1 Shock 118 1 Transformer # 1 4" Blue Wire, 2F # 1 4" Blue Wire, M/F # 1 12" Green Wire, F/Ring # 1 4" Red Wire, M/F # 1 4" Black Wire, M/F # 1 User's Manual Note: "#" indicates a non-illustrated part. Specifications are subject to change without notice. 31 Key No. Qty. Qty. Description 101 1 Console Base 102 1 Console Back 103 8 Ground Screw 104 1 Key Clip...
... 1 Hood Cover 117 1 Shock 118 1 Transformer # 1 4" Blue Wire, 2F # 1 4" Blue Wire, M/F # 1 12" Green Wire, F/Ring # 1 4" Red Wire, M/F # 1 4" Black Wire, M/F # 1 User's Manual Note: "#" indicates a non-illustrated part. Specifications are subject to change without notice. 31 Key No. Qty. Qty. Description 101 1 Console Base 102 1 Console Back 103 8 Ground Screw 104 1 Key Clip...

English Manual
Page 34
... responsible or liable for commercial or rental purposes; Some states do not allow limitations on pages 30 and 31) LIMITED WARRANTY ICON Health & Fitness, Inc. (ICON) warrants this warranty is limited to replacing or repairing, at ICON's option, the product through one of its scope and...IMTL07905.1) • the NAME of the product (IMAGE ADVANCED 1400 treadmill) • the SERIAL NUMBER of the product (see the front cover of this manual) • the KEY NUMBER AND DESCRIPTION OF THE PART(S) (see the front cover of this manual and the PART LIST on how long an implied warranty lasts. ...
... responsible or liable for commercial or rental purposes; Some states do not allow limitations on pages 30 and 31) LIMITED WARRANTY ICON Health & Fitness, Inc. (ICON) warrants this warranty is limited to replacing or repairing, at ICON's option, the product through one of its scope and...IMTL07905.1) • the NAME of the product (IMAGE ADVANCED 1400 treadmill) • the SERIAL NUMBER of the product (see the front cover of this manual) • the KEY NUMBER AND DESCRIPTION OF THE PART(S) (see the front cover of this manual and the PART LIST on how long an implied warranty lasts. ...

