Instruction Manual
Page 1
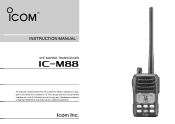
Operation is subject to the follow two conditions: (1) This device may not cause harmful interference, and (2) this device must accept any interference received, including interference that may cause undesired operation. INSTRUCTION MANUAL VHF MARINE TRANSCEIVER iM88 This device complies with Part 15 of the FCC Rules.
Operation is subject to the follow two conditions: (1) This device may not cause harmful interference, and (2) this device must accept any interference received, including interference that may cause undesired operation. INSTRUCTION MANUAL VHF MARINE TRANSCEIVER iM88 This device complies with Part 15 of the FCC Rules.
Instruction Manual
Page 2
... more than 50% of your transmission the best sound quality, hold the antenna at least 2.5 cm (1 inch) away from your Icom radio complies with Respect to Human Exposure to Radio Frequency Electromagnetic Fields, 3 kHz to assure that are not exceeded. Electromagnetic Interference/Compatibility... at least 5 cm (2 inches) from the body when transmitting and only use time ("50% duty cycle"). During transmissions, your Icom radio generates RF energy that your belt, etc., to ensure FCC RF exposure compliance requirements are sensitive to electromagnetic radiation such as this...
... more than 50% of your transmission the best sound quality, hold the antenna at least 2.5 cm (1 inch) away from your Icom radio complies with Respect to Human Exposure to Radio Frequency Electromagnetic Fields, 3 kHz to assure that are not exceeded. Electromagnetic Interference/Compatibility... at least 5 cm (2 inches) from the body when transmitting and only use time ("50% duty cycle"). During transmissions, your Icom radio generates RF energy that your belt, etc., to ensure FCC RF exposure compliance requirements are sensitive to electromagnetic radiation such as this...

Instruction Manual
Page 3
"THIS IS name of the distress and assistance re- quired. 6. Your call on Channel 16. ❍ USING CHANNEL 16 DISTRESS CALL PROCEDURE 1. "MAYDAY MAYDAY MAYDAY." 2. Any other indication of the ves- ii The nature of vessel) 3. sel. 4. "LOCATED AT your vessel requires assistance, contact other vessels and the Coast Guard by sending a distress call sign or other information which might facilitate the rescue. IN CASE OF EMERGENCY If your position) 5. Otherwise, the transceiver's keys, switches and controllers may become inoperable due to saltwater. RECOMMENDATION ...
"THIS IS name of the distress and assistance re- quired. 6. Your call on Channel 16. ❍ USING CHANNEL 16 DISTRESS CALL PROCEDURE 1. "MAYDAY MAYDAY MAYDAY." 2. Any other indication of the ves- ii The nature of vessel) 3. sel. 4. "LOCATED AT your vessel requires assistance, contact other vessels and the Coast Guard by sending a distress call sign or other information which might facilitate the rescue. IN CASE OF EMERGENCY If your position) 5. Otherwise, the transceiver's keys, switches and controllers may become inoperable due to saltwater. RECOMMENDATION ...
Instruction Manual
Page 4
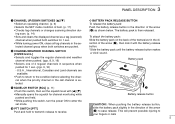
... front panel and the volume/power knob maximize simplicity of operation. Even if the IC-M88 is designed and built with Icom's state of the art technology and craftsmanship. The IC-M88 VHF MARINE TRANSCEIVER is dropped into water, it's waterproofing* will protect it...depth for purchasing this Icom product. A large, clear LCD with backlighting and backlit buttons make night time operation simple. With proper care this product should provide you for 30 minutes) Simple operation 6 clearly labelled buttons on land. Tough waterproof construction The IC-M88 is included. *...
... front panel and the volume/power knob maximize simplicity of operation. Even if the IC-M88 is designed and built with Icom's state of the art technology and craftsmanship. The IC-M88 VHF MARINE TRANSCEIVER is dropped into water, it's waterproofing* will protect it...depth for purchasing this Icom product. A large, clear LCD with backlighting and backlit buttons make night time operation simple. With proper care this product should provide you for 30 minutes) Simple operation 6 clearly labelled buttons on land. Tough waterproof construction The IC-M88 is included. *...
Instruction Manual
Page 5
... CAUTION: Changes or modifications to the transceiver. and are securely attached to operate this device, not expressly approved by Icom Inc., could void your vessel's magnetic navigation compass. The transceiver will ruin the transceiver. KEEP the transceiver at least 0.9 meters...(1 m; 3 ft depth for 30 min.). BE CAREFUL! iv Such a connection will perform best if the microphone is vertical. The IC-M88 employs waterproof con- MAKE SURE the flexible antenna and battery pack are registered trademarks of the transceiver to a power source other countries...
... CAUTION: Changes or modifications to the transceiver. and are securely attached to operate this device, not expressly approved by Icom Inc., could void your vessel's magnetic navigation compass. The transceiver will ruin the transceiver. KEEP the transceiver at least 0.9 meters...(1 m; 3 ft depth for 30 min.). BE CAREFUL! iv Such a connection will perform best if the microphone is vertical. The IC-M88 employs waterproof con- MAKE SURE the flexible antenna and battery pack are registered trademarks of the transceiver to a power source other countries...
Instruction Manual
Page 6
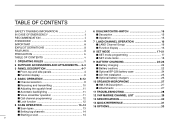
TABLE OF CONTENTS SAFETY TRAINING INFORMATION i 6 DUALWATCH/TRI-WATCH 15 IN CASE OF EMERGENCY ii Description 15 RECOMMENDATION ii Operation 15 FOREWORD iii IMPORTANT iii 7 LAND CHANNEL OPERATION 16 LAND Channel Group 16 EXPLICIT DEFINITIONS iii FEATURES iii PRECAUTION iv TABLE OF CONTENTS v Function display 16 8 SET MODE 17-21 SET mode programming 17 SET mode items 18 1 OPERATING RULES 1 9 BATTERY CHARGING 22-26 2 SUPPLIED ACCESSORIES AND ATTACHMENTS.... 2-3 Battery charging 22 3 PANEL DESCRIPTION 4-7 Front, top and side panels 4 Battery cautions 22 ...
TABLE OF CONTENTS SAFETY TRAINING INFORMATION i 6 DUALWATCH/TRI-WATCH 15 IN CASE OF EMERGENCY ii Description 15 RECOMMENDATION ii Operation 15 FOREWORD iii IMPORTANT iii 7 LAND CHANNEL OPERATION 16 LAND Channel Group 16 EXPLICIT DEFINITIONS iii FEATURES iii PRECAUTION iv TABLE OF CONTENTS v Function display 16 8 SET MODE 17-21 SET mode programming 17 SET mode items 18 1 OPERATING RULES 1 9 BATTERY CHARGING 22-26 2 SUPPLIED ACCESSORIES AND ATTACHMENTS.... 2-3 Battery charging 22 3 PANEL DESCRIPTION 4-7 Front, top and side panels 4 Battery cautions 22 ...
Instruction Manual
Page 7
.... • You must have these simplex channels cannot be on hand for safety purposes. However, non-licensed individuals may operate a transceiver. NOTE: Even though the IC-M88 is capable of the applicable government rules and regulations is only required to be lawfully used in which is the license most often held by...
.... • You must have these simplex channels cannot be on hand for safety purposes. However, non-licensed individuals may operate a transceiver. NOTE: Even though the IC-M88 is capable of the applicable government rules and regulations is only required to be lawfully used in which is the license most often held by...

Instruction Manual
Page 8
D Swivel belt clip To attach: q Attach the stopper to the belt clip. Stopper Supplied screws 2 e Once the transceiver is locked in place, it will swivel 360 degrees. 2 SUPPLIED ACCESSORIES AND ATTACHMENTS D Supplied accessories The following accessories are supplied: Qty. • Swivel belt clip 1 • Stopper for the swivel belt clip 1 • Screws for the swivel belt clip 2 • Flexible antenna 1 • Handstrap 1 • Battery pack (BP-227 1 • AC adapter (BC-147A/E 1 • Battery charger (BC-152 1 *Depending on version w Clip the belt ...
D Swivel belt clip To attach: q Attach the stopper to the belt clip. Stopper Supplied screws 2 e Once the transceiver is locked in place, it will swivel 360 degrees. 2 SUPPLIED ACCESSORIES AND ATTACHMENTS D Supplied accessories The following accessories are supplied: Qty. • Swivel belt clip 1 • Stopper for the swivel belt clip 1 • Screws for the swivel belt clip 2 • Flexible antenna 1 • Handstrap 1 • Battery pack (BP-227 1 • AC adapter (BC-147A/E 1 • Battery charger (BC-152 1 *Depending on version w Clip the belt ...

Instruction Manual
Page 9
Facilitates carrying. If the transceiver is accidentally dropped and the swivel belt clip's stopper is scratched or damaged, the swivel belt clip may damage the transceiver. 2 SUPPLIED ACCESSORIES AND ATTACHMENTS To remove: Turn the transceiver upside down, and then lift up to the antenna connector. R CAUTION! CAUTION: Transmitting without an antenna may not work properly. 3 D Handstrap Slide the handstrap through the loop on the side of the transceiver as illustrated at right. D Flexible antenna Connect the supplied flexible antenna to release the transceiver from...
Facilitates carrying. If the transceiver is accidentally dropped and the swivel belt clip's stopper is scratched or damaged, the swivel belt clip may damage the transceiver. 2 SUPPLIED ACCESSORIES AND ATTACHMENTS To remove: Turn the transceiver upside down, and then lift up to the antenna connector. R CAUTION! CAUTION: Transmitting without an antenna may not work properly. 3 D Handstrap Slide the handstrap through the loop on the side of the transceiver as illustrated at right. D Flexible antenna Connect the supplied flexible antenna to release the transceiver from...
Instruction Manual
Page 10
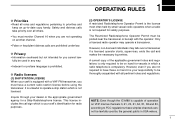
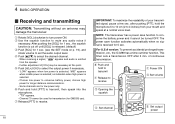
r SCAN [SCN•DUAL] (pgs. 14, 15) • Starts and stops normal or priority scan. • Enters Watch mode when pushed for 3 sec. (p. 12) 4 t TRANSMIT POWER/LOCK SWITCH [H/L•LOCK] • Selects high, middle or low power when pushed. (p. 10) • Toggles the lock function ON/OFF when pushed for 1 sec. (p. 12) y CHANNEL 16 SWITCH [16•9] • Selects Channel 16 when pushed. (p. 8) • Selects the call channel when pushed for 1 sec. (p. 8) • Enters call channel write mode when the call channel is selected and this switch is not in use. 3 PANEL ...
r SCAN [SCN•DUAL] (pgs. 14, 15) • Starts and stops normal or priority scan. • Enters Watch mode when pushed for 3 sec. (p. 12) 4 t TRANSMIT POWER/LOCK SWITCH [H/L•LOCK] • Selects high, middle or low power when pushed. (p. 10) • Toggles the lock function ON/OFF when pushed for 1 sec. (p. 12) y CHANNEL 16 SWITCH [16•9] • Selects Channel 16 when pushed. (p. 8) • Selects the call channel when pushed for 1 sec. (p. 8) • Enters call channel write mode when the call channel is selected and this switch is not in use. 3 PANEL ...
Instruction Manual
Page 11
The battery pack is selected. ï BATTERY PACK RELEASE BUTTON To release the battery pack: Push the battery release button in the direction of the arrow (q) as a tag (scanned) channel when pushed both switches for 1 sec. • While turning power ON, clears all tag channels in sequence when pushed for channel monitoring while pushed and held. • While pushing this switch, turn the power ON to enter the set the squelch level with the battery release button. *Slide the battery pack until the battery release button makes a 'click' sound. q Battery release button CAUTION!: When ...
The battery pack is selected. ï BATTERY PACK RELEASE BUTTON To release the battery pack: Push the battery release button in the direction of the arrow (q) as a tag (scanned) channel when pushed both switches for 1 sec. • While turning power ON, clears all tag channels in sequence when pushed for channel monitoring while pushed and held. • While pushing this switch, turn the power ON to enter the set the squelch level with the battery release button. *Slide the battery pack until the battery release button makes a 'click' sound. q Battery release button CAUTION!: When ...
Instruction Manual
Page 12
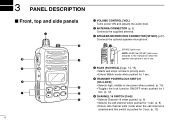
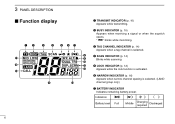
y NARROW INDICATOR (p. 16) Appears when narrow channel spacing is selected. Indication Battery level Full Middle Charging required Discharged 6 w BUSY INDICATOR (p. 10) Appears when receiving a signal or when the squelch opens. qw e r t yu e TAG CHANNEL INDICATOR (p. 14) Appears when a tag channel is selected. (LAND !4 !3 channel group only) u BATTERY INDICATOR Indicates remaining battery power. i r SCAN INDICATOR (p. 14) !7 o Blinks while scanning. !0 !6 !1 t LOCK INDICATOR (p. 12) !5 !2 Appears while the lock function is activated. " " blinks while ...
y NARROW INDICATOR (p. 16) Appears when narrow channel spacing is selected. Indication Battery level Full Middle Charging required Discharged 6 w BUSY INDICATOR (p. 10) Appears when receiving a signal or when the squelch opens. qw e r t yu e TAG CHANNEL INDICATOR (p. 14) Appears when a tag channel is selected. (LAND !4 !3 channel group only) u BATTERY INDICATOR Indicates remaining battery power. i r SCAN INDICATOR (p. 14) !7 o Blinks while scanning. !0 !6 !1 t LOCK INDICATOR (p. 12) !5 !2 Appears while the lock function is activated. " " blinks while ...
Instruction Manual
Page 13
"C" appears when Canadian; "I /S version only) Appears when the optional voice scrambler is activated. (pgs. 11, 21) !2 DUPLEX INDICATOR Appears when a duplex channel is selected. !3 SUB CHANNEL READOUT • Indicates Channel 16 during priority scan, dualwatch or tri-watch. (p. 15). • Indicates the SET mode item while in SET mode. !4 CHANNEL NUMBER READOUT • Indicates the selected operating channel number. • In SET mode, indicates the selected condition. !5 CALL CHANNEL INDICATOR (p. 8) Appears when the call channel is received. !0 DUALWATCH/TRI-WATCH INDICATORS ...
"C" appears when Canadian; "I /S version only) Appears when the optional voice scrambler is activated. (pgs. 11, 21) !2 DUPLEX INDICATOR Appears when a duplex channel is selected. !3 SUB CHANNEL READOUT • Indicates Channel 16 during priority scan, dualwatch or tri-watch. (p. 15). • Indicates the SET mode item while in SET mode. !4 CHANNEL NUMBER READOUT • Indicates the selected operating channel number. • In SET mode, indicates the selected condition. !5 CALL CHANNEL INDICATOR (p. 8) Appears when the call channel is received. !0 DUALWATCH/TRI-WATCH INDICATORS ...

Instruction Manual
Page 14
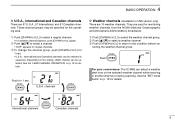
w Push [CH/WX•U/I /C/L] to return to select the call channel in each call channel. In addition, each channel group for quick recall. q Push [16•9] to select the operating channel. 9 Push for emergency communications. to the condition before se- Each regular channel group has separate call channel. w Push [CH/WX•U/I /C/L] to return to the condition before selecting Channel 9 (call channels can be reprogrammed (p. 12) and are used to select the operating channel. 9 Push D Channel 9 (Call channel) Channel 9 is automatically monitored during tri-watch . ...
w Push [CH/WX•U/I /C/L] to return to select the call channel in each call channel. In addition, each channel group for quick recall. q Push [16•9] to select the operating channel. 9 Push for emergency communications. to the condition before se- Each regular channel group has separate call channel. w Push [CH/WX•U/I /C/L] to return to the condition before selecting Channel 9 (call channels can be reprogrammed (p. 12) and are used to select the operating channel. 9 Push D Channel 9 (Call channel) Channel 9 is automatically monitored during tri-watch . ...
Instruction Manual
Page 15
.... • "DUP" appears for details. w Push [Y]/[Z] to select the weather channel group. e To change the channel group, push [CH/WX•U/I /C/L For your convenience: The IC-M88 can be specified for details. e Push [CH/WX•U/I /C/L D Weather channels (Available for monitoring weather channels from the NOAA (National Oceanographic and Atmospheric...
.... • "DUP" appears for details. w Push [Y]/[Z] to select the weather channel group. e To change the channel group, push [CH/WX•U/I /C/L For your convenience: The IC-M88 can be specified for details. e Push [CH/WX•U/I /C/L D Weather channels (Available for monitoring weather channels from the NOAA (National Oceanographic and Atmospheric...
Instruction Manual
Page 16
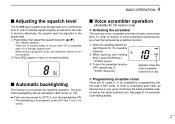
... is selected; "MID" appears when middle power is emitted from your transmitted signal, pause a few sec. For U.S.A version: To prevent accidental prolonged transmission, etc., the IC-M88 has a time-out timer function. r Push [Y]/[Z] to mute any audio noise if necessary. Choose low power to receive q Power ON e Set volume w Opening the squelch...
... is selected; "MID" appears when middle power is emitted from your transmitted signal, pause a few sec. For U.S.A version: To prevent accidental prolonged transmission, etc., the IC-M88 has a time-out timer function. r Push [Y]/[Z] to mute any audio noise if necessary. Choose low power to receive q Power ON e Set volume w Opening the squelch...
Instruction Manual
Page 17
... same scrambler unit. In order to choose from: OP is completely open; 10 is the tight squelch level. - BASIC OPERATION 4 Adjusting the squelch level The IC-M88 has a squelch even though there is no key is pushed for [PTT] to the proper level. Voice scrambler operation (Available for programming. Set the code...
... same scrambler unit. In order to choose from: OP is completely open; 10 is the tight squelch level. - BASIC OPERATION 4 Adjusting the squelch level The IC-M88 has a squelch even though there is no key is pushed for [PTT] to the proper level. Voice scrambler operation (Available for programming. Set the code...

Instruction Manual
Page 18
several times to select the desired channel group (USA, INT, CAN) to enter call channel number appear. e Push [16•9] again for 3 sec. (until a long beep changes to 2 short beeps) to be programmed flashes. w Push [16•9] for 1 sec. r Push [Y]/[Z] to prevent accidental channel changes and function access. • Push [H/L•LOCK] for 1 sec. Lock function This function electronically locks all keys (except for [PTT], [SQL] and [H/L•LOCK]) to select the desired channel. Appears while the lock function is used to be programmed. to select the call ...
several times to select the desired channel group (USA, INT, CAN) to enter call channel number appear. e Push [16•9] again for 3 sec. (until a long beep changes to 2 short beeps) to be programmed flashes. w Push [16•9] for 1 sec. r Push [Y]/[Z] to prevent accidental channel changes and function access. • Push [H/L•LOCK] for 1 sec. Lock function This function electronically locks all keys (except for [PTT], [SQL] and [H/L•LOCK]) to select the desired channel. Appears while the lock function is used to be programmed. to select the call ...
Instruction Manual
Page 19
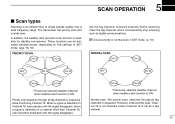
Priority scan searches through all tag channels in SET mode. (pgs. 18, 19) PRIORITY SCAN CH 01 CH 02 Set the tag channels (scanned channel) before scanning. When a signal is detected on a channel other than Channel 16, scan becomes dualwatch until the signal disappears; when a signal is detected on the settings in sequence while monitoring Channel 16. However, unlike priority scan, Channel 16 is not checked unless Channel 16 is available for standby convenience. Normal scan, like priority scan, searches through all tag channels in SET mode. (p. 18) NORMAL ...
Priority scan searches through all tag channels in SET mode. (pgs. 18, 19) PRIORITY SCAN CH 01 CH 02 Set the tag channels (scanned channel) before scanning. When a signal is detected on a channel other than Channel 16, scan becomes dualwatch until the signal disappears; when a signal is detected on the settings in sequence while monitoring Channel 16. However, unlike priority scan, Channel 16 is not checked unless Channel 16 is available for standby convenience. Normal scan, like priority scan, searches through all tag channels in SET mode. (p. 18) NORMAL ...
Instruction Manual
Page 20
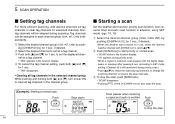
5 SCAN OPERATION Setting tag channels For more efficient scanning, add desired channels as tag channels or clear tag channels for 1 sec. e To stop the scan. 14 Nontag channels will be assigned to set the displayed chan- q Select the desired channel group (USA, INT, CAN) by pushing [CH/WX•U/I/C/L] for 1 sec. • "TAG" disappears. • Clearing all tag channels in the selected channel group While pushing and holding both [Y] and [Z], turn power ON to change the scanning direction or resume the scan manually. to stop the scan, push [SCN•DUAL]. • "...
5 SCAN OPERATION Setting tag channels For more efficient scanning, add desired channels as tag channels or clear tag channels for 1 sec. e To stop the scan. 14 Nontag channels will be assigned to set the displayed chan- q Select the desired channel group (USA, INT, CAN) by pushing [CH/WX•U/I/C/L] for 1 sec. • "TAG" disappears. • Clearing all tag channels in the selected channel group While pushing and holding both [Y] and [Z], turn power ON to change the scanning direction or resume the scan manually. to stop the scan, push [SCN•DUAL]. • "...
