Operating Instructions
Page 1
• ST • 55 4 )7, 41, iii 4 4 • 1 4 45 3; • lk Oct T p rs , 5 05 , 4 4". 5,45 41. .4ss 5 +•D•,t:,::
• ST • 55 4 )7, 41, iii 4 4 • 1 4 45 3; • lk Oct T p rs , 5 05 , 4 4". 5,45 41. .4ss 5 +•D•,t:,::
Operating Instructions
Page 3
... 6 Checklist for Proper Typewriter IBM Supplies 18 Operation 6 IBM 210 Correctable Ribbon Page-End Indicator 7 Cassette 18 To Center Information 8 IBM Color Correctable Ribbon Horizontally 8 Cassette 18 Vertically 8 IBM 800 T-III Ribbon Cassette . . . . 18 To Center the Paper 8 IBM High Yield Correctable Film Ribbon 19 As You Type 9 IBM Lift-off Tape 19 To Make A Correction 9 IBM Tech III Ribbon 20 To Type...
... 6 Checklist for Proper Typewriter IBM Supplies 18 Operation 6 IBM 210 Correctable Ribbon Page-End Indicator 7 Cassette 18 To Center Information 8 IBM Color Correctable Ribbon Horizontally 8 Cassette 18 Vertically 8 IBM 800 T-III Ribbon Cassette . . . . 18 To Center the Paper 8 IBM High Yield Correctable Film Ribbon 19 As You Type 9 IBM Lift-off Tape 19 To Make A Correction 9 IBM Tech III Ribbon 20 To Type...
Operating Instructions
Page 4
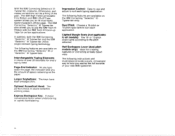
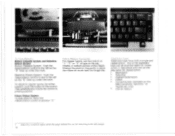
... Typewriter also allows you the amount of space remaining on the IBM Correcting "Selectric" Ill or "Selectric" III Typewriters: Interchangeable Typing Elements: A choice of over 20 available for every typing need. Page-End Indicator:... of the past. The IBM High Yield Correctable Film Ribbon and IBM Lift-off the page. In addition, both the IBM Correcting "Selectric" III Typewriter and the IBM "Selectric" Ill Typewriter utilize single-element typing technology. With the IBM Correcting Selectric01) Ill Typewriter, erasures, strikeovers, and messy corrections can be a thing of...
... Typewriter also allows you the amount of space remaining on the IBM Correcting "Selectric" Ill or "Selectric" III Typewriters: Interchangeable Typing Elements: A choice of over 20 available for every typing need. Page-End Indicator:... of the past. The IBM High Yield Correctable Film Ribbon and IBM Lift-off the page. In addition, both the IBM Correcting "Selectric" III Typewriter and the IBM "Selectric" Ill Typewriter utilize single-element typing technology. With the IBM Correcting Selectric01) Ill Typewriter, erasures, strikeovers, and messy corrections can be a thing of...
Operating Instructions
Page 5
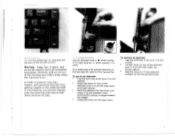
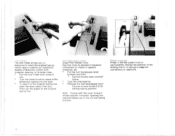
Use the lever to prevent long hair, fingers. and personal articles from getting caught on top of the On/Off control. ilfinnr" 4 On Off On?011 Cvmtoi To turn the typewriter on, depress the top part of the element until it on the element post, pointing the yellow triangle toward the platen. • Close the lever all the way down. Only elementt With yellow labeling on the.top may be sure it is not locked • Open the lever an top of the printing and ribbon area when the machine is all the way open , as shown above . To remove an element: • Tap the shift key ...
Use the lever to prevent long hair, fingers. and personal articles from getting caught on top of the On/Off control. ilfinnr" 4 On Off On?011 Cvmtoi To turn the typewriter on, depress the top part of the element until it on the element post, pointing the yellow triangle toward the platen. • Close the lever all the way down. Only elementt With yellow labeling on the.top may be sure it is not locked • Open the lever an top of the printing and ribbon area when the machine is all the way open , as shown above . To remove an element: • Tap the shift key ...
Operating Instructions
Page 6
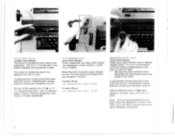
. .: , . .:...:• ... The scale is located directly above the keyboard. use a 12 A for a 12-pitch typewriter. Note: Using a typing element of one scale to type in 10 pitch; kiargin/Pttch Scale (Single-Pitch Model) This scale is numbered every five spaces from you to the other pitch will light. • Moving the pitch selection lever switches the illumination trom one pitch when the typewriter is set for a 10-pitch typewriter; use will alter only the amount of the next character to print. A red pointer moves along the scale with the carrier, indicating ...
. .: , . .:...:• ... The scale is located directly above the keyboard. use a 12 A for a 12-pitch typewriter. Note: Using a typing element of one scale to type in 10 pitch; kiargin/Pttch Scale (Single-Pitch Model) This scale is numbered every five spaces from you to the other pitch will light. • Moving the pitch selection lever switches the illumination trom one pitch when the typewriter is set for a 10-pitch typewriter; use will alter only the amount of the next character to print. A red pointer moves along the scale with the carrier, indicating ...

Operating Instructions
Page 7
For most jobs, set the control on three. For greater striking force, move the control to a higher number (example, multiple carbon packs, stencils.) For less striking force, move the control to roll the paper into the typewriter. Use this lever back after it is in the typewriter, pull the paper release lever forward. Poime To remove the paper or to the right before changing the position. Push this feature when inserting a thick carbon pack. Depress the index key to a lower number (example, offset masters). 3 Move the control to reposition the paper after the paper ...
For most jobs, set the control on three. For greater striking force, move the control to a higher number (example, multiple carbon packs, stencils.) For less striking force, move the control to roll the paper into the typewriter. Use this lever back after it is in the typewriter, pull the paper release lever forward. Poime To remove the paper or to the right before changing the position. Push this feature when inserting a thick carbon pack. Depress the index key to a lower number (example, offset masters). 3 Move the control to reposition the paper after the paper ...

Operating Instructions
Page 8
The lett margin stop . * You can space or tab through it. Note- C tarto pitch 'Within a Document (Dual-Pitch Model) If a document will contain both pica and elite, set the left margin stop prevents you from you for space-and-a-half spacing, and away from typing past the right margin, depress the margin release key (page 5) and continue typing. Use the spacebar to move the pointer out of the way before moving the margin stop cannot be moved to check the spacing in and slide the margin stops to show where the left margin at a numbered marking on the 10-pitch scale. Line ...
The lett margin stop . * You can space or tab through it. Note- C tarto pitch 'Within a Document (Dual-Pitch Model) If a document will contain both pica and elite, set the left margin stop prevents you from you for space-and-a-half spacing, and away from typing past the right margin, depress the margin release key (page 5) and continue typing. Use the spacebar to move the pointer out of the way before moving the margin stop cannot be moved to check the spacing in and slide the margin stops to show where the left margin at a numbered marking on the 10-pitch scale. Line ...

Operating Instructions
Page 9
Then tap the carrier return followed by the tab key as soon as columns of the typing begins. To set a tab, move the carrier to the space where you set a tab and depress Set. To clear all the way to the right; Set tab stops first. Typing forms is , tap the carrier return followed by the tab key as soon as you want to set tab stops at the points on the form where most of figures or addresses on the page; Hints: A partial carrier return can be at least two spaces before a tab stop you depress the carrier return or the express backspace key. (Dual Pitch Model) If a ...
Then tap the carrier return followed by the tab key as soon as columns of the typing begins. To set a tab, move the carrier to the space where you set a tab and depress Set. To clear all the way to the right; Set tab stops first. Typing forms is , tap the carrier return followed by the tab key as soon as you want to set tab stops at the points on the form where most of figures or addresses on the page; Hints: A partial carrier return can be at least two spaces before a tab stop you depress the carrier return or the express backspace key. (Dual Pitch Model) If a ...
Operating Instructions
Page 10
..., depress the left margin as long as the key is not In the stencil posi€ion. • ft the carrier will have been instailed correctly. - If nothing prints on the paper, make certain the ribbontstencil control (page 10) is held down. 4:* Y4% Shift Keys and Shift Lack To type capital...
..., depress the left margin as long as the key is not In the stencil posi€ion. • ft the carrier will have been instailed correctly. - If nothing prints on the paper, make certain the ribbontstencil control (page 10) is held down. 4:* Y4% Shift Keys and Shift Lack To type capital...

Operating Instructions
Page 11
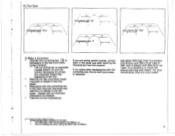
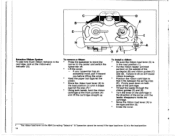
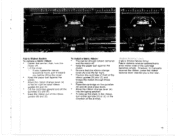
For paper inserted vertically: Use the top three lines on the indicator for paper inserted horizontally. 7 For paper inserted horizontally: Use the tower three lines on the indicator for easy viewing. 'NV The page-end indicator wilt • Show you approximately how far you are from the bottom of a page. • Support the paper for paper inserted vertically.
For paper inserted vertically: Use the top three lines on the indicator for paper inserted horizontally. 7 For paper inserted horizontally: Use the tower three lines on the indicator for easy viewing. 'NV The page-end indicator wilt • Show you approximately how far you are from the bottom of a page. • Support the paper for paper inserted vertically.

Operating Instructions
Page 12
For example, for the center of paper 814 inchas .(215.90 mm) wide. 8 inches (215,90 mm) wide, both edges touch f-14 , • Whcn paper is centered in the typewriter, The dot in It of the paper, Backspace once for every two characters to gauge the bottom margin. ..vier the Paper To center any width paper, insert the paper so that the left and right edges touch the same number on the margin scale, use the first dot for paper 81/w. Info Horizontally • Move the carrier to the center of the margin scale is . When paper is thii c:i.mter of C6 lines per ...
For example, for the center of paper 814 inchas .(215.90 mm) wide. 8 inches (215,90 mm) wide, both edges touch f-14 , • Whcn paper is centered in the typewriter, The dot in It of the paper, Backspace once for every two characters to gauge the bottom margin. ..vier the Paper To center any width paper, insert the paper so that the left and right edges touch the same number on the margin scale, use the first dot for paper 81/w. Info Horizontally • Move the carrier to the center of the margin scale is . When paper is thii c:i.mter of C6 lines per ...
Operating Instructions
Page 13
... color coded. 1 When typing offset masters do not use: • The IBM High Yield Correctable Film Ribbon, or • The correcting key when using the IBM Tech Iii Ribbon. Use either IBM High Yield Correctable Film Ribbon with IBM Lift-off Tape or IBM Tech ill Ribbon with IBM Cover-up Tape.1 it is necessary to delete it from the...
... color coded. 1 When typing offset masters do not use: • The IBM High Yield Correctable Film Ribbon, or • The correcting key when using the IBM Tech Iii Ribbon. Use either IBM High Yield Correctable Film Ribbon with IBM Lift-off Tape or IBM Tech ill Ribbon with IBM Cover-up Tape.1 it is necessary to delete it from the...
Operating Instructions
Page 14
... the page without the (Ardor cottoning to space down for repeat action. • Backspace • Spacebar • Hyphen/Underscore • Index2 • Correcting key (available on the control. Any of the ribbon. To return to regular typing €for either system), push the button on the... IBM Correct€ng "Seleciric" ill Typewr€ter only) • Carrier Return 2 Index key is used to the lett margin. 10 i t ' i t cf p g,„ ...
... the page without the (Ardor cottoning to space down for repeat action. • Backspace • Spacebar • Hyphen/Underscore • Index2 • Correcting key (available on the control. Any of the ribbon. To return to regular typing €for either system), push the button on the... IBM Correct€ng "Seleciric" ill Typewr€ter only) • Carrier Return 2 Index key is used to the lett margin. 10 i t ' i t cf p g,„ ...

Operating Instructions
Page 15
... vertical lines. Position an "i" or an "I" directly under the vertical line at the bottom of the cardholder. and envelopes close to its original position for a correction, use the notches on the cardholder as illustrated above the line. The red vertical line on the cardholder can roll the platen freely. This line...
... vertical lines. Position an "i" or an "I" directly under the vertical line at the bottom of the cardholder. and envelopes close to its original position for a correction, use the notches on the cardholder as illustrated above the line. The red vertical line on the cardholder can roll the platen freely. This line...
Operating Instructions
Page 16
.... Then roll the platen to the original typing line.. Carrier moves back one -half space out of the writing line or to realign a page for corrections or additions. 12 a)). • Pull the half backspace lever forward and hold. - Firoter The line tinder allows you to temporarily leave the original typing line...
.... Then roll the platen to the original typing line.. Carrier moves back one -half space out of the writing line or to realign a page for corrections or additions. 12 a)). • Pull the half backspace lever forward and hold. - Firoter The line tinder allows you to temporarily leave the original typing line...
Operating Instructions
Page 17
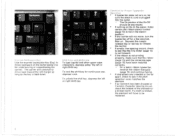
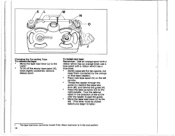
... • to the operating position (2). Close the cover. To avoid any confusion In matching ribbon cartridges the cot responding coi itctirig tape for the IBM Correcting "SeJectric" Ili Typewriter, ribbon cartridges and tapes are color coded. To Install a ribbon: • Be sure the ribbon load lever (B) is ...to the ribbon system on page 22 to order ribbons and other supplies. See "Ordering Procedures" on your typewri cannot be moved if the correction tape load lever (C) is in the load position (1). • Using both hands, lift the cassette straight up and off. The ribbon...
... • to the operating position (2). Close the cover. To avoid any confusion In matching ribbon cartridges the cot responding coi itctirig tape for the IBM Correcting "SeJectric" Ili Typewriter, ribbon cartridges and tapes are color coded. To Install a ribbon: • Be sure the ribbon load lever (B) is ...to the ribbon system on page 22 to order ribbons and other supplies. See "Ordering Procedures" on your typewri cannot be moved if the correction tape load lever (C) is in the load position (1). • Using both hands, lift the cassette straight up and off. The ribbon...
Operating Instructions
Page 18
... the ribbon guides (C) and (0). • Turn the knob on the cartridge in the load position (1). • Put the ribbon leader (uninked portion) on the ISM Correcting "Selectric" III Typewriter cannot be moved if the tape load lever (I To remove a ribbon: • Press the spacebar to move the carrier to the type position (2). •...
... the ribbon guides (C) and (0). • Turn the knob on the cartridge in the load position (1). • Put the ribbon leader (uninked portion) on the ISM Correcting "Selectric" III Typewriter cannot be moved if the tape load lever (I To remove a ribbon: • Press the spacebar to move the carrier to the type position (2). •...
Operating Instructions
Page 19
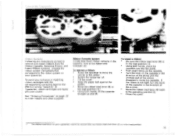
However, to manually reverse the ribbon, press the ribbon reverse lever nearest you before lifting the cover. • Keep the paper bail against the platen. • Be sure that the ribbon change lever (A) is ...2.6,0,20..2e2 42 .412r4.11=11M2 al; then, turn either side of the ribbon guides (B) and (C) To Install a fabric ribbon: • The carrier should remain centered •and the motor off. If your typewriter has an acoustical hood, pull it toward you to raise ribbon guides (C) and (C). • Lift the cartridge upward and off . • Lilt the cover. - ...
However, to manually reverse the ribbon, press the ribbon reverse lever nearest you before lifting the cover. • Keep the paper bail against the platen. • Be sure that the ribbon change lever (A) is ...2.6,0,20..2e2 42 .412r4.11=11M2 al; then, turn either side of the ribbon guides (B) and (C) To Install a fabric ribbon: • The carrier should remain centered •and the motor off. If your typewriter has an acoustical hood, pull it toward you to raise ribbon guides (C) and (C). • Lift the cartridge upward and off . • Lilt the cover. - ...
Operating Instructions
Page 20
... the empty tape spool (K), twist slightly clockwise; To Install new tap*: Remember: Use an orange spool with a ribbon which has an orange knob; 0 0 Changing the Correcting Tape To remove the tape: • Move the tape load lever (J) to the left • spindle. remove takeup spool.
... the empty tape spool (K), twist slightly clockwise; To Install new tap*: Remember: Use an orange spool with a ribbon which has an orange knob; 0 0 Changing the Correcting Tape To remove the tape: • Move the tape load lever (J) to the left • spindle. remove takeup spool.

Operating Instructions
Page 21
Note: The element will help the service person diagnose the problem and repair the typewriter, 17 make a note of the problem, The sample will break if you call for service. it with a dry brush and cloth. Where stubborn stains persist, consult your typewriter shoell receive periodic inspection an≥ lubrication by trained service personnel only. cr.: • Cover the typewriter at the end of the typHwriter Certain cleaning fluids may be repaired. the dust cover protects the typewriter from the typewriter and clean it possible, save a sample of the problem when you drop ...
Note: The element will help the service person diagnose the problem and repair the typewriter, 17 make a note of the problem, The sample will break if you call for service. it with a dry brush and cloth. Where stubborn stains persist, consult your typewriter shoell receive periodic inspection an≥ lubrication by trained service personnel only. cr.: • Cover the typewriter at the end of the typHwriter Certain cleaning fluids may be repaired. the dust cover protects the typewriter from the typewriter and clean it possible, save a sample of the problem when you drop ...
