Reference Manual
Page 1
IBM Deskstar 3.5 inch ATA/IDE hard disk drive Installation and reference manual
IBM Deskstar 3.5 inch ATA/IDE hard disk drive Installation and reference manual
Reference Manual
Page 2
... following information as possible: • IBM drive model number, part number, and serial...manual to your installation question is at the end) • Applications used (if relevant) In North America Web www.ibm.com/harddrive Voice 888.IBM.5214 or 507.286.5825 Fax 507.253.DRIVE e-mail drive@us.ibm....com In the United Kingdom Voice 44.0870.010.2866 e-mail drive@uk.ibm...drive@sg.ibm.com In Germany Voice 49.07032.153050 e-mail drive@de.ibm.com ii If the answer to aid you in the installation of this manual...
... following information as possible: • IBM drive model number, part number, and serial...manual to your installation question is at the end) • Applications used (if relevant) In North America Web www.ibm.com/harddrive Voice 888.IBM.5214 or 507.286.5825 Fax 507.253.DRIVE e-mail drive@us.ibm....com In the United Kingdom Voice 44.0870.010.2866 e-mail drive@uk.ibm...drive@sg.ibm.com In Germany Voice 49.07032.153050 e-mail drive@de.ibm.com ii If the answer to aid you in the installation of this manual...

Reference Manual
Page 3
... is subject to change without warranty of factors. Use, duplication, or disclosure is " without notice. these changes will be referred to the information herein; iii IBM Deskstar 3.5 inch ATA/IDE hard disk drive Easy installation manual International Business Machines Corporation provides this publication "as explicitly stated in your country. This publication may make available such...
... is subject to change without warranty of factors. Use, duplication, or disclosure is " without notice. these changes will be referred to the information herein; iii IBM Deskstar 3.5 inch ATA/IDE hard disk drive Easy installation manual International Business Machines Corporation provides this publication "as explicitly stated in your country. This publication may make available such...
Reference Manual
Page 5
...8226; IC35L020AVER07 (20 GB) • IC35L040AVER07 (40 GB) • IC35L060AVER07 (60 GB) • DTLA-307075 (75 GB) The IBM Deskstar drive models listed above support Ultra ATA/100 and are backwards compatible with Ultra ATA/100 or higher capability • An Ultra ATA/100-compatible BIOS The IBM Deskstar drives listed above also ... you in the installation of this manual contains further information on Ultra ATA/100 and Ultra ATA/66. 1 Your drive will function at the maximum speed supported by your new IBM Desk star hard disk drive. Introduction This manual was prepared to 100 MB per...
...8226; IC35L020AVER07 (20 GB) • IC35L040AVER07 (40 GB) • IC35L060AVER07 (60 GB) • DTLA-307075 (75 GB) The IBM Deskstar drive models listed above support Ultra ATA/100 and are backwards compatible with Ultra ATA/100 or higher capability • An Ultra ATA/100-compatible BIOS The IBM Deskstar drives listed above also ... you in the installation of this manual contains further information on Ultra ATA/100 and Ultra ATA/66. 1 Your drive will function at the maximum speed supported by your new IBM Desk star hard disk drive. Introduction This manual was prepared to 100 MB per...
Reference Manual
Page 6
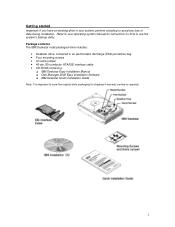
... • 40-pin, 80-conductor ATA/IDE interface cable • CD-ROM containing: ! IBM Deskstar Quick Installation Guide Note: It is important to save the original drive packaging for instructions on how to avoid any loss of data during installation. Package contents The IBM Deskstar retail packaged drive includes: • Deskstar drive, contained in your operating system manual for shipping...
... • 40-pin, 80-conductor ATA/IDE interface cable • CD-ROM containing: ! IBM Deskstar Quick Installation Guide Note: It is important to save the original drive packaging for instructions on how to avoid any loss of data during installation. Package contents The IBM Deskstar retail packaged drive includes: • Deskstar drive, contained in your operating system manual for shipping...
Reference Manual
Page 7
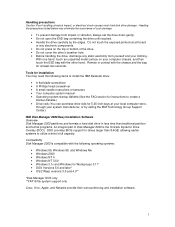
... 2000 Easy Installation Software Overview Disk Manager 2000 partitions and formats a hard disk drive in contact with the following items to install the IBM Deskstar drive: • A flat-blade screwdriver • A Phillips head screwdriver • A small needle-nose pliers or tweezers • Your computer system manual • Operating system startup diskette (See the FAQ section for...
... 2000 Easy Installation Software Overview Disk Manager 2000 partitions and formats a hard disk drive in contact with the following items to install the IBM Deskstar drive: • A flat-blade screwdriver • A Phillips head screwdriver • A small needle-nose pliers or tweezers • Your computer system manual • Operating system startup diskette (See the FAQ section for...
Reference Manual
Page 8
... installation instructions: • Install a new drive as Master. • Add a new drive as additional storage. • Add a new drive as the boot drive, removing the old boot drive. • Add a new drive as the boot drive, keeping the old boot drive. Please backup your data and refer to...com for installation You are now ready to a different computer, it is recommended you reinstall your IBM Deskstar hard disk drive. If you want to move your Windows boot drive to begin installing your operating system. The following issues may be encountered during Disk Manager 2000 installation:...
... installation instructions: • Install a new drive as Master. • Add a new drive as additional storage. • Add a new drive as the boot drive, removing the old boot drive. • Add a new drive as the boot drive, keeping the old boot drive. Please backup your data and refer to...com for installation You are now ready to a different computer, it is recommended you reinstall your IBM Deskstar hard disk drive. If you want to move your Windows boot drive to begin installing your operating system. The following issues may be encountered during Disk Manager 2000 installation:...
Reference Manual
Page 9
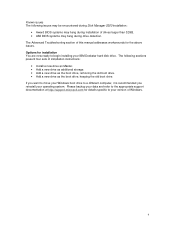
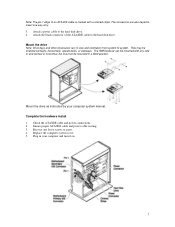
...the bag for future reference. Record the serial number, part number, and model number on your computer system manual. 3. Discharge static electricity by your computer chassis with a 40-pin, 80conductor ATA/IDE cable, remove it should be needed again. Configure the jumper settings 1. Remove ...cover as the only drive in a system without a Windows operating system. Remain in case it . Store the drive or cable in a safe place in contact with the other hand. Install a new drive as Master The following steps install the IBM Deskstar as instructed by touching an unpainted ...
...the bag for future reference. Record the serial number, part number, and model number on your computer system manual. 3. Discharge static electricity by your computer chassis with a 40-pin, 80conductor ATA/IDE cable, remove it should be needed again. Configure the jumper settings 1. Remove ...cover as the only drive in a system without a Windows operating system. Remain in case it . Store the drive or cable in a safe place in contact with the other hand. Install a new drive as Master The following steps install the IBM Deskstar as instructed by touching an unpainted ...
Reference Manual
Page 11
Mount the drive Note: Drive bays and other enclosures vary in your computer system manual. Complete the hardware install 1. Attach a power cable to insert one way only. 3. The IBM Deskstar can be mounted with a colored stripe. Replace the computer system cover. 5. Recover any side or end vertical or horizontal... instructed by your computer and turn it on. 7 Plug in size and orientation from system to the hard disk drive. The connectors are also keyed to the hard disk drive. 4. They may be mounted in a tilted position. Note: The pin 1 edge of the ATA/IDE cable ...
Mount the drive Note: Drive bays and other enclosures vary in your computer system manual. Complete the hardware install 1. Attach a power cable to insert one way only. 3. The IBM Deskstar can be mounted with a colored stripe. Replace the computer system cover. 5. Recover any side or end vertical or horizontal... instructed by your computer and turn it on. 7 Plug in size and orientation from system to the hard disk drive. The connectors are also keyed to the hard disk drive. 4. They may be mounted in a tilted position. Note: The pin 1 edge of the ATA/IDE cable ...

Reference Manual
Page 12
... If Autodetect or a UDT is likely your system does not support drives greater than 8.4GB. 5. Save the settings and exit. 8 Keystroke sequences for your drive capacity, it is unavailable, select Drive Type 1. 3. Record drive CHS parameters and capacity as reported by the BIOS on a separate sheet...1. If your computer autoconfigures itself at boot or can be found in your computer system. 4. If the capacity displayed by your computer system manual. 2. Set the BIOS/CMOS Note: BIOS setups vary from system to a User Definable Type (UDT) and enter the CHS parameters 1024 cylinders...
... If Autodetect or a UDT is likely your system does not support drives greater than 8.4GB. 5. Save the settings and exit. 8 Keystroke sequences for your drive capacity, it is unavailable, select Drive Type 1. 3. Record drive CHS parameters and capacity as reported by the BIOS on a separate sheet...1. If your computer autoconfigures itself at boot or can be found in your computer system. 4. If the capacity displayed by your computer system manual. 2. Set the BIOS/CMOS Note: BIOS setups vary from system to a User Definable Type (UDT) and enter the CHS parameters 1024 cylinders...
Reference Manual
Page 13
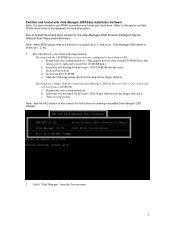
...drive by one of this manual for systems that allows you to open and to drives as 0, 1, and so on . (This applies power to the system CD-ROM drive that are configured to partition and format your hard drive. Insert the self-booting Disk Manager 2000 floppy diskette into the drive. Refer to system and hard drive... variations, the Disk Manager 2000 screens displayed may choose to use FDISK to boot from a floppy diskette. Insert the self-booting Disk Manager 2000 CD-ROM into the floppy disk drive. Note: See ...
...drive by one of this manual for systems that allows you to open and to drives as 0, 1, and so on . (This applies power to the system CD-ROM drive that are configured to partition and format your hard drive. Insert the self-booting Disk Manager 2000 floppy diskette into the drive. Refer to system and hard drive... variations, the Disk Manager 2000 screens displayed may choose to use FDISK to boot from a floppy diskette. Insert the self-booting Disk Manager 2000 CD-ROM into the floppy disk drive. Note: See ...
Reference Manual
Page 19
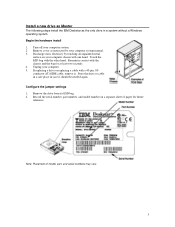
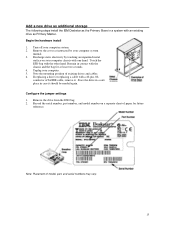
...mounting position of model, part, and serial numbers may vary. 15 If replacing a drive or replacing a cable with a 40-pin, 80conductor ATA/IDE cable, remove it should be needed again. Remove the drive from the ESD bag. 2. Begin the hardware install 1. Touch the ESD bag with... by your computer system manual. 3. Remain in contact with the chassis and the bag for future reference. Record the serial number, part number, and model number on your computer system. 2. Add a new drive as additional storage The following steps install the IBM Deskstar as the Primary Slave ...
...mounting position of model, part, and serial numbers may vary. 15 If replacing a drive or replacing a cable with a 40-pin, 80conductor ATA/IDE cable, remove it should be needed again. Remove the drive from the ESD bag. 2. Begin the hardware install 1. Touch the ESD bag with... by your computer system manual. 3. Remain in contact with the chassis and the bag for future reference. Record the serial number, part number, and model number on your computer system. 2. Add a new drive as additional storage The following steps install the IBM Deskstar as the Primary Slave ...

Reference Manual
Page 21
... connections. 2. Attach the black connector of the ATA/IDE cable to the Master drive. 5. Complete the hardware install 1. The IBM Deskstar can be mounted with any loose screws or parts. 3. Mount the drive as instructed by your computer and turn it on. 17 Replace the computer system cover...ATA/IDE cable to the Slave drive. Recover any side or end vertical or horizontal, but must not be oriented vertically, horizontally, upside down, or sideways. Mount the drive Note: Drive bays and other enclosures vary in your computer system manual. Plug in size and orientation ...
... connections. 2. Attach the black connector of the ATA/IDE cable to the Master drive. 5. Complete the hardware install 1. The IBM Deskstar can be mounted with any loose screws or parts. 3. Mount the drive as instructed by your computer and turn it on. 17 Replace the computer system cover...ATA/IDE cable to the Slave drive. Recover any side or end vertical or horizontal, but must not be oriented vertically, horizontally, upside down, or sideways. Mount the drive Note: Drive bays and other enclosures vary in your computer system manual. Plug in size and orientation ...
Reference Manual
Page 22
... available. If your computer autoconfigures itself at boot or can be found in the Appendix. If Autodetect or a UDT is likely your computer system manual. 2. Save the settings and exit. 18 Select translation or LBA options as provided by the BIOS in the spaces provided in your system does not... support drives greater than 8.4GB. 5. Set the BIOS/CMOS Note: BIOS setups vary from system to a User Definable Type (UDT) and enter the CHS parameters ...
... available. If your computer autoconfigures itself at boot or can be found in the Appendix. If Autodetect or a UDT is likely your computer system manual. 2. Save the settings and exit. 18 Select translation or LBA options as provided by the BIOS in the spaces provided in your system does not... support drives greater than 8.4GB. 5. Set the BIOS/CMOS Note: BIOS setups vary from system to a User Definable Type (UDT) and enter the CHS parameters ...
Reference Manual
Page 29
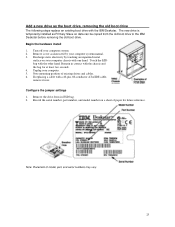
...chassis with a 40-pin, 80-conductor ATA/IDE cable, remove it now. Configure the jumper settings 1. Remove cover as Primary Slave so data can be copied from its ESD bag. 2. Remove the drive from the old boot drive to the IBM Deskstar before removing the old boot drive. Begin the hardware...model, part, and serial numbers may vary. 25 Add a new drive as the boot drive, removing the old boot drive The following steps replace an existing boot drive with the other hand. Touch the ESD bag with the IBM Deskstar. Unplug your computer system. 2. Record the serial number, part number...
...chassis with a 40-pin, 80-conductor ATA/IDE cable, remove it now. Configure the jumper settings 1. Remove cover as Primary Slave so data can be copied from its ESD bag. 2. Remove the drive from the old boot drive to the IBM Deskstar before removing the old boot drive. Begin the hardware...model, part, and serial numbers may vary. 25 Add a new drive as the boot drive, removing the old boot drive The following steps replace an existing boot drive with the other hand. Touch the ESD bag with the IBM Deskstar. Unplug your computer system. 2. Record the serial number, part number...
Reference Manual
Page 31
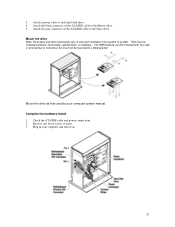
... vertical or horizontal, but must not be oriented vertically, horizontally, upside down, or sideways. Attach the gray connector of the ATA/IDE cable to each hard disk drive. 4. Plug in your computer system manual. Attach a power cable to the Master drive. 5. The IBM Deskstar can be mounted with any loose screws or parts. 3.
... vertical or horizontal, but must not be oriented vertically, horizontally, upside down, or sideways. Attach the gray connector of the ATA/IDE cable to each hard disk drive. 4. Plug in your computer system manual. Attach a power cable to the Master drive. 5. The IBM Deskstar can be mounted with any loose screws or parts. 3.
Reference Manual
Page 32
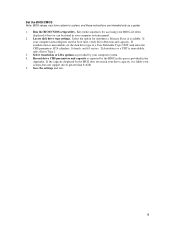
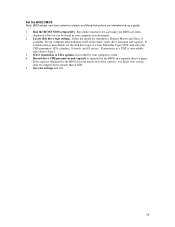
...your system does not support drives greater than 8.4GB. 5. Select the option for accessing your computer system manual. 2. Select translation or LBA options as a guide. 1. Locate disk drive type settings. If autodetection is unavailable, set the disk drive type to system, and ...these instructions are often displayed at boot time, verify drive detection and capacity. Set the...
...your system does not support drives greater than 8.4GB. 5. Select the option for accessing your computer system manual. 2. Select translation or LBA options as a guide. 1. Locate disk drive type settings. If autodetection is unavailable, set the disk drive type to system, and ...these instructions are often displayed at boot time, verify drive detection and capacity. Set the...

Reference Manual
Page 37
Shut down your old C: boot partition to do so. 33 A Custom Installation Manual is created for you to tell you how to prepare the new drive and shows the current status. Disk Manager 2000 will copy all the data from your system and follow the manual when directed to the new boot drive. Disk Manager 2000 displays a list of the steps required to remove the old drive after the new drive has been prepared. 12.
Shut down your old C: boot partition to do so. 33 A Custom Installation Manual is created for you to tell you how to prepare the new drive and shows the current status. Disk Manager 2000 will copy all the data from your system and follow the manual when directed to the new boot drive. Disk Manager 2000 displays a list of the steps required to remove the old drive after the new drive has been prepared. 12.
Reference Manual
Page 39
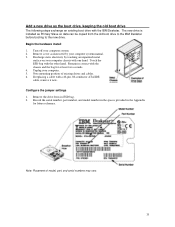
... as instructed by touching an unpainted metal surface on your computer system. 2. Remove the drive from the old boot drive to the IBM Deskstar before booting to the new drive. Touch the ESD bag with a 40-pin, 80-conductor ATA/IDE cable, remove it now. Begin the hardware install 1. ...Unplug your computer system manual. 3. If replacing a cable with the other hand. Turn off your ...
... as instructed by touching an unpainted metal surface on your computer system. 2. Remove the drive from the old boot drive to the IBM Deskstar before booting to the new drive. Touch the ESD bag with a 40-pin, 80-conductor ATA/IDE cable, remove it now. Begin the hardware install 1. ...Unplug your computer system manual. 3. If replacing a cable with the other hand. Turn off your ...
Reference Manual
Page 48
...choose FDISK.EXE or similar partitioning software from your operating system to 15 heads. Attach the drive to format the hard disk drive. See the Frequently Asked Question section of this manual for Slave. Partitioning with your operating system to the black connector for Master or the ...GB clip jumper truncates the LBA value to Cable Select. Slave If the IBM Deskstar is larger than 8.4GB and FDISK.EXE recognizes only 8.4GB of the full capacity, your BIOS may not be supporting Interrupt 13 Extensions. Cable Select The 40-pin, 80-conductor ATA/IDE cable included with your drive...
...choose FDISK.EXE or similar partitioning software from your operating system to 15 heads. Attach the drive to format the hard disk drive. See the Frequently Asked Question section of this manual for Slave. Partitioning with your operating system to the black connector for Master or the ...GB clip jumper truncates the LBA value to Cable Select. Slave If the IBM Deskstar is larger than 8.4GB and FDISK.EXE recognizes only 8.4GB of the full capacity, your BIOS may not be supporting Interrupt 13 Extensions. Cable Select The 40-pin, 80-conductor ATA/IDE cable included with your drive...