
Parts Manual
Page 11
... 1 505 28 00-01 1 Description Assembly, Fender, Right Gry Assembly, Fender, Left Gry Assembly, Fuel Tank Cap, Fuel w/ Tether Cable, Throttle J Hook Switch, Ignition Switch, Blade Cable, Battery Positive Knob Panel, Control Battery Bracket, Battery Box, Battery Black Terminal Cover Terminal Cover Valve, Fuel Check Valve, Fuel Assembly, Fuel Line w/ Valve...
... 1 505 28 00-01 1 Description Assembly, Fender, Right Gry Assembly, Fender, Left Gry Assembly, Fuel Tank Cap, Fuel w/ Tether Cable, Throttle J Hook Switch, Ignition Switch, Blade Cable, Battery Positive Knob Panel, Control Battery Bracket, Battery Box, Battery Black Terminal Cover Terminal Cover Valve, Fuel Check Valve, Fuel Assembly, Fuel Line w/ Valve...

Parts Manual
Page 19
... 90 05-00 2 532 11 04-52 1 532 17 85-15 1 532 18 76-90 3 819 19 19-12 2 Description Deck Org Belt 54" Deck Blade, Hi-lift Belt Shield, Left Gry Belt Shield, Right Gry Mandrel, Aluminum Wheel, Gauge Roller, Gauge Pulley, Mandrel Pulley Idler Pulley Idler Deflector 54" Org...
... 90 05-00 2 532 11 04-52 1 532 17 85-15 1 532 18 76-90 3 819 19 19-12 2 Description Deck Org Belt 54" Deck Blade, Hi-lift Belt Shield, Left Gry Belt Shield, Right Gry Mandrel, Aluminum Wheel, Gauge Roller, Gauge Pulley, Mandrel Pulley Idler Pulley Idler Deflector 54" Org...
Owner Manual
Page 7
...SAFETY INSTRUCTIONS COULD RESULT IN SERIOUS INJURY OR DEATH. Children who have been given rides in daylight or good artificial light. 7 Stop the blades when going near rotating parts or under the machine. They can fall off . Stop machine if someone . THIS CUTTING MACHINE CAN AMPUTATE ... child enters the area. • Before and while backing, look down and behind and down before turning. • Always turn machine off blades, move the steering control lever out to the park brake position, stop engine and remove keys before starting. • It is recommended that someone...
...SAFETY INSTRUCTIONS COULD RESULT IN SERIOUS INJURY OR DEATH. Children who have been given rides in daylight or good artificial light. 7 Stop the blades when going near rotating parts or under the machine. They can fall off . Stop machine if someone . THIS CUTTING MACHINE CAN AMPUTATE ... child enters the area. • Before and while backing, look down and behind and down before turning. • Always turn machine off blades, move the steering control lever out to the park brake position, stop engine and remove keys before starting. • It is recommended that someone...

Owner Manual
Page 8
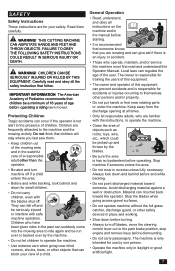
...recommended. 8 • Always wear approved protective glasses or a full visor when assembling or driving. • Always wear gloves when handling the blades. • Do not wear loose clothing that operators age 60 years and above are a major cause related to occur. Uneven terrain could suddenly ... of control and tip-over . • Use more care while operating machine with slopes greater than 10 degrees. SAFETY • Disengage blades when not mowing. Slope Operation Slopes are involved in severe injury or death. Operation on wet grass. Clean oil or fuel spillage before ...
...recommended. 8 • Always wear approved protective glasses or a full visor when assembling or driving. • Always wear gloves when handling the blades. • Do not wear loose clothing that operators age 60 years and above are a major cause related to occur. Uneven terrain could suddenly ... of control and tip-over . • Use more care while operating machine with slopes greater than 10 degrees. SAFETY • Disengage blades when not mowing. Slope Operation Slopes are involved in severe injury or death. Operation on wet grass. Clean oil or fuel spillage before ...
Owner Manual
Page 9
... spilled fuel. • Do not use gasoline as necessary. • Do not interfere with manufacturer's recommended parts when necessary. Wrap blades or use care in fuel system, the engine must not be started when the driver's floor plate or protective plates for maintenance work ... Always put containers on the ground. DO NOT operate a machine with a safety device that all nuts and bolts, especially those fastening the blade attachments, are explosive. The engine must not be started until problem has been resolved. • Check the fuel level before starting. •...
... spilled fuel. • Do not use gasoline as necessary. • Do not interfere with manufacturer's recommended parts when necessary. Wrap blades or use care in fuel system, the engine must not be started when the driver's floor plate or protective plates for maintenance work ... Always put containers on the ground. DO NOT operate a machine with a safety device that all nuts and bolts, especially those fastening the blade attachments, are explosive. The engine must not be started until problem has been resolved. • Check the fuel level before starting. •...

Owner Manual
Page 10
... of the starter circuit. The machine is used in good working with this machine, do maintenance on your authorized Husqvarna dealer. 10 Do not lift! A spark arrestor for the machine. • The mulch blades must only be used , it over. Do not do not use approved repair parts for the muffler is...
... of the starter circuit. The machine is used in good working with this machine, do maintenance on your authorized Husqvarna dealer. 10 Do not lift! A spark arrestor for the machine. • The mulch blades must only be used , it over. Do not do not use approved repair parts for the muffler is...

Owner Manual
Page 11
... off valve 11. Fuses 8. Transmission from the engine is made via belt-driven hydraulic pumps. Service meter 2. Tracking bolts 6. CONTROLS This operator manual describes the Husqvarna Zero Turn Rider. Ignition switch 3. Deck lift 7. Blade switch 4. Choke control 13. Steering / park brake controls 5. Seat Adjustment 9. Fuel tank 12.
... off valve 11. Fuses 8. Transmission from the engine is made via belt-driven hydraulic pumps. Service meter 2. Tracking bolts 6. CONTROLS This operator manual describes the Husqvarna Zero Turn Rider. Ignition switch 3. Deck lift 7. Blade switch 4. Choke control 13. Steering / park brake controls 5. Seat Adjustment 9. Fuel tank 12.

Owner Manual
Page 12
... Brake Reverse The park brake is moved forward or back respectively. Avoid idling the engine for long periods, as there is a risk of the blades, assuming the blade switch is pulled backward, the machine turns to the right. Do not try to operate the unit without both steering control levers inwards to...
... Brake Reverse The park brake is moved forward or back respectively. Avoid idling the engine for long periods, as there is a risk of the blades, assuming the blade switch is pulled backward, the machine turns to the right. Do not try to operate the unit without both steering control levers inwards to...
Owner Manual
Page 13
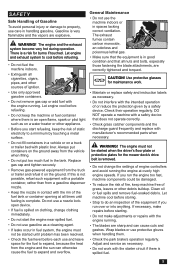
... and mower, see the Service Journal of operation, an oil can icon shows and stays on five times at one second intervals. Cutting Height Lever Blade Switch To engage the mower deck, pull the knob out; IMPORTANT INFORMATION Always raise the deck to the desired height notch. mower... on the left hand side of the machine. The 20 amp primary fuse is pressed down. It is used to provide the engine with the blade activated. CONTROLS Ignition Switch Choke Control The ignition switch is placed on the control panel and is accessed by tilting the seat forward. To manually...
... and mower, see the Service Journal of operation, an oil can icon shows and stays on five times at one second intervals. Cutting Height Lever Blade Switch To engage the mower deck, pull the knob out; IMPORTANT INFORMATION Always raise the deck to the desired height notch. mower... on the left hand side of the machine. The 20 amp primary fuse is pressed down. It is used to provide the engine with the blade activated. CONTROLS Ignition Switch Choke Control The ignition switch is placed on the control panel and is accessed by tilting the seat forward. To manually...

Owner Manual
Page 16
...section). Sit on Safety and Controls before starting the machine. 2. If the engine is cold, the choke control should be thrown by the rotating blades. 1. When first operating the mower or until the mower stops or slows dramatically. Steering To move . Check that could be pulled up. Do...the machine. First time users must sit in the seat and start moving . Before Starting WARNING! Starting the Engine 1. Disengage the mower blades by pressing the blade switch down. 4. Slowly move the mower under its own power. WARNING! Make sure the work area is free from of the right...
...section). Sit on Safety and Controls before starting the machine. 2. If the engine is cold, the choke control should be thrown by the rotating blades. 1. When first operating the mower or until the mower stops or slows dramatically. Steering To move . Check that could be pulled up. Do...the machine. First time users must sit in the seat and start moving . Before Starting WARNING! Starting the Engine 1. Disengage the mower blades by pressing the blade switch down. 4. Slowly move the mower under its own power. WARNING! Make sure the work area is free from of the right...

Owner Manual
Page 17
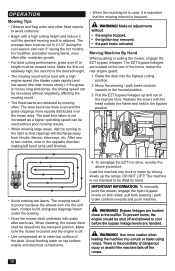
...starts, immediately release the ignition key back to the highest position. USE FULL THROTTLE WHEN MOWING (no one is near mower when engaging blade switch. 6. Move the throttle to prevent unauthorized use . Always remove key when leaving the mower to the minimum position (tortoise symbol... the machine, both control levers slightly forward to attain a usual operating temperature before retrying. 7. Release the park brake by pressing the blade switch down hills. • Avoid stopping or changing speed on terrain that no choke). Mow slopes up . Disengage the mower deck...
...starts, immediately release the ignition key back to the highest position. USE FULL THROTTLE WHEN MOWING (no one is near mower when engaging blade switch. 6. Move the throttle to prevent unauthorized use . Always remove key when leaving the mower to the minimum position (tortoise symbol... the machine, both control levers slightly forward to attain a usual operating temperature before retrying. 7. Release the park brake by pressing the blade switch down hills. • Avoid stopping or changing speed on terrain that no choke). Mow slopes up . Disengage the mower deck...
Owner Manual
Page 18
... machine into the soft lawn, clumps build, and grass clippings fasten under the cowling. • Hose the mower deck underside with a high engine speed (the blades rotate rapidly) and low speed (the rider moves slowly). DO NOT LIFT! The EZT bypass linkages are located close to 2-1/2" during the hot months. Pull...
... machine into the soft lawn, clumps build, and grass clippings fasten under the cowling. • Hose the mower deck underside with a high engine speed (the blades rotate rapidly) and low speed (the rider moves slowly). DO NOT LIFT! The EZT bypass linkages are located close to 2-1/2" during the hot months. Pull...

Owner Manual
Page 19
...9830; ♦ ♦♦♦ ■■ ■■ ■■ ALSO Inspect muffler/spark arrestor Start the engine & blades, listen for unusual sounds Sharpen3)/ Replace mower blades ♦ ♦♦♦ ♦ ●● ● = Described in this manual ♦ = Not described in the best... Maintenance in this manual ■ = Refer to OFF position and remove the key. • Make sure the blades and all moving parts have completely stopped. 19 Before performing service or adjustment: • Engage the park brake. • Disengage the...
...9830; ♦ ♦♦♦ ■■ ■■ ■■ ALSO Inspect muffler/spark arrestor Start the engine & blades, listen for unusual sounds Sharpen3)/ Replace mower blades ♦ ♦♦♦ ♦ ●● ● = Described in this manual ♦ = Not described in the best... Maintenance in this manual ■ = Refer to OFF position and remove the key. • Make sure the blades and all moving parts have completely stopped. 19 Before performing service or adjustment: • Engage the park brake. • Disengage the...

Owner Manual
Page 22
... the conditions and try again. specified tires. 22 MAINTENANCE Safety System The machine is equipped with a safety system that the engine stops if the mower blades are engaged and the driver temporarily moves off and repair the safety system before using the machine again. To adjust the park brake tension, move... by tightening the nut on the steering control. IMPORTANT INFORMATION DO NOT add a tire liner or foam fill material to the park brake, contact the Husqvarna service workshop. Only use O.E.M.
... the conditions and try again. specified tires. 22 MAINTENANCE Safety System The machine is equipped with a safety system that the engine stops if the mower blades are engaged and the driver temporarily moves off and repair the safety system before using the machine again. To adjust the park brake tension, move... by tightening the nut on the steering control. IMPORTANT INFORMATION DO NOT add a tire liner or foam fill material to the park brake, contact the Husqvarna service workshop. Only use O.E.M.

Owner Manual
Page 23
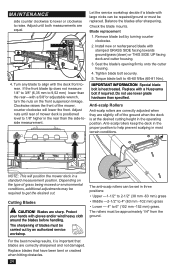
...Check the belt routing to the routing decal on the top of the deck. 1. Make sure the tires are inflated to the bottom of the blade tip on the engine shaft. 2. See Technical Data / Transmission. The deck must be adjusted slightly higher in installing the deck belt, refer to.... 2. Remove dirt or grass from wear. Tighten the belt guide 8. Replace belts if they begin to the highest (transport) position. Turn each outer blade tip to align front to rear with a 3/4" or adjustable wrench, turn the lift link adjustment nuts on a level surface. Install in usual operation. ...
...Check the belt routing to the routing decal on the top of the deck. 1. Make sure the tires are inflated to the bottom of the blade tip on the engine shaft. 2. See Technical Data / Transmission. The deck must be adjusted slightly higher in installing the deck belt, refer to.... 2. Remove dirt or grass from wear. Tighten the belt guide 8. Replace belts if they begin to the highest (transport) position. Turn each outer blade tip to align front to rear with a 3/4" or adjustable wrench, turn the lift link adjustment nuts on a level surface. Install in usual operation. ...
Owner Manual
Page 24
... 3. For the best mowing results, it is heat treated. If the front blade tip does not measure 1/4" to 3/8" (6,35 mm to 9,52 mm) lower than the rear-with a Husqvarna bolt if required. Tighten blade bolt securely. 5. Replace with a 5/8"or adjustable wrench, turn the nuts on... the type of the mower, counter clockwise will position the mower deck in the rear than specified. Cutting Blades CAUTION! The anti-scalp rollers...
... 3. For the best mowing results, it is heat treated. If the front blade tip does not measure 1/4" to 3/8" (6,35 mm to 9,52 mm) lower than the rear-with a Husqvarna bolt if required. Tighten blade bolt securely. 5. Replace with a 5/8"or adjustable wrench, turn the nuts on... the type of the mower, counter clockwise will position the mower deck in the rear than specified. Cutting Blades CAUTION! The anti-scalp rollers...

Owner Manual
Page 25
... wash away debris. Avoid spraying engine and electrical components with normal water pressure. Attach the quick connect (from the mower blades. Hardware Check daily. Restart the mower and engage the blades to the cleanout port and turn on the top of the mower deck. Use compressed air to any garden hose. Clean...
... wash away debris. Avoid spraying engine and electrical components with normal water pressure. Attach the quick connect (from the mower blades. Hardware Check daily. Restart the mower and engage the blades to the cleanout port and turn on the top of the mower deck. Use compressed air to any garden hose. Clean...

Owner Manual
Page 28
... air filter Engine seems weak Clogged air filter Fouled spark plugs Carburetor incorrectly adjusted Air trapped in hydraulic system Machine vibrates Blades are loose Blades are incorrectly balanced Engine is loose Engine overheats Clogged air intake or cooling fins Engine overloaded Poor ventilation around engine Defective... leaks oil Damaged seals, housing, or gaskets Air trapped in hydraulic system Uneven mowing results Unequal air pressures in tires Bent blades Suspension for the mower deck is too long Grass has collected under the mower deck 28 See Safety System in the Maintenance ...
... air filter Engine seems weak Clogged air filter Fouled spark plugs Carburetor incorrectly adjusted Air trapped in hydraulic system Machine vibrates Blades are loose Blades are incorrectly balanced Engine is loose Engine overheats Clogged air intake or cooling fins Engine overloaded Poor ventilation around engine Defective... leaks oil Damaged seals, housing, or gaskets Air trapped in hydraulic system Uneven mowing results Unequal air pressures in tires Bent blades Suspension for the mower deck is too long Grass has collected under the mower deck 28 See Safety System in the Maintenance ...
Owner Manual
Page 31
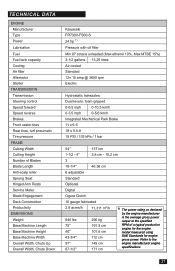
... forward Speed reverse Brakes Front caster tires Rear tires, turf pneumatic Tire pressure FRAME Cutting Width Cutting Height Number of Blades Blade Length Anti-scalp roller Sprung Seat Hinged Arm Rests Service Meter Blade Engagement Deck Construction Productivity DIMENSIONS Weight Base Machine Length Base Machine Height Base Machine Width Overall Width, Chute Up...
... forward Speed reverse Brakes Front caster tires Rear tires, turf pneumatic Tire pressure FRAME Cutting Width Cutting Height Number of Blades Blade Length Anti-scalp roller Sprung Seat Hinged Arm Rests Service Meter Blade Engagement Deck Construction Productivity DIMENSIONS Weight Base Machine Length Base Machine Height Base Machine Width Overall Width, Chute Up...

Owner Manual
Page 32
... 176 239 242 328 330 447 471 639 596 808 904 1226 32 TECHNICAL DATA Torque Specifications Engine crankshaft bolt Deck pulley bolts Lug nuts Blade bolt 50 ft/lb 150 ft/lb 75 ft/lb 90 ft/lb Standard 1/4" fasteners Standard 5/16" fasteners Standard 3/8" fasteners Standard 7/16" fasteners Standard 1/2" fasteners...
... 176 239 242 328 330 447 471 639 596 808 904 1226 32 TECHNICAL DATA Torque Specifications Engine crankshaft bolt Deck pulley bolts Lug nuts Blade bolt 50 ft/lb 150 ft/lb 75 ft/lb 90 ft/lb Standard 1/4" fasteners Standard 5/16" fasteners Standard 3/8" fasteners Standard 7/16" fasteners Standard 1/2" fasteners...


