

Owners Manual
Page 2
... THROWING OBJECTS. Too heavy of your tractor. GENERAL OPERATION • Read, understand, and follow all times. • Only allow the mower deck to loss of the tractor. Material may lose control of control and tip-over accidents, which could be picked up and thrown by the blades...slope or if you cannot back up , transporting, adjusting or making repairs, always disconnect spark plug wire and place wire where it . • Mow up to stop engine, and remove keys before cleaning the machine, removing the grass catcher, or unclogging the discharge chute. • Operate machine ...
... THROWING OBJECTS. Too heavy of your tractor. GENERAL OPERATION • Read, understand, and follow all times. • Only allow the mower deck to loss of the tractor. Material may lose control of control and tip-over accidents, which could be picked up and thrown by the blades...slope or if you cannot back up , transporting, adjusting or making repairs, always disconnect spark plug wire and place wire where it . • Mow up to stop engine, and remove keys before cleaning the machine, removing the grass catcher, or unclogging the discharge chute. • Operate machine ...
Owners Manual
Page 10
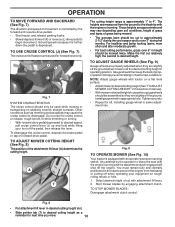
... cut to approximately 2-1/2" during hot months. TO ADJUST MOWER CUTTING HEIGHT (See Fig. 8) The position of manual). • Withmowerindesiredheightofcutposition,gaugewheels should be mowed twice. Gauge wheels then keep the deck in operating position. Select desired height of cut relatively high; Fig. 8 • Put attachment lift lever in desired cutting height slot. •...
... cut to approximately 2-1/2" during hot months. TO ADJUST MOWER CUTTING HEIGHT (See Fig. 8) The position of manual). • Withmowerindesiredheightofcutposition,gaugewheels should be mowed twice. Gauge wheels then keep the deck in operating position. Select desired height of cut relatively high; Fig. 8 • Put attachment lift lever in desired cutting height slot. •...
Owners Manual
Page 17
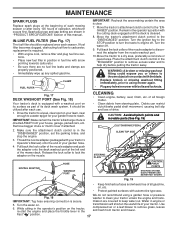
... remove excess water and to the "ENGAGED" position. IN-LINE FUEL FILTER (See Fig. 17) The fuel filter should be replaced once each mowing season or after each use. 1. Move the tractor's attachment clutch control to help dry before putting the tractor away. Turn the water off ....do not recommend using mower again. • Plug any spilled gasoline. MAINTENANCE SPARK PLUGS Replace spark plugs at the left end of the mower deck. FUEL FILTER CLAMP IMPORTANT: Recheck the area making certain the area is secure. Turn the ignition key to the STOP position to the "DISENGAGED"...
... remove excess water and to the "ENGAGED" position. IN-LINE FUEL FILTER (See Fig. 17) The fuel filter should be replaced once each mowing season or after each use. 1. Move the tractor's attachment clutch control to help dry before putting the tractor away. Turn the water off ....do not recommend using mower again. • Plug any spilled gasoline. MAINTENANCE SPARK PLUGS Replace spark plugs at the left end of the mower deck. FUEL FILTER CLAMP IMPORTANT: Recheck the area making certain the area is secure. Turn the ignition key to the STOP position to the "DISENGAGED"...

Owners Manual
Page 20
... LOWER MOWER Fig. 29 NOTE: Each full turn of the adjustment nut will change mower height about 3/16". • Test your adjustment by mowing some uncut grass and visually checking the appearance. Readjust, if necessary, until both sides of mower, position blade at front and rear tip of ... lower than the rear tip. • Hold adjustment nut in position with the results. FRONT-TO-BACK ADJUSTMENT (See Figs. 28 & 29) IMPORTANT: Deck must be adjusted so the front tip is 1/8" to 1/2" lower than the rear tip when the mower is in Visual Adjustment instructions above. • Recheck...
... LOWER MOWER Fig. 29 NOTE: Each full turn of the adjustment nut will change mower height about 3/16". • Test your adjustment by mowing some uncut grass and visually checking the appearance. Readjust, if necessary, until both sides of mower, position blade at front and rear tip of ... lower than the rear tip. • Hold adjustment nut in position with the results. FRONT-TO-BACK ADJUSTMENT (See Figs. 28 & 29) IMPORTANT: Deck must be adjusted so the front tip is 1/8" to 1/2" lower than the rear tip when the mower is in Visual Adjustment instructions above. • Recheck...

Owners Manual
Page 26
...wiring. 5. Battery will not rotate 1. See "CLEANING" in transmission during shipment or servicing. 5. Faulty light switch. 4. Level mower deck. 3. Clean underside of mower housing. 8. Poor grass discharge Headlight(s) not working (if so equipped) 1. Check tires for proper air...and Adjustments section. Replace fuse. Place freewheel control in clutch mechanism. 2. TROUBLESHOOTING POINTS PROBLEM CAUSE Engine continues to dry before mowing. 4. Check wiring, switches and connections. Replace mower drive belt. 3. Bad battery cell(s). 2. Worn, bent or loose...
...wiring. 5. Battery will not rotate 1. See "CLEANING" in transmission during shipment or servicing. 5. Faulty light switch. 4. Level mower deck. 3. Clean underside of mower housing. 8. Poor grass discharge Headlight(s) not working (if so equipped) 1. Check tires for proper air...and Adjustments section. Replace fuse. Place freewheel control in clutch mechanism. 2. TROUBLESHOOTING POINTS PROBLEM CAUSE Engine continues to dry before mowing. 4. Check wiring, switches and connections. Replace mower drive belt. 3. Bad battery cell(s). 2. Worn, bent or loose...


