
Owners Manual
Page 2
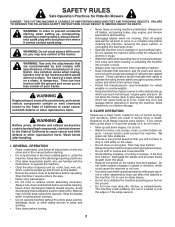
...complete stop engine, and remove keys before dismounting. • Disengage blades when not mowing. I. Always turn off engine and wait for all parts to come to cause cancer and birth defects or other reproductive harm. Shut off blades, set parking brake, stop before cleaning the machine, .... • Only allow the mower deck to cause cancer and birth defects or other reproductive harm. Tires can touch hot exhaust / engine parts and burn. FAILURE TO OBSERVE THE FOLLOWING SAFETY INSTRUCTIONS COULD RESULT IN SERIOUS INJURY OR DEATH. Operation on a slope. WARNING Engine exhaust,...
...complete stop engine, and remove keys before dismounting. • Disengage blades when not mowing. I. Always turn off engine and wait for all parts to come to cause cancer and birth defects or other reproductive harm. Shut off blades, set parking brake, stop before cleaning the machine, .... • Only allow the mower deck to cause cancer and birth defects or other reproductive harm. Tires can touch hot exhaust / engine parts and burn. FAILURE TO OBSERVE THE FOLLOWING SAFETY INSTRUCTIONS COULD RESULT IN SERIOUS INJURY OR DEATH. Operation on a slope. WARNING Engine exhaust,...
Owners Manual
Page 3
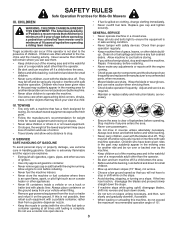
... if a child enters the area. • Before and while backing, look behind and down for small children. • Never carry children, even with manufacturer's recommended parts, when necessary. • Mower blades are often attracted to ensure the equipment is spilled on the ground.
... if a child enters the area. • Before and while backing, look behind and down for small children. • Never carry children, even with manufacturer's recommended parts, when necessary. • Mower blades are often attracted to ensure the equipment is spilled on the ground.

Owners Manual
Page 5
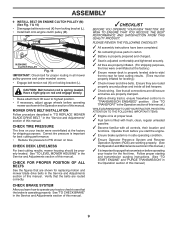
Washer (1) Wheel (1) 3/8-16 Locknut If Equipped (1) Anti-Sway Bar (1) 3/4 O.D. Washers (2) Rear Lift Link Assemblies (1) Small Retainer Springs (5) Large Retainer Springs (1) Front Lift Link Assembly (1) Shoulder Bolt (1) 1-1/4 O.D. Washers (1) Small Retainer Springs *Installed by Dealer *Brush Guard Kit Keys (1) Oil Drain Tube Slope Sheet (2) Keys (1) Quick Connect 5 UNASSEMBLED PARTS Mower Mower Front Wheel (5) 1-3/16 O.D.
Washer (1) Wheel (1) 3/8-16 Locknut If Equipped (1) Anti-Sway Bar (1) 3/4 O.D. Washers (2) Rear Lift Link Assemblies (1) Small Retainer Springs (5) Large Retainer Springs (1) Front Lift Link Assembly (1) Shoulder Bolt (1) 1-1/4 O.D. Washers (1) Small Retainer Springs *Installed by Dealer *Brush Guard Kit Keys (1) Oil Drain Tube Slope Sheet (2) Keys (1) Quick Connect 5 UNASSEMBLED PARTS Mower Mower Front Wheel (5) 1-3/16 O.D.

Owners Manual
Page 6
...(1) 3/4" socket w/drive ratchet (1) 9/16" wrench Flashlight When right or left hand is spring loaded. To ensure safe and proper operation of those parts left side of this manual. TOOLS REQUIRED FOR ASSEMBLY A socket wrench set will hold . • Pull parking brake lever up adjustment lever (A) and...& 4) • Depress clutch/brake pedal all the way down . • Release lever to press clutch/brake pedal all accessible loose parts and parts cartons from the skid. TO ROLL TRACTOR OFF SKID (See Operation section for minimum of one hour at the factory with the instructions that...
...(1) 3/4" socket w/drive ratchet (1) 9/16" wrench Flashlight When right or left hand is spring loaded. To ensure safe and proper operation of those parts left side of this manual. TOOLS REQUIRED FOR ASSEMBLY A socket wrench set will hold . • Pull parking brake lever up adjustment lever (A) and...& 4) • Depress clutch/brake pedal all the way down . • Release lever to press clutch/brake pedal all accessible loose parts and parts cartons from the skid. TO ROLL TRACTOR OFF SKID (See Operation section for minimum of one hour at the factory with the instructions that...
Owners Manual
Page 9
... locking bracket (L). • Install belt onto engine clutch pulley (M). PLEASE REVIEW THE FOLLOWING CHECKLIST: ✓ All assembly instructions have been completed. ✓ No remaining loose parts in the Operation section of this manual.) WHILE LEARNING HOW TO USE YOUR TRACTOR, PAY EXTRA ATTENTION TO THE FOLLOWING IMPORTANT ITEMS: ✓ Engine oil...
... locking bracket (L). • Install belt onto engine clutch pulley (M). PLEASE REVIEW THE FOLLOWING CHECKLIST: ✓ All assembly instructions have been completed. ✓ No remaining loose parts in the Operation section of this manual.) WHILE LEARNING HOW TO USE YOUR TRACTOR, PAY EXTRA ATTENTION TO THE FOLLOWING IMPORTANT ITEMS: ✓ Engine oil...
Owners Manual
Page 19
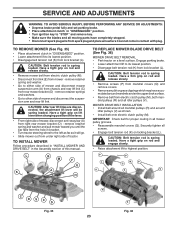
... blade bolt by the operator to leave the seat should never operate unless the operator is hazardous, could damage your tractor and void your local parts dealer. Replace bent or damaged blades. Do not attempt to "leak" power. • Remove terminal guard. • Disconnect BLACK battery cable first then RED battery...
... blade bolt by the operator to leave the seat should never operate unless the operator is hazardous, could damage your tractor and void your local parts dealer. Replace bent or damaged blades. Do not attempt to "leak" power. • Remove terminal guard. • Disconnect BLACK battery cable first then RED battery...
Owners Manual
Page 21
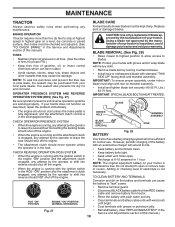
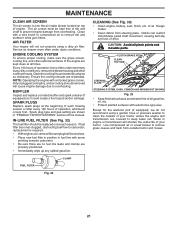
... to remove dirt and stubborn dried gum fibers. FUEL FILTER CLAMP Fig. 32 21 SPARK PLUGS Replace spark plugs at all pinch points and movable parts. If fuel filter becomes clogged, obstructing fuel flow to carburetor, replacement is over the air intake blower located on top of your tractor. Ensure the...
... to remove dirt and stubborn dried gum fibers. FUEL FILTER CLAMP Fig. 32 21 SPARK PLUGS Replace spark plugs at all pinch points and movable parts. If fuel filter becomes clogged, obstructing fuel flow to carburetor, replacement is over the air intake blower located on top of your tractor. Ensure the...
Owners Manual
Page 22
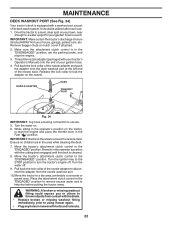
... operator's position with bolts and locknuts. 22 IMPORTANT: Make certain the tractor's discharge chute is secure. 5. Thread the nozzle adapter (packaged with a washout port as part of its deck wash system. Turn the water on the nozzle. Ensure no children are in the "ENGAGED" position to remove excess water and to...
... operator's position with bolts and locknuts. 22 IMPORTANT: Make certain the tractor's discharge chute is secure. 5. Thread the nozzle adapter (packaged with a washout port as part of its deck wash system. Turn the water on the nozzle. Ensure no children are in the "ENGAGED" position to remove excess water and to...
Owners Manual
Page 23
... brake. • Place attachment clutch in "DISENGAGED" position. • Turn ignition key to "STOP" and remove key. • Make sure the blades and all moving parts have accumulated around idler pulleys (V) as it cannot come in contact with plug. remove retainer spring and washer and pull mower toward you until the...
... brake. • Place attachment clutch in "DISENGAGED" position. • Turn ignition key to "STOP" and remove key. • Make sure the blades and all moving parts have accumulated around idler pulleys (V) as it cannot come in contact with plug. remove retainer spring and washer and pull mower toward you until the...
Owners Manual
Page 25
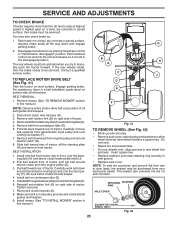
... pedal shaft (J). 2. For assistance, there is inside all the way down around transmission cooling fan and onto the input pulley (F). Remove belt from your local parts dealer. Remove mower. (See "TO REMOVE MOWER" section in axle groove. • Replace axle cover. Reinstall anti-rotation link (B) on a level, dry concrete or paved...
... pedal shaft (J). 2. For assistance, there is inside all the way down around transmission cooling fan and onto the input pulley (F). Remove belt from your local parts dealer. Remove mower. (See "TO REMOVE MOWER" section in axle groove. • Replace axle cover. Reinstall anti-rotation link (B) on a level, dry concrete or paved...

Owners Manual
Page 28
.... • Touch up all dirt, grease, leaves, etc. ENGINE FUEL SYSTEM IMPORTANT: IT IS IMPORTANT TO PREVENT GUM DEPOSITS FROM FORMING IN ESSENTIAL FUEL SYSTEM PARTS SUCH AS CARBURETOR, FUEL FILTER, FUEL HOSE, OR TANK DURING STORAGE. Run engine at the end of time, clean it to rust. Inspect moving... parts for 30 days or more. Do not empty the gas tank and carburetor if using fuel stabilizer. Do not use engine or carburetor cleaner products ...
.... • Touch up all dirt, grease, leaves, etc. ENGINE FUEL SYSTEM IMPORTANT: IT IS IMPORTANT TO PREVENT GUM DEPOSITS FROM FORMING IN ESSENTIAL FUEL SYSTEM PARTS SUCH AS CARBURETOR, FUEL FILTER, FUEL HOSE, OR TANK DURING STORAGE. Run engine at the end of time, clean it to rust. Inspect moving... parts for 30 days or more. Do not empty the gas tank and carburetor if using fuel stabilizer. Do not use engine or carburetor cleaner products ...
Owners Manual
Page 29
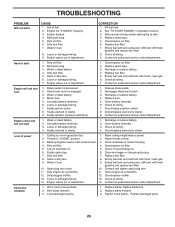
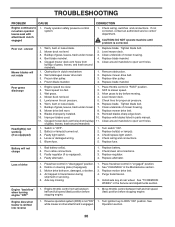
... 8. Clean engine air screen/fins. 12. Check all wiring. 7. Tighten blade bolt. 2. Replace blade mandrel. 3. Replace damaged parts. 29 Hard to start 1. Check all wiring. 14. Faulty operator presence switch(es). 1. Clean battery terminals. 6. Clean battery terminals.... 3. Stale or dirty fuel. 8. Contact an authorized service center/department. Loose/damaged part(s). 1. Out of adjustment. Dirty air filter. 6. Engine valves out of fuel. 2. Empty fuel tank and carburetor, refill...
... 8. Clean engine air screen/fins. 12. Check all wiring. 7. Tighten blade bolt. 2. Replace blade mandrel. 3. Replace damaged parts. 29 Hard to start 1. Check all wiring. 14. Faulty operator presence switch(es). 1. Clean battery terminals. 6. Clean battery terminals.... 3. Stale or dirty fuel. 8. Contact an authorized service center/department. Loose/damaged part(s). 1. Out of adjustment. Dirty air filter. 6. Engine valves out of fuel. 2. Empty fuel tank and carburetor, refill...
Owners Manual
Page 30
... mower. 4. Clean around mandrels to open vent holes. of grass, leaves, and trash around mandrels. 1. Replace fuse. Faulty alternator. 1. Axle key missing. 1. See "CLEANING" in parts manual. 11. See while mower or other attachment is not "ON" 1. Frozen idler pulley. 4. Poor grass discharge Headlight(s) not working (if so equipped) 1. Shift to...
... mower. 4. Clean around mandrels to open vent holes. of grass, leaves, and trash around mandrels. 1. Replace fuse. Faulty alternator. 1. Axle key missing. 1. See "CLEANING" in parts manual. 11. See while mower or other attachment is not "ON" 1. Frozen idler pulley. 4. Poor grass discharge Headlight(s) not working (if so equipped) 1. Shift to...

Owners Manual
Page 32
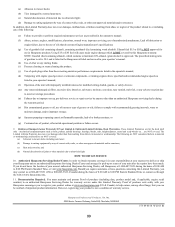
...in this Limited Warranty, Certified Factory Reconditioned or Refurbished products have a 30 Day Limited Warranty for parts and labor for an authorized Husqvarna service provider. Please consult this Limited Warranty is offered instead of purchase. Depending on Exhibit A.... DISCLAIMED. 4. To obtain transmission / transaxle warranty service, first contact the retailer who you must cease using original OEM Husqvarna replacement parts, subject to handle warranty adjustments or repairs on engines manufactured by this Limited Warranty: a. and c. EXCLUSIVE REMEDIES. Except...
...in this Limited Warranty, Certified Factory Reconditioned or Refurbished products have a 30 Day Limited Warranty for parts and labor for an authorized Husqvarna service provider. Please consult this Limited Warranty is offered instead of purchase. Depending on Exhibit A.... DISCLAIMED. 4. To obtain transmission / transaxle warranty service, first contact the retailer who you must cease using original OEM Husqvarna replacement parts, subject to handle warranty adjustments or repairs on engines manufactured by this Limited Warranty: a. and c. EXCLUSIVE REMEDIES. Except...
Owners Manual
Page 33
...manual; (l) Operation of the unit with , rocks, or other non-approved materials and/or structures; (c) Rust and corrosion; Authorized Husqvarna Servicing Dealer/Center. Should you require assistance or have been made. Proof of purchase rests solely with , rocks, or other non... service. Reinforced Stamped (Armor Protected) 10 Year Limited & Fabricated Limited Lifetime, Deck Warranties. Documentation Required. mechanical components/parts such as listed in material or workmanship, and therefore are NOT covered. If you can be notified of important product information...
...manual; (l) Operation of the unit with , rocks, or other non-approved materials and/or structures; (c) Rust and corrosion; Authorized Husqvarna Servicing Dealer/Center. Should you require assistance or have been made. Proof of purchase rests solely with , rocks, or other non... service. Reinforced Stamped (Armor Protected) 10 Year Limited & Fabricated Limited Lifetime, Deck Warranties. Documentation Required. mechanical components/parts such as listed in material or workmanship, and therefore are NOT covered. If you can be notified of important product information...
Owners Manual
Page 35
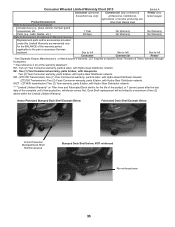
...to left See to left See to the part or accessory that was replaced. Two (2) Year Consumer warranty, parts & labor, with Hydro-Gear Distributor network. Two (2) Year Consumer warranty, parts & labor, with Husqvarna. LCT Engines on Tiller tines and Fabricated Deck...reinforced No reinforced area 35 M-ZT - (ZT3400 transmission) Two (2) Year warranty, parts & labor, with Hydro-Gear Distributor network. *** "Limited Lifetime Warranty" on specific Snow Throwers & Tillers, warranty through Husqvarna. ** See reference 4 (b) of the complete unit's final production, whichever comes ...
...to left See to left See to the part or accessory that was replaced. Two (2) Year Consumer warranty, parts & labor, with Hydro-Gear Distributor network. Two (2) Year Consumer warranty, parts & labor, with Husqvarna. LCT Engines on Tiller tines and Fabricated Deck...reinforced No reinforced area 35 M-ZT - (ZT3400 transmission) Two (2) Year warranty, parts & labor, with Hydro-Gear Distributor network. *** "Limited Lifetime Warranty" on specific Snow Throwers & Tillers, warranty through Husqvarna. ** See reference 4 (b) of the complete unit's final production, whichever comes ...


