
Operation Manual
Page 3
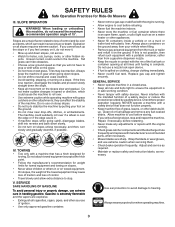
... is complete. Always keep the machine in safe working condition. • Never tamper with manufacturer's recommended parts, when necessary. • Mower blades are explosive. • Extinguish all times until fueling is over . • Use extreme caution while operating machine with the rim of 15°...provided by putting your vehicle when filling. • Remove gas-powered equipment from the truck or trailer and refuel it on clothing, change clothing immediately. • Never overfill fuel tank. Tires may cause loss of traction and loss of control. • Travel slowly and...
... is complete. Always keep the machine in safe working condition. • Never tamper with manufacturer's recommended parts, when necessary. • Mower blades are explosive. • Extinguish all times until fueling is over . • Use extreme caution while operating machine with the rim of 15°...provided by putting your vehicle when filling. • Remove gas-powered equipment from the truck or trailer and refuel it on clothing, change clothing immediately. • Never overfill fuel tank. Tires may cause loss of traction and loss of control. • Travel slowly and...
Operation Manual
Page 11
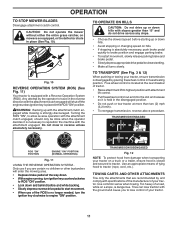
... a truck or a trailer, ensure hood is placed in place (See Fig. 10). Too heavy of tying hood to tractor. OPERATION TO STOP MOWER BLADES Disengage attachment clutch control. Do not mow in the disengaged position. • Do not push or tow tractor at the rear drawbar of the ROS... with specifications of the manufacturer of your tractor on a slope, is necessary to ROS "ON" position. • Look down hills. • Avoid stopping or changing speed on mowers so equipped, or the deflector chute in the ROS "ON" position. TO TRANSPORT (See Fig. 3 & 12) When pushing or towing your...
... a truck or a trailer, ensure hood is placed in place (See Fig. 10). Too heavy of tying hood to tractor. OPERATION TO STOP MOWER BLADES Disengage attachment clutch control. Do not mow in the disengaged position. • Do not push or tow tractor at the rear drawbar of the ROS... with specifications of the manufacturer of your tractor on a slope, is necessary to ROS "ON" position. • Look down hills. • Avoid stopping or changing speed on mowers so equipped, or the deflector chute in the ROS "ON" position. TO TRANSPORT (See Fig. 3 & 12) When pushing or towing your...
Operation Manual
Page 15
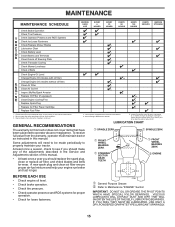
... signs of damage. Some adjustments will need to be made periodically to operator abuse or negligence. Change more often when mowing in sandy soil. 4 - Replace blades more often when operating under a heavy load or in the Service and Adjustments section of operation or...4 O Clean Battery and Terminals R Clean Debris off Steering Plate 5 Check Transaxle Cooling Check Mower Levelness Check V-Belts Check Engine Oil Level Change Engine Oil (models with maintenance-free battery 5 - IF YOU FEEL THEY MUST BE LUBRICATED, USE ONLY A DRY, POWDERED GRAPHITE TYPE LUBRICANT ...
... signs of damage. Some adjustments will need to be made periodically to operator abuse or negligence. Change more often when mowing in sandy soil. 4 - Replace blades more often when operating under a heavy load or in the Service and Adjustments section of operation or...4 O Clean Battery and Terminals R Clean Debris off Steering Plate 5 Check Transaxle Cooling Check Mower Levelness Check V-Belts Check Engine Oil Level Change Engine Oil (models with maintenance-free battery 5 - IF YOU FEEL THEY MUST BE LUBRICATED, USE ONLY A DRY, POWDERED GRAPHITE TYPE LUBRICANT ...
Operation Manual
Page 17
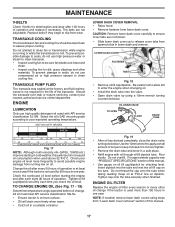
... ENGINE LUBRICATION Only use high quality detergent oil rated with oil through oil fill dipstick tube. Check the crankcase oil level before oil change if the tractor is running low on dipstick. Keep oil at least once a year if the tractor is not required for the ...The transmission fan and cooling fins should be sure fan blades are intact and clean. • Inspect cooling fins for dirt, grass clippings and other oil change . Tighten oil fill cap/dipstick securely each eight (8) hours of the transaxle. TO CHANGE ENGINE OIL (See Fig. 17 - 19) Determine temperature...
... ENGINE LUBRICATION Only use high quality detergent oil rated with oil through oil fill dipstick tube. Check the crankcase oil level before oil change if the tractor is running low on dipstick. Keep oil at least once a year if the tractor is not required for the ...The transmission fan and cooling fins should be sure fan blades are intact and clean. • Inspect cooling fins for dirt, grass clippings and other oil change . Tighten oil fill cap/dipstick securely each eight (8) hours of the transaxle. TO CHANGE ENGINE OIL (See Fig. 17 - 19) Determine temperature...
Operation Manual
Page 20
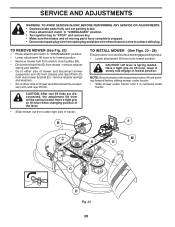
... mower - B F M A E C D Fig. 23 20 TO INSTALL MOWER (See Figs. 23 - 28) Ensure tractor is on lift lever when changing position of tractor. CAUTION: Lift lever is centered under tractor. Have a tight grip on level surface and engage parking brake. • Lower attachment lift lever... • Place attachment clutch in "DISENGAGED" position. • Turn ignition key to "STOP" and remove key. • Make sure the blades and all moving parts have completely stopped. • Disconnect spark plug wire from rear mower bracket (D) - remove retainer springs and washers. •...
... mower - B F M A E C D Fig. 23 20 TO INSTALL MOWER (See Figs. 23 - 28) Ensure tractor is on lift lever when changing position of tractor. CAUTION: Lift lever is centered under tractor. Have a tight grip on level surface and engage parking brake. • Lower attachment lift lever... • Place attachment clutch in "DISENGAGED" position. • Turn ignition key to "STOP" and remove key. • Make sure the blades and all moving parts have completely stopped. • Disconnect spark plug wire from rear mower bracket (D) - remove retainer springs and washers. •...

Operation Manual
Page 22
... RAISE MOWER TURN NUT LEFT TO LOWER MOWER Fig. 29 NOTE: Each full turn of adjustment nut will change mower height about 1/8" (3,1 mm). • Recheck measurements, adjust if necessary until front tip of blade is 1/8" to 1/2" (3,1 to 12,7 mm) lower than the rear tip. • Hold adjustment nut in its highest position...
... RAISE MOWER TURN NUT LEFT TO LOWER MOWER Fig. 29 NOTE: Each full turn of adjustment nut will change mower height about 1/8" (3,1 mm). • Recheck measurements, adjust if necessary until front tip of blade is 1/8" to 1/2" (3,1 to 12,7 mm) lower than the rear tip. • Hold adjustment nut in its highest position...
Operation Manual
Page 27
... refill tank with fresh, clean gas. 6. Check all wiring. 9. Contact an authorized service center/department. Worn, bent or loose blade. 2. Replace blade. Bad spark plug. 5. CORRECTION 1. Wait several minutes before attempting to start . 4. Replace spark plug. 5. Hard to start ...of fuel. 2. Replace fuse. 5. Engine clicks but will not turn over 1. Check all wiring. 7. Check oil level/change spark plug. 7. Clean and regap or change oil. 6. Water in Operation section. 3. Out of adjustment. 1. Water in "CHOKE" position. 2. Engine valves out...
... refill tank with fresh, clean gas. 6. Check all wiring. 9. Contact an authorized service center/department. Worn, bent or loose blade. 2. Replace blade. Bad spark plug. 5. CORRECTION 1. Wait several minutes before attempting to start . 4. Replace spark plug. 5. Hard to start ...of fuel. 2. Replace fuse. 5. Engine clicks but will not turn over 1. Check all wiring. 7. Check oil level/change spark plug. 7. Clean and regap or change oil. 6. Water in Operation section. 3. Out of adjustment. 1. Water in "CHOKE" position. 2. Engine valves out...


