
Operation Manual
Page 2
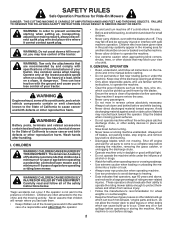
.... Always turn machine off . WARNING: Do not coast down and behind and down before dismounting. • Disengage blades when not mowing. WARNING: Tow only the attachments that children will remain where you last saw them. • Keep children out of the mowing area and in a large percentage of a child. Operate only...
.... Always turn machine off . WARNING: Do not coast down and behind and down before dismounting. • Disengage blades when not mowing. WARNING: Tow only the attachments that children will remain where you last saw them. • Keep children out of the mowing area and in a large percentage of a child. Operate only...
Operation Manual
Page 3
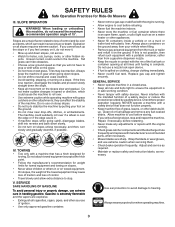
... of control. • Travel slowly and allow extra distance to stop or shift while on the slope. • Do not mow on a slope. Do not attach towed equipment except at all slopes requires extreme caution. SERVICE SAFE HANDLING OF GASOLINE To avoid personal injury or property damage, use on steep slopes... necessary. Check there proper operation regularly. Adjust and service as required. • Maintain or replace safety and instruction labels, as on a water heater or other attachments; The machine could overturn the machine.
... of control. • Travel slowly and allow extra distance to stop or shift while on the slope. • Do not mow on a slope. Do not attach towed equipment except at all slopes requires extreme caution. SERVICE SAFE HANDLING OF GASOLINE To avoid personal injury or property damage, use on steep slopes... necessary. Check there proper operation regularly. Adjust and service as required. • Maintain or replace safety and instruction labels, as on a water heater or other attachments; The machine could overturn the machine.
Operation Manual
Page 6
... brake by depressing clutch/brake pedal. • Place freewheel control in "TRANSMISSION DISENGAGED" position. (See "TO TRANSPORT" in the Operation section of controls) • Raise attachment lift lever to purge the transmission before you learn how to operate your tractor, check to remove the tractor from the skid. TO ROLL TRACTOR...
... brake by depressing clutch/brake pedal. • Place freewheel control in "TRANSMISSION DISENGAGED" position. (See "TO TRANSPORT" in the Operation section of controls) • Raise attachment lift lever to purge the transmission before you learn how to operate your tractor, check to remove the tractor from the skid. TO ROLL TRACTOR...
Operation Manual
Page 7
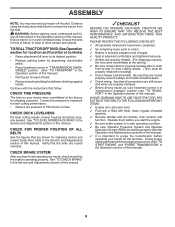
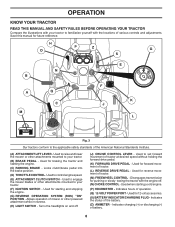
... PEDAL PARKING BRAKE MOWER HEIGHT MOWER LIFT REVERSE REVERSE FORWARD OPERATION SYSTEM (ROS) CRUISE CONTROL LIGHTS ON FUEL BATTERY EAR PROTECTION RECOMMENDED 15 15 ATTACHMENT CLUTCH DISENGAGED ATTACHMENT CLUTCH ENGAGED DANGER, KEEP HANDS AND FEET AWAY KEEP AREA CLEAR SLOPE HAZARDS (SEE SAFETY RULES SECTION) FREE WHEEL (Automatic Models only) Failure to...
... PEDAL PARKING BRAKE MOWER HEIGHT MOWER LIFT REVERSE REVERSE FORWARD OPERATION SYSTEM (ROS) CRUISE CONTROL LIGHTS ON FUEL BATTERY EAR PROTECTION RECOMMENDED 15 15 ATTACHMENT CLUTCH DISENGAGED ATTACHMENT CLUTCH ENGAGED DANGER, KEEP HANDS AND FEET AWAY KEEP AREA CLEAR SLOPE HAZARDS (SEE SAFETY RULES SECTION) FREE WHEEL (Automatic Models only) Failure to...
Operation Manual
Page 8
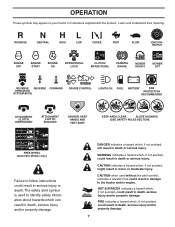
...the forward drive pedal. (K) FORWARD DRIVE PEDAL - Used when starting the engine. (C) PARKING BRAKE - Allows operation of mower or other attachments mounted to your tractor. (F) IGNITION SWITCH - Turns the headlights on and off . (N) CHOKE CONTROL - Save this manual for starting and... (ROS) "ON" POSITION - Used for pushing or slowly towing the tractor with the locations of the American National Standards Institute. (A) ATTACHMENT LIFT LEVER - Used for future reference. Used to set forward movement of tractor. (L) REVERSE DRIVE PEDAL - Disengages transmission for braking the...
...the forward drive pedal. (K) FORWARD DRIVE PEDAL - Used when starting the engine. (C) PARKING BRAKE - Allows operation of mower or other attachments mounted to your tractor. (F) IGNITION SWITCH - Turns the headlights on and off . (N) CHOKE CONTROL - Save this manual for starting and... (ROS) "ON" POSITION - Used for pushing or slowly towing the tractor with the locations of the American National Standards Institute. (A) ATTACHMENT LIFT LEVER - Used for future reference. Used to set forward movement of tractor. (L) REVERSE DRIVE PEDAL - Disengages transmission for braking the...
Operation Manual
Page 9
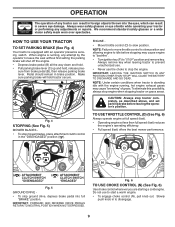
... THE BATTERY TO DISCHARGE AND GO DEAD. ENGINE - • Move throttle control (D) to "STOP" position and remove key. D F N ( ) ATTACHMENT ( ) ATTACHMENT CLUTCH SWITCH CLUTCH SWITCH "DISENGAGED" "ENGAGED" Fig. 5 GROUND DRIVE - • To stop engine when stopping tractor on grass areas. We recommend standard... safety glasses or a wide vision safety mask worn over spectacles. CAUTION: Always stop mower blades, place attachment clutch control in foreign objects thrown into full "BRAKE" position. HOW TO USE YOUR TRACTOR TO SET PARKING BRAKE (See Fig...
... THE BATTERY TO DISCHARGE AND GO DEAD. ENGINE - • Move throttle control (D) to "STOP" position and remove key. D F N ( ) ATTACHMENT ( ) ATTACHMENT CLUTCH SWITCH CLUTCH SWITCH "DISENGAGED" "ENGAGED" Fig. 5 GROUND DRIVE - • To stop engine when stopping tractor on grass areas. We recommend standard... safety glasses or a wide vision safety mask worn over spectacles. CAUTION: Always stop mower blades, place attachment clutch control in foreign objects thrown into full "BRAKE" position. HOW TO USE YOUR TRACTOR TO SET PARKING BRAKE (See Fig...
Operation Manual
Page 10
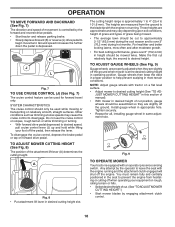
...mower is equipped with the engine running . Make the first cut . (See "TO ADJUST MOWER CUTTING HEIGHT".) • Start mower blades by engaging attachment clutch control. 10 Any attempt by the forward and reverse drive pedals. • Start tractor and release parking brake. • Slowly depress forward ... cutting height range is controlled by the operator to begin movement. NOTE: Adjust gauge wheels with the engine not running and the attachment clutch engaged will shut off the pedal, then release the lever. The heights are approximate and may cause the cruise control to desired...
...mower is equipped with the engine running . Make the first cut . (See "TO ADJUST MOWER CUTTING HEIGHT".) • Start mower blades by engaging attachment clutch control. 10 Any attempt by the forward and reverse drive pedals. • Start tractor and release parking brake. • Slowly depress forward ... cutting height range is controlled by the operator to begin movement. NOTE: Adjust gauge wheels with the engine not running and the attachment clutch engaged will shut off the pedal, then release the lever. The heights are approximate and may cause the cruise control to desired...
Operation Manual
Page 11
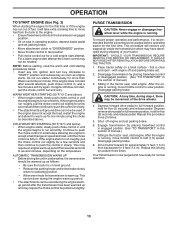
...tractor is strongly discouraged. Free wheel control is closed and secured to tractor (rope, cord, etc.). OPERATION TO STOP MOWER BLADES Disengage attachment clutch control. CAUTION: Do not operate the mower without either the entire grass catcher, on a truck or a trailer, ensure hood is... Look down . • With engine running, turn the ignition key clockwise to engine "ON" position. Any attempt by and comply with the attachment clutch engaged will enter the mowing area. • Depress brake pedal all turns slowly. TRANSMISSION ENGAGED ROS "ON" POSITION 02828 ENGINE "ON" ...
...tractor is strongly discouraged. Free wheel control is closed and secured to tractor (rope, cord, etc.). OPERATION TO STOP MOWER BLADES Disengage attachment clutch control. CAUTION: Do not operate the mower without either the entire grass catcher, on a truck or a trailer, ensure hood is... Look down . • With engine running, turn the ignition key clockwise to engine "ON" position. Any attempt by and comply with the attachment clutch engaged will enter the mowing area. • Depress brake pedal all turns slowly. TRANSMISSION ENGAGED ROS "ON" POSITION 02828 ENGINE "ON" ...
Operation Manual
Page 13
... brake pedal and set . 2. Shut- Do not run out of manual.) 3. This can be done during the engine warm up period. • The attachments can now be used . OPERATION TO START ENGINE (See Fig. 3) When starting procedures below ) • When engine starts, slowly push choke control in until... this section of fuel, it is now purged and now ready for normal operation. 13 off and parking brake set parking brake. • Move attachment clutch to "DISENGAGED" position. • Move throttle control to fast position • Pull choke control out for a cold engine start after the ...
... brake pedal and set . 2. Shut- Do not run out of manual.) 3. This can be done during the engine warm up period. • The attachments can now be used . OPERATION TO START ENGINE (See Fig. 3) When starting procedures below ) • When engine starts, slowly push choke control in until... this section of fuel, it is now purged and now ready for normal operation. 13 off and parking brake set parking brake. • Move attachment clutch to "DISENGAGED" position. • Move throttle control to fast position • Pull choke control out for a cold engine start after the ...
Operation Manual
Page 14
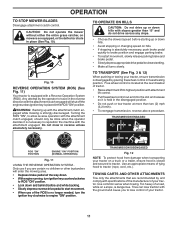
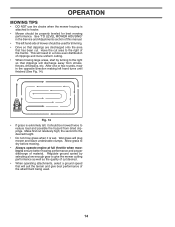
...to dry before mowing. • Always operate engine at full throttle when mowing to the right so that has been cut desired. • When operating attachments, select a ground speed that will suit the terrain and give best performance of clippings and more even distribution of the... used for best mowing performance. the second to tractor. • Mower should be used . 14 Fig. 14 • If grass is extremely tall, it is attached to the desired height. • Do not mow grass when it should be properly leveled for trimming. • Drive so that clippings are discharged onto...
...to dry before mowing. • Always operate engine at full throttle when mowing to the right so that has been cut desired. • When operating attachments, select a ground speed that will suit the terrain and give best performance of clippings and more even distribution of the... used for best mowing performance. the second to tractor. • Mower should be used . 14 Fig. 14 • If grass is extremely tall, it is attached to the desired height. • Do not mow grass when it should be properly leveled for trimming. • Drive so that clippings are discharged onto...

Operation Manual
Page 16
...• Keep battery bolts tight. • When the engine is running with the ignition switch in the ROS "ON" position and the attachment clutch engaged, any maintenance. TO CLEAN BATTERY AND TERMINALS Corrosion and dirt on mandrel assembly. • Install and tighten blade bolt securely (45... CHECK BRAKE" in the Service and Adjustments section of electrolyte is running with the ignition switch in the engine "ON" position and the attachment clutch engaged, any attempt by the operator to open . • Recharge at highest speed in the disengaged position. NOTE: To seal ...
...• Keep battery bolts tight. • When the engine is running with the ignition switch in the ROS "ON" position and the attachment clutch engaged, any maintenance. TO CLEAN BATTERY AND TERMINALS Corrosion and dirt on mandrel assembly. • Install and tighten blade bolt securely (45... CHECK BRAKE" in the Service and Adjustments section of electrolyte is running with the ignition switch in the engine "ON" position and the attachment clutch engaged, any attempt by the operator to open . • Recharge at highest speed in the disengaged position. NOTE: To seal ...
Operation Manual
Page 19
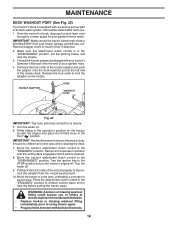
...excess water and to using mower again. • Plug any holes in mower with bolts and locknuts. 19 Remove bagger chute or mulch cover if attached. 2. Turn the water on the tractor, re-start the engine and place the throttle lever in the "DISENGAGED" position, set the parking brake,... MAINTENANCE DECK WASHOUT PORT (See Fig. 22) Your tractor's deck is equipped with a washout port as part of the mower deck. Make sure the attachment clutch control is in the Fast " " position. WARNING: A broken or missing washout fitting could expose you or others to thrown objects from your garden ...
...excess water and to using mower again. • Plug any holes in mower with bolts and locknuts. 19 Remove bagger chute or mulch cover if attached. 2. Turn the water on the tractor, re-start the engine and place the throttle lever in the "DISENGAGED" position, set the parking brake,... MAINTENANCE DECK WASHOUT PORT (See Fig. 22) Your tractor's deck is equipped with a washout port as part of the mower deck. Make sure the attachment clutch control is in the Fast " " position. WARNING: A broken or missing washout fitting could expose you or others to thrown objects from your garden ...
Operation Manual
Page 20
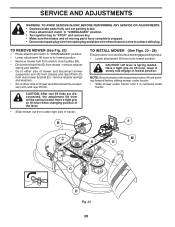
.... • Slide mower out from under tractor. B F M A E C D Fig. 23 20 TO REMOVE MOWER (See Fig. 23) • Place attachment clutch in contact with plug. Have a tight grip on lift lever when changing position of tractor. SERVICE AND ADJUSTMENTS WARNING: TO AVOID SERIOUS INJURY, BEFORE... PERFORMING ANY SERVICE OR ADJUSTMENTS: • Depress brake pedal fully and set parking brake. • Place attachment clutch in "DISENGAGED" position. • Turn ignition key to "STOP" and remove key. • Make sure the blades and all moving ...
.... • Slide mower out from under tractor. B F M A E C D Fig. 23 20 TO REMOVE MOWER (See Fig. 23) • Place attachment clutch in contact with plug. Have a tight grip on lift lever when changing position of tractor. SERVICE AND ADJUSTMENTS WARNING: TO AVOID SERIOUS INJURY, BEFORE... PERFORMING ANY SERVICE OR ADJUSTMENTS: • Depress brake pedal fully and set parking brake. • Place attachment clutch in "DISENGAGED" position. • Turn ignition key to "STOP" and remove key. • Make sure the blades and all moving ...
Operation Manual
Page 21
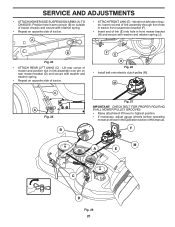
...of tractor. M C D Fig. 25 B Fig. 27 IMPORTANT: CHECK BELT FOR PROPER ROUTING IN ALL MOWER PULLEY GROOVES. • Raise attachment lift lever to highest position. • If necessary, adjust gauge wheels before operating mower as shown in front mower bracket (H) and secure with ... tractor. Work from left side of this manual. J F E H Fig. 26 • Install belt onto electric clutch pulley (M). SERVICE AND ADJUSTMENTS • ATTACH MOWER SIDE SUSPENSION ARMS (A) TO CHASSIS - F M A E C D Fig. 28 21 Position hole in link assembly over pin (B) on opposite side of...
...of tractor. M C D Fig. 25 B Fig. 27 IMPORTANT: CHECK BELT FOR PROPER ROUTING IN ALL MOWER PULLEY GROOVES. • Raise attachment lift lever to highest position. • If necessary, adjust gauge wheels before operating mower as shown in front mower bracket (H) and secure with ... tractor. Work from left side of this manual. J F E H Fig. 26 • Install belt onto electric clutch pulley (M). SERVICE AND ADJUSTMENTS • ATTACH MOWER SIDE SUSPENSION ARMS (A) TO CHASSIS - F M A E C D Fig. 28 21 Position hole in link assembly over pin (B) on opposite side of...
Operation Manual
Page 23
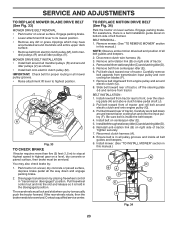
... position. Slide belt toward front of tractor. Pull belt toward rear of all idler pulleys (V). Engage parking brake. • Lower attachment lift lever to front, over cooling fan blades (F). 7. Engage parking brake. Disconnect clutch wire harness (A). 3. Remove belt from transmission.... MOWER DRIVE BELT INSTALLATION • Install belt around all mower pulley grooves. • Raise attachment lift lever to be serviced. You may have accumulated around electric clutch and onto engine pulley (G). 3. Installbeltthroughstationaryidler(C)andclutchingidler(D). 6.
... position. Slide belt toward front of tractor. Pull belt toward rear of all idler pulleys (V). Engage parking brake. • Lower attachment lift lever to front, over cooling fan blades (F). 7. Engage parking brake. Disconnect clutch wire harness (A). 3. Remove belt from transmission.... MOWER DRIVE BELT INSTALLATION • Install belt around all mower pulley grooves. • Raise attachment lift lever to be serviced. You may have accumulated around electric clutch and onto engine pulley (G). 3. Installbeltthroughstationaryidler(C)andclutchingidler(D). 6.
Operation Manual
Page 24
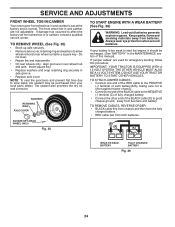
... square key. • Replace washers and snap retaining ring securely in or camber, contact a qualified service center. Always wear eye protection when around batteries. TO ATTACH JUMPER CABLES • Connect one end of the RED cable to the POSITIVE (+) terminal of each battery(A-B), taking care not to short against tractor chassis...
... square key. • Replace washers and snap retaining ring securely in or camber, contact a qualified service center. Always wear eye protection when around batteries. TO ATTACH JUMPER CABLES • Connect one end of the RED cable to the POSITIVE (+) terminal of each battery(A-B), taking care not to short against tractor chassis...
Operation Manual
Page 27
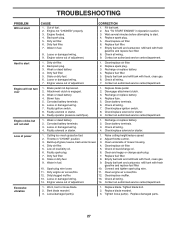
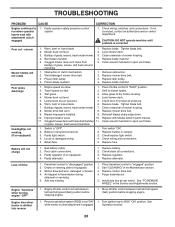
... Out of grass, leaves, trash under mower. 3. Dirty air filter. 6. Engine valves out of adjustment. 14. Check all wiring. 7. Disengage attachment clutch. 3. Replace fuse. 5. Weak or dead battery. 2. Recharge or replace battery. 2. Stale or dirty fuel. 8. Loose or damaged wiring. ...Cutting too much grass/too fast. 1. Empty fuel tank and refill tank with fresh, clean gas. 6. Clean engine air screen/fins. 12. Attachment clutch is engaged. 3. Weak or dead battery. 4. Faulty spark plug. 6. Dirty engine air screen/fins. 11. Clean/replace muffler. 13...
... Out of grass, leaves, trash under mower. 3. Dirty air filter. 6. Engine valves out of adjustment. 14. Check all wiring. 7. Disengage attachment clutch. 3. Replace fuse. 5. Weak or dead battery. 2. Recharge or replace battery. 2. Stale or dirty fuel. 8. Loose or damaged wiring. ...Cutting too much grass/too fast. 1. Empty fuel tank and refill tank with fresh, clean gas. 6. Clean engine air screen/fins. 12. Attachment clutch is engaged. 3. Weak or dead battery. 4. Faulty spark plug. 6. Dirty engine air screen/fins. 11. Clean/replace muffler. 13...
Operation Manual
Page 28
... drive belt. 4. Install axle key at rear wheel. Engine dies when tractor is "OFF". 2. See while mower or other attachment is engaged. Buildup of grass, leaves, trash under mower. 4. Frozen idler pulley. 4. Replace blade mandrel. 5. Reinstall blades sharp edge down. ...10. Replace with attachment clutch engaged 1. Poor cable connections. 3. Check/clean all connections. 3. Motion drive belt worn, damaged, or broken. 4. Turn ignition ...
... drive belt. 4. Install axle key at rear wheel. Engine dies when tractor is "OFF". 2. See while mower or other attachment is engaged. Buildup of grass, leaves, trash under mower. 4. Frozen idler pulley. 4. Replace blade mandrel. 5. Reinstall blades sharp edge down. ...10. Replace with attachment clutch engaged 1. Poor cable connections. 3. Check/clean all connections. 3. Motion drive belt worn, damaged, or broken. 4. Turn ignition ...

