
Operation Manual
Page 5
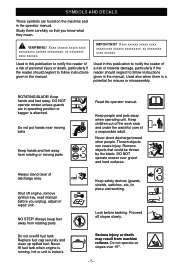
Study them carefully so that could be thrown by the blade. Used in this publication to notify the reader of a risk of personal injury or death, particularly if the reader should neglect to follow instructions given ... fuel. Xxxx xxxxxx xxxxx xxxx xxxxxxxxx xxxxxx xxxxxxxxx. IMPORTANT Xxxx xxxxxx xxxxx xxxx xxxxxxxxx xxxxxx xxxxxxxxx. xx xxxxxxxx xxxx xxxxxx. xx xxxxxxxx xxxx xxxxxx. ROTATING BLADE! Serious injury or death may result from rotating parts. Always keep feet away from machine rollover. NO STEP! SYMBOLS AND DECALS These symbols are in...
Study them carefully so that could be thrown by the blade. Used in this publication to notify the reader of a risk of personal injury or death, particularly if the reader should neglect to follow instructions given ... fuel. Xxxx xxxxxx xxxxx xxxx xxxxxxxxx xxxxxx xxxxxxxxx. IMPORTANT Xxxx xxxxxx xxxxx xxxx xxxxxxxxx xxxxxx xxxxxxxxx. xx xxxxxxxx xxxx xxxxxx. xx xxxxxxxx xxxx xxxxxx. ROTATING BLADE! Serious injury or death may result from rotating parts. Always keep feet away from machine rollover. NO STEP! SYMBOLS AND DECALS These symbols are in...

Operation Manual
Page 6
...regulate the age of a responsible adult other people and/or property. • Do not operate the machine while under the machine. Stop the blades when crossing gravel surfaces. • Never carry • Do not operate machine without the children, even discharge guard, or other objects that... can prevent accidents and is clear of the discharge opening at all attention. Always turn machine off and be picked up and thrown by the blades. • Low-hanging branches and similar - 6 - control console. themselves, other than the operator. • Be alert and turn off . ...
...regulate the age of a responsible adult other people and/or property. • Do not operate the machine while under the machine. Stop the blades when crossing gravel surfaces. • Never carry • Do not operate machine without the children, even discharge guard, or other objects that... can prevent accidents and is clear of the discharge opening at all attention. Always turn machine off and be picked up and thrown by the blades. • Low-hanging branches and similar - 6 - control console. themselves, other than the operator. • Be alert and turn off . ...

Operation Manual
Page 7
... objects. If you cannot reverse up and down the slope. • Keep all slopes requires extra caution. If the tires lose traction, disengage the blades and proceed slowly straight down . • Watch for Testing & Materials (ASTM). Safe Handling of the machine. • Do not use and leave...with steel toe caps. • Always wear approved protective glasses or a full visor when assembling or mowing. • Always wear gloves when handling the blades. • Never wear loose clothing that can hide obstacles. • Choose a low ground speed so that you feel unsure, do not mow it ...
... objects. If you cannot reverse up and down the slope. • Keep all slopes requires extra caution. If the tires lose traction, disengage the blades and proceed slowly straight down . • Watch for Testing & Materials (ASTM). Safe Handling of the machine. • Do not use and leave...with steel toe caps. • Always wear approved protective glasses or a full visor when assembling or mowing. • Always wear gloves when handling the blades. • Never wear loose clothing that can hide obstacles. • Choose a low ground speed so that you feel unsure, do not mow it ...

Operation Manual
Page 8
... the machine. Methanol • is tested and approved only with manufacturer's recommended parts, when necessary. • Mower blades are stored in fuel system, engine must be started until fueling is complete. Wrap the blade or wear gloves, and use a nozzle lock-open device. • If leaks arise in an open flame, spark...
... the machine. Methanol • is tested and approved only with manufacturer's recommended parts, when necessary. • Mower blades are stored in fuel system, engine must be started until fueling is complete. Wrap the blade or wear gloves, and use a nozzle lock-open device. • If leaks arise in an open flame, spark...
Operation Manual
Page 13
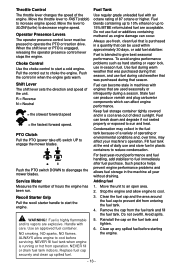
...Move the lever to SLOW (turtle) to prevent dirt from entering the fuel tank. 4. Choke Control Use the choke control to disengage the mower blades. Push the PTO switch DOWN to start the engine. Always use fuel during cold weather that was purchased during that season, and use fresh,... practice helps prevent engine performance problems and allows fuel storage in when the engine gets warm. Pull the control out to engage the mower blades. Replace fuel cap securely and clean up any spilled fuel before servicing. Handle with an octane rating of the unit. Stale fuel can ...
...Move the lever to SLOW (turtle) to prevent dirt from entering the fuel tank. 4. Choke Control Use the choke control to disengage the mower blades. Push the PTO switch DOWN to start the engine. Always use fuel during cold weather that was purchased during that season, and use fresh,... practice helps prevent engine performance problems and allows fuel storage in when the engine gets warm. Pull the control out to engage the mower blades. Replace fuel cap securely and clean up any spilled fuel before servicing. Handle with an octane rating of the unit. Stale fuel can ...
Operation Manual
Page 16
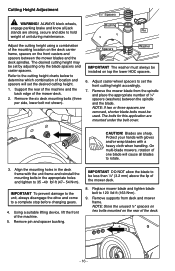
... spindles. Support the rear of the machine and the back edge of the deck. - 16 - The bolts for this application are removed, shorter blade bolts must always be set the desired cutting height. 1. Remove pin and spacer bushing. Refer to the cutting height charts below to be used. ...must be less than 1/8" (3.2 mm) above the lip of location and spacers will cause all jack stands are sharp. IMPORTANT DO NOT allow the blade to determine which combination of the mower deck. 8. NOTE: Store the unused ¼" spacers on hex bolts mounted on the front casters and spacers...
... spindles. Support the rear of the machine and the back edge of the deck. - 16 - The bolts for this application are removed, shorter blade bolts must always be set the desired cutting height. 1. Remove pin and spacer bushing. Refer to the cutting height charts below to be used. ...must be less than 1/8" (3.2 mm) above the lip of location and spacers will cause all jack stands are sharp. IMPORTANT DO NOT allow the blade to determine which combination of the mower deck. 8. NOTE: Store the unused ¼" spacers on hex bolts mounted on the front casters and spacers...

Operation Manual
Page 17
... 2¼ 5.7 2 1 2 4 2½ 6.35 3 0 2 4 2 5.1 0 3 3 3 2¼ 5.7 1 2 3 3 2½ 6.35 2 1 3 3 2¾ 7.0 3 0 3 3 Cutting Height Chart - Stored Between Below Spindle Weldment and Blade Above Weldment 2¾ 7.0 0 3 3 3 3 7.62 1 2 3 3 3¼ 8.3 2 1 3 3 3½ 8.9 3 0 3 3 3 7.62 0 3 4 2 3¼ 8.3 1 2 4 2 3½ 8.9 2 1 4 2 3¾ ... -top holes Cutting Height ¼" Blade Spacers ½" Caster Spacers In. Deck bolted to frame -bottom holes Cutting Height ¼" Blade Spacers ½" Caster Spacers In. ...
... 2¼ 5.7 2 1 2 4 2½ 6.35 3 0 2 4 2 5.1 0 3 3 3 2¼ 5.7 1 2 3 3 2½ 6.35 2 1 3 3 2¾ 7.0 3 0 3 3 Cutting Height Chart - Stored Between Below Spindle Weldment and Blade Above Weldment 2¾ 7.0 0 3 3 3 3 7.62 1 2 3 3 3¼ 8.3 2 1 3 3 3½ 8.9 3 0 3 3 3 7.62 0 3 4 2 3¼ 8.3 1 2 4 2 3½ 8.9 2 1 4 2 3¾ ... -top holes Cutting Height ¼" Blade Spacers ½" Caster Spacers In. Deck bolted to frame -bottom holes Cutting Height ¼" Blade Spacers ½" Caster Spacers In. ...
Operation Manual
Page 19
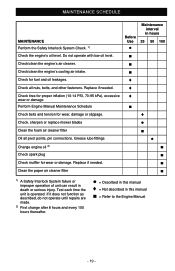
... ♦ wear or damage Perform Engine Manual Maintenance Schedule ■ Check belts and tension for wear, damage or slippage. ♦ Check, sharpen or replace mower blades ● Clean the foam air cleaner filter ■ Oil all nuts, bolts, and other fasteners. Test each time the unit is operated. If it does...
... ♦ wear or damage Perform Engine Manual Maintenance Schedule ■ Check belts and tension for wear, damage or slippage. ♦ Check, sharpen or replace mower blades ● Clean the foam air cleaner filter ■ Oil all nuts, bolts, and other fasteners. Test each time the unit is operated. If it does...

Operation Manual
Page 23
...6. Turn off the engine, remove the ignition key and allow unit to 2 in. ± 1/8 in . (5.1 cm ± .32 cm). 7. Replace deck belt. 9. Mower Blades Adjust Nut 5. Belt Replacement 48" Deck Belt 1. Remove deck belt from the idler spring. Tighten the adjusting nut to cool. 2. Replace deck cover and secure... cool. 2. Replace deck cover. Turn off the engine, remove the ignition key and allow unit to tension the belt. Remove deck belt. 4. Blades are sharp. Turn off the engine, remove the ignition key and the ignition wire from the spindle shafts. Remove the bolts...
...6. Turn off the engine, remove the ignition key and allow unit to 2 in. ± 1/8 in . (5.1 cm ± .32 cm). 7. Replace deck belt. 9. Mower Blades Adjust Nut 5. Belt Replacement 48" Deck Belt 1. Remove deck belt from the idler spring. Tighten the adjusting nut to cool. 2. Replace deck cover and secure... cool. 2. Replace deck cover. Turn off the engine, remove the ignition key and allow unit to tension the belt. Remove deck belt. 4. Blades are sharp. Turn off the engine, remove the ignition key and the ignition wire from the spindle shafts. Remove the bolts...

Operation Manual
Page 24
...unthreaded bolt. The clearance between the lower bearing and the housing is used under sandy soil conditions, replace blades when air lifts become eroded. • Blade is balanced. 4. Install pulley and nut. Nut Spacer Grease Fitting Washer Pulley Bearing Retaining Ring Housing ...Air lifts become eroded through at ends. 3. Clean entire assembly. 7. A balanced blade should remain in (.05 mm). Install mower blade, blade washers and blade bolt assembly. If either end of mower blade. Block blades with a wooden block to 120 lbf-ft (163 N•m). Shaft Remove spindle ...
...unthreaded bolt. The clearance between the lower bearing and the housing is used under sandy soil conditions, replace blades when air lifts become eroded. • Blade is balanced. 4. Install pulley and nut. Nut Spacer Grease Fitting Washer Pulley Bearing Retaining Ring Housing ...Air lifts become eroded through at ends. 3. Clean entire assembly. 7. A balanced blade should remain in (.05 mm). Install mower blade, blade washers and blade bolt assembly. If either end of mower blade. Block blades with a wooden block to 120 lbf-ft (163 N•m). Shaft Remove spindle ...
Operation Manual
Page 27
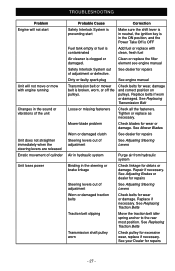
... belt idler spring anchor to the rear most position. Tighten or replace as necessary. See your Dealer for wear or damage. Mower blade problem Check blades for repairs - 27 - See Adjusting Brakes or dealer for repairs See Adjusting Steering Levers Check belts for excessive wear, replace if ...necessary. See Replacing Traction Belts Check pulley for wear or damage. Check belts for debris or damage. See Mower Blades Worn or damaged clutch See dealer for repairs Steering levers out of adjustment See Adjusting Steering Levers Air in hydraulic system Binding in ...
... belt idler spring anchor to the rear most position. Tighten or replace as necessary. See your Dealer for wear or damage. Mower blade problem Check blades for repairs - 27 - See Adjusting Brakes or dealer for repairs See Adjusting Steering Levers Check belts for excessive wear, replace if ...necessary. See Replacing Traction Belts Check pulley for wear or damage. Check belts for debris or damage. See Mower Blades Worn or damaged clutch See dealer for repairs Steering levers out of adjustment See Adjusting Steering Levers Air in hydraulic system Binding in ...


