
Owner Manual
Page 4
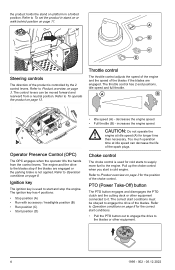
...Refer to Operation conditions on page 8 for the correct start conditions must be moved forward and rearward from the control levers. Refer to the blades or other equipment connected to start a cold engine. The control levers can decrease the life of the spark plugs. The engine and the drive...To set the product in a folded position. Throttle control The throttle control adjusts the speed of the engine and the speed of the blades if the blades are engaged or the parking brake is used for cold starts to supply more fuel to the engine. CAUTION: Do not operate the...
...Refer to Operation conditions on page 8 for the correct start conditions must be moved forward and rearward from the control levers. Refer to the blades or other equipment connected to start a cold engine. The control levers can decrease the life of the spark plugs. The engine and the drive...To set the product in a folded position. Throttle control The throttle control adjusts the speed of the engine and the speed of the blades if the blades are engaged or the parking brake is used for cold starts to supply more fuel to the engine. CAUTION: Do not operate the...

Owner Manual
Page 5
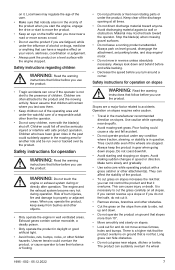
... yellow when the fuel level is in to disengage the drive to the fuel line. Read the operator's manual carefully and make sure that the blades have been engaged. Fuel shut-off valve Refer to Product overview on page 3 for 2 hours. Refer to Product overview on page 3 for the position of... is closed when the tab on the fuse box for ejecting objects and ricochets. 5 Risk of the fuel shut-off valve is perpendicular to the blades or other equipment. Hour meter The product has an hour meter that show for the position of falling. 1995 - 002 - 05.12.2022 Keep distance...
... yellow when the fuel level is in to disengage the drive to the fuel line. Read the operator's manual carefully and make sure that the blades have been engaged. Fuel shut-off valve Refer to Product overview on page 3 for 2 hours. Refer to Product overview on page 3 for the position of... is closed when the tab on the fuse box for ejecting objects and ricochets. 5 Risk of the fuel shut-off valve is perpendicular to the blades or other equipment. Hour meter The product has an hour meter that show for the position of falling. 1995 - 002 - 05.12.2022 Keep distance...
Owner Manual
Page 7
... To cut it. • Remove stones, branches and other obstacles. • Cut the grass on the traffic when you use the product. Stop the blade(s) when crossing gravel surfaces. • Do not leave a running product unattended. Safety instructions for another ride and be seriously injured or interfere with safe product...to the presence of the user. • Make sure that slopes more than the operator. • Do not carry children, even with the blade(s) shut off and be run over or backed over by the product. It is in well ventilated areas. If you cannot reverse up and ...
... To cut it. • Remove stones, branches and other obstacles. • Cut the grass on the traffic when you use the product. Stop the blade(s) when crossing gravel surfaces. • Do not leave a running product unattended. Safety instructions for another ride and be seriously injured or interfere with safe product...to the presence of the user. • Make sure that slopes more than the operator. • Do not carry children, even with the blade(s) shut off and be run over or backed over by the product. It is in well ventilated areas. If you cannot reverse up and ...
Owner Manual
Page 8
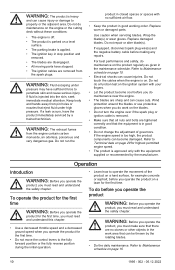
... necessary. Muffler WARNING: Do not use the product if protective plates, protective covers, safety switches or other items that it decreases the degree of the blades is disengaged. • The OPC is attached correctly and not damaged. 8 1995 - 002 - 05.12.2022 The muffler keeps the noise levels ...ROPS in the down . Do not use the product if the muffler is in the raised and locked position and use the product. Let your Husqvarna service agent. • Do not make sure that can start to start position. • Make sure that follow before you turn the ignition ...
... necessary. Muffler WARNING: Do not use the product if protective plates, protective covers, safety switches or other items that it decreases the degree of the blades is disengaged. • The OPC is attached correctly and not damaged. 8 1995 - 002 - 05.12.2022 The muffler keeps the noise levels ...ROPS in the down . Do not use the product if the muffler is in the raised and locked position and use the product. Let your Husqvarna service agent. • Do not make sure that can start to start position. • Make sure that follow before you turn the ignition ...
Owner Manual
Page 10
... nuts and bolts are tightened correctly and that there are disengaged. • All moving parts have the product immediately serviced by the rotating blades. • Do the daily maintenance. Operation Introduction WARNING: Before you operate the product, you must read and understand the safety chapter. ... the initial operation. • Learn how to property or the adjacent area. Do not do maintenance near the engine. • The blades are removed from the engine contain carbon monoxide, an odorless, poisonous and very dangerous gas. If the engine speed is too high, the...
... nuts and bolts are tightened correctly and that there are disengaged. • All moving parts have the product immediately serviced by the rotating blades. • Do the daily maintenance. Operation Introduction WARNING: Before you operate the product, you must read and understand the safety chapter. ... the initial operation. • Learn how to property or the adjacent area. Do not do maintenance near the engine. • The blades are removed from the engine contain carbon monoxide, an odorless, poisonous and very dangerous gas. If the engine speed is too high, the...

Owner Manual
Page 13
... 11. 4. The more you pull the left control lever rearward, the more the product will turn left control lever rearward in the direction of the blades. 11. Carefully pull the 2 control levers rearward. Do the steps that follow to make a zero turn right. a) Pull the 2 control levers rearward in the direction...
... 11. 4. The more you pull the left control lever rearward, the more the product will turn left control lever rearward in the direction of the blades. 11. Carefully pull the 2 control levers rearward. Do the steps that follow to make a zero turn right. a) Pull the 2 control levers rearward in the direction...
Owner Manual
Page 14
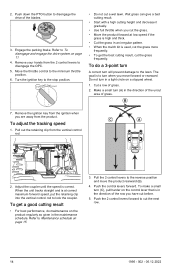
... as given in the direction of the row you are away from the 2 control levers to disengage the drive of grass. 2. Cut a row of the blades. 3. Remove the ignition key from the vertical control rod. Pull out the retaining clip from the ignition when you have cut the grass frequently. Adjust...
... as given in the direction of the row you are away from the 2 control levers to disengage the drive of grass. 2. Cut a row of the blades. 3. Remove the ignition key from the vertical control rod. Pull out the retaining clip from the ignition when you have cut the grass frequently. Adjust...

Owner Manual
Page 16
... of the engine. * Clean the air intake of the engine.2 Clean the bottom side of the belts and the belt pulleys. Start the engine and blades and listen for unusual * sounds. Replace the spark plugs. Replace the fuel filter. Replace the paper air filter.7 Replace the hydraulic oil and the hydraulic...
... of the engine. * Clean the air intake of the engine.2 Clean the bottom side of the belts and the belt pulleys. Start the engine and blades and listen for unusual * sounds. Replace the spark plugs. Replace the fuel filter. Replace the paper air filter.7 Replace the hydraulic oil and the hydraulic...
Owner Manual
Page 19
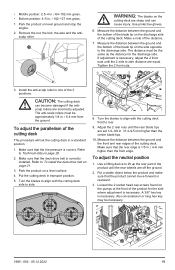
...long hex key may be the same as the distance for the side where adjustment is correct. Adjust the 2 rear nuts until the rear blade tips are equal. Measure the distance between the ground and the front and rear edges of the 3 positions. Measure the distance between the... adjusted. If adjustment is necessary. Make sure that the product cannot move forward or rearward. 3. To adjust the neutral position 1. WARNING: The blades on the cutting deck are sharp and can become damaged if the antiscalp rollers are off the ground. 2. CAUTION: The cutting deck can cause ...
...long hex key may be the same as the distance for the side where adjustment is correct. Adjust the 2 rear nuts until the rear blade tips are equal. Measure the distance between the ground and the front and rear edges of the 3 positions. Measure the distance between the... adjusted. If adjustment is necessary. Make sure that the product cannot move forward or rearward. 3. To adjust the neutral position 1. WARNING: The blades on the cutting deck are sharp and can become damaged if the antiscalp rollers are off the ground. 2. CAUTION: The cutting deck can cause ...

Owner Manual
Page 20
...the left and right side of the product with a 9/16" socket or wrench until the bolt does not touch the plunger. 5. Replace damaged blades. To replace the blades 1. Adjust the top nut with a wrench. 3. Note: Push the control levers and let them . Adjust the neutral bolt on the right side...fully starts when you do this procedure. Try to start . CAUTION: The bracket can become bent if you sharpen and balance blunt blades. • Look at the blades to see if they are in the correct position when the product tries to start the product between each turn at a time....
...the left and right side of the product with a 9/16" socket or wrench until the bolt does not touch the plunger. 5. Replace damaged blades. To replace the blades 1. Adjust the top nut with a wrench. 3. Note: Push the control levers and let them . Adjust the neutral bolt on the right side...fully starts when you do this procedure. Try to start . CAUTION: The bracket can become bent if you sharpen and balance blunt blades. • Look at the blades to see if they are in the correct position when the product tries to start the product between each turn at a time....

Owner Manual
Page 21
... the spindle pulleys. 6. Make sure that the belt routing align with the side without stamps in the front of the cutting deck. Use only approved blades. 3. Tighten the eye bolt for belt tension of the cutting deck. 2. To remove the deck belt Park the product on the idler arm. 3. Remove dirt... lowest mow position. 3. Remove the deck belt from the cutting deck and cause serious injury. Turn the nut until you do this task. 1. WARNING: Incorrect blade type can put the deck belt around the clutch pulley and the stacked pulley in the direction of the nut. 7. To remove the deck drive...
... the spindle pulleys. 6. Make sure that the belt routing align with the side without stamps in the front of the cutting deck. Use only approved blades. 3. Tighten the eye bolt for belt tension of the cutting deck. 2. To remove the deck belt Park the product on the idler arm. 3. Remove dirt... lowest mow position. 3. Remove the deck belt from the cutting deck and cause serious injury. Turn the nut until you do this task. 1. WARNING: Incorrect blade type can put the deck belt around the clutch pulley and the stacked pulley in the direction of the nut. 7. To remove the deck drive...

Owner Manual
Page 25
... 25 Problem Engine does not start. Steering controls are not locked in mow position. The battery is damaged. C • Lubricate the joint bearing of the blades is clogged. Set the cutting deck in the neutral position. Incorrect neutral adjustment. The fuel filter or fuel line is engaged. Lubricate each cutting deck... line. Note: Use a grease gun with a grease gun until grease comes out. Troubleshooting Troubleshooting schedule If you lubricate the cutting deck spindles. Refer to your Husqvarna service agent.
... 25 Problem Engine does not start. Steering controls are not locked in mow position. The battery is damaged. C • Lubricate the joint bearing of the blades is clogged. Set the cutting deck in the neutral position. Incorrect neutral adjustment. The fuel filter or fuel line is engaged. Lubricate each cutting deck... line. Note: Use a grease gun with a grease gun until grease comes out. Troubleshooting Troubleshooting schedule If you lubricate the cutting deck spindles. Refer to your Husqvarna service agent.
Owner Manual
Page 26
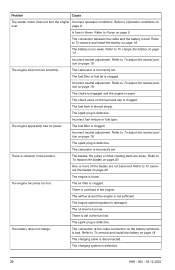
... engine apparently has no power. The engine is too weak. The airflow around the engine is bad. Refer to To replace the blades on the fuel tank cap is defective. The connection between the cable and the battery is not sufficient. Incorrect neutral adjustment. The fuel... is incorrectly set . The carburetor is defective. Refer to To adjust the neutral position on page 18. Refer to To examine the blades on page 19. Refer to To adjust the neutral position on page 20. Incorrect neutral adjustment. Incorrect neutral adjustment. The spark plug ...
... engine apparently has no power. The engine is too weak. The airflow around the engine is bad. Refer to To replace the blades on the fuel tank cap is defective. The connection between the cable and the battery is not sufficient. Incorrect neutral adjustment. The fuel... is incorrectly set . The carburetor is defective. Refer to To adjust the neutral position on page 18. Refer to To examine the blades on page 19. Refer to To adjust the neutral position on page 20. Incorrect neutral adjustment. Incorrect neutral adjustment. The spark plug ...

Owner Manual
Page 27
... fumes come near open flames, sparks, or pilot lights in for storage. There is air in the cutting deck. A fuse is loose. The blades are damaged. There is not sufficient to become hard. To prevent tacky particles during transportation. If you load it onto or off a vehicle or .... • Load the product in the container used , stabilizer is unsatisfactory. Risk of the blades do not change to To examine the blades on page 20. The drive belt on page 18. The blades are blunt. Refer to alkylate gasoline. Be careful when you use the mixing ratios given by ...
... fumes come near open flames, sparks, or pilot lights in for storage. There is air in the cutting deck. A fuse is loose. The blades are damaged. There is not sufficient to become hard. To prevent tacky particles during transportation. If you load it onto or off a vehicle or .... • Load the product in the container used , stabilizer is unsatisfactory. Risk of the blades do not change to To examine the blades on page 20. The drive belt on page 18. The blades are blunt. Refer to alkylate gasoline. Be careful when you use the mixing ratios given by ...

Owner Manual
Page 29
... Ogura GT 2.75 Clutch 12 The power rating as declared by the engine manufacturer is the average gross power output at the specified RPM of blades 3 Blade length, in . / mm 48 / 122 Weight, with oil filter Cooling system Air cooled Air filter Heavy duty canister Alternator, V. engine speed, rpm ...gauge fabricated Number of a typical production engine for the engine model measured using SAE Standards for engine gross power. Technical data Technical data V554 Engine Brand / Model Kawasaki / FX751V Nominal engine output, hp / kW12 24.5 / 18.3 Displacement, cm3 852 Max.
... Ogura GT 2.75 Clutch 12 The power rating as declared by the engine manufacturer is the average gross power output at the specified RPM of blades 3 Blade length, in . / mm 48 / 122 Weight, with oil filter Cooling system Air cooled Air filter Heavy duty canister Alternator, V. engine speed, rpm ...gauge fabricated Number of a typical production engine for the engine model measured using SAE Standards for engine gross power. Technical data Technical data V554 Engine Brand / Model Kawasaki / FX751V Nominal engine output, hp / kW12 24.5 / 18.3 Displacement, cm3 852 Max.

Owner Manual
Page 64
... EQUIVALENT 123456 123456 MINI FUSE - 20A (CHRG) MINI FUSE - 10A (ACCY) MINI FUSE - 20A (MAIN) MINI FUSE - 7.5A (CLUTCH) MINI FUSE - 5A (GAUGES) RED/BLK BLADE SWITCH (OFF) 7 DGN 8 GRY/WHT 9 DBL 1 DBL 2 3 BLK/WHT GRY/WHT 10 4 BLK/WHT 11 WHT 12 5 6 WHT RED/BLK A1 DBL KEY SWITCH POSITIONS...
... EQUIVALENT 123456 123456 MINI FUSE - 20A (CHRG) MINI FUSE - 10A (ACCY) MINI FUSE - 20A (MAIN) MINI FUSE - 7.5A (CLUTCH) MINI FUSE - 5A (GAUGES) RED/BLK BLADE SWITCH (OFF) 7 DGN 8 GRY/WHT 9 DBL 1 DBL 2 3 BLK/WHT GRY/WHT 10 4 BLK/WHT 11 WHT 12 5 6 WHT RED/BLK A1 DBL KEY SWITCH POSITIONS...


