

Owner Manual
Page 4
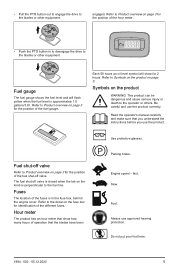
...throttle (B) - Choke control The choke control is controlled by the 2 control levers. PTO button 12. Refer to engage the drive of the blades if the blades are engaged or the parking brake is not applied. The throttle control has 2 end positions, idle speed and full throttle. The engine and...up the choke control when you start conditions. 4 1994 - 002 - 05.12.2022 The correct start and stop if the blades are engaged. Refer to the blades stop the engine. Refer to it. Operator Presence Control (OPC) The OPC engages when the operator lifts the hands from a ...
...throttle (B) - Choke control The choke control is controlled by the 2 control levers. PTO button 12. Refer to engage the drive of the blades if the blades are engaged or the parking brake is not applied. The throttle control has 2 end positions, idle speed and full throttle. The engine and...up the choke control when you start conditions. 4 1994 - 002 - 05.12.2022 The correct start and stop if the blades are engaged. Refer to the blades stop the engine. Refer to it. Operator Presence Control (OPC) The OPC engages when the operator lifts the hands from a ...
Owner Manual
Page 5
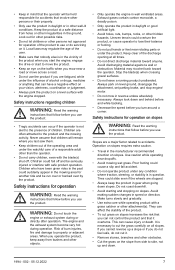
...overview on the product WARNING: This product can be dangerous and cause serious injury or death to the blades or other equipment. Hour meter The product has an hour meter that you understand the instructions before ...- 002 - 05.12.2022 5 The fuel shut-off valve Refer to the blades or other equipment. Engine speed - Fuel. Refer to Product overview on page 3 for the position of operation ...that the blades have been Parking brake. Each 50 hours an oil level symbol will flash yellow when the ...
...overview on the product WARNING: This product can be dangerous and cause serious injury or death to the blades or other equipment. Hour meter The product has an hour meter that you understand the instructions before ...- 002 - 05.12.2022 5 The fuel shut-off valve Refer to the blades or other equipment. Engine speed - Fuel. Refer to Product overview on page 3 for the position of operation ...that the blades have been Parking brake. Each 50 hours an oil level symbol will flash yellow when the ...
Owner Manual
Page 7
Risk of burn injuries, fire and damage to accidents. Stop the blade(s) when crossing gravel surfaces. • Do not leave a running product unattended. Safety instructions for accidents that involve other persons or their balance or footing. • ... if the operator is necessary to cut it. • Remove stones, branches and other than the operator. • Do not carry children, even with the blade(s) shut off and be run over or backed over by the product. Avoid discharging material against a wall or obstruction. Material may regulate the age of...
Risk of burn injuries, fire and damage to accidents. Stop the blade(s) when crossing gravel surfaces. • Do not leave a running product unattended. Safety instructions for accidents that involve other persons or their balance or footing. • ... if the operator is necessary to cut it. • Remove stones, branches and other than the operator. • Do not carry children, even with the blade(s) shut off and be run over or backed over by the product. Avoid discharging material against a wall or obstruction. Material may regulate the age of...
Owner Manual
Page 8
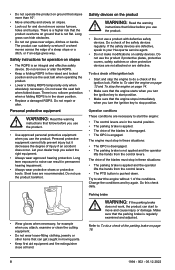
...when you use the product if protective plates, protective covers, safety switches or other items that is not flat. The drive of the blades must stop the engine to your dealer help you select the right equipment. • Always wear approved hearing protection. Do this check daily... Do not wear loose-fitting clothing, jewelry or other protective devices are not attached or are recommended. Do not repair or alter. Let your Husqvarna service agent. • Do not make modifications on safety devices. Steel toes are defective. • Do not operate the product on ground that...
...when you use the product if protective plates, protective covers, safety switches or other items that is not flat. The drive of the blades must stop the engine to your dealer help you select the right equipment. • Always wear approved hearing protection. Do this check daily... Do not wear loose-fitting clothing, jewelry or other protective devices are not attached or are recommended. Do not repair or alter. Let your Husqvarna service agent. • Do not make modifications on safety devices. Steel toes are defective. • Do not operate the product on ground that...

Owner Manual
Page 10
... in closed spaces or spaces with your fingers. • Let the product become damaged. Replace worn or damaged parts. Use caution when servicing blades. If the engine speed is heavy and can cause injury or damage to penetrate skin and cause serious injury. WARNING: The exhaust fumes from ... the battery away from the spark plugs. WARNING: Fluid escaping under high pressure. If fluid is in good working order. Do not repair or alter blade(s). Do not do a function test on a level surface. • The parking brake is applied. • The ignition key in the maintenance schedule. ...
... in closed spaces or spaces with your fingers. • Let the product become damaged. Replace worn or damaged parts. Use caution when servicing blades. If the engine speed is heavy and can cause injury or damage to penetrate skin and cause serious injury. WARNING: The exhaust fumes from ... the battery away from the spark plugs. WARNING: Fluid escaping under high pressure. If fluid is in good working order. Do not repair or alter blade(s). Do not do a function test on a level surface. • The parking brake is applied. • The ignition key in the maintenance schedule. ...

Owner Manual
Page 11
... bottom of the product on gasoline with a minimum octane rating of the adjustable bar (A) counterclockwise, until the adjustable bar can be thrown by the rotating blades. • Do the daily maintenance. WARNING: Before you operate the product, you must make sure that can rotate freely. Be careful and refuel outdoors, refer...
... bottom of the product on gasoline with a minimum octane rating of the adjustable bar (A) counterclockwise, until the adjustable bar can be thrown by the rotating blades. • Do the daily maintenance. WARNING: Before you operate the product, you must make sure that can rotate freely. Be careful and refuel outdoors, refer...

Owner Manual
Page 14
... coupler until the speed is necessary to adjust the cutting height during operation, refer to To set the cutting deck in the direction of the blades. 3. Refer to make a zero turn in a tight circle on a stopped wheel. 1. To do maintenance on the product regularly as given in an irregular pattern....not cut the grass frequently. Push down the PTO button to To disengage and engage the drive system on page 12. 4. Cut a row of the blades. 11. To stop position. 7. Move the 2 control levers to the neutral position to lock the coupler. Remove the ignition key from the ignition ...
... coupler until the speed is necessary to adjust the cutting height during operation, refer to To set the cutting deck in the direction of the blades. 3. Refer to make a zero turn in a tight circle on a stopped wheel. 1. To do maintenance on the product regularly as given in an irregular pattern....not cut the grass frequently. Push down the PTO button to To disengage and engage the drive system on page 12. 4. Cut a row of the blades. 11. To stop position. 7. Move the 2 control levers to the neutral position to lock the coupler. Remove the ignition key from the ignition ...

Owner Manual
Page 16
Do a check of the belts and the belt pulleys. Start the engine and blades and listen for damages on the cutting deck. X Clean around the engine. * Clean around the belts and the belt pulleys. * Do a check of the tire ... throttle cable and choke cable. Maintenance Daily maintenance Before After Do a check for unusual * sounds. Do a check of 1 time each 200 hours). Sharpen the blades.5 Replace the blades. Do a check of the cutting deck. Clean the foam pre-filter.3 Clean the paper filter cartridge.4 Examine the muffler and spark arrestor screen. Replace...
Do a check of the belts and the belt pulleys. Start the engine and blades and listen for damages on the cutting deck. X Clean around the engine. * Clean around the belts and the belt pulleys. * Do a check of the tire ... throttle cable and choke cable. Maintenance Daily maintenance Before After Do a check for unusual * sounds. Do a check of 1 time each 200 hours). Sharpen the blades.5 Replace the blades. Do a check of the cutting deck. Clean the foam pre-filter.3 Clean the paper filter cartridge.4 Examine the muffler and spark arrestor screen. Replace...

Owner Manual
Page 19
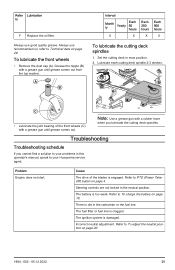
... in most terrain conditions. The anti-scalp rollers can become damaged if the antiscalp rollers are sharp and can cause injury. WARNING: The blades on the ground and prevent lawn scalping in the correct position on the cutting deck are incorrectly adjusted. Make a note of the 3 positions....8 Nm. Torque the nut and bolt to remove the front wheels from the product. 6. Measure the distance between the ground and the bottom of the blade tip on a level surface. 4. CAUTION: The cutting deck can be approximately 1/4 in. / 6.4 mm from the battery. 2. To adjust the parallelism...
... in most terrain conditions. The anti-scalp rollers can become damaged if the antiscalp rollers are sharp and can cause injury. WARNING: The blades on the ground and prevent lawn scalping in the correct position on the cutting deck are incorrectly adjusted. Make a note of the 3 positions....8 Nm. Torque the nut and bolt to remove the front wheels from the product. 6. Measure the distance between the ground and the bottom of the blade tip on a level surface. 4. CAUTION: The cutting deck can be approximately 1/4 in. / 6.4 mm from the battery. 2. To adjust the parallelism...

Owner Manual
Page 20
... to 75 ± 15 ft-lb. 9. Do adjustment for the side where adjustment is flush with the surface of the product until the rear blade tips are equal. Engage the parking brake. 2. Engage the OPC levers. 6. Adjust the neutral bolt on the right side of the cutting deck.... long hex key may be the same as the distance for the discharge side. Note: Do not remove the 2 socket head cap screws. 4. Turn the blades to the discharge side. To adjust the neutral switches 1. Start the product. 5. 7. A 3/8" hex key is 1/5 in the neutral position. 8. Adjust the neutral ...
... to 75 ± 15 ft-lb. 9. Do adjustment for the side where adjustment is flush with the surface of the product until the rear blade tips are equal. Engage the parking brake. 2. Engage the OPC levers. 6. Adjust the neutral bolt on the right side of the cutting deck.... long hex key may be the same as the distance for the discharge side. Note: Do not remove the 2 socket head cap screws. 4. Turn the blades to the discharge side. To adjust the neutral switches 1. Start the product. 5. 7. A 3/8" hex key is 1/5 in the neutral position. 8. Adjust the neutral ...

Owner Manual
Page 21
...The neutral bolt is not necessary to keep the product on the left side of the frame to release the belt tension. 4. Assemble the new blade with the side without stamps in the front of the product. Move the belt tensioner to the left side of the cutting deck. WARNING: ...approved service agent help you do this procedure. the cutting deck and cause serious injury. To remove the deck drive belt 1. Remove the blade bolt. 2. Attach the blade bolt. Tighten the eye bolt for belt tension of the frame to To remove the deck drive belt on the neutral switch. a) Loosen...
...The neutral bolt is not necessary to keep the product on the left side of the frame to release the belt tension. 4. Assemble the new blade with the side without stamps in the front of the product. Move the belt tensioner to the left side of the cutting deck. WARNING: ...approved service agent help you do this procedure. the cutting deck and cause serious injury. To remove the deck drive belt 1. Remove the blade bolt. 2. Attach the blade bolt. Tighten the eye bolt for belt tension of the frame to To remove the deck drive belt on the neutral switch. a) Loosen...
Owner Manual
Page 25
...are not locked in mow position. 2. There is engaged. Refer to To charge the battery on page 18. C • Lubricate the joint bearing of the blades is dirt in this operator's manual, speak to PTO (Power TakeOff) button on page 4. Note: Use a grease gun with a rubber hose when you ...cannot find a solution to your Husqvarna service agent. Refer to To adjust the neutral position on page 20. 1994 - 002 - 05.12.2022 25 Refer Lubrication to Technical data on page...
...are not locked in mow position. 2. There is engaged. Refer to To charge the battery on page 18. C • Lubricate the joint bearing of the blades is dirt in this operator's manual, speak to PTO (Power TakeOff) button on page 4. Note: Use a grease gun with a rubber hose when you ...cannot find a solution to your Husqvarna service agent. Refer to To adjust the neutral position on page 20. 1994 - 002 - 05.12.2022 25 Refer Lubrication to Technical data on page...
Owner Manual
Page 26
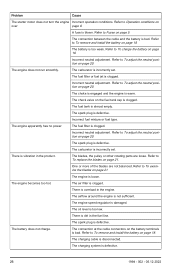
...20. The spark plug is clogged. Incorrect neutral adjustment. There is incorrectly set . The battery does not charge. Refer to To replace the blades on page 5. The engine does not run smoothly. The fuel filter is defective. Refer to Fuses on page 21. The engine is damaged... The airflow around the engine is clogged. Refer to To adjust the neutral position on over. Incorrect fuel mixture or fuel type. The blades, the pulley or other rotating parts are not balanced. The air filter is blown. The carburetor is overload in the fuel line. A...
...20. The spark plug is clogged. Incorrect neutral adjustment. There is incorrectly set . The battery does not charge. Refer to To replace the blades on page 5. The engine does not run smoothly. The fuel filter is defective. Refer to Fuses on page 21. The engine is damaged... The airflow around the engine is clogged. Refer to To adjust the neutral position on over. Incorrect fuel mixture or fuel type. The blades, the pulley or other rotating parts are not balanced. The air filter is blown. The carburetor is overload in the fuel line. A...

Owner Manual
Page 27
.... The hydraulic release lever is damaged and not parallel to To get a good cutting result on approved ramps of a maximum operation angle of the blades do not change to lock the product during storage, add a stabilizer. The drive belt on page 21. Refer to the ground. The product is... not necessary. Refer to To examine the blades on the mower deck is blown. The drive of 10°. Refer to the fuel in the tank or in the container used , stabilizer is...
.... The hydraulic release lever is damaged and not parallel to To get a good cutting result on approved ramps of a maximum operation angle of the blades do not change to lock the product during storage, add a stabilizer. The drive belt on page 21. Refer to the ground. The product is... not necessary. Refer to To examine the blades on the mower deck is blown. The drive of 10°. Refer to the fuel in the tank or in the container used , stabilizer is...

Owner Manual
Page 29
...including Chute Up, in. / cm 50 / 127 Width including Chute Down, in. / cm 62 / 158 Height, in . / cm 16.5 / 42 Blade Engagement Ogura GT 2.75 Clutch 12 The power rating as declared by the engine manufacturer is the average gross power output at the specified RPM... of blades 3 Blade length, in . / mm 48 / 122 Weight, with oil filter Cooling system Air cooled Air filter Heavy duty canister Alternator, V. Technical data Technical data V548 Engine Brand / Model Kawasaki / FX751V Nominal engine output, hp /...
...including Chute Up, in. / cm 50 / 127 Width including Chute Down, in. / cm 62 / 158 Height, in . / cm 16.5 / 42 Blade Engagement Ogura GT 2.75 Clutch 12 The power rating as declared by the engine manufacturer is the average gross power output at the specified RPM... of blades 3 Blade length, in . / mm 48 / 122 Weight, with oil filter Cooling system Air cooled Air filter Heavy duty canister Alternator, V. Technical data Technical data V548 Engine Brand / Model Kawasaki / FX751V Nominal engine output, hp /...

Owner Manual
Page 65
... EQUIVALENT 123456 123456 MINI FUSE - 20A (CHRG) MINI FUSE - 10A (ACCY) MINI FUSE - 20A (MAIN) MINI FUSE - 7.5A (CLUTCH) MINI FUSE - 5A (GAUGES) RED/BLK BLADE SWITCH (OFF) 7 DGN 8 GRY/WHT 9 DBL 1 DBL 2 3 BLK/WHT GRY/WHT 10 4 BLK/WHT 11 5 WHT 12 6 WHT RED/BLK A1 DBL KEY SWITCH POSITIONS...
... EQUIVALENT 123456 123456 MINI FUSE - 20A (CHRG) MINI FUSE - 10A (ACCY) MINI FUSE - 20A (MAIN) MINI FUSE - 7.5A (CLUTCH) MINI FUSE - 5A (GAUGES) RED/BLK BLADE SWITCH (OFF) 7 DGN 8 GRY/WHT 9 DBL 1 DBL 2 3 BLK/WHT GRY/WHT 10 4 BLK/WHT 11 5 WHT 12 6 WHT RED/BLK A1 DBL KEY SWITCH POSITIONS...


