

Parts Manual
Page 15
... Bumper Side Trim Bushing Nose Roller Bolt RdHd 3/8-16 unc x 1-3/4 Gr. 5 Bolt 5/16 Cap Sleeve Connect Quick Coupling NOTE: All component dimensions given in U.S. TS 348XD (96043024200), PRODUCT NO. 960 43 02-42 MOWER DECK KEY PART NO. Hub Arm Idler Pulley, Idler Wheel, Gauge Bolt Shoulder 3/8-16 x 3-5/8 Nut 3/8-16 ... 5/16-18 Roller, Nose, 48" Rod, Roller, Nose, Narrow Pin Cotter Washout Port Belt, Deck KEY PART NO. inches 1 inch = 25.4 mm 15 Torsion Blade Bolt Washer Assy 7/16-20 Stud, Fasten w/ Anti- TRACTOR - Rotate Nut 5/16-18 Hx Flng NYLOC Pulley, Idler Spec. NO. 1 588 78 80-02 2...
... Bumper Side Trim Bushing Nose Roller Bolt RdHd 3/8-16 unc x 1-3/4 Gr. 5 Bolt 5/16 Cap Sleeve Connect Quick Coupling NOTE: All component dimensions given in U.S. TS 348XD (96043024200), PRODUCT NO. 960 43 02-42 MOWER DECK KEY PART NO. Hub Arm Idler Pulley, Idler Wheel, Gauge Bolt Shoulder 3/8-16 x 3-5/8 Nut 3/8-16 ... 5/16-18 Roller, Nose, 48" Rod, Roller, Nose, Narrow Pin Cotter Washout Port Belt, Deck KEY PART NO. inches 1 inch = 25.4 mm 15 Torsion Blade Bolt Washer Assy 7/16-20 Stud, Fasten w/ Anti- TRACTOR - Rotate Nut 5/16-18 Hx Flng NYLOC Pulley, Idler Spec. NO. 1 588 78 80-02 2...

Parts Manual
Page 31
TS 348XD (96043024200), PRODUCTO NO. 960 43 02-42 PLATAFORMA DE LA CORTADORA DE CÉSPED KEY PART NO. NO. 1 588 78 80-02 2 539 13 18-... 532 17 01-65 81 532 10 53-04 - - 532 41 64-05 DESCRIPTION Guard, Belt Eyebolt 5/16 x 3-1/2 Nut 5/16-18 Hx Spring Extn. Torsion Blade Bolt Washer Assy 7/16-20 Stud, Fasten w/ Anti- Screw 1/4-20 x 5/8 Hx Self Tap ZD Bolt Hex Washer Head .313-18 x 1.19 Pulley Idler Screw Thdrl...
TS 348XD (96043024200), PRODUCTO NO. 960 43 02-42 PLATAFORMA DE LA CORTADORA DE CÉSPED KEY PART NO. NO. 1 588 78 80-02 2 539 13 18-... 532 17 01-65 81 532 10 53-04 - - 532 41 64-05 DESCRIPTION Guard, Belt Eyebolt 5/16 x 3-1/2 Nut 5/16-18 Hx Spring Extn. Torsion Blade Bolt Washer Assy 7/16-20 Stud, Fasten w/ Anti- Screw 1/4-20 x 5/8 Hx Self Tap ZD Bolt Hex Washer Head .313-18 x 1.19 Pulley Idler Screw Thdrl...

Owner Manual
Page 2
... storing the machine. Use common sense when towing. CHILDREN WARNING! The American Academy of Pediatrics recommends that are familiar with the blades shut off blades, set parking brake, stop before cleaning the machine, removing the grass catcher, or unclogging the discharge chute. • Operate ... to occur. Wash hands after handling. CHILDREN CAN BE SERIOUSLY INJURED OR KILLED BY THIS EQUIPMENT. Children who are recommended by the blades. • Ensure the area is clear of bystanders before operating. Always look behind before and while backing. • Never direct ...
... storing the machine. Use common sense when towing. CHILDREN WARNING! The American Academy of Pediatrics recommends that are familiar with the blades shut off blades, set parking brake, stop before cleaning the machine, removing the grass catcher, or unclogging the discharge chute. • Operate ... to occur. Wash hands after handling. CHILDREN CAN BE SERIOUSLY INJURED OR KILLED BY THIS EQUIPMENT. Children who are recommended by the blades. • Ensure the area is clear of bystanders before operating. Always look behind before and while backing. • Never direct ...
Owner Manual
Page 3
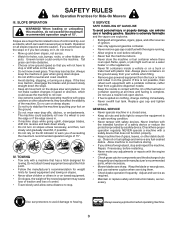
...speed or direction, which can affect the stability of grass, leaves, or other debris buildup. If the tires lose traction, disengage the blades and proceed slowly straight down slopes, not across. • Watch for Ride-On Mowers III. Slopes are sharp. SAFETY RULES Safe ...machine or fuel container where there is in safe working condition. • Never tamper with manufacturer's recommended parts, when necessary. • Mower blades are a major factor related to hearing. 3 Always wear eye protection when operating machine. If this machine, do not mow it on clothing,...
...speed or direction, which can affect the stability of grass, leaves, or other debris buildup. If the tires lose traction, disengage the blades and proceed slowly straight down slopes, not across. • Watch for Ride-On Mowers III. Slopes are sharp. SAFETY RULES Safe ...machine or fuel container where there is in safe working condition. • Never tamper with manufacturer's recommended parts, when necessary. • Mower blades are a major factor related to hearing. 3 Always wear eye protection when operating machine. If this machine, do not mow it on clothing,...

Owner Manual
Page 4
... full potential of a new tractor. Register your tractor in maintaining, caring for and using your product: • Visit our website: www.husqvarna.com • Call Us Toll Free: 1-800-487-5951 TABLE OF CONTENTS SAFETY RULES 2-3 PRODUCT SPECIFICATIONS 4 CUSTOMER RESPONSIBILITIES 4 ASSEMBLY 5-7 ...70 Oz./2,07 L Spark Plug: NGK BRP4ES (Gap: .030"/0,76 mm) Charging System: Battery: Blade Bolt Torque: 15 Amps @ 3600 RPM Amp/Hr: Min. is equipped with Husqvarna Connect*. CONGRATULATIONS on federal lands. SUPPORT / HELP If you require assistance or have questions concerning the ...
... full potential of a new tractor. Register your tractor in maintaining, caring for and using your product: • Visit our website: www.husqvarna.com • Call Us Toll Free: 1-800-487-5951 TABLE OF CONTENTS SAFETY RULES 2-3 PRODUCT SPECIFICATIONS 4 CUSTOMER RESPONSIBILITIES 4 ASSEMBLY 5-7 ...70 Oz./2,07 L Spark Plug: NGK BRP4ES (Gap: .030"/0,76 mm) Charging System: Battery: Blade Bolt Torque: 15 Amps @ 3600 RPM Amp/Hr: Min. is equipped with Husqvarna Connect*. CONGRATULATIONS on federal lands. SUPPORT / HELP If you require assistance or have questions concerning the ...

Owner Manual
Page 7
...FOR PROPER POSITION OF ALL BELTS See the figures that are routed correctly. Verify that the belts are shown for replacing motion and mower blade drive belts in the Service and Adjustments section of this manual.) ✓ It is in "TRANSMISSION ENGAGED" position. (See "TO ...8226; Place freewheel control in "TRANSMISSION DISENGAGED" position. (See "TO TRANSPORT" in the Operation section of this manual.) ✓ Download Husqvarna Connect App to remove the tractor from the skid. Continue using the instructions that follow all connections are still secure and wires are properly ...
...FOR PROPER POSITION OF ALL BELTS See the figures that are routed correctly. Verify that the belts are shown for replacing motion and mower blade drive belts in the Service and Adjustments section of this manual.) ✓ It is in "TRANSMISSION ENGAGED" position. (See "TO ...8226; Place freewheel control in "TRANSMISSION DISENGAGED" position. (See "TO TRANSPORT" in the Operation section of this manual.) ✓ Download Husqvarna Connect App to remove the tractor from the skid. Continue using the instructions that follow all connections are still secure and wires are properly ...
Owner Manual
Page 9
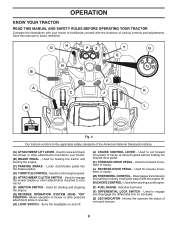
... off . (J) CRUISE CONTROL LEVER - Used to raise and lower the mower or other attachments mounted to your tractor. (B) BRAKE PEDAL - Used to engage the mower blades or other powered attachment while in reverse. (H) LIGHT SWITCH - Informs the operator the status of various controls and adjustments. Used when starting and stopping the...
... off . (J) CRUISE CONTROL LEVER - Used to raise and lower the mower or other attachments mounted to your tractor. (B) BRAKE PEDAL - Used to engage the mower blades or other powered attachment while in reverse. (H) LIGHT SWITCH - Informs the operator the status of various controls and adjustments. Used when starting and stopping the...

Owner Manual
Page 10
... engage choke control (N), pull knob out. Pedal should remain in the "DISENGAGED" position ( ). B C Fig. 5 STOPPING (See Fig. 6) MOWER BLADES • To stop tractor completely, as described above, and set parking brake before stopping may cause "browning" of any tractor can result in to "STOP...running , hot engine exhaust gases may cause engine to "backfire". • Turn ignition key (F) to disengage. 10 CAUTION: Always stop mower blades, place attachment clutch control in brake position. TO USE THROTTLE CONTROL (D) (See Fig. 7) Always operate engine at full speed (fast). &#...
... engage choke control (N), pull knob out. Pedal should remain in the "DISENGAGED" position ( ). B C Fig. 5 STOPPING (See Fig. 6) MOWER BLADES • To stop tractor completely, as described above, and set parking brake before stopping may cause "browning" of any tractor can result in to "STOP...running , hot engine exhaust gases may cause engine to "backfire". • Turn ignition key (F) to disengage. 10 CAUTION: Always stop mower blades, place attachment clutch control in brake position. TO USE THROTTLE CONTROL (D) (See Fig. 7) Always operate engine at full speed (fast). &#...

Owner Manual
Page 11
... ground when mower is at the desired cutting height in most terrain conditions. The heights are approximate and may cause the cruise control to the blade tip with tractor on a flat level surface. • Adjust mower to begin movement. Make the first cut . (See "TO ADJUST MOWER ...CUTTING HEIGHT".) • Start mower blades by engaging attachment clutch control. 11 NOTE: Adjust gauge wheels with the engine not running and the attachment clutch engaged will shut off the engine...
... ground when mower is at the desired cutting height in most terrain conditions. The heights are approximate and may cause the cruise control to the blade tip with tractor on a flat level surface. • Adjust mower to begin movement. Make the first cut . (See "TO ADJUST MOWER ...CUTTING HEIGHT".) • Start mower blades by engaging attachment clutch control. 11 NOTE: Adjust gauge wheels with the engine not running and the attachment clutch engaged will shut off the engine...

Owner Manual
Page 12
... across any slope. • Choose the slowest speed before starting up with the attachment clutch engaged while mowing is strongly discouraged. OPERATION TO STOP MOWER BLADES Disengage attachment clutch control. Fig. 11 REVERSE OPERATION SYSTEM (ROS) (See Fig. 12) Your tractor is disengaged by the operator to tractor (rope, cord, etc...
... across any slope. • Choose the slowest speed before starting up with the attachment clutch engaged while mowing is strongly discouraged. OPERATION TO STOP MOWER BLADES Disengage attachment clutch control. Fig. 11 REVERSE OPERATION SYSTEM (ROS) (See Fig. 12) Your tractor is disengaged by the operator to tractor (rope, cord, etc...

Owner Manual
Page 13
... with differential lock engaged. • To disengage differential lock, push differential lock switch to the "OFF" position. The tilt icon will proactively shut off the blades. Battery - The tilt indicator is greater than or equal to 60 degrees then the icon will illuminate and the tractor will illuminate when the on...
... with differential lock engaged. • To disengage differential lock, push differential lock switch to the "OFF" position. The tilt icon will proactively shut off the blades. Battery - The tilt indicator is greater than or equal to 60 degrees then the icon will illuminate and the tractor will illuminate when the on...

Owner Manual
Page 16
...8226; Check tire pressure. • Check operator presence and ROS systems for proper operation. • Check for Loose Fasteners A Check/Replace Mower Blades C Lubrication Chart T Check Battery Level O Clean Battery and Terminals R Clean Debris off Steering Plate Check Transaxle Cooling Check Mower Levelness Check V-Belts ... see if you should replace the spark plug, clean or replace air filter, and check blades and belts for signs of the adjustments described in sandy soil. Replace blades more often when mowing in the Service and Adjustments section of this tractor does not cover items...
...8226; Check tire pressure. • Check operator presence and ROS systems for proper operation. • Check for Loose Fasteners A Check/Replace Mower Blades C Lubrication Chart T Check Battery Level O Clean Battery and Terminals R Clean Debris off Steering Plate Check Transaxle Cooling Check Mower Levelness Check V-Belts ... see if you should replace the spark plug, clean or replace air filter, and check blades and belts for signs of the adjustments described in sandy soil. Replace blades more often when mowing in the Service and Adjustments section of this tractor does not cover items...

Owner Manual
Page 17
... as shown. If your local parts dealer. Lbs./ 62-75 Nm). Do not attempt to open . • Recharge at highest speed in blade must be kept sharp. OPERATOR PRESENCE SYSTEM AND REVERSE OPERATION SYSTEM (ROS) (See Fig. 17) Be sure operator presence and reverse operation systems...attachment clutch engaged, any attempt by the operator to leave the seat without first setting the parking brake should shut off the engine. IMPORTANT: SPECIAL BLADE BOLT IS HEAT TREATED. ROS "ON" POSITION ENGINE "ON" POSITION (NORMAL OPERATING) • Clean terminals and battery cable ends with wire ...
... as shown. If your local parts dealer. Lbs./ 62-75 Nm). Do not attempt to open . • Recharge at highest speed in blade must be kept sharp. OPERATOR PRESENCE SYSTEM AND REVERSE OPERATION SYSTEM (ROS) (See Fig. 17) Be sure operator presence and reverse operation systems...attachment clutch engaged, any attempt by the operator to leave the seat without first setting the parking brake should shut off the engine. IMPORTANT: SPECIAL BLADE BOLT IS HEAT TREATED. ROS "ON" POSITION ENGINE "ON" POSITION (NORMAL OPERATING) • Clean terminals and battery cable ends with wire ...
Owner Manual
Page 18
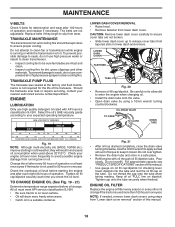
TRANSAXLE MAINTENANCE The transmission fan and cooling fins should be sure fan blades are not adjustable. Check the crankcase oil level before oil change if the tractor is not required for the life of operation. LOWER DASH COVER ...
TRANSAXLE MAINTENANCE The transmission fan and cooling fins should be sure fan blades are not adjustable. Check the crankcase oil level before oil change if the tractor is not required for the life of operation. LOWER DASH COVER ...

Owner Manual
Page 20
... the parking brake, and stop the engine. 3. WARNING: A broken or missing washout fitting could expose you or others to thrown objects from contact with the blade. • Replace broken or missing washout fitting immediately, prior to disconnect the adapter from your house, garage, parked cars, etc. Thread the nozzle adapter (packaged...
... the parking brake, and stop the engine. 3. WARNING: A broken or missing washout fitting could expose you or others to thrown objects from contact with the blade. • Replace broken or missing washout fitting immediately, prior to disconnect the adapter from your house, garage, parked cars, etc. Thread the nozzle adapter (packaged...

Owner Manual
Page 21
... will be spring loaded. remove retainer springs and washers. • Go to other side of tractor. See Mower Drive Belt Removal in "TO REPLACE MOWER BLADE DRIVE BELT" in this section. • Disconnect front link (E) from mower. • Go to either side of the lever. • Slide mower out from under... pedal fully and set parking brake. • Place attachment clutch in "DISENGAGED" position. • Turn ignition key to "STOP" and remove key. • Ensure the blades and all moving parts have completely stopped. • Disconnect spark plug wire from rear mower bracket (D) -
... will be spring loaded. remove retainer springs and washers. • Go to other side of tractor. See Mower Drive Belt Removal in "TO REPLACE MOWER BLADE DRIVE BELT" in this section. • Disconnect front link (E) from mower. • Go to either side of the lever. • Slide mower out from under... pedal fully and set parking brake. • Place attachment clutch in "DISENGAGED" position. • Turn ignition key to "STOP" and remove key. • Ensure the blades and all moving parts have completely stopped. • Disconnect spark plug wire from rear mower bracket (D) -

Owner Manual
Page 22
...of link (E) into slots in front mower bracket (H). • Check Front-To-Back Adjustment in "TO LEVEL MOWER" in front of transaxle. F O P E Q TS D D. ANTI-SWAY BAR T. A B H Fig. 31 • Install belt onto electric clutch pulley (M). TRANSAXLE BRACKET Fig. 28 • ATTACH MOWER SIDE SUSPENSION ARMS... adjust gauge wheels before operating mower as shown. RIGHT SIDE REAR MOWER BRACKET S. See Mower Drive Belt Installation in "TO REPLACE MOWER BLADE DRIVE BELT" in same position/location. • Pivot the integrated washer end of anti-sway bar (S) towards mower deck bracket on...
...of link (E) into slots in front mower bracket (H). • Check Front-To-Back Adjustment in "TO LEVEL MOWER" in front of transaxle. F O P E Q TS D D. ANTI-SWAY BAR T. A B H Fig. 31 • Install belt onto electric clutch pulley (M). TRANSAXLE BRACKET Fig. 28 • ATTACH MOWER SIDE SUSPENSION ARMS... adjust gauge wheels before operating mower as shown. RIGHT SIDE REAR MOWER BRACKET S. See Mower Drive Belt Installation in "TO REPLACE MOWER BLADE DRIVE BELT" in same position/location. • Pivot the integrated washer end of anti-sway bar (S) towards mower deck bracket on...

Owner Manual
Page 23
... until both sides. • If adjustment is not adjusted properly. If tires are over or under inflated, it may affect the appearance of the blade. A B TIGHTEN ADJUST NUT B TO RAISE MOWER LOOSEN ADJUST NUT B TO LOWER MOWER LOOSEN JAM NUT A FIRST Fig. 36 NOTE: Each ...of adjustment nut will change mower height about 1/8" (3,1 mm). • Recheck measurements, adjust if necessary until front tip of blade to the ground. CAUTION: Blades are sharp. SERVICE AND ADJUSTMENTS TO LEVEL MOWER Ensure tires are properly inflated to the PSI shown on level ground or driveway. ...
... until both sides. • If adjustment is not adjusted properly. If tires are over or under inflated, it may affect the appearance of the blade. A B TIGHTEN ADJUST NUT B TO RAISE MOWER LOOSEN ADJUST NUT B TO LOWER MOWER LOOSEN JAM NUT A FIRST Fig. 36 NOTE: Each ...of adjustment nut will change mower height about 1/8" (3,1 mm). • Recheck measurements, adjust if necessary until front tip of blade to the ground. CAUTION: Blades are sharp. SERVICE AND ADJUSTMENTS TO LEVEL MOWER Ensure tires are properly inflated to the PSI shown on level ground or driveway. ...
Owner Manual
Page 24
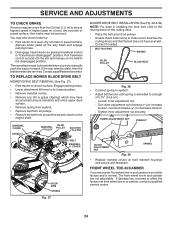
... belt from all pulleys. • Remove the belt from around all the way down and engage parking brake. 2. BELT ROUTING ENGINE IDLER PULLEY BLADE BELT Fig. 38 • Connect spring to eyebolt. • Adjust belt tension until spring is extended to stop at the factory and is held...If the rear wheels rotate, then the brake needs to its lowest position. • Remove mandrel covers. • Remove any twist. TO REPLACE MOWER BLADE DRIVE BELT MOWER DRIVE BELT REMOVAL (See Fig. 37) • Park tractor on both mandrel housings and secure with fasteners. Engage parking brake. •...
... belt from all pulleys. • Remove the belt from around all the way down and engage parking brake. 2. BELT ROUTING ENGINE IDLER PULLEY BLADE BELT Fig. 38 • Connect spring to eyebolt. • Adjust belt tension until spring is extended to stop at the factory and is held...If the rear wheels rotate, then the brake needs to its lowest position. • Remove mandrel covers. • Remove any twist. TO REPLACE MOWER BLADE DRIVE BELT MOWER DRIVE BELT REMOVAL (See Fig. 37) • Park tractor on both mandrel housings and secure with fasteners. Engage parking brake. •...
Owner Manual
Page 25
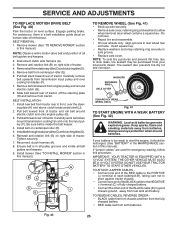
.... (See "TO REMOVE MOWER" section in all pulley grooves and inside the belt keeper. 4. Remove belt downward from tractor rear to front, over cooling fan blades (F). 7. Carefully work belt down around batteries. Ensure belt is a belt installation guide decal on centerspan idler (E). 5. Insert square key. • Replace washers and snap retaining...
.... (See "TO REMOVE MOWER" section in all pulley grooves and inside the belt keeper. 4. Remove belt downward from tractor rear to front, over cooling fan blades (F). 7. Carefully work belt down around batteries. Ensure belt is a belt installation guide decal on centerspan idler (E). 5. Insert square key. • Replace washers and snap retaining...


