

Parts Manual
Page 5
CRANKCASE Ref Part No Description 1 590 15 33-01 CRANKCASE ASSY 2 590 50 80-01 ELBOW 3 587 86 95-01 BALL BEARING 4 521 77 91-01 SEAL 5 590 26 67-01 SCREW 6 587 86 87-01 IMPULSE HOSE Remark T525 QTY KIT 1 11 21 21 7 1
CRANKCASE Ref Part No Description 1 590 15 33-01 CRANKCASE ASSY 2 590 50 80-01 ELBOW 3 587 86 95-01 BALL BEARING 4 521 77 91-01 SEAL 5 590 26 67-01 SCREW 6 587 86 87-01 IMPULSE HOSE Remark T525 QTY KIT 1 11 21 21 7 1

Parts Manual
Page 11
CARBURETOR Ref Part No Description 1 587 87 05-01 CARBURETTOR 2 520 95 70-01 SCREEN 3 590 21 91-01 COVER ASSY 4 520 97 63-01 SCREW 5 520 95 ... 58 11-01 LEVER 32 520 97 88-01 SCREW ASSY 33 590 23 73-01 RING 34 585 59 74-01 GASKET KIT Remark T525 QTY KIT 1 1 1 1 1 1, 34 1 1, 34 1 1 1, 34 1 1, 34...
CARBURETOR Ref Part No Description 1 587 87 05-01 CARBURETTOR 2 520 95 70-01 SCREEN 3 590 21 91-01 COVER ASSY 4 520 97 63-01 SCREW 5 520 95 ... 58 11-01 LEVER 32 520 97 88-01 SCREW ASSY 33 590 23 73-01 RING 34 585 59 74-01 GASKET KIT Remark T525 QTY KIT 1 1 1 1 1 1, 34 1 1, 34 1 1 1, 34 1 1, 34...

Parts Manual
Page 13
HOUSING Ref Part No Description 1 587 87 15-01 HOUSING ASSY 1 587 87 15-03 HOUSING ASSY 2 587 87 22-01 MUFFLER GUARD 2 593 72 67-01 MUFFLER ... 590 15 38-01 INSULATING SHEET 40 587 88 13-01 DECAL 41 576 38 13-01 LOOP 42 522 84 79-01 SCREW ITXSCFM T525 Remark s/n up to 20182699999 s/n from 20182700001 For EU market For US/CAN, AUS/NZ market For EU, AUS/NZ market For US/CAN market QTY...
HOUSING Ref Part No Description 1 587 87 15-01 HOUSING ASSY 1 587 87 15-03 HOUSING ASSY 2 587 87 22-01 MUFFLER GUARD 2 593 72 67-01 MUFFLER ... 590 15 38-01 INSULATING SHEET 40 587 88 13-01 DECAL 41 576 38 13-01 LOOP 42 522 84 79-01 SCREW ITXSCFM T525 Remark s/n up to 20182699999 s/n from 20182700001 For EU market For US/CAN, AUS/NZ market For EU, AUS/NZ market For US/CAN market QTY...

Parts Manual
Page 15
CLUTCH & OIL PUMP Ref Part No Description 1 587 87 34-01 OIL PUMP ASSY 2 505 05 31-01 WORM 3 521 51 57-01 BOLT 4 505 05 33-01 WASHER 5 587 87 38-01 OIL PRESSURE HOSE 6 587 87 39-01 COVER 6 587 87 39-02 COVER 7 587 87 41-01 OIL HOSE 8 521 54 56-01 FILTER 9 501 29 05-01 CLUTCH DRUM ASSY 9 501 29 05-02 CLUTCH DRUM ASSY 10 514 18 33-01 BEARING 11 511 04 45-01 CLUTCH 12 512 42 35-01 SPRING 13 512 42 34-01 PLATE 14 576 98 40-02 SCREW T525 Remark s/n up to 20182699999 s/n from 20182700001 3/8 6 tooth 1/4 8 tooth QTY KIT 1 11 2 1 1 1 1 1 17 1 1 19 1 11 3 1 1
CLUTCH & OIL PUMP Ref Part No Description 1 587 87 34-01 OIL PUMP ASSY 2 505 05 31-01 WORM 3 521 51 57-01 BOLT 4 505 05 33-01 WASHER 5 587 87 38-01 OIL PRESSURE HOSE 6 587 87 39-01 COVER 6 587 87 39-02 COVER 7 587 87 41-01 OIL HOSE 8 521 54 56-01 FILTER 9 501 29 05-01 CLUTCH DRUM ASSY 9 501 29 05-02 CLUTCH DRUM ASSY 10 514 18 33-01 BEARING 11 511 04 45-01 CLUTCH 12 512 42 35-01 SPRING 13 512 42 34-01 PLATE 14 576 98 40-02 SCREW T525 Remark s/n up to 20182699999 s/n from 20182700001 3/8 6 tooth 1/4 8 tooth QTY KIT 1 11 2 1 1 1 1 1 17 1 1 19 1 11 3 1 1

Parts Manual
Page 17
IGNITION SYSTEM Ref Part No Description 1 587 87 47-01 FLYWHEEL ASSY 2 521 55 17-01 PAWL 3 521 55 18-01 SPRING 4 521 51 60-01 SCREW 5 506 61 44-01 WASHER 6 587 87 49-01 IGNITION MODULE ASSY 7 512 44 40-01 HUB CAP 8 513 24 33-01 SPRING 9 590 15 45-01 TUBE 10 515 41 53-01 GROMMET 11 505 04 34-01 SPACER 12 506 74 57-01 BOLT 13 522 79 82-01 STOP SWITCH 14 587 87 54-01 SHORT CIRCUIT CABLE 15 587 87 53-01 SHORT CIRCUIT CABLE 16 588 66 27-01 TERMINAL 17 504 11 80-01 NUT Remark T525 QTY KIT 1 21 21 21 21 1 16 16 16 16 2 2 1 1 1 1 1
IGNITION SYSTEM Ref Part No Description 1 587 87 47-01 FLYWHEEL ASSY 2 521 55 17-01 PAWL 3 521 55 18-01 SPRING 4 521 51 60-01 SCREW 5 506 61 44-01 WASHER 6 587 87 49-01 IGNITION MODULE ASSY 7 512 44 40-01 HUB CAP 8 513 24 33-01 SPRING 9 590 15 45-01 TUBE 10 515 41 53-01 GROMMET 11 505 04 34-01 SPACER 12 506 74 57-01 BOLT 13 522 79 82-01 STOP SWITCH 14 587 87 54-01 SHORT CIRCUIT CABLE 15 587 87 53-01 SHORT CIRCUIT CABLE 16 588 66 27-01 TERMINAL 17 504 11 80-01 NUT Remark T525 QTY KIT 1 21 21 21 21 1 16 16 16 16 2 2 1 1 1 1 1

Parts Manual
Page 19
STARTER Ref Part No Description 1 587 87 55-01 STARTER ASSY 2 587 87 56-01 STARTER HOUSING 3 587 87 58-01 STARTER PULLEY 4 587 87 59-01 SPRING 5 ... market For EU market For EU market For US/CAN, AUS/NZ market For US/CAN, AUS/NZ market For US/CAN, AUS/NZ market T525 QTY KIT 1 1 1,14 11 11 11 1 1,14 1 1,14 11 1 1,14 1 1,14 1 4 1 1 1 14 1 14
STARTER Ref Part No Description 1 587 87 55-01 STARTER ASSY 2 587 87 56-01 STARTER HOUSING 3 587 87 58-01 STARTER PULLEY 4 587 87 59-01 SPRING 5 ... market For EU market For EU market For US/CAN, AUS/NZ market For US/CAN, AUS/NZ market For US/CAN, AUS/NZ market T525 QTY KIT 1 1 1,14 11 11 11 1 1,14 1 1,14 11 1 1,14 1 1,14 1 4 1 1 1 14 1 14

Parts Manual
Page 21
CHAIN BRAKE & CLUTCH COVER Ref Part No Description 1 587 87 66-01 CHAIN BRAKE ASSY 2 587 87 69-01 KNEE JOINT ASSY 3 516 82 56-01 ARM 4 587 87 73-01 BRAKE BAND 5 521 07 54-01 ROLLER 6 589 56 99-01 BRAKE SPRING 7 587 87 75-01 COVER LID 8 576 98 40-02 SCREW 9 505 19 73-01 NUT 10 513 61 90-01 GUIDE 11 587 87 27-01 HAND GUARD 12 587 87 29-02 SPACER 13 587 87 30-01 WASHER 14 576 98 40-02 SCREW 15 576 98 45-01 SPRING 16 576 98 46-01 CATCH Remark T525 QTY KIT 1 11 11 11 11 11 11 31 11 11 1 1 1 1 1 1
CHAIN BRAKE & CLUTCH COVER Ref Part No Description 1 587 87 66-01 CHAIN BRAKE ASSY 2 587 87 69-01 KNEE JOINT ASSY 3 516 82 56-01 ARM 4 587 87 73-01 BRAKE BAND 5 521 07 54-01 ROLLER 6 589 56 99-01 BRAKE SPRING 7 587 87 75-01 COVER LID 8 576 98 40-02 SCREW 9 505 19 73-01 NUT 10 513 61 90-01 GUIDE 11 587 87 27-01 HAND GUARD 12 587 87 29-02 SPACER 13 587 87 30-01 WASHER 14 576 98 40-02 SCREW 15 576 98 45-01 SPRING 16 576 98 46-01 CATCH Remark T525 QTY KIT 1 11 11 11 11 11 11 31 11 11 1 1 1 1 1 1

Parts Manual
Page 23
HANDLE Ref Part No Description 1 587 87 78-01 FRONT HANDLE 2 512 84 81-01 SCREW 3 587 87 81-01 HANDLE 3 587 87 81-03 HANDLE 4 587 87 ... 18 587 88 06-01 SPRING 19 588 98 92-01 ANTIVIBRATION ELEMENT 20 521 51 79-01 SCREW 21 513 72 78-01 BOLT T525 Remark For EU market For US/CAN, AUS/NZ market For EU market For US/CAN, AUS/NZ market For EU, AUS/NZ market For...
HANDLE Ref Part No Description 1 587 87 78-01 FRONT HANDLE 2 512 84 81-01 SCREW 3 587 87 81-01 HANDLE 3 587 87 81-03 HANDLE 4 587 87 ... 18 587 88 06-01 SPRING 19 588 98 92-01 ANTIVIBRATION ELEMENT 20 521 51 79-01 SCREW 21 513 72 78-01 BOLT T525 Remark For EU market For US/CAN, AUS/NZ market For EU market For US/CAN, AUS/NZ market For EU, AUS/NZ market For...

Parts Manual
Page 26
...02) with thread lock. (*1) Valid for new HOUSING & COVER (*2) Valid for SCREW with thread lock type. 2. part no : 4 Page 1 of change 1. IPL Update Product Name(s) T525 Description of 3 However, Regarding HOUSING(587 87 15-03) and COVER(587 87 39-02), there are recommended exchanging ...together. no 3 4 J 8 CHAIN BRAKE & CLUTCH COVER 14 New part no Name Delete LOOP Delete SCREW ITXSCF 576 98 40...
...02) with thread lock. (*1) Valid for new HOUSING & COVER (*2) Valid for SCREW with thread lock type. 2. part no : 4 Page 1 of change 1. IPL Update Product Name(s) T525 Description of 3 However, Regarding HOUSING(587 87 15-03) and COVER(587 87 39-02), there are recommended exchanging ...together. no 3 4 J 8 CHAIN BRAKE & CLUTCH COVER 14 New part no Name Delete LOOP Delete SCREW ITXSCF 576 98 40...

Parts Manual
Page 27
Illustrated Parts List - no 7 New part no . Remark 521 62 56-01 13 595 52 69-03 FUEL HOSE 581 79 83-01 G 6 CLUTCH &OIL PUMP 14 587 87 39-02 ... *1 28 590 15 44-03 FUEL HOSE 590 15 44-01 For EU, AUS/NZ market ASSY 28 590 15 44-02 FUEL HOSE ASSY - part no 521 62 56-02 Name GROMMET Excl. For US/CAN market Form no:MERN-8SJE6Q Rev no: 4 Page 2 of 3
Illustrated Parts List - no 7 New part no . Remark 521 62 56-01 13 595 52 69-03 FUEL HOSE 581 79 83-01 G 6 CLUTCH &OIL PUMP 14 587 87 39-02 ... *1 28 590 15 44-03 FUEL HOSE 590 15 44-01 For EU, AUS/NZ market ASSY 28 590 15 44-02 FUEL HOSE ASSY - part no 521 62 56-02 Name GROMMET Excl. For US/CAN market Form no:MERN-8SJE6Q Rev no: 4 Page 2 of 3

Parts Manual
Page 28
no 33 New part no . For US/CAN, AUS/NZ market - IPL Update Page Title Ref. part no 595 52 69-12 Name FUEL HOSE Excl. Remark 580 60 72-02 41 576 38 13-01 LOOP - 42 I 7 STARTER 13 522 84 79-01 SCREW ITXSCFM 513 41 71-01 STARTER ROPE 593 78 17-01 DECAL 14 596 91 40-01 STARTER ASSY 15 593 58 71-01 STARTER PULLEY 16 593 58 73-02 STARTER HANDLE - 589 44 40-01 Correction of 3 For US/CAN, AUS/NZ market Form no:MERN-8SJE6Q Rev no: 4 Page 3 of mistake. 587 88 62-01 *3 - For US/CAN, AUS/NZ market - Illustrated Parts List -
no 33 New part no . For US/CAN, AUS/NZ market - IPL Update Page Title Ref. part no 595 52 69-12 Name FUEL HOSE Excl. Remark 580 60 72-02 41 576 38 13-01 LOOP - 42 I 7 STARTER 13 522 84 79-01 SCREW ITXSCFM 513 41 71-01 STARTER ROPE 593 78 17-01 DECAL 14 596 91 40-01 STARTER ASSY 15 593 58 71-01 STARTER PULLEY 16 593 58 73-02 STARTER HANDLE - 589 44 40-01 Correction of 3 For US/CAN, AUS/NZ market Form no:MERN-8SJE6Q Rev no: 4 Page 3 of mistake. 587 88 62-01 *3 - For US/CAN, AUS/NZ market - Illustrated Parts List -

Owner Manual
Page 4
... information in this product. To reduce the risk of the operator or others and only use of nonauthorized accessories or replacement parts. • The inside of ! • When using this product contains chemicals known to consult their physician and the ... of California to have been modified by the use accessories recommended for each signal word. EPA III EMISSION CONTROL INFORMATION T525 27cc JHQZS.0274GR EM/N HUESPQAVAARNNDACAABLIHFOURSNKVIAAREXNHA/SEWVPEDREEGNS*FTOHRIS ENGINE MEETS U.S. SORE. General safety instructions WARNING: Read the warning instructions ...
... information in this product. To reduce the risk of the operator or others and only use of nonauthorized accessories or replacement parts. • The inside of ! • When using this product contains chemicals known to consult their physician and the ... of California to have been modified by the use accessories recommended for each signal word. EPA III EMISSION CONTROL INFORMATION T525 27cc JHQZS.0274GR EM/N HUESPQAVAARNNDACAABLIHFOURSNKVIAAREXNHA/SEWVPEDREEGNS*FTOHRIS ENGINE MEETS U.S. SORE. General safety instructions WARNING: Read the warning instructions ...

Owner Manual
Page 8
.... • Only use the guide bar/saw chain combinations and filing equipment that has come in your servicing dealer. Change your clothes and wash any part of your body that we recommend. Safety instructions for maintenance WARNING: Read the warning instructions that follow before you have spilled fuel on yourself or...
.... • Only use the guide bar/saw chain combinations and filing equipment that has come in your servicing dealer. Change your clothes and wash any part of your body that we recommend. Safety instructions for maintenance WARNING: Read the warning instructions that follow before you have spilled fuel on yourself or...
Owner Manual
Page 10
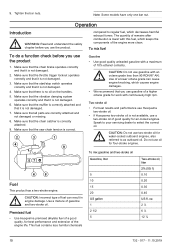
...use the product. CAUTION: Incorrect type of good quality for best performance and extension of gasoline and two-stroke oil. Premixed fuel • Use Husqvarna premixed alkylate fuel of a good quality, for air-cooled engines. The quantity of 10% ethanol contents. Make sure that the throttle trigger lockout operates... before you use two-stroke oil for water-cooled outboard engines, also referred to select the correct oil. Make sure that all parts are correctly attached and not damaged or missing. 8. Tighten the bar nuts. Note: Some models have only one bar nut.
...use the product. CAUTION: Incorrect type of good quality for best performance and extension of gasoline and two-stroke oil. Premixed fuel • Use Husqvarna premixed alkylate fuel of a good quality, for air-cooled engines. The quantity of 10% ethanol contents. Make sure that the throttle trigger lockout operates... before you use two-stroke oil for water-cooled outboard engines, also referred to select the correct oil. Make sure that all parts are correctly attached and not damaged or missing. 8. Tighten the bar nuts. Note: Some models have only one bar nut.

Owner Manual
Page 13
... choke position and then directly to engage the chain brake. 4. Move the front hand guard forward to work position. 4. Put the product on the rear part of the top handle. 4. Set the choke to your left hand on page 13 for more instructions. CAUTION: Do not pull the starter rope to...
... choke position and then directly to engage the chain brake. 4. Move the front hand guard forward to work position. 4. Put the product on the rear part of the top handle. 4. Set the choke to your left hand on page 13 for more instructions. CAUTION: Do not pull the starter rope to...

Owner Manual
Page 17
.... Turn the guide bar, do maintenance on page 26. Refer to To clean the air filter on page 18. Clean the external parts of the prod- Refer Empty the fuel tank. Maintenance Introduction WARNING: Read and understand the safety chapter before you do a check of... to To do a check of the chain brake on page 22. Maintenance schedule Daily maintenance Weekly maintenance Monthly maintenance Clean the external parts of the carburettor. Refer uct and make sure that there is no damage on the starter. Make sure that there is no oil...
.... Turn the guide bar, do maintenance on page 26. Refer to To clean the air filter on page 18. Clean the external parts of the prod- Refer Empty the fuel tank. Maintenance Introduction WARNING: Read and understand the safety chapter before you do a check of... to To do a check of the chain brake on page 22. Maintenance schedule Daily maintenance Weekly maintenance Monthly maintenance Clean the external parts of the carburettor. Refer uct and make sure that there is no damage on the starter. Make sure that there is no oil...

Owner Manual
Page 18
... saw chain does not touch the ground or other objects. 3. Monthly maintenance Maintenance and checks of the muffler are missing. WARNING: Make sure that no parts of the safety devices on page 12 for instructions. Make sure that there are no defects, such as cracks. 2. Use a brush to the clutch cover...
... saw chain does not touch the ground or other objects. 3. Monthly maintenance Maintenance and checks of the muffler are missing. WARNING: Make sure that no parts of the safety devices on page 12 for instructions. Make sure that there are no defects, such as cracks. 2. Use a brush to the clutch cover...

Owner Manual
Page 22
... release the starter rope until the pulley engages with different types of engine power, wear to your product can be fully cleaned. Speak to engine parts and more frequently if necessary. An incorrect spark plug can also cause injuries. 22 732 - 017 - 11.10.2019 b) make sure that is used with...
... release the starter rope until the pulley engages with different types of engine power, wear to your product can be fully cleaned. Speak to engine parts and more frequently if necessary. An incorrect spark plug can also cause injuries. 22 732 - 017 - 11.10.2019 b) make sure that is used with...

Owner Manual
Page 23
... the type of the teeth on bar tip sprocket (T). • Chain pitch, in /mm. The cutting tooth (A) and the depth gauge (B) together makes the cutting part of the product. A B • Bar groove width, in . Refer to keep the safety functions of the saw chain eats through the wood. The number of... cutting depth (depth gauge setting). Replace a worn or damaged guide bar or saw chain with the guide bar and saw chain. This is decided by Husqvarna.
... the type of the teeth on bar tip sprocket (T). • Chain pitch, in /mm. The cutting tooth (A) and the depth gauge (B) together makes the cutting part of the product. A B • Bar groove width, in . Refer to keep the safety functions of the saw chain eats through the wood. The number of... cutting depth (depth gauge setting). Replace a worn or damaged guide bar or saw chain with the guide bar and saw chain. This is decided by Husqvarna.

Owner Manual
Page 25
... 2 for the depth gauge. 2. Loosen the bar nuts that extends through the depth gauge tool. 5. Tighten the bar nuts by hand and that you use Husqvarna depth gauge tool to get the correct depth gauge setting and bevel for the position of the chain tensioning screw on your servicing dealer if... does not help. 732 - 017 - 11.10.2019 25 Lift the front of light color. 3. Refer to use our depth gauge tool to remove the part of the guide bar. Use the flat file to receive the correct depth gauge setting and bevel for the depth gauge. 4. Hold the guide bar...
... 2 for the depth gauge. 2. Loosen the bar nuts that extends through the depth gauge tool. 5. Tighten the bar nuts by hand and that you use Husqvarna depth gauge tool to get the correct depth gauge setting and bevel for the position of the chain tensioning screw on your servicing dealer if... does not help. 732 - 017 - 11.10.2019 25 Lift the front of light color. 3. Refer to use our depth gauge tool to remove the part of the guide bar. Use the flat file to receive the correct depth gauge setting and bevel for the depth gauge. 4. Hold the guide bar...


