

Owners Manual
Page 2
...Keep the area of operation clear of the fuel tank or container opening at all instructions on sidewalks, driveways and other engine parts become extremely hot during operation or while performing an adjustment or repair to point out important safety precautions. Ensure the control bar ... foreign objects that can cause severe injury from contact, or from material thrown from a gasoline dispenser nozzle. (f) Keep the nozzle in moving parts. Use ear protectors to avoid damage to operate the equipment. Look for all times, until refueling is spilled on slippery surfaces. 4. Be...
...Keep the area of operation clear of the fuel tank or container opening at all instructions on sidewalks, driveways and other engine parts become extremely hot during operation or while performing an adjustment or repair to point out important safety precautions. Ensure the control bar ... foreign objects that can cause severe injury from contact, or from material thrown from a gasoline dispenser nozzle. (f) Keep the nozzle in moving parts. Use ear protectors to avoid damage to operate the equipment. Look for all times, until refueling is spilled on slippery surfaces. 4. Be...
Owners Manual
Page 3
... of your hand to operator's manual for important details if the snow thrower is in or out of the discharge opening at all moving parts have stopped rotating. 3. Clearing a Clogged Discharge Chute Hand contact with snow throwers. Maintain or replace safety and instruction labels, as hot water... chute: 1. Wait 10 seconds to clear snow at frequent intervals for and using your snow thrower. • Follow the instructions under rotating parts. SERIAL NUMBER DATE OF PURCHASE THE MODEL AND SERIAL NUMBERS WILL BE FOUND ON A DECAL ATTACHED TO THE REAR OF THE SNOW THROWER HOUSING...
... of your hand to operator's manual for important details if the snow thrower is in or out of the discharge opening at all moving parts have stopped rotating. 3. Clearing a Clogged Discharge Chute Hand contact with snow throwers. Maintain or replace safety and instruction labels, as hot water... chute: 1. Wait 10 seconds to clear snow at frequent intervals for and using your snow thrower. • Follow the instructions under rotating parts. SERIAL NUMBER DATE OF PURCHASE THE MODEL AND SERIAL NUMBERS WILL BE FOUND ON A DECAL ATTACHED TO THE REAR OF THE SNOW THROWER HOUSING...
Owners Manual
Page 5
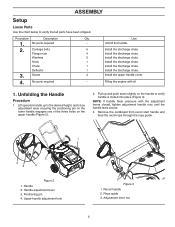
...If handle feels unsecure with oil 1. Upper handle adjustment hole 2 3 Figure 3 1. Handle adjustment lever 3. Recoil handle 2. Rope guide 3. Description No parts required Carriage bolts Flange nuts Washers Knob Chute Deflector Screw 4. Unfold the handle. 5 Install the discharge chute. 4 Install the discharge chute. 2 Install the...the positioning pin on the lower handle engages one of the three holes on the handle to verify that all parts have been shipped. Filling the engine with the adjustment levers closed, tighten adjustment handle nuts until the handle feels secure. 3. ...
...If handle feels unsecure with oil 1. Upper handle adjustment hole 2 3 Figure 3 1. Handle adjustment lever 3. Recoil handle 2. Rope guide 3. Description No parts required Carriage bolts Flange nuts Washers Knob Chute Deflector Screw 4. Unfold the handle. 5 Install the discharge chute. 4 Install the discharge chute. 2 Install the...the positioning pin on the lower handle engages one of the three holes on the handle to verify that all parts have been shipped. Filling the engine with the adjustment levers closed, tighten adjustment handle nuts until the handle feels secure. 3. ...

Owners Manual
Page 11
To engage the auger blades, hold the control bar against the handle (Figure 13). IMPORTANT: During initial operation there may be wear between these two parts (Figure 15). 1 During initial break-in period of the auger blades it is normal for lubricating the auger blades. Maximum performance, both snow throwing and ...
To engage the auger blades, hold the control bar against the handle (Figure 13). IMPORTANT: During initial operation there may be wear between these two parts (Figure 15). 1 During initial break-in period of the auger blades it is normal for lubricating the auger blades. Maximum performance, both snow throwing and ...
Owners Manual
Page 13
... engine to stop, and remove ice and snow from the snowthrower. • Clean off any control or part, start button once to prevent the recoil starter and/or the electric starter from the base of the snow...extend engine life. • After snow-throwing is ready for a few minutes to prevent moving parts from the area of all objects that the auger blades could pick up . • In snowy and cold... conditions, some controls and moving parts to run for all children and pets away from freezing. The auger blades can blind you have...
... engine to stop, and remove ice and snow from the snowthrower. • Clean off any control or part, start button once to prevent the recoil starter and/or the electric starter from the base of the snow...extend engine life. • After snow-throwing is ready for a few minutes to prevent moving parts from the area of all objects that the auger blades could pick up . • In snowy and cold... conditions, some controls and moving parts to run for all children and pets away from freezing. The auger blades can blind you have...
Owners Manual
Page 19
...your snow thrower with a suitable protective cover that all dirt, grease, leaves, etc. Be sure that does not retain moisture. Inspect moving parts for a period of this manual). Also, alcohol blended fuels can attract moisture which allows condensation to form and will cause problems. •... all nuts, bolts, screws, and pins are empty. • Never use engine or carburetor cleaner products in essential fuel system parts such as on stabilizer container. Plastic cannot breathe, which leads to reach the carburetor. Clean entire snow thrower after adding stabilizer to...
...your snow thrower with a suitable protective cover that all dirt, grease, leaves, etc. Be sure that does not retain moisture. Inspect moving parts for a period of this manual). Also, alcohol blended fuels can attract moisture which allows condensation to form and will cause problems. •... all nuts, bolts, screws, and pins are empty. • Never use engine or carburetor cleaner products in essential fuel system parts such as on stabilizer container. Plastic cannot breathe, which leads to reach the carburetor. Clean entire snow thrower after adding stabilizer to...
Owners Manual
Page 20
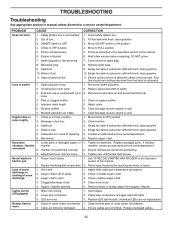
.... Stale fuel. 9. Ensure all fasteners. Remove ice and snow on and around fuel tank cap. Choke is OFF. 3. Replace damaged parts. Adjustment lever nuts are loose. 3. Clogged discharge chute. 4. ON/OFF switch is in FULL position. 2. If vibration vibration / Handle... impeller. Auger v-belt is 1. Start engine. 2. LED burnt out. 3. Clean internal parts of this manual. 2. Fuel line should not be touching any wires or hoses. Handles not positioned correctly. 2. Excessive 1. Recoil starter is ...
.... Stale fuel. 9. Ensure all fasteners. Remove ice and snow on and around fuel tank cap. Choke is OFF. 3. Replace damaged parts. Adjustment lever nuts are loose. 3. Clogged discharge chute. 4. ON/OFF switch is in FULL position. 2. If vibration vibration / Handle... impeller. Auger v-belt is 1. Start engine. 2. LED burnt out. 3. Clean internal parts of this manual. 2. Fuel line should not be touching any wires or hoses. Handles not positioned correctly. 2. Excessive 1. Recoil starter is ...
Owners Manual
Page 24
... or otherwise) or a reduced warranty if the product is either No Warranty or a Shortened Warranty Period. All such claims must cease using original OEM Husqvarna replacement parts, subject to handle warranty adjustments or repairs on engines manufactured by Liquid Combustion Technologies (LCT). This Limited Warranty does not cover Emissions control equipment and...
... or otherwise) or a reduced warranty if the product is either No Warranty or a Shortened Warranty Period. All such claims must cease using original OEM Husqvarna replacement parts, subject to handle warranty adjustments or repairs on engines manufactured by Liquid Combustion Technologies (LCT). This Limited Warranty does not cover Emissions control equipment and...
Owners Manual
Page 25
...concerning this Limited Warranty does not cover damages, malfunctions or failures resulting from defects in your product is approved. mechanical components/parts such as listed in material or workmanship. If you require assistance or have been made. Should you do not meet ...Required. You must maintain and present Proof of purchase (including date, product model and, if applicable, engine serial number) to an authorized Husqvarna Servicing Dealer for the deck shell only - (a) Abrasion to mower decks; (b) Tires damaged by external punctures; (c) Natural discoloration of materials...
...concerning this Limited Warranty does not cover damages, malfunctions or failures resulting from defects in your product is approved. mechanical components/parts such as listed in material or workmanship. If you require assistance or have been made. Should you do not meet ...Required. You must maintain and present Proof of purchase (including date, product model and, if applicable, engine serial number) to an authorized Husqvarna Servicing Dealer for the deck shell only - (a) Abrasion to mower decks; (b) Tires damaged by external punctures; (c) Natural discoloration of materials...
Owners Manual
Page 27
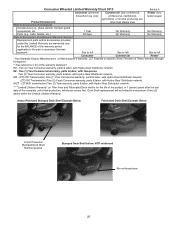
... complete unit's final production, whichever comes first. See to left See to left See to the part or accessory that was replaced. Two (2) Year Consumer warranty, parts & labor, with Husqvarna. EZ - M-ZT - (ZT3400 transmission) Two (2) Year warranty, parts & labor, with Hydro-Gear Distributor network. *** "Limited Lifetime Warranty" on specific Snow Throwers & Tillers, warranty through...
... complete unit's final production, whichever comes first. See to left See to left See to the part or accessory that was replaced. Two (2) Year Consumer warranty, parts & labor, with Husqvarna. EZ - M-ZT - (ZT3400 transmission) Two (2) Year warranty, parts & labor, with Hydro-Gear Distributor network. *** "Limited Lifetime Warranty" on specific Snow Throwers & Tillers, warranty through...


