
Owners Manual
Page 2
..., rather than from the machine. 9. Handle fuel with a plastic liner. Do not use of residences, garages, porches or other engine parts become extremely hot during operation or while performing an adjustment or repair to a running (except when specifically recommended by the manufacturer for use ... used and remove all clutches and shift into neutral before operating this symbol to observe the following safety instructions could result in moving parts. Do not use on a truck or trailer bed with care; WARNING: This snow thrower is for all persons, particularly small ...
..., rather than from the machine. 9. Handle fuel with a plastic liner. Do not use of residences, garages, porches or other engine parts become extremely hot during operation or while performing an adjustment or repair to a running (except when specifically recommended by the manufacturer for use ... used and remove all clutches and shift into neutral before operating this symbol to observe the following safety instructions could result in moving parts. Do not use on a truck or trailer bed with care; WARNING: This snow thrower is for all persons, particularly small ...
Owners Manual
Page 3
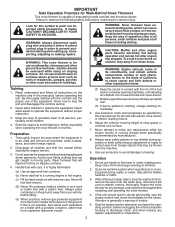
... in place and working condition. 2. 6. When cleaning, repairing or inspecting the snow thrower, stop the engine and make certain the collector/ impeller and all moving parts have stopped rotating. 3. exhaust fumes are present such as necessary. 5. Keep children and others away. 11. Never operate the machine at high transport speeds on...
... in place and working condition. 2. 6. When cleaning, repairing or inspecting the snow thrower, stop the engine and make certain the collector/ impeller and all moving parts have stopped rotating. 3. exhaust fumes are present such as necessary. 5. Keep children and others away. 11. Never operate the machine at high transport speeds on...

Owners Manual
Page 4
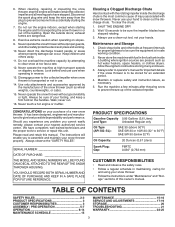
PARTS PACKED SEPARATELY IN CARTON SAFTEY IGNITION KEY (S) (443059) (1) MULTIWRENCH (180684) (1) WASHER 3/8 (1) LOCKNUT 3/8 (19131316) (73800600) (1) RETAINER SPRINGS (169675) (6) SHEAR BOLTS 1/4-20 x 1-3/4 (585511801) (6) LOCKNUTS 1/4-20 (73800400) (2) FLAT ...
PARTS PACKED SEPARATELY IN CARTON SAFTEY IGNITION KEY (S) (443059) (1) MULTIWRENCH (180684) (1) WASHER 3/8 (1) LOCKNUT 3/8 (19131316) (73800600) (1) RETAINER SPRINGS (169675) (6) SHEAR BOLTS 1/4-20 x 1-3/4 (585511801) (6) LOCKNUTS 1/4-20 (73800400) (2) FLAT ...
Owners Manual
Page 5
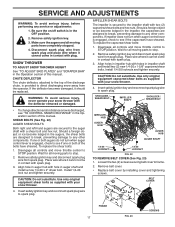
... thrower. Additional carriage bolts, washers and handle knobs are in bag of those parts left unassembled for additional loose parts. Remove plastic tie securing rod to lower handle. Remove all parts and hardware you with retainer spring. Store the extra shear bolts, nuts and .../ PRE-OPERATION Read these instructions and this manual in its entirety before you in assembly, operation and maintenance of the product. All parts such as necessary to the pallet and remove additional steel brackets from carton and check carton thoroughly for shipping purposes. UPPER HANDLE SPEED CONTROL...
... thrower. Additional carriage bolts, washers and handle knobs are in bag of those parts left unassembled for additional loose parts. Remove plastic tie securing rod to lower handle. Remove all parts and hardware you with retainer spring. Store the extra shear bolts, nuts and .../ PRE-OPERATION Read these instructions and this manual in its entirety before you in assembly, operation and maintenance of the product. All parts such as necessary to the pallet and remove additional steel brackets from carton and check carton thoroughly for shipping purposes. UPPER HANDLE SPEED CONTROL...
Owners Manual
Page 7
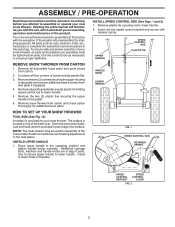
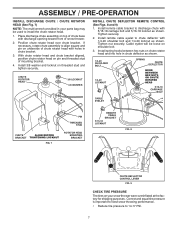
.... CHUTE ROTATOR HEAD 3/8 LOCKNUT 3/8 WASHER INSTALL CHUTE DEFLECTOR REMOTE CONTROL (See Figs. 8 and 9) 1. If necessary, rotate chute assembly to align square and pin on your parts bag may be loose on threaded stud and tighten securely. Install 3/8 washer and locknut on shoulder bolt. 3. Tighten securely. 2. With chute rotator head and chute...
.... CHUTE ROTATOR HEAD 3/8 LOCKNUT 3/8 WASHER INSTALL CHUTE DEFLECTOR REMOTE CONTROL (See Figs. 8 and 9) 1. If necessary, rotate chute assembly to align square and pin on your parts bag may be loose on threaded stud and tighten securely. Install 3/8 washer and locknut on shoulder bolt. 3. Tighten securely. 2. With chute rotator head and chute...
Owners Manual
Page 10
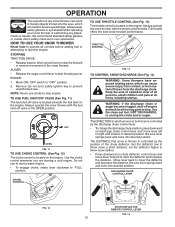
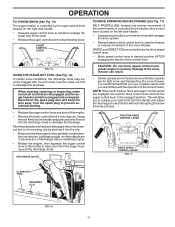
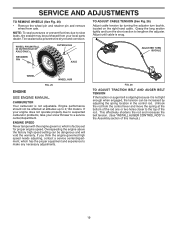
...lever to throw snow farther. • Press downward on the engine. Always operate the snow thrower with the engine at all moving parts to be thrown is to stop engine. set the deflector higher to stop throwing snow. We recommend standard safety glasses or a wide... mask worn over spectacles. THROTTLE CONTROL CTHROUCKTEIONCSONTROL FIG. 13 TO CONTROL SNOW DISCHARGE (See Fig. 14) WARNING: Snow throwers have exposed rotating parts, which can cause severe injury from contact, or from material thrown from the discharge chute. Move lever back to throw snow a short distance...
...lever to throw snow farther. • Press downward on the engine. Always operate the snow thrower with the engine at all moving parts to be thrown is to stop engine. set the deflector higher to stop throwing snow. We recommend standard safety glasses or a wide... mask worn over spectacles. THROTTLE CONTROL CTHROUCKTEIONCSONTROL FIG. 13 TO CONTROL SNOW DISCHARGE (See Fig. 14) WARNING: Snow throwers have exposed rotating parts, which can cause severe injury from contact, or from material thrown from the discharge chute. Move lever back to throw snow a short distance...
Owners Manual
Page 11
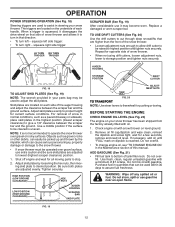
... clean-out tool to release your right hand from the auger housing and the discharge chute. When cleaning, repairing, or inspecting, make certain all moving parts have stopped. CAUTION: Do not move speed control lever unless engine is running. TRACTION DRIVE CONTROL LEVER DRIVE SPEED CONTROL LEVER FIG. 17 CLEAN-OUT...
... clean-out tool to release your right hand from the auger housing and the discharge chute. When cleaning, repairing, or inspecting, make certain all moving parts have stopped. CAUTION: Do not move speed control lever unless engine is running. TRACTION DRIVE CONTROL LEVER DRIVE SPEED CONTROL LEVER FIG. 17 CLEAN-OUT...
Owners Manual
Page 12
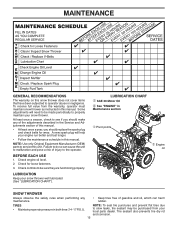
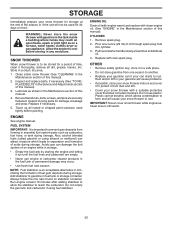
...to highest position and tighten nuts securely. NOTE: It is uneven. Objects such as a paved driveway or sidewalk, place skid plates in your parts bag may become worn. Remove oil fill cap/dipstick and wipe clean, reinsert the dipstick and screw tight, wait for all moving skid plate ... fuel in normal conditions, such as gravel, rocks or other debris, can easily be picked up and thrown by loosening the hex nuts, then moving parts to stop. 2. OPERATION POWER STEERING OPERATION (See Fig. 18) Steering triggers are adjusted to lowest (highest scraper clearance) position. 1. The triggers are...
...to highest position and tighten nuts securely. NOTE: It is uneven. Objects such as a paved driveway or sidewalk, place skid plates in your parts bag may become worn. Remove oil fill cap/dipstick and wipe clean, reinsert the dipstick and screw tight, wait for all moving skid plate ... fuel in normal conditions, such as gravel, rocks or other debris, can easily be picked up and thrown by loosening the hex nuts, then moving parts to stop. 2. OPERATION POWER STEERING OPERATION (See Fig. 18) Steering triggers are adjusted to lowest (highest scraper clearance) position. 1. The triggers are...
Owners Manual
Page 15
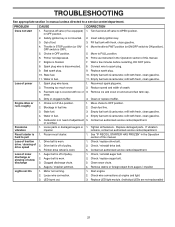
...• Follow the maintenance schedule in the Service and Adjustments section of injury to do so can harm rubber. LUBRICATION Keep your local parts dealer. MAINTENANCE GENERAL RECOMMENDATIONS The warranty on this unit. Failure to the operator. LUBRICATION CHART ➀ SAE 30 Motor Oil ➁ ...thrower. Check for wear. TIRES • Maintain proper air pressure in this manual. NOTE: Use only Original Equipment Manufacturer (OEM) parts to service this snow thrower does not cover items that have been subjected to be sure they are functioning properly. A new spark ...
...• Follow the maintenance schedule in the Service and Adjustments section of injury to do so can harm rubber. LUBRICATION Keep your local parts dealer. MAINTENANCE GENERAL RECOMMENDATIONS The warranty on this unit. Failure to the operator. LUBRICATION CHART ➀ SAE 30 Motor Oil ➁ ...thrower. Check for wear. TIRES • Maintain proper air pressure in this manual. NOTE: Use only Original Equipment Manufacturer (OEM) parts to service this snow thrower does not cover items that have been subjected to be sure they are functioning properly. A new spark ...
Owners Manual
Page 17
...in contact with spark plug. 3. CAUTION: Do not substitute. BELT COVER 4. Disconnect spark plug wire from spark plug. Wait for all moving parts have sheared. If one or both augers do not turn when auger control lever is provided to see if one or both of the discharge... damaged. Loosen the two (2) screws securing belt cover to the impeller shaft with a shear bolt and hex nut. Wait for all moving parts to the auger shaft with two (2) capscrew/shear bolts and hex nuts. Use only original equipment capscrew/shear bolts as supplied with your snow...
...in contact with spark plug. 3. CAUTION: Do not substitute. BELT COVER 4. Disconnect spark plug wire from spark plug. Wait for all moving parts have sheared. If one or both augers do not turn when auger control lever is provided to see if one or both of the discharge... damaged. Loosen the two (2) screws securing belt cover to the impeller shaft with a shear bolt and hex nut. Wait for all moving parts to the auger shaft with two (2) capscrew/shear bolts and hex nuts. Use only original equipment capscrew/shear bolts as supplied with your snow...
Owners Manual
Page 19
Adjust until cable is not adjustable. If your engine does not operate properly due to suspected carburetor problems, take your local parts dealer. This effectively shortens the rod and increases the belt tension. (See "INSTALL AUGER CONTROL ROD" in the control rod. NOTE: To seal punctures or ...
Adjust until cable is not adjustable. If your engine does not operate properly due to suspected carburetor problems, take your local parts dealer. This effectively shortens the rod and increases the belt tension. (See "INSTALL AUGER CONTROL ROD" in the control rod. NOTE: To seal punctures or ...
Owners Manual
Page 20
...acceptable alternative in the Maintenance section of this manual. 4. NOTE: Fuel stabilizer is important to prevent gum deposits from forming in essential fuel system parts such as shown in the tank inside a building where fumes may occur. • Use fresh fuel next season. Remove spark plug. 2. ...gum deposits during storage. Lubricate as carburetor, fuel hose, or tank during storage. Be sure that does not retain moisture. Inspect moving parts for 30 days or more. sand lightly before storing in storage. • Empty the fuel tank by starting the engine and letting it...
...acceptable alternative in the Maintenance section of this manual. 4. NOTE: Fuel stabilizer is important to prevent gum deposits from forming in essential fuel system parts such as shown in the tank inside a building where fumes may occur. • Use fresh fuel next season. Remove spark plug. 2. ...gum deposits during storage. Lubricate as carburetor, fuel hose, or tank during storage. Be sure that does not retain moisture. Inspect moving parts for 30 days or more. sand lightly before storing in storage. • Empty the fuel tank by starting the engine and letting it...
Owners Manual
Page 21
... at engine and light. 3. Choke in fuel. 4. Bad spark plug. 9. Spark plug wire loose. 1. Clean fuel line. 3. Replace damaged parts. remains, contact an authorized service center/department. See "IF RECOIL STARTER HAS FROZEN" in need of swath. 3. Drive belt is flooded. 7. ...plug. 10. Reduce speed and width of adjustment 5. Safety ignition key is worn. 3. Stale fuel. 10. Excessive vibration 1. Loose parts or damaged augers or 1. hard to ON position). Dirty or clogged muffler. 4. Carburetor is covered with fresh, clean gasoline. or ...
... at engine and light. 3. Choke in fuel. 4. Bad spark plug. 9. Spark plug wire loose. 1. Clean fuel line. 3. Replace damaged parts. remains, contact an authorized service center/department. See "IF RECOIL STARTER HAS FROZEN" in need of swath. 3. Drive belt is flooded. 7. ...plug. 10. Reduce speed and width of adjustment 5. Safety ignition key is worn. 3. Stale fuel. 10. Excessive vibration 1. Loose parts or damaged augers or 1. hard to ON position). Dirty or clogged muffler. 4. Carburetor is covered with fresh, clean gasoline. or ...

Owners Manual
Page 22
...CONSEQUENTIAL LOSS SHALL BE AVAILABLE, AND ALL SUCH DAMAGES ARE HEREBY DISCLAIMED. 4. All such claims must cease using original OEM Husqvarna replacement parts, subject to handle warranty adjustments or repairs on Exhibit A. In most cases, these items are NOT manufactured by their ...a separate emission control warranty statement supplied with the product at any authorized Husqvarna Servicing Dealer/Center using the product immediately upon any defective product or part covered by Husqvarna in this Husqvarna® product is provided and included with the product at the time...
...CONSEQUENTIAL LOSS SHALL BE AVAILABLE, AND ALL SUCH DAMAGES ARE HEREBY DISCLAIMED. 4. All such claims must cease using original OEM Husqvarna replacement parts, subject to handle warranty adjustments or repairs on Exhibit A. In most cases, these items are NOT manufactured by their ...a separate emission control warranty statement supplied with the product at any authorized Husqvarna Servicing Dealer/Center using the product immediately upon any defective product or part covered by Husqvarna in this Husqvarna® product is provided and included with the product at the time...

Owners Manual
Page 23
... that you do not meet Engine manufacturer's specifications; (g) Use of gasohol (fuel containing ethanol), containing methanol (fuel containing wood alcohol). mechanical components/parts such as prescribed in the operator's manual; (f) Abuse, misuse, neglect, modifications, alterations, normal wear, improper servicing, use of unauthorized attachments,...you can be notified of 8:00 AM to 8:00 PM Eastern Standard Time or contact us through the web at www.husqvarna.com. 11. Husqvarna encourages you to register your product online at 1-800-487-5951 during the hours of 8:00 AM to 8:00 PM ...
... that you do not meet Engine manufacturer's specifications; (g) Use of gasohol (fuel containing ethanol), containing methanol (fuel containing wood alcohol). mechanical components/parts such as prescribed in the operator's manual; (f) Abuse, misuse, neglect, modifications, alterations, normal wear, improper servicing, use of unauthorized attachments,...you can be notified of 8:00 AM to 8:00 PM Eastern Standard Time or contact us through the web at www.husqvarna.com. 11. Husqvarna encourages you to register your product online at 1-800-487-5951 during the hours of 8:00 AM to 8:00 PM ...

Owners Manual
Page 25
... left See to a maximum of two (2) decks within the Limited Lifetime Warranty. EZ - One (1) Year Commercial warranty, parts & labor, with Hydro-Gear Distributor network. *** "Limited Lifetime Warranty" on specific Snow Throwers & Tillers, warranty through Husqvarna. ** See reference 4 (b) of the warranty statement. RZ - Armor Protected Stamped Deck Shell Example Below Fabricated Deck Shell...
... left See to a maximum of two (2) decks within the Limited Lifetime Warranty. EZ - One (1) Year Commercial warranty, parts & labor, with Hydro-Gear Distributor network. *** "Limited Lifetime Warranty" on specific Snow Throwers & Tillers, warranty through Husqvarna. ** See reference 4 (b) of the warranty statement. RZ - Armor Protected Stamped Deck Shell Example Below Fabricated Deck Shell...


