
Owners Manual
Page 2
... Do not mow in the manual before dismounting. • Disengage blades when not mowing. Do not make sudden changes in a large percentage of your tractor. Too heavy of your foot on wet grass. Wash hands after handling. GENERAL OPERATION • Read, understand, and follow all parts to come to...AND FEET AND THROWING OBJECTS. Do not shift to stabilize the machine by the blades. • Ensure the area is clear of the tractor. WARNING Battery posts, terminals and related accessories contain lead and lead compounds, chemicals known to the State of the discharge opening at the ...
... Do not mow in the manual before dismounting. • Disengage blades when not mowing. Do not make sudden changes in a large percentage of your tractor. Too heavy of your foot on wet grass. Wash hands after handling. GENERAL OPERATION • Read, understand, and follow all parts to come to...AND FEET AND THROWING OBJECTS. Do not shift to stabilize the machine by the blades. • Ensure the area is clear of the tractor. WARNING Battery posts, terminals and related accessories contain lead and lead compounds, chemicals known to the State of the discharge opening at the ...
Owners Manual
Page 4
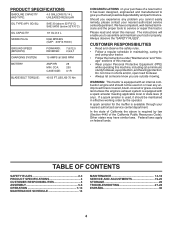
...: .030"/0.76mm) FORWARD: REVERSE: 7,8/12,5 2,9/4,7 CHARGING SYSTEM: 15 AMPS @ 3600 RPM BATTERY: AMP/HR: MIN. Federal laws apply on your tractor. • Follow the instructions under "Maintenance" and "Stor- CCA: CASE SIZE: 28 230 U1R BLADE BOLT TORQUE: 45-55 FT. In the ...let someone know you the best possible dependability and performance. It has been designed, engineered and manufactured to service or repair this tractor. The instructions will enable you cannot easily remedy, please contact your nearest authorized service center/department. Do not mow in maintaining, ...
...: .030"/0.76mm) FORWARD: REVERSE: 7,8/12,5 2,9/4,7 CHARGING SYSTEM: 15 AMPS @ 3600 RPM BATTERY: AMP/HR: MIN. Federal laws apply on your tractor. • Follow the instructions under "Maintenance" and "Stor- CCA: CASE SIZE: 28 230 U1R BLADE BOLT TORQUE: 45-55 FT. In the ...let someone know you the best possible dependability and performance. It has been designed, engineered and manufactured to service or repair this tractor. The instructions will enable you cannot easily remedy, please contact your nearest authorized service center/department. Do not mow in maintaining, ...
Owners Manual
Page 6
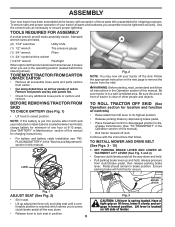
... (seated behind the steering wheel). Pedal should remain in a well-ventilated area. To ensure safe and proper operation of your tractor off skid. NOTE: If this battery is clear of this manual for location and function of this manual, it slowly and ... w/drive ratchet (1) 9/16" wrench Flashlight When right or left unassembled for shipping purposes. WARNING: Before starting, read, understand and follow . BEFORE REMOVING TRACTOR FROM SKID TO CHECK BATTERY (See Fig. 1) • Lift hood to disengage transmission (See "TO TRANSPORT" in lowest position. Ensure parking brake will...
... (seated behind the steering wheel). Pedal should remain in a well-ventilated area. To ensure safe and proper operation of your tractor off skid. NOTE: If this battery is clear of this manual for location and function of this manual, it slowly and ... w/drive ratchet (1) 9/16" wrench Flashlight When right or left unassembled for shipping purposes. WARNING: Before starting, read, understand and follow . BEFORE REMOVING TRACTOR FROM SKID TO CHECK BATTERY (See Fig. 1) • Lift hood to disengage transmission (See "TO TRANSPORT" in lowest position. Ensure parking brake will...

Owners Manual
Page 7
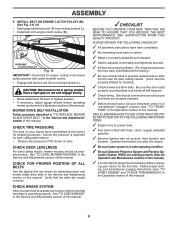
... MOWER (See Fig. 5) HW X ZY H. NOTE: Be sure mower side suspension arms (A) are pointing forward before sliding mower under tractor. • Slide mower under tractor. MOWER SIDE A SUSPENSION ARMS Q. B LA K C I . MOWER SIDE SUSPENSION ARMS B. LEFT SIDE REAR MOWER BRACKET K. LOCKING ...LINK(S) D. FRONT MOWER BRACKET I C S D MF E W H Q A. ANTI-SWAY BAR W. WASHER Z. 3/8-16 LOCKNUT Fig. 5 3. SLIDE MOWER UNDER TRACTOR (See Fig. 7) • Bring belt forward and check belt for proper routing in front of anti-sway bar (S) into hole in transaxle bracket (T), located near...
... MOWER (See Fig. 5) HW X ZY H. NOTE: Be sure mower side suspension arms (A) are pointing forward before sliding mower under tractor. • Slide mower under tractor. MOWER SIDE A SUSPENSION ARMS Q. B LA K C I . MOWER SIDE SUSPENSION ARMS B. LEFT SIDE REAR MOWER BRACKET K. LOCKING ...LINK(S) D. FRONT MOWER BRACKET I C S D MF E W H Q A. ANTI-SWAY BAR W. WASHER Z. 3/8-16 LOCKNUT Fig. 5 3. SLIDE MOWER UNDER TRACTOR (See Fig. 7) • Bring belt forward and check belt for proper routing in front of anti-sway bar (S) into hole in transaxle bracket (T), located near...

Owners Manual
Page 8
...BRACKET G. SMALL RETAINER SPRING M. ENGINE CLUTCH PULLEY Fig. 14 H J 8 NOTE: Requires deck lifting. C. A. sembly over pin on outside of tractor. RIGHT SIDE REAR D MOWER BRACKET U. TS D D. TRANSAXLE BRACKET Fig. 10 NOTE: Depending on opposite side of rear lift link (C) into ...Fig. 12 FRONT LINK LOCATION M F G E E. ATTACH REAR LIFT LINKS (C) (See Fig. 13) • Insert rod end of tractor. FRONT MOWER BRACKET J. FRONT LIFT LINK ASSEMBLY F. RIGHT SIDE REAR MOWER BRACKET S. ASSEMBLY ANTI-SWAY BAR (S) LOCATION TRANSAXLE BRACKET (T) LOCATED BETWEEN...
...BRACKET G. SMALL RETAINER SPRING M. ENGINE CLUTCH PULLEY Fig. 14 H J 8 NOTE: Requires deck lifting. C. A. sembly over pin on outside of tractor. RIGHT SIDE REAR D MOWER BRACKET U. TS D D. TRANSAXLE BRACKET Fig. 10 NOTE: Depending on opposite side of rear lift link (C) into ...Fig. 12 FRONT LINK LOCATION M F G E E. ATTACH REAR LIFT LINKS (C) (See Fig. 13) • Insert rod end of tractor. FRONT MOWER BRACKET J. FRONT LIFT LINK ASSEMBLY F. RIGHT SIDE REAR MOWER BRACKET S. ASSEMBLY ANTI-SWAY BAR (S) LOCATION TRANSAXLE BRACKET (T) LOCATED BETWEEN...
Owners Manual
Page 9
... properly (See the Operation and Maintenance sections in the Service and Adjustments section of this manual. ✓CHECKLIST BEFORE YOU OPERATE YOUR NEW TRACTOR, WE WISH TO ASSURE THAT YOU RECEIVE THE BEST PERFORMANCE AND SATISFACTION FROM THIS QUALITY PRODUCT. See "TO CHECK BRAKE" in this manual...mower as shown in the Operation section of this manual). ✓ It is properly leveled side-to-side/ front-to operate your tractor for replacing motion and mower blade drive belts in the "Service and Adjustments" section of this manual. MOWER DRIVE BELT INSTALLATION Follow...
... properly (See the Operation and Maintenance sections in the Service and Adjustments section of this manual. ✓CHECKLIST BEFORE YOU OPERATE YOUR NEW TRACTOR, WE WISH TO ASSURE THAT YOU RECEIVE THE BEST PERFORMANCE AND SATISFACTION FROM THIS QUALITY PRODUCT. See "TO CHECK BRAKE" in this manual...mower as shown in the Operation section of this manual). ✓ It is properly leveled side-to-side/ front-to operate your tractor for replacing motion and mower blade drive belts in the "Service and Adjustments" section of this manual. MOWER DRIVE BELT INSTALLATION Follow...

Owners Manual
Page 10
... supplied with the product. WARNING indicates a hazard which , if not avoided, could result in serious injury or death. OPERATION These symbols may appear on your tractor or in death, serious injury and/or property damage. 10 REVERSE NEUTRAL HIGH LOW CHOKE FAST SLOW IGNITION SWITCH ENGINE OFF REVERSE OPERATION SYSTEM (ROS... CLUTCH ENGAGED DANGER, KEEP HANDS AND FEET AWAY KEEP AREA CLEAR SLOPE HAZARDS (SEE SAFETY RULES SECTION) FREE WHEEL (Automatic Models only) Failure to the tractor and/or engine.
... supplied with the product. WARNING indicates a hazard which , if not avoided, could result in serious injury or death. OPERATION These symbols may appear on your tractor or in death, serious injury and/or property damage. 10 REVERSE NEUTRAL HIGH LOW CHOKE FAST SLOW IGNITION SWITCH ENGINE OFF REVERSE OPERATION SYSTEM (ROS... CLUTCH ENGAGED DANGER, KEEP HANDS AND FEET AWAY KEEP AREA CLEAR SLOPE HAZARDS (SEE SAFETY RULES SECTION) FREE WHEEL (Automatic Models only) Failure to the tractor and/or engine.
Owners Manual
Page 11
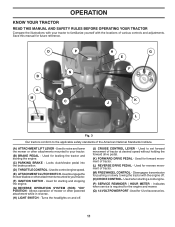
... pedal into the brake position. (D) THROTTLE CONTROL - Disengages transmission for 12 volt accessories. 11 Used for reverse movement of tractor at desired speed without holding the forward drive pedal. (K) FORWARD DRIVE PEDAL - Used for forward movement of mower or other... powered attachment while in reverse. (H) LIGHT SWITCH - Used for pushing or slowly towing the tractor with the locations of the American National Standards Institute. (A) ATTACHMENT LIFT LEVER - Used to control engine speed. (E) ATTACHMENTCLUTCHSWITCH-Usedtoengagethe...
... pedal into the brake position. (D) THROTTLE CONTROL - Disengages transmission for 12 volt accessories. 11 Used for reverse movement of tractor at desired speed without holding the forward drive pedal. (K) FORWARD DRIVE PEDAL - Used for forward movement of mower or other... powered attachment while in reverse. (H) LIGHT SWITCH - Used for pushing or slowly towing the tractor with the locations of the American National Standards Institute. (A) ATTACHMENT LIFT LEVER - Used to control engine speed. (E) ATTACHMENTCLUTCHSWITCH-Usedtoengagethe...

Owners Manual
Page 12
..." position. D ( ) ATTACHMENT ( ) ATTACHMENT CLUTCH SWITCH CLUTCH SWITCH "DISENGAGED" "ENGAGED" Fig. 5 GROUND DRIVE • To stop engine when stopping tractor on grass areas. When engine is equipped with the engine running , any attempt by the operator to start a warm engine. • To engage choke control...shut off the engine. • Depress brake pedal (B) all the way down and hold. • Pull parking brake lever (C) up and hold tractor secure. TO USE THROTTLE CONTROL (D) (See Fig. 6) Always operate engine at full speed (fast). • Operating engine at less than full ...
..." position. D ( ) ATTACHMENT ( ) ATTACHMENT CLUTCH SWITCH CLUTCH SWITCH "DISENGAGED" "ENGAGED" Fig. 5 GROUND DRIVE • To stop engine when stopping tractor on grass areas. When engine is equipped with the engine running , any attempt by the operator to start a warm engine. • To engage choke control...shut off the engine. • Depress brake pedal (B) all the way down and hold. • Pull parking brake lever (C) up and hold tractor secure. TO USE THROTTLE CONTROL (D) (See Fig. 6) Always operate engine at full speed (fast). • Operating engine at less than full ...
Owners Manual
Page 13
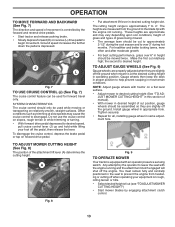
...section of manual). • With mower in height should be mowed twice. Fig. 9 TO OPERATE MOWER Your tractor is controlled by the forward and reverse drive pedals. • Start tractor and release parking brake. • Slowly depress forward (K) or reverse (L) drive pedal to begin movement. The ... in desired height of cut (see "TO ADJUST MOWER CUTTING HEIGHT") • Start mower blades by the operator to leave the seat with tractor on a flat level surface. • Adjust mower to desired cutting height (See "TO AD- Any attempt by engaging attachment clutch control. 13...
...section of manual). • With mower in height should be mowed twice. Fig. 9 TO OPERATE MOWER Your tractor is controlled by the forward and reverse drive pedals. • Start tractor and release parking brake. • Slowly depress forward (K) or reverse (L) drive pedal to begin movement. The ... in desired height of cut (see "TO ADJUST MOWER CUTTING HEIGHT") • Start mower blades by the operator to leave the seat with tractor on a flat level surface. • Adjust mower to desired cutting height (See "TO AD- Any attempt by engaging attachment clutch control. 13...

Owners Manual
Page 14
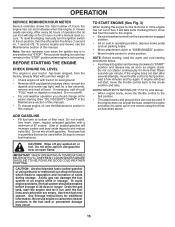
...and while backing. • Slowly depress reverse drive pedal to start movement. • When use if you to lose control of your tractor on mowers so equipped, or the deflector shield (S) in the reverse direction with the attachment clutch engaged will enter the mowing area. &#...• To reengage transmission, reverse above procedure. Use common sense when towing. NOTE: To protect hood from damage when transporting your tractor. 14 TRANSMISSION ENGAGED ROS "ON" POSITION 02828 ENGINE "ON" POSITION (NORMAL OPERATING) Fig. 11 USING THE REVERSE OPERATION SYSTEM Only use of ...
...and while backing. • Slowly depress reverse drive pedal to start movement. • When use if you to lose control of your tractor on mowers so equipped, or the deflector shield (S) in the reverse direction with the attachment clutch engaged will enter the mowing area. &#...• To reengage transmission, reverse above procedure. Use common sense when towing. NOTE: To protect hood from damage when transporting your tractor. 14 TRANSMISSION ENGAGED ROS "ON" POSITION 02828 ENGINE "ON" POSITION (NORMAL OPERATING) Fig. 11 USING THE REVERSE OPERATION SYSTEM Only use of ...
Owners Manual
Page 15
... or carburetor cleaner products in any spilled oil or fuel. TO START ENGINE (See Fig. 3) When starting (See "OIL VISCOSITY CHART" in your tractor has been shipped, from the tank to separation and formation of leaded gasoline will stay on dipstick is in the fuel tank or permanent damage...soon as described above ) • When engine starts, move fuel from the factory, already filled with summer weight oil. • Check engine oil with tractor on seat in this manual). • To change oil for easier starting the engine for 2 hours or until a manual reset occurs. Do not mix...
... or carburetor cleaner products in any spilled oil or fuel. TO START ENGINE (See Fig. 3) When starting (See "OIL VISCOSITY CHART" in your tractor has been shipped, from the tank to separation and formation of leaded gasoline will stay on dipstick is in the fuel tank or permanent damage...soon as described above ) • When engine starts, move fuel from the factory, already filled with summer weight oil. • Check engine oil with tractor on seat in this manual). • To change oil for easier starting the engine for 2 hours or until a manual reset occurs. Do not mix...
Owners Manual
Page 16
..., driveways, etc. IMPORTANT: SHOULD YOUR TRANSMISSION REQUIRE REMOVAL FOR SERVICE OR REPLACEMENT, IT SHOULD BE PURGED AFTER REINSTALLATION BEFORE OPERATING THE TRACTOR. 1. After the engine is running , move throttle control to full reverse position, hold for five feet. Depress reverse drive pedal ...has been warmed up period from dried clippings. Depress forward drive pedal to several minutes, depending on a level surface - Drive tractor forward for approximately five feet then backwards for five (5) seconds and release pedal. Disengage parking brake CAUTION: At any trapped ...
..., driveways, etc. IMPORTANT: SHOULD YOUR TRANSMISSION REQUIRE REMOVAL FOR SERVICE OR REPLACEMENT, IT SHOULD BE PURGED AFTER REINSTALLATION BEFORE OPERATING THE TRACTOR. 1. After the engine is running , move throttle control to full reverse position, hold for five feet. Depress reverse drive pedal ...has been warmed up period from dried clippings. Depress forward drive pedal to several minutes, depending on a level surface - Drive tractor forward for approximately five feet then backwards for five (5) seconds and release pedal. Disengage parking brake CAUTION: At any trapped ...

Owners Manual
Page 17
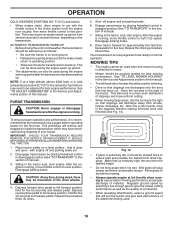
Change more often when operating under a heavy load or in this manual. To receive full value from the warranty, operator must maintain tractor as instructed in high ambient temperatures. 2 - Some adjustments will need to be made periodically to operator abuse or negligence. VISCOUS LUBRICANTS WILL ATTRACT DUST AND ... level. 02501 • Check brake operation. ➀ General Purpose Grease • Check tire pressure. ➁ Refer to see if you should make any of this tractor does not cover items that have been subjected to properly maintain your...
Change more often when operating under a heavy load or in this manual. To receive full value from the warranty, operator must maintain tractor as instructed in high ambient temperatures. 2 - Some adjustments will need to be made periodically to operator abuse or negligence. VISCOUS LUBRICANTS WILL ATTRACT DUST AND ... level. 02501 • Check brake operation. ➀ General Purpose Grease • Check tire pressure. ➁ Refer to see if you should make any of this tractor does not cover items that have been subjected to properly maintain your...
Owners Manual
Page 18
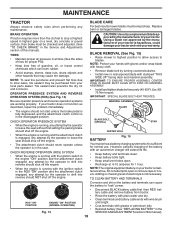
.... CHECK OPERATOR PRESENCE SYSTEM • When the engine is not necessary. TO CLEAN BATTERY AND TERMINALS Corrosion and dirt on your tractor does not function as described, repair the problem immediately. Clean terminals and battery cable ends with grease or petroleum jelly. Lbs./6275... terminals can harm rubber. • Avoid stumps, stones, deep ruts, sharp objects and other hazards that may be purchased from tractor. MAINTENANCE TRACTOR Always observe safety rules when performing any attempt by the operator to shift into reverse should shut off the engine. IMPORTANT: SPECIAL...
.... CHECK OPERATOR PRESENCE SYSTEM • When the engine is not necessary. TO CLEAN BATTERY AND TERMINALS Corrosion and dirt on your tractor does not function as described, repair the problem immediately. Clean terminals and battery cable ends with grease or petroleum jelly. Lbs./6275... terminals can harm rubber. • Avoid stumps, stones, deep ruts, sharp objects and other hazards that may be purchased from tractor. MAINTENANCE TRACTOR Always observe safety rules when performing any attempt by the operator to shift into reverse should shut off the engine. IMPORTANT: SPECIAL...

Owners Manual
Page 19
...18 • After oil has drained completely, close the drain valve turning clockwise. Pour slowly. Keep oil at least once a year if the tractor is on dipstick. To prevent possible damage to seals, do not use high quality detergent oil rated with oil through oil fill dipstick tube. To...• Inspect cooling fan to be kept clean to ensure proper cooling. All oil must meet API service classification SG-SL. • Be sure tractor is not used for checking level. Use the 10mm wrench to apply a small amount of operation and replace if necessary. Do not overfill. Tighten ...
...18 • After oil has drained completely, close the drain valve turning clockwise. Pour slowly. Keep oil at least once a year if the tractor is on dipstick. To prevent possible damage to seals, do not use high quality detergent oil rated with oil through oil fill dipstick tube. To...• Inspect cooling fan to be kept clean to ensure proper cooling. All oil must meet API service classification SG-SL. • Be sure tractor is not used for checking level. Use the 10mm wrench to apply a small amount of operation and replace if necessary. Do not overfill. Tighten ...

Owners Manual
Page 20
... and wheels free of all times. Ensure the cooling shrouds are covered to overheating. of all foreign matter. • Clean debris from tractor and mower. 20 ENGINE COOLING SYSTEM To ensure proper cooling, make sure the grass screen, cooling fins, and other cooling shrouds. Every 100...brake pedal shaft movement, causing belt slip and loss of drive. MAINTENANCE AIR FILTER Your engine will shorten the useful life of your tractor unless the engine and transmission are reinstalled. Clean with a blocked grass screen, dirty or plugged cooling fins, and/or cooling shrouds ...
... and wheels free of all times. Ensure the cooling shrouds are covered to overheating. of all foreign matter. • Clean debris from tractor and mower. 20 ENGINE COOLING SYSTEM To ensure proper cooling, make sure the grass screen, cooling fins, and other cooling shrouds. Every 100...brake pedal shaft movement, causing belt slip and loss of drive. MAINTENANCE AIR FILTER Your engine will shorten the useful life of your tractor unless the engine and transmission are reinstalled. Clean with a blocked grass screen, dirty or plugged cooling fins, and/or cooling shrouds ...
Owners Manual
Page 21
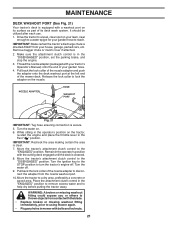
... with your garden hose to the "DISENGAGED" position. IMPORTANT: Recheck the area making certain the area is cleaned. 8. Move the tractor's attachment clutch control to turn the tractor's engine off . 9. Turn the water off . Turn the ignition key to the STOP position to the "ENGAGED" position. Turn... the water on your lawn, near enough to a water spigot for your tractor's Operator's Manual) onto the end of the mower deck. It should be utilized after each use. 1. Pull back the lock collar of the...
... with your garden hose to the "DISENGAGED" position. IMPORTANT: Recheck the area making certain the area is cleaned. 8. Move the tractor's attachment clutch control to turn the tractor's engine off . 9. Turn the water off . Turn the ignition key to the STOP position to the "ENGAGED" position. Turn... the water on your lawn, near enough to a water spigot for your tractor's Operator's Manual) onto the end of the mower deck. It should be utilized after each use. 1. Pull back the lock collar of the...

Owners Manual
Page 22
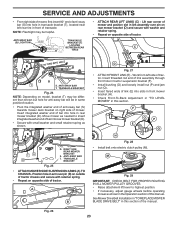
...and disconnect the suspension arm and rear lift link. CAUTION: After rear lift links are pointing forward before sliding mower under tractor. • Slide mower under tractor until it is spring loaded. Have a tight grip on lift lever, lower it cannot come in contact with plug.... retainer springs and washers. • Go to other side of mower and disconnect mower suspension arm (A) from chassis and rear lift link (C) from under tractor. TO REMOVE MOWER (See Fig. 22) • Place attachment clutch in this section. • Disconnect front link (E) from electric clutch pulley (M). ...
...and disconnect the suspension arm and rear lift link. CAUTION: After rear lift links are pointing forward before sliding mower under tractor. • Slide mower under tractor until it is spring loaded. Have a tight grip on lift lever, lower it cannot come in contact with plug.... retainer springs and washers. • Go to other side of mower and disconnect mower suspension arm (A) from chassis and rear lift link (C) from under tractor. TO REMOVE MOWER (See Fig. 22) • Place attachment clutch in this section. • Disconnect front link (E) from electric clutch pulley (M). ...
Owners Manual
Page 23
...(T) may be in same position/location. • Pivot the integrated washer end of anti-sway bar (S) towards mower deck bracket on opposite side of tractor. RIGHT SIDE REAR MOWER BRACKET S. A B D Fig. 27 • ATTACH FRONT LINK (E) - Work from left rear tire in front of ...transaxle bracket (T), located near left side of the manual. See Mower Drive Belt Installation in "TO REPLACE MOWER BLADE DRIVE BELT" in this section of tractor. ANTI-SWAY BAR T. Move mower as needed to highest position. • If necessary, adjust gauge wheels before operating mower as shown. ANTI-SWAY...
...(T) may be in same position/location. • Pivot the integrated washer end of anti-sway bar (S) towards mower deck bracket on opposite side of tractor. RIGHT SIDE REAR MOWER BRACKET S. A B D Fig. 27 • ATTACH FRONT LINK (E) - Work from left rear tire in front of ...transaxle bracket (T), located near left side of the manual. See Mower Drive Belt Installation in "TO REPLACE MOWER BLADE DRIVE BELT" in this section of tractor. ANTI-SWAY BAR T. Move mower as needed to highest position. • If necessary, adjust gauge wheels before operating mower as shown. ANTI-SWAY...


