

Owners Manual
Page 6
...should be properly inflated for leveling). ✓ Check mower and drive belts. Verify that are properly clamped. ✓ Before driving tractor, ensure freewheel control is filled with fresh, clean, regular unleaded gasoline. ✓ Become familiar with all belt keepers. ✓ Check wiring. See that the brake is... to purge the transmission before you learn how to operate your tractor, check to -rear for replacing motion and mower blade drive belts in this manual. ✓CHECKLIST BEFORE YOU OPERATE YOUR NEW TRACTOR, WE WISH TO ASSURE THAT YOU RECEIVE THE BEST PERFORMANCE...
...should be properly inflated for leveling). ✓ Check mower and drive belts. Verify that are properly clamped. ✓ Before driving tractor, ensure freewheel control is filled with fresh, clean, regular unleaded gasoline. ✓ Become familiar with all belt keepers. ✓ Check wiring. See that the brake is... to purge the transmission before you learn how to operate your tractor, check to -rear for replacing motion and mower blade drive belts in this manual. ✓CHECKLIST BEFORE YOU OPERATE YOUR NEW TRACTOR, WE WISH TO ASSURE THAT YOU RECEIVE THE BEST PERFORMANCE...

Owners Manual
Page 19
...other external surfaces of the engine are reinstalled. NOTE: Operating the engine with automotive type wax. Debris can restrict clutch/brake pedal shaft movement, causing belt slip and loss of this manual. CLUTCH/BRAKE PEDAL CLEAN TOP SIDE STEERING PLATE STEERING SYSTEM, DASH, FENDER AND MOWER NOT SHOWN Fig. 27 &#... required. • With engine cool, remove filter and plug fuel line sections. • Place new fuel filter in position in "PRODUCT SPECIFICATIONS" section of drive. (See Fig. 27.) CAUTION: Avoid all foreign matter. • Clean debris from outside of each season.
...other external surfaces of the engine are reinstalled. NOTE: Operating the engine with automotive type wax. Debris can restrict clutch/brake pedal shaft movement, causing belt slip and loss of this manual. CLUTCH/BRAKE PEDAL CLEAN TOP SIDE STEERING PLATE STEERING SYSTEM, DASH, FENDER AND MOWER NOT SHOWN Fig. 27 &#... required. • With engine cool, remove filter and plug fuel line sections. • Place new fuel filter in position in "PRODUCT SPECIFICATIONS" section of drive. (See Fig. 27.) CAUTION: Avoid all foreign matter. • Clean debris from outside of each season.
Owners Manual
Page 21
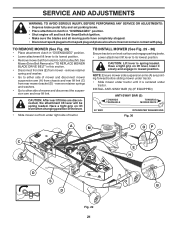
See Mower Drive Belt Removal in "TO REPLACE MOWER BLADE DRIVE BELT" in this section. • Disconnect front link (E) from rear mower bracket (D) - TO INSTALL MOWER (See Fig. 29 - 36) Ensure tractor is on lift lever, lower ... (M). TO REMOVE MOWER (See Fig. 29) • Place attachment clutch in "DISENGAGED" position. • Lower attachment lift lever to its lowest position. • Remove mower belt from spark plug and place wire where it is spring loaded. NOTE: Ensure mower side suspension arms (A) are disconnected, the attachment lift lever will be...
See Mower Drive Belt Removal in "TO REPLACE MOWER BLADE DRIVE BELT" in this section. • Disconnect front link (E) from rear mower bracket (D) - TO INSTALL MOWER (See Fig. 29 - 36) Ensure tractor is on lift lever, lower ... (M). TO REMOVE MOWER (See Fig. 29) • Place attachment clutch in "DISENGAGED" position. • Lower attachment lift lever to its lowest position. • Remove mower belt from spark plug and place wire where it is spring loaded. NOTE: Ensure mower side suspension arms (A) are disconnected, the attachment lift lever will be...
Owners Manual
Page 22
...gauge wheels before operating mower as shown in the Operation section of transaxle. RIGHT SIDE REAR MOWER BRACKET S. F O P E Q H Fig. 35 • Install belt onto electric clutch pulley (M). Fig. 33 22 Move mower as shown. C PLACE 90° END INTO HOLE S T S. A B D Fig. 34 •...32 • ATTACH MOWER SIDE SUSPENSION ARMS (A) TO CHASSIS - Insert integrated washer end of the manual. See Mower Drive Belt Installation in "TO REPLACE MOWER BLADE DRIVE BELT" in this section of bar into rear mower bracket (D). • Secure with washer and retainer spring. • ...
...gauge wheels before operating mower as shown in the Operation section of transaxle. RIGHT SIDE REAR MOWER BRACKET S. F O P E Q H Fig. 35 • Install belt onto electric clutch pulley (M). Fig. 33 22 Move mower as shown. C PLACE 90° END INTO HOLE S T S. A B D Fig. 34 •...32 • ATTACH MOWER SIDE SUSPENSION ARMS (A) TO CHASSIS - Insert integrated washer end of the manual. See Mower Drive Belt Installation in "TO REPLACE MOWER BLADE DRIVE BELT" in this section of bar into rear mower bracket (D). • Secure with washer and retainer spring. • ...

Owners Manual
Page 24
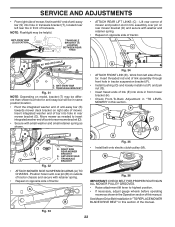
SERVICE AND ADJUSTMENTS TO REPLACE MOWER BLADE DRIVE BELT MOWER DRIVE BELT REMOVAL (See Fig. 41) • Park tractor on both mandrel ...into the slot and release so it is extended to a length of the cutter housing pulleys. • Double check belt routing to its lowest position. • Remove mandrel covers. • Remove any twist. Contact a qualified service ...using the square opening in highest gear on the cutting deck. • Place the belt around all the way down and engage parking brake. 2. MOWER DRIVE BELT INSTALLATION (See Fig. 42 & 43) NOTE: For ease in and camber is...
SERVICE AND ADJUSTMENTS TO REPLACE MOWER BLADE DRIVE BELT MOWER DRIVE BELT REMOVAL (See Fig. 41) • Park tractor on both mandrel ...into the slot and release so it is extended to a length of the cutter housing pulleys. • Double check belt routing to its lowest position. • Remove mandrel covers. • Remove any twist. Contact a qualified service ...using the square opening in highest gear on the cutting deck. • Place the belt around all the way down and engage parking brake. 2. MOWER DRIVE BELT INSTALLATION (See Fig. 42 & 43) NOTE: For ease in and camber is...

Owners Manual
Page 25
.... 9. Engage parking brake. SERVICE AND ADJUSTMENTS TO REPLACE MOTION DRIVE BELT (See Fig. 44) Park the tractor on level surface. Remove belt from centerspan idler (E). 6. Carefully remove belt upwards from tractor. Be sure belt is in this manual.) NOTE: Observe entire motion drive belt and position of tractor. Ensure belt is inside all pulley grooves and inside the...
.... 9. Engage parking brake. SERVICE AND ADJUSTMENTS TO REPLACE MOTION DRIVE BELT (See Fig. 44) Park the tractor on level surface. Remove belt from centerspan idler (E). 6. Carefully remove belt upwards from tractor. Be sure belt is in this manual.) NOTE: Observe entire motion drive belt and position of tractor. Ensure belt is inside all pulley grooves and inside the...
Owners Manual
Page 30
... Air trapped in "disengaged" position. 2. See "TO REMOVE WHEEL" in the maintenance section. 3. Poor cut - Worn/damaged mower drive belt. 3. Level mower deck. 3. Travel speed too fast. 2. Mower deck not level. 4. Check tires for proper air pressure. 6. ...charge 1. Replace with attachment clutch engaged 1. Switch is corrected. Motion drive belt worn, damaged, or broken. 4. Engine "backfires" when turning engine "OFF" 1. Replace mower drive belt. 3. Replace blade. Replace motion drive belt. 4. CAUTION: DO NOT operate machine until problem is "OFF". ...
... Air trapped in "disengaged" position. 2. See "TO REMOVE WHEEL" in the maintenance section. 3. Poor cut - Worn/damaged mower drive belt. 3. Level mower deck. 3. Travel speed too fast. 2. Mower deck not level. 4. Check tires for proper air pressure. 6. ...charge 1. Replace with attachment clutch engaged 1. Switch is corrected. Motion drive belt worn, damaged, or broken. 4. Engine "backfires" when turning engine "OFF" 1. Replace mower drive belt. 3. Replace blade. Replace motion drive belt. 4. CAUTION: DO NOT operate machine until problem is "OFF". ...

Owners Manual
Page 31
...Drive Systems) are covered by their respective manufacturer's warranties if one is offered instead of purchase. THE ABOVE REMEDIES ARE THE EXCLUSIVE REMEDIES FOR ANY BREACH OF THIS LIMITED WARRANTY. Engines, Transmissions and certain other limitations apply, as otherwise directed in which case they may be transferred to Husqvarna... adjustments or repairs on Exhibit A. To preserve your new product. Preventative maintenance as throttle cable, belt guides adjustments; Husqvarna is free from normal aging, wear and tear or neglect are NOT covered. All such claims must...
...Drive Systems) are covered by their respective manufacturer's warranties if one is offered instead of purchase. THE ABOVE REMEDIES ARE THE EXCLUSIVE REMEDIES FOR ANY BREACH OF THIS LIMITED WARRANTY. Engines, Transmissions and certain other limitations apply, as otherwise directed in which case they may be transferred to Husqvarna... adjustments or repairs on Exhibit A. To preserve your new product. Preventative maintenance as throttle cable, belt guides adjustments; Husqvarna is free from normal aging, wear and tear or neglect are NOT covered. All such claims must...


