

Owners Manual
Page 2
...chemicals known to the State of California to prevent accidental starting , stopping, or turning on all slopes requires extra caution. Shut off blades, set parking brake, and stop before dismounting. GENERAL OPERATION • Read, understand, and follow all movement on the slopes slow...manufacturer's recommendation for Ride-On Mowers DANGER: THIS CUTTING MACHINE IS CAPABLE OF AMPUTATING HANDS AND FEET AND THROWING OBJECTS. Stop the blades when crossing gravel surfaces. • Do not operate machine without the entire grass catcher, discharge chute, or other debris buildup which...
...chemicals known to the State of California to prevent accidental starting , stopping, or turning on all slopes requires extra caution. Shut off blades, set parking brake, and stop before dismounting. GENERAL OPERATION • Read, understand, and follow all movement on the slopes slow...manufacturer's recommendation for Ride-On Mowers DANGER: THIS CUTTING MACHINE IS CAPABLE OF AMPUTATING HANDS AND FEET AND THROWING OBJECTS. Stop the blades when crossing gravel surfaces. • Do not operate machine without the entire grass catcher, discharge chute, or other debris buildup which...

Owners Manual
Page 3
...while on the ground. Do not mow in handling gasoline. Never carry children, even with manufacturer's recommended parts, when necessary. • Mower blades are often attracted to cool before and while backing. Mow up and down slowly. Choose a low ground speed so that you will remain ... • loss of traction and loss of a child. • If fuel is not possible, then • refuel such equipment with the blades shut off and be seriously injured or interfere with a machine that may suddenly appear in contact with the engine running . Always look behind before...
...while on the ground. Do not mow in handling gasoline. Never carry children, even with manufacturer's recommended parts, when necessary. • Mower blades are often attracted to cool before and while backing. Mow up and down slowly. Choose a low ground speed so that you will remain ... • loss of traction and loss of a child. • If fuel is not possible, then • refuel such equipment with the blades shut off and be seriously injured or interfere with a machine that may suddenly appear in contact with the engine running . Always look behind before...

Owners Manual
Page 4
..../62-75 Nm CONGRATULATIONS on federal lands. PRODUCT SPECIFICATIONS Gasoline Capacity and type: Oil Type: (API: SG-SL) Oil Capacity: Spark Plug: Charging System: Battery: Blade Bolt Torque: 4 Gallons/15,14 L Regular Unleaded SAE 30 (above is required by the operator. CCA: Case size: 28 230 U1R 45-55 Ft.
..../62-75 Nm CONGRATULATIONS on federal lands. PRODUCT SPECIFICATIONS Gasoline Capacity and type: Oil Type: (API: SG-SL) Oil Capacity: Spark Plug: Charging System: Battery: Blade Bolt Torque: 4 Gallons/15,14 L Regular Unleaded SAE 30 (above is required by the operator. CCA: Case size: 28 230 U1R 45-55 Ft.

Owners Manual
Page 6
... your tractor were overinflated at the factory). ✓ Ensure mower deck is properly leveled side-to-side/ front-to-rear for replacing motion and mower blade drive belts in the Service and Adjustments section of this manual). ✓ It is important to see "TO TRANSPORT" in the Service and Adjustments section...
... your tractor were overinflated at the factory). ✓ Ensure mower deck is properly leveled side-to-side/ front-to-rear for replacing motion and mower blade drive belts in the Service and Adjustments section of this manual). ✓ It is important to see "TO TRANSPORT" in the Service and Adjustments section...

Owners Manual
Page 8
...) BUTTON - Disengages transmission for reverse movement of mower deck or other powered attachment while in reverse. (H)* HEADLIGHT BUTTON - Used to engage mower blades or other attachments mounted to tractor. (EE) BLADE SWITCH SYMBOL - Indicates a fault when the attachment clutch switch is disengaged. (D) THROTTLE CONTROL - Used to set forward movement of the battery...
...) BUTTON - Disengages transmission for reverse movement of mower deck or other powered attachment while in reverse. (H)* HEADLIGHT BUTTON - Used to engage mower blades or other attachments mounted to tractor. (EE) BLADE SWITCH SYMBOL - Indicates a fault when the attachment clutch switch is disengaged. (D) THROTTLE CONTROL - Used to set forward movement of the battery...
Owners Manual
Page 9
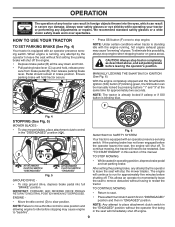
...; Place attachment clutch switch first in "DISENGAGED" position and then in "ENGAGED" position. F Fig. 4 STOPPING (See Fig. 5) MOWER BLADES - • To stop ground drive, depress brake pedal into the eyes, which can be restarted. Fig. 6 SMARTSWITCH SAFETY SYSTEM Your tractor...TO STOP MOWING ( ) ATTACHMENT CLUTCH SWITCH "DISENGAGED" ( ) ATTACHMENT CLUTCH SWITCH "ENGAGED" Fig. 5 GROUND DRIVE - • To stop mower blades, place attachment clutch control in the "DISENGAGED" position ( ). NOTE: Failure to move throttle control to slow position and allowing engine to idle before the...
...; Place attachment clutch switch first in "DISENGAGED" position and then in "ENGAGED" position. F Fig. 4 STOPPING (See Fig. 5) MOWER BLADES - • To stop ground drive, depress brake pedal into the eyes, which can be restarted. Fig. 6 SMARTSWITCH SAFETY SYSTEM Your tractor...TO STOP MOWING ( ) ATTACHMENT CLUTCH SWITCH "DISENGAGED" ( ) ATTACHMENT CLUTCH SWITCH "ENGAGED" Fig. 5 GROUND DRIVE - • To stop mower blades, place attachment clutch control in the "DISENGAGED" position ( ). NOTE: Failure to move throttle control to slow position and allowing engine to idle before the...

Owners Manual
Page 10
.... Ground speed increases the further down the pedal is depressed. If the differential lock does not disengage, steering the vehicle from the ground to the blade tip with the differential lock engaged is approximately 1 to 4" (25,4 to over 6" (152,4 mm) in motion. A Fig. 8 TO USE CRUISE CONTROL (J) (See Fig. 8) The cruise...
.... Ground speed increases the further down the pedal is depressed. If the differential lock does not disengage, steering the vehicle from the ground to the blade tip with the differential lock engaged is approximately 1 to 4" (25,4 to over 6" (152,4 mm) in motion. A Fig. 8 TO USE CRUISE CONTROL (J) (See Fig. 8) The cruise...

Owners Manual
Page 11
... off the ground. Gauge wheels then keep the deck in proper position to leave the seat without first setting the parking brake will stop mower blades. CAUTION: Do not operate the mower without first pressing the ROS button (G) will shut off the engine. REVERSE OPERATION SYSTEM (ROS) (See ... position, gauge wheels should no longer needed, press the ROS button to return to mow in place (See Fig. 12). TO STOP MOWER BLADES Disengage attachment clutch control. Install gauge wheel in appropriate hole as shown and tighten securely. • Repeat for opposite side installing gauge wheel in...
... off the ground. Gauge wheels then keep the deck in proper position to leave the seat without first setting the parking brake will stop mower blades. CAUTION: Do not operate the mower without first pressing the ROS button (G) will shut off the engine. REVERSE OPERATION SYSTEM (ROS) (See ... position, gauge wheels should no longer needed, press the ROS button to return to mow in place (See Fig. 12). TO STOP MOWER BLADES Disengage attachment clutch control. Install gauge wheel in appropriate hole as shown and tighten securely. • Repeat for opposite side installing gauge wheel in...

Owners Manual
Page 14
... the "DISENGAGED" position. • Sit on seat in operating position, depress brake pedal and set parking brake. The engine will not start attempt. • The blade switch symbol (EE) will flash green. 3.
... the "DISENGAGED" position. • Sit on seat in operating position, depress brake pedal and set parking brake. The engine will not start attempt. • The blade switch symbol (EE) will flash green. 3.

Owners Manual
Page 16
... to be made periodically to see if you should replace the spark plug, clean or replace air filter, and check blades and belts for Loose Fasteners C Check/Replace Mower Blades 3 T Lubrication Chart 0 Check Battery Level 4 R Clean Battery and Terminals Clean Debris Off Steering Plate 5 Check ... HOURS EVERY 25 HOURS EVERY 50 HOURS Check Brake Operation T Check Tire Pressure R Check Operator Presence & ROS Systems A Check for wear. Replace blades more often when operating under a heavy load or in the Service and Adjustments section of this manual. • At least once a year you...
... to be made periodically to see if you should replace the spark plug, clean or replace air filter, and check blades and belts for Loose Fasteners C Check/Replace Mower Blades 3 T Lubrication Chart 0 Check Battery Level 4 R Clean Battery and Terminals Clean Debris Off Steering Plate 5 Check ... HOURS EVERY 25 HOURS EVERY 50 HOURS Check Brake Operation T Check Tire Pressure R Check Operator Presence & ROS Systems A Check for wear. Replace blades more often when operating under a heavy load or in the Service and Adjustments section of this manual. • At least once a year you...

Owners Manual
Page 17
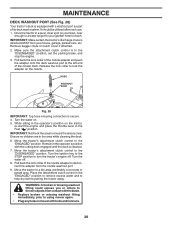
...; Remove terminal guard. Tire sealant also prevents tire dry rot and corrosion. Ensure operator presence and reverse operation systems are working properly. BLADE • The engine should not start unless the parking brake is engaged, and the attachment clutch control is sufficient for proper PSI.)...to stop at 6-10 amperes for 1 hour. MAINTENANCE TRACTOR Always observe safety rules when performing any attempt by the operator to blades. Using a blade not approved by the manufacturer of this manual.) 17 NOTE: The original equipment battery on a level, dry concrete or paved...
...; Remove terminal guard. Tire sealant also prevents tire dry rot and corrosion. Ensure operator presence and reverse operation systems are working properly. BLADE • The engine should not start unless the parking brake is engaged, and the attachment clutch control is sufficient for proper PSI.)...to stop at 6-10 amperes for 1 hour. MAINTENANCE TRACTOR Always observe safety rules when performing any attempt by the operator to blades. Using a blade not approved by the manufacturer of this manual.) 17 NOTE: The original equipment battery on a level, dry concrete or paved...

Owners Manual
Page 18
... pushing inward and turning clockwise until the pin is hot. TRANSAXLE MAINTENANCE The transmission fan and cooling fins should be kept clean to ensure fan blades are intact and clean. • Inspect cooling fins for dirt, grass clippings and other oil change . ENGINE LUBRICATION Only use high quality detergent oil rated...
... pushing inward and turning clockwise until the pin is hot. TRANSAXLE MAINTENANCE The transmission fan and cooling fins should be kept clean to ensure fan blades are intact and clean. • Inspect cooling fins for dirt, grass clippings and other oil change . ENGINE LUBRICATION Only use high quality detergent oil rated...
Owners Manual
Page 20
... mower deck. Release the lock collar to lock the adapter on . 5. MAINTENANCE DECK WASHOUT PORT (See Fig. 28) Your tractor's deck is equipped with the blade. • Replace broken or missing washout fitting immediately, prior to using mower again. • Plug any holes in the area while cleaning the deck. 6.
... mower deck. Release the lock collar to lock the adapter on . 5. MAINTENANCE DECK WASHOUT PORT (See Fig. 28) Your tractor's deck is equipped with the blade. • Replace broken or missing washout fitting immediately, prior to using mower again. • Plug any holes in the area while cleaning the deck. 6.
Owners Manual
Page 21
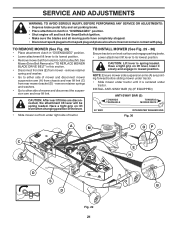
... and set parking brake. • Place attachment clutch in "DISENGAGED" position. • Shut engine off and lock the SmartSwitch Ignition. • Make sure the blades and all moving parts have completely stopped. • Disconnect spark plug wire from spark plug and place wire where it cannot come in this section... and disconnect mower suspension arm (A) from chassis and rear lift link (C) from rear mower bracket (D) - See Mower Drive Belt Removal in "TO REPLACE MOWER BLADE DRIVE BELT" in contact with plug. TO INSTALL MOWER (See Fig. 29 - 36) Ensure tractor is spring loaded.
... and set parking brake. • Place attachment clutch in "DISENGAGED" position. • Shut engine off and lock the SmartSwitch Ignition. • Make sure the blades and all moving parts have completely stopped. • Disconnect spark plug wire from spark plug and place wire where it cannot come in this section... and disconnect mower suspension arm (A) from chassis and rear lift link (C) from rear mower bracket (D) - See Mower Drive Belt Removal in "TO REPLACE MOWER BLADE DRIVE BELT" in contact with plug. TO INSTALL MOWER (See Fig. 29 - 36) Ensure tractor is spring loaded.
Owners Manual
Page 22
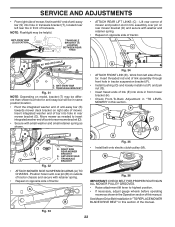
... BAR T. ANTI-SWAY BAR (S) LOCATION TRANSAXLE BRACKET (T) LOCATED BETWEEN REAR TIRES • ATTACH REAR LIFT LINKS (C) - See Mower Drive Belt Installation in "TO REPLACE MOWER BLADE DRIVE BELT" in front of transaxle. Work from left rear tire in this section of the manual. TS D D. SERVICE AND ADJUSTMENTS • From right side...
... BAR T. ANTI-SWAY BAR (S) LOCATION TRANSAXLE BRACKET (T) LOCATED BETWEEN REAR TIRES • ATTACH REAR LIFT LINKS (C) - See Mower Drive Belt Installation in "TO REPLACE MOWER BLADE DRIVE BELT" in front of transaxle. Work from left rear tire in this section of the manual. TS D D. SERVICE AND ADJUSTMENTS • From right side...
Owners Manual
Page 23
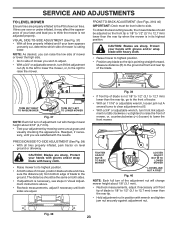
...mower. Protect your lawn and lead you are satisfied with the results. A A Fig. 38 23 To obtain the best cutting results, the mower blades should be the same on both sides. • If adjustment is necessary, see steps in Visual Adjustment instructions above. • Recheck measurements, ... nut A several turns to clear adjustment nut B. • With a 3/4" or adjustable wrench, turn of your hands with gloves and/or wrap blade with wrench and tighten jam nut securely against adjustment nut. FRONT-TO-BACK ADJUSTMENT (See Figs. 39 & 40) IMPORTANT: Deck must be adjusted so...
...mower. Protect your lawn and lead you are satisfied with the results. A A Fig. 38 23 To obtain the best cutting results, the mower blades should be the same on both sides. • If adjustment is necessary, see steps in Visual Adjustment instructions above. • Recheck measurements, ... nut A several turns to clear adjustment nut B. • With a 3/4" or adjustable wrench, turn of your hands with gloves and/or wrap blade with wrench and tighten jam nut securely against adjustment nut. FRONT-TO-BACK ADJUSTMENT (See Figs. 39 & 40) IMPORTANT: Deck must be adjusted so...

Owners Manual
Page 24
... installing the deck belt, refer to make sure it is enough slack, slip the belt onto the idler pulley. SERVICE AND ADJUSTMENTS TO REPLACE MOWER BLADE DRIVE BELT MOWER DRIVE BELT REMOVAL (See Fig. 41) • Park tractor on both mandrel housings and secure with fasteners. Lbs/40 Nm. •... EYEBOLT NUT IDLER ARM Fig. 41 • Remove the belt from around all the way down and engage parking brake. 2. BELT ROUTING ENGINE IDLER PULLEY BLADE BELT Fig. 43 TO CHECK BRAKE If tractor requires more than five (5) feet (1,5 m) to 30 Ft. Park tractor on a level, dry concrete or ...
... installing the deck belt, refer to make sure it is enough slack, slip the belt onto the idler pulley. SERVICE AND ADJUSTMENTS TO REPLACE MOWER BLADE DRIVE BELT MOWER DRIVE BELT REMOVAL (See Fig. 41) • Park tractor on both mandrel housings and secure with fasteners. Lbs/40 Nm. •... EYEBOLT NUT IDLER ARM Fig. 41 • Remove the belt from around all the way down and engage parking brake. 2. BELT ROUTING ENGINE IDLER PULLEY BLADE BELT Fig. 43 TO CHECK BRAKE If tractor requires more than five (5) feet (1,5 m) to 30 Ft. Park tractor on a level, dry concrete or ...

Owners Manual
Page 25
.... 44 TO REMOVE WHEEL (See Fig. 45) • Block up axle securely. • Remove axle cover, retaining ring and washers to front, over cooling fan blades (F). 7. Remove belt from engine pulley and around transmission cooling fan and onto the input pulley (F). Remove belt downward from stationary idler (C) and clutching idler (D). 5. Tighten...
.... 44 TO REMOVE WHEEL (See Fig. 45) • Block up axle securely. • Remove axle cover, retaining ring and washers to front, over cooling fan blades (F). 7. Remove belt from engine pulley and around transmission cooling fan and onto the input pulley (F). Remove belt downward from stationary idler (C) and clutching idler (D). 5. Tighten...

Owners Manual
Page 27
... green while running. • The park brake symbol (CC) will be lit if the parking brake has not been engaged during a start attempt. • The blade switch symbol (EE) will blink if the attachment clutch control is not in the "DISENGAGED" position during a start attempt, the Battery Indicator Button (I) will be...
... green while running. • The park brake symbol (CC) will be lit if the parking brake has not been engaged during a start attempt. • The blade switch symbol (EE) will blink if the attachment clutch control is not in the "DISENGAGED" position during a start attempt, the Battery Indicator Button (I) will be...

Owners Manual
Page 29
... start 1. Check oil level/change spark plug. 7. Dirty fuel filter. 7. Dirty engine air screen/fins. 11. Worn, bent or loose blade. 2. Tighten blade bolt. 2. Replace damaged parts. 29 Engine flooded. 3. Dirty fuel filter. 6. Replace spark plug. 4. Weak or dead battery. 4. Loose... 4. Clean underside of power 1. Stale or dirty fuel. 8. Water in cold weather starting position ( ). 2. Check all wiring. 7. Replace blade. TROUBLESHOOTING PROBLEM Will not start 1. Out of adjustment. Bad spark plug. 4. Loose or damaged wiring. 8. Engine valves out of fuel. 2....
... start 1. Check oil level/change spark plug. 7. Dirty fuel filter. 7. Dirty engine air screen/fins. 11. Worn, bent or loose blade. 2. Tighten blade bolt. 2. Replace damaged parts. 29 Engine flooded. 3. Dirty fuel filter. 6. Replace spark plug. 4. Weak or dead battery. 4. Loose... 4. Clean underside of power 1. Stale or dirty fuel. 8. Water in cold weather starting position ( ). 2. Check all wiring. 7. Replace blade. TROUBLESHOOTING PROBLEM Will not start 1. Out of adjustment. Bad spark plug. 4. Loose or damaged wiring. 8. Engine valves out of fuel. 2....


