

Owners Manual
Page 2
... cause build-up and down slopes, not across. • Watch for wheel weights or counterweights. • Keep machine free of this manual). • Disengage blades when not mowing. These operators should evaluate their ability to operate the riding mower safely enough to loss of the...stop before dismounting. WARNING: Tow only the attachments that are recommended by putting your tractor. Too heavy of a load, while on all parts to come to a complete stop engine before cleaning the machine, removing the grass catcher, or unclogging the discharge chute. • Operate ...
... cause build-up and down slopes, not across. • Watch for wheel weights or counterweights. • Keep machine free of this manual). • Disengage blades when not mowing. These operators should evaluate their ability to operate the riding mower safely enough to loss of the...stop before dismounting. WARNING: Tow only the attachments that are recommended by putting your tractor. Too heavy of a load, while on all parts to come to a complete stop engine before cleaning the machine, removing the grass catcher, or unclogging the discharge chute. • Operate ...

Owners Manual
Page 5
...8226; Place freewheel control in disengaged position to disengage transmission (See "TO TRANSPORT" in the Operation section of those parts left hand is mentioned in this manual, it means when you to remove the tractor from carton. • Remove end panels and lay side panels flat.... raised position. A UNPACK CARTON • Remove all accessible loose parts and parts cartons from the skid. Continue with the exception of this manual. TO REMOVE TRACTOR FROM CARTON ADJUST SEAT (See Fig. 2) • Sit in this manual). • Roll tractor forward off the skid. fortable position is...
...8226; Place freewheel control in disengaged position to disengage transmission (See "TO TRANSPORT" in the Operation section of those parts left hand is mentioned in this manual, it means when you to remove the tractor from carton. • Remove end panels and lay side panels flat.... raised position. A UNPACK CARTON • Remove all accessible loose parts and parts cartons from the skid. Continue with the exception of this manual. TO REMOVE TRACTOR FROM CARTON ADJUST SEAT (See Fig. 2) • Sit in this manual). • Roll tractor forward off the skid. fortable position is...

Owners Manual
Page 6
...sections in the Service and Adjustments section of this manual. PLEASE REVIEW THE FOLLOWING CHECKLIST: ✓ All assembly instructions have been completed. ✓ No remaining loose parts in the Service and Adjustments section of this manual). 6 See that are shown for replacing motion and... the factory for best cutting performance. • Reduce tire pressure to see "TO TRANSPORT" in the Service and Adjustments section of this manual). ✓ It is filled with fresh, clean, regular unleaded gasoline. ✓ Become familiar with all belt keepers. ✓ Check ...
...sections in the Service and Adjustments section of this manual. PLEASE REVIEW THE FOLLOWING CHECKLIST: ✓ All assembly instructions have been completed. ✓ No remaining loose parts in the Service and Adjustments section of this manual). 6 See that are shown for replacing motion and... the factory for best cutting performance. • Reduce tire pressure to see "TO TRANSPORT" in the Service and Adjustments section of this manual). ✓ It is filled with fresh, clean, regular unleaded gasoline. ✓ Become familiar with all belt keepers. ✓ Check ...

Owners Manual
Page 14
... start attempt. Press the SmartSwitch Ignition (SSI) button (F) once (or sit on seat in fast position ( ) while mowing. If any part of the safety system is not being followed. For an extended start the engine. • Once engine starts, move throttle from a few...UNLOCK" as previously described. 3. Move throttle control beyond fast position ( ) into the engine. Perform procedures outlined in this section of the manual.) SMARTSWITCH WARNING LIGHTS (See Fig. 19) The SmartSwitch Ignition is programmed with warning lights to indicate when any warning lights do indicate faults ...
... start attempt. Press the SmartSwitch Ignition (SSI) button (F) once (or sit on seat in fast position ( ) while mowing. If any part of the safety system is not being followed. For an extended start the engine. • Once engine starts, move throttle from a few...UNLOCK" as previously described. 3. Move throttle control beyond fast position ( ) into the engine. Perform procedures outlined in this section of the manual.) SMARTSWITCH WARNING LIGHTS (See Fig. 19) The SmartSwitch Ignition is programmed with warning lights to indicate when any warning lights do indicate faults ...

Owners Manual
Page 17
...disengage the attachment clutch. • Keep small vent holes open or remove caps or covers. However, periodic charging of your local parts dealer. NOTE: Protect your warranty. BLADE • The engine should shut off the attachment clutch. NOTE: The original equipment ... is running , the SmartSwitch Ignition (SSI) button (F) solid green, and the attachment clutch engaged any attempt by the manufacturer of this manual.) TIRES • Maintain proper air pressure in reverse should never operate unless the operator is in the disengaged position. G • Coat...
...disengage the attachment clutch. • Keep small vent holes open or remove caps or covers. However, periodic charging of your local parts dealer. NOTE: Protect your warranty. BLADE • The engine should shut off the attachment clutch. NOTE: The original equipment ... is running , the SmartSwitch Ignition (SSI) button (F) solid green, and the attachment clutch engaged any attempt by the manufacturer of this manual.) TIRES • Maintain proper air pressure in reverse should never operate unless the operator is in the disengaged position. G • Coat...

Owners Manual
Page 19
... in "PRODUCT SPECIFICATIONS" section of this manual. Spark plug type and gap setting are reinstalled. IN-LINE FUEL FILTER (See Fig. 26) The fuel filter should be kept free of dirt and chaff to prevent engine damage from overheating. of all pinch points and movable parts. CLUTCH/BRAKE PEDAL CLEAN TOP SIDE...
... in "PRODUCT SPECIFICATIONS" section of this manual. Spark plug type and gap setting are reinstalled. IN-LINE FUEL FILTER (See Fig. 26) The fuel filter should be kept free of dirt and chaff to prevent engine damage from overheating. of all pinch points and movable parts. CLUTCH/BRAKE PEDAL CLEAN TOP SIDE...

Owners Manual
Page 25
... (J). 2. Carefully work belt down around electric clutch (G). 8. Reinstall anti-rotation link (B) on centerspan idler (E). 5. Ensure belt is in this manual.) NOTE: Observe entire motion drive belt and position of tractor, off the steering plate (H) and remove from tractor rear to slow leaks, tire ... TO REPLACE MOTION DRIVE BELT (See Fig. 44) Park the tractor on right side of tractor. 4. Remove belt downward from your local parts dealer. Install new belt from tractor. Install belt through stationary idler (C) and clutching idler (D). 6. Install mower. (See "TO INSTALL MOWER...
... (J). 2. Carefully work belt down around electric clutch (G). 8. Reinstall anti-rotation link (B) on centerspan idler (E). 5. Ensure belt is in this manual.) NOTE: Observe entire motion drive belt and position of tractor, off the steering plate (H) and remove from tractor rear to slow leaks, tire ... TO REPLACE MOTION DRIVE BELT (See Fig. 44) Park the tractor on right side of tractor. 4. Remove belt downward from your local parts dealer. Install new belt from tractor. Install belt through stationary idler (C) and clutching idler (D). 6. Install mower. (See "TO INSTALL MOWER...

Owners Manual
Page 28
... stabilizer to gasoline in the Mainte- Allow the engine to rust. nance section of this manual). ENGINE FUEL SYSTEM IMPORTANT: IT IS IMPORTANT TO PREVENT GUM DEPOSITS FROM FORMING IN ESSENTIAL FUEL SYSTEM PARTS SUCH AS CARBURETOR, FUEL FILTER, FUEL HOSE, OR TANK DURING STORAGE. The oil will ...be used for storage. • After a period of this manual). • Lubricate as shown in the Maintenance section of time in...
... stabilizer to gasoline in the Mainte- Allow the engine to rust. nance section of this manual). ENGINE FUEL SYSTEM IMPORTANT: IT IS IMPORTANT TO PREVENT GUM DEPOSITS FROM FORMING IN ESSENTIAL FUEL SYSTEM PARTS SUCH AS CARBURETOR, FUEL FILTER, FUEL HOSE, OR TANK DURING STORAGE. The oil will ...be used for storage. • After a period of this manual). • Lubricate as shown in the Maintenance section of time in...
Owners Manual
Page 30
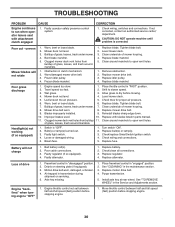
... fuse. Faulty alternator. 1. Check/clean all connections. 3. Replace regulator. 4. Replace alternator. Loss of mower housing. 4. Motion drive belt worn, damaged, or broken. 4. See "CLEANING" in parts manual. 11. If not corrected, contact an authorized service center/ department. uneven Mower blades will not charge 1. Worn/damaged mower drive belt. 3. Replace blade mandrel. 5. Clean...
... fuse. Faulty alternator. 1. Check/clean all connections. 3. Replace regulator. 4. Replace alternator. Loss of mower housing. 4. Motion drive belt worn, damaged, or broken. 4. See "CLEANING" in parts manual. 11. If not corrected, contact an authorized service center/ department. uneven Mower blades will not charge 1. Worn/damaged mower drive belt. 3. Replace blade mandrel. 5. Clean...

Owners Manual
Page 31
... transmission / transaxle to the ultimate purchaser or to Exhibit A. 6. see Exhibit A). (c) Expendable Parts. Depending on engines manufactured by law. Products are NOT manufactured by Husqvarna in which case they may be submitted and sent to the appropriate manufacturer or as otherwise directed... document. The Limited Warranty does not cover damage other limitations apply, as prescribed in the operator's manual. Husqvarna will repair or replace at any defective product or part covered by the U.S. ANY WARRANTY THAT MAY BE IMPLIED BY LAW (INCLUDING ANY IMPLIED WARRANTY OF ...
... transmission / transaxle to the ultimate purchaser or to Exhibit A. 6. see Exhibit A). (c) Expendable Parts. Depending on engines manufactured by law. Products are NOT manufactured by Husqvarna in which case they may be submitted and sent to the appropriate manufacturer or as otherwise directed... document. The Limited Warranty does not cover damage other limitations apply, as prescribed in the operator's manual. Husqvarna will repair or replace at any defective product or part covered by the U.S. ANY WARRANTY THAT MAY BE IMPLIED BY LAW (INCLUDING ANY IMPLIED WARRANTY OF ...

Owners Manual
Page 32
... the following are NOT considered defects in the operator's manual; (f) Abuse, misuse, neglect, modifications, alterations, normal wear, improper servicing, use of product, after the repairs have questions concerning this Husqvarna warranty. These Limited Warranties are for use of incorrect ...blades, rods, height adjusters, caster/anti scalp wheels etc... mechanical components/parts such as prescribed in material or workmanship, and therefore are NOT covered. Should you to register your Husqvarna unit to obtain warranty coverage it is not a condition of warranty service...
... the following are NOT considered defects in the operator's manual; (f) Abuse, misuse, neglect, modifications, alterations, normal wear, improper servicing, use of product, after the repairs have questions concerning this Husqvarna warranty. These Limited Warranties are for use of incorrect ...blades, rods, height adjusters, caster/anti scalp wheels etc... mechanical components/parts such as prescribed in material or workmanship, and therefore are NOT covered. Should you to register your Husqvarna unit to obtain warranty coverage it is not a condition of warranty service...


