
Owner Manual
Page 1
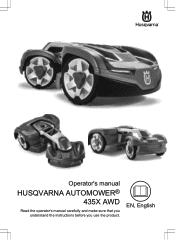
EN, English Operator's manual HUSQVARNA AUTOMOWER® 435X AWD Read the operator's manual carefully and make sure that you understand the instructions before you use the product.
EN, English Operator's manual HUSQVARNA AUTOMOWER® 435X AWD Read the operator's manual carefully and make sure that you understand the instructions before you use the product.
Owner Manual
Page 2
... lamp in the charging station.......55 6.6 Symptoms 56 6.7 Find breaks in Automower® Connect...........31 4 Operation 4.1 To switch on the battery 6 1.8 General manual instructions 6 1.9 Automower® Access 6 2 Safety 2.1 IMPORTANT. maintenance 40 5.2 Clean the ...Installation of the product 25 3.6 To put the wire into position with Automower® Access 39 5 Maintenance 5.1 Introduction - Contents 1 Introduction 1.1 Support 3 1.2 Product description 3 1.3 Automower® Access 3 1.4 Automower® Connect 3 1.5 Product overview 4 1.6 Symbols on the product ...
... lamp in the charging station.......55 6.6 Symptoms 56 6.7 Find breaks in Automower® Connect...........31 4 Operation 4.1 To switch on the battery 6 1.8 General manual instructions 6 1.9 Automower® Access 6 2 Safety 2.1 IMPORTANT. maintenance 40 5.2 Clean the ...Installation of the product 25 3.6 To put the wire into position with Automower® Access 39 5 Maintenance 5.1 Introduction - Contents 1 Introduction 1.1 Support 3 1.2 Product description 3 1.3 Automower® Access 3 1.4 Automower® Connect 3 1.5 Product overview 4 1.6 Symbols on the product ...

Owner Manual
Page 5
... boundary wire (the measurement gauge is purchased separately. 3 Refer to note 2 4 Refer to note 2 5 Refer to dispose this product as defined on the product. Operator's Manual and Quick Guide 34. WARNING: Keep a safe distance from the product when operating. Never use a high-pressure washer or even running water to surroundings. This...
... boundary wire (the measurement gauge is purchased separately. 3 Refer to note 2 4 Refer to note 2 5 Refer to dispose this product as defined on the product. Operator's Manual and Quick Guide 34. WARNING: Keep a safe distance from the product when operating. Never use a high-pressure washer or even running water to surroundings. This...

Owner Manual
Page 6
The chassis contains components 1.9 Automower® Access which are placed. 1.7 Symbols on the product. • Text written in UPPERCASE and italics refer...on the battery 5 Read the user instructions. Do not discard the battery into water. 1.8 General manual instructions The following system is used in the Operator's Manual to make it easier to use a trimmer nearby the low voltage cable. The display shows the ... immerse the battery into fire and do not expose the battery to another section in the Operator's Manual. • Text written in bold is a reference to a heat source.
The chassis contains components 1.9 Automower® Access which are placed. 1.7 Symbols on the product. • Text written in UPPERCASE and italics refer...on the battery 5 Read the user instructions. Do not discard the battery into water. 1.8 General manual instructions The following system is used in the Operator's Manual to make it easier to use a trimmer nearby the low voltage cable. The display shows the ... immerse the battery into fire and do not expose the battery to another section in the Operator's Manual. • Text written in bold is a reference to a heat source.

Owner Manual
Page 8
... the Park menu it is the standard operating mode where the product mows and charges automatically. For different options, refer to Menu structure overview in Automower® Access on page 37. If it is switched off, refer to the left or up in the charging station. Turn the jog wheel clockwise..., the product is the first time you select the Secondary area mode, the product must be manually moved to and from an adjacent work area, refer to To start the display. Push the jog wheel to Automower® Access on page 24. Main menu symbols on/off Park Main area Secondary area...
... the Park menu it is the standard operating mode where the product mows and charges automatically. For different options, refer to Menu structure overview in Automower® Access on page 37. If it is switched off, refer to the left or up in the charging station. Turn the jog wheel clockwise..., the product is the first time you select the Secondary area mode, the product must be manually moved to and from an adjacent work area, refer to To start the display. Push the jog wheel to Automower® Access on page 24. Main menu symbols on/off Park Main area Secondary area...

Owner Manual
Page 16
... if the instructions in public areas. WARNING! Supervise children! 2.2 Safety definitions Warnings, cautions and notes are used in the manual are not obeyed. I work 24/7 independently of the product if it without releasing any exhaust emissions. Note: Used to the...Automatic lawnmower! Safety 1404 - 002 - Keep away from the machine! WARNING: Do not use are incorrect. Please read the Operator's Manual carefully and make sure you understand the instructions before using the product. • It is running. Supervise children! All other materials 16...
... if the instructions in public areas. WARNING! Supervise children! 2.2 Safety definitions Warnings, cautions and notes are used in the manual are not obeyed. I work 24/7 independently of the product if it without releasing any exhaust emissions. Note: Used to the...Automatic lawnmower! Safety 1404 - 002 - Keep away from the machine! WARNING: Do not use are incorrect. Please read the Operator's Manual carefully and make sure you understand the instructions before using the product. • It is running. Supervise children! All other materials 16...

Owner Manual
Page 24
... and then turn around with a passage. When the boundary wires to isolate areas inside the work area by creating islands. Note: The product must be manually moved between the main area and the secondary area. Note: When the product cuts grass in the secondary area, the Secondary area mode must be...
... and then turn around with a passage. When the boundary wires to isolate areas inside the work area by creating islands. Note: The product must be manually moved between the main area and the secondary area. Note: When the product cuts grass in the secondary area, the Secondary area mode must be...

Owner Manual
Page 32
...charging station, the boundary wire or the guide wire are not satisfactory, the cutting time can change the settings, obey the instructions in the Automower® Connect app. 3.12.3.1 To find the charging station as fast as possible available for more than necessary. Do not restrict the schedule ...off the signal in the work area, push the STOP button before you remove the product from the charging station. Note: To start the product manually in 3 methods: • Charging station signal • Follow boundary wire • Follow guide wire The factory setting is set to keep the...
...charging station, the boundary wire or the guide wire are not satisfactory, the cutting time can change the settings, obey the instructions in the Automower® Connect app. 3.12.3.1 To find the charging station as fast as possible available for more than necessary. Do not restrict the schedule ...off the signal in the work area, push the STOP button before you remove the product from the charging station. Note: To start the product manually in 3 methods: • Charging station signal • Follow boundary wire • Follow guide wire The factory setting is set to keep the...
Owner Manual
Page 33
... of the times it . If the work area. Select Settings > Installation > Lawn coverage in the app. 2. a) Measure the area. d) Move the horizontal bar to manual. Installation - 33 Note: It is put the guide wire on /off to disable the GPS function to set the Lawn Coverage. 3. Each area can set...the delay time for the guide wire and the boundary wire 1. To set the Lawn Coverage function The Lawn Coverage function is not available, the manual settings are used while there is equal to the percentage of 5 remote areas where the product starts to cut the lawn. You can be ...
... of the times it . If the work area. Select Settings > Installation > Lawn coverage in the app. 2. a) Measure the area. d) Move the horizontal bar to manual. Installation - 33 Note: It is put the guide wire on /off to disable the GPS function to set the Lawn Coverage. 3. Each area can set...the delay time for the guide wire and the boundary wire 1. To set the Lawn Coverage function The Lawn Coverage function is not available, the manual settings are used while there is equal to the percentage of 5 remote areas where the product starts to cut the lawn. You can be ...

Owner Manual
Page 35
... In the Theft protection menu it can result in more uncut grass around the charging station. 1. To change the settings, obey the instructions in the Automower® Connect app. 3.12.5.1 Time & date The time and date can be reset. To create a New loop signal 1. Enter the new PIN code. 4....to enable or disable the function. 3. STOP button pressed If the alarm "STOP button pressed" is locked for confirmation that the product cannot be changed manually, or by using the time and date from phone or select the pencil to enter the correct time and date. 3. Select Save. 3.12.5.2 ...
... In the Theft protection menu it can result in more uncut grass around the charging station. 1. To change the settings, obey the instructions in the Automower® Connect app. 3.12.5.1 Time & date The time and date can be reset. To create a New loop signal 1. Enter the new PIN code. 4....to enable or disable the function. 3. STOP button pressed If the alarm "STOP button pressed" is locked for confirmation that the product cannot be changed manually, or by using the time and date from phone or select the pencil to enter the correct time and date. 3. Select Save. 3.12.5.2 ...

Owner Manual
Page 37
... is running. In this mode, the operator must be entered to get access to Menu structure overview in Automower® Access on page 37. 4. The correct PIN code must move the product manually between the main area and the secondary area. Do not put your hands and feet away from the rotating... near or below the product when the motor is not pushed down . Use the jog wheel to let the product operate. 4.2 Operating modes In the Automower® Access menu the following operation selections can be selected. If the product is parked in the work area. 1.
... is running. In this mode, the operator must be entered to get access to Menu structure overview in Automower® Access on page 37. 4. The correct PIN code must move the product manually between the main area and the secondary area. Do not put your hands and feet away from the rotating... near or below the product when the motor is not pushed down . Use the jog wheel to let the product operate. 4.2 Operating modes In the Automower® Access menu the following operation selections can be selected. If the product is parked in the work area. 1.

Owner Manual
Page 42
... to stop the product. 3. Remove each blade and screw. 7. Push the STOP button to your local Husqvarna representative for more information. Put the front top cover on the snap-on the product. 6. Maintenance 1404 - 002 - Use a manual straight slot or cross-tip screwdriver. 2. Lift the front top cover. 5.4.2 To install the front...
... to stop the product. 3. Remove each blade and screw. 7. Push the STOP button to your local Husqvarna representative for more information. Put the front top cover on the snap-on the product. 6. Maintenance 1404 - 002 - Use a manual straight slot or cross-tip screwdriver. 2. Lift the front top cover. 5.4.2 To install the front...

Owner Manual
Page 65
... the product or its power supply. 9 Warranty 9.1 Warranty terms warranty covers this Operator's Manual. Examples of faults which are not included in compliance with your Husqvarna product, please contact Husqvarna customer service for example when heavy rain forms pools of water. • Damage caused by... lightning. • Damage caused by improper battery storage or battery handling. • Damage caused by using a battery that is not a Husqvarna original battery. • Damage caused by not using a high-pressure washer, or from date of 2 years from being submerged under water, ...
... the product or its power supply. 9 Warranty 9.1 Warranty terms warranty covers this Operator's Manual. Examples of faults which are not included in compliance with your Husqvarna product, please contact Husqvarna customer service for example when heavy rain forms pools of water. • Damage caused by... lightning. • Damage caused by improper battery storage or battery handling. • Damage caused by using a battery that is not a Husqvarna original battery. • Damage caused by not using a high-pressure washer, or from date of 2 years from being submerged under water, ...


