Owners Manual
Page 2
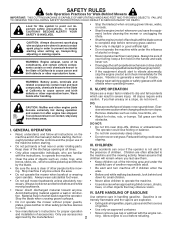
... the engine (motor) whenever you leave the equipment, before mowing. Always wear substantial foot wear. • Do not pull mower backwards unless absolutely necessary. The operator could cause slipping. WARNING: Engine exhaust, some of its constituents, and certain vehicle components contain...etc. • Watch for small children. • Never allow responsible individuals, who are explosive. • Extinguish all instructions on mowers so equipped before starting the engine (motor). • If the equipment should start to cool before starting . Stop machine if anyone...
... the engine (motor) whenever you leave the equipment, before mowing. Always wear substantial foot wear. • Do not pull mower backwards unless absolutely necessary. The operator could cause slipping. WARNING: Engine exhaust, some of its constituents, and certain vehicle components contain...etc. • Watch for small children. • Never allow responsible individuals, who are explosive. • Extinguish all instructions on mowers so equipped before starting the engine (motor). • If the equipment should start to cool before starting . Stop machine if anyone...
Owners Manual
Page 3
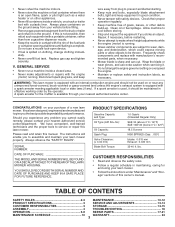
...combustion engine and should be maintained in maintaining, caring for the muffler is available through your lawn mower properly. WARNING: This lawn mower is equipped with a plastic liner. We have competent, well-trained technicians and the proper tools to service or... dispenser nozzle. • Keep the nozzle in good condition. • Never tamper with manufacturer's recommended parts, when necessary. • Mower blade is sharp and can cut. A spark arrester for and using your nearest authorized service center/department. It has been designed, engineered ...
...combustion engine and should be maintained in maintaining, caring for the muffler is available through your lawn mower properly. WARNING: This lawn mower is equipped with a plastic liner. We have competent, well-trained technicians and the proper tools to service or... dispenser nozzle. • Keep the nozzle in good condition. • Never tamper with manufacturer's recommended parts, when necessary. • Mower blade is sharp and can cut. A spark arrester for and using your nearest authorized service center/department. It has been designed, engineered ...

Owners Manual
Page 4
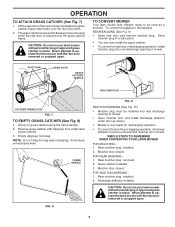
...handle and padding holding operator presence control bar to be tightened securely. Remove protective padding, raise upper handle section into grass bag with mower. 2. Your handles may be inserted into one of the three height adjustment holes. 2. Remove all parts and hardware you attempt ...around control bar. OPERATOR PRESENCE CONTROL BAR LIFT UP MOWING POSITION FIG. 2 TO ASSEMBLE GRASS CATCHER (See Fig. 3) 1. To convert mower to ensure proper tightness. Remove loose parts included with rigid part of bag on lower handle and tighten both handle knobs. 3. SQUEEZE HANDLE ...
...handle and padding holding operator presence control bar to be tightened securely. Remove protective padding, raise upper handle section into grass bag with mower. 2. Your handles may be inserted into one of the three height adjustment holes. 2. Remove all parts and hardware you attempt ...around control bar. OPERATOR PRESENCE CONTROL BAR LIFT UP MOWING POSITION FIG. 2 TO ASSEMBLE GRASS CATCHER (See Fig. 3) 1. To convert mower to ensure proper tightness. Remove loose parts included with rigid part of bag on lower handle and tighten both handle knobs. 3. SQUEEZE HANDLE ...
Owners Manual
Page 5
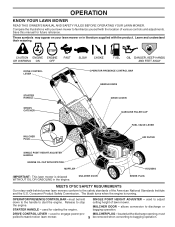
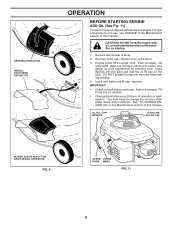
.... used for future reference. The blade turns when the engine is shipped WITHOUT OIL OR GASOLINE in literature supplied with your lawn mower or in the engine. OPERATOR PRESENCE CONTROL BAR - Release to discharge or bagging operation. MULCHER PLUG - SINGLE POINT HEIGHT ADJUSTER...adjust cutting height of the American National Standards Institute and the U.S. OPERATION KNOW YOUR LAWN MOWER READ THIS OWNER'S MANUAL AND SAFETY RULES BEFORE OPERATING YOUR LAWN MOWER. DRIVE CONTROL LEVER STARTER HANDLE GRASS CATCHER MULCHER PLUG OPERATOR PRESENCE CONTROL BAR HANDLE KNOB ...
.... used for future reference. The blade turns when the engine is shipped WITHOUT OIL OR GASOLINE in literature supplied with your lawn mower or in the engine. OPERATOR PRESENCE CONTROL BAR - Release to discharge or bagging operation. MULCHER PLUG - SINGLE POINT HEIGHT ADJUSTER...adjust cutting height of the American National Standards Institute and the U.S. OPERATION KNOW YOUR LAWN MOWER READ THIS OWNER'S MANUAL AND SAFETY RULES BEFORE OPERATING YOUR LAWN MOWER. DRIVE CONTROL LEVER STARTER HANDLE GRASS CATCHER MULCHER PLUG OPERATOR PRESENCE CONTROL BAR HANDLE KNOB ...
Owners Manual
Page 6
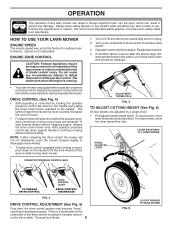
... lever toward the rear. NOTE: If after the above steps (for optimum performance. Readjust as follows: 6 FIG. 6 LEVER FORWARD TO RAISE MOWER ADJUSTMENT TURNBUCKLE FIG. 5 TO ADJUST CUTTING HEIGHT (See Fig. 6) All four wheels are released. We recommend standard safety glasses or a wide vision... replaced. Hold operator presence control bar down on the handle to increase drive speed. 3. Turn nut on the drive cable. To lower mower, move lever forward to continue mowing without stopping engine, release the drive control lever only. Proceed as required. 4. DRIVE CONTROL (See ...
... lever toward the rear. NOTE: If after the above steps (for optimum performance. Readjust as follows: 6 FIG. 6 LEVER FORWARD TO RAISE MOWER ADJUSTMENT TURNBUCKLE FIG. 5 TO ADJUST CUTTING HEIGHT (See Fig. 6) All four wheels are released. We recommend standard safety glasses or a wide vision... replaced. Hold operator presence control bar down on the handle to increase drive speed. 3. Turn nut on the drive cable. To lower mower, move lever forward to continue mowing without stopping engine, release the drive control lever only. Proceed as required. 4. DRIVE CONTROL (See ...
Owners Manual
Page 7
...open . 7 Mulcher door closed . FOR SIDE DISCHARGING 1. FOR REAR BAGGING 1. Discharge deflector installed. CAUTION: Do not run your lawn mower without mulcher plug or approved grass catcher in place. Lift up on grass catcher using the frame handle. 2. NOTE: Do not drag the bag ...when emptying; Rear mulcher plug installed. 2. Never attempt to operate the lawn mower with the rear door removed or propped open . The grass catcher is lowered onto the grass catcher frame. Store mulcher plug in a safe place...
...open . 7 Mulcher door closed . FOR SIDE DISCHARGING 1. FOR REAR BAGGING 1. Discharge deflector installed. CAUTION: Do not run your lawn mower without mulcher plug or approved grass catcher in place. Lift up on grass catcher using the frame handle. 2. NOTE: Do not drag the bag ...when emptying; Rear mulcher plug installed. 2. Never attempt to operate the lawn mower with the rear door removed or propped open . The grass catcher is lowered onto the grass catcher frame. Store mulcher plug in a safe place...
Owners Manual
Page 8
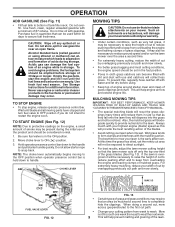
... to allow oil to change the oil more often under dusty, dirty conditions. You may need to settle. OIL FILL CAP/ DIPSTICK GASOLINE FILLER CAP MOWER IS NOW READY FOR DISCHARGING OPERATION FIG. 6 UPPER LOWER MARK MARK FIG. 11 8 IMPORTANT: • Check oil level before each season. Fill to use . Be...
... to allow oil to change the oil more often under dusty, dirty conditions. You may need to settle. OIL FILL CAP/ DIPSTICK GASOLINE FILLER CAP MOWER IS NOW READY FOR DISCHARGING OPERATION FIG. 6 UPPER LOWER MARK MARK FIG. 11 8 IMPORTANT: • Check oil level before each season. Fill to use . Be...
Owners Manual
Page 9
...considered normal. 1. At this will disperse into the grass and not be exposed to direct sunlight. • For best results, adjust the lawn mower cutting height so that can attract moisture which leads to provide nutrients for additional information. When doing a second cut, mow across (perpendicular) to ...the grass clippings many times and reduce them in the ON position. 2. Wait until the fuel lines and carburetor are hazardous, will damage your mower and could void your warranty. • Under certain conditions, such as this time the grass has dried, yet the newly cut path. ...
...considered normal. 1. At this will disperse into the grass and not be exposed to direct sunlight. • For best results, adjust the lawn mower cutting height so that can attract moisture which leads to provide nutrients for additional information. When doing a second cut, mow across (perpendicular) to ...the grass clippings many times and reduce them in the ON position. 2. Wait until the fuel lines and carburetor are hazardous, will damage your mower and could void your warranty. • Under certain conditions, such as this time the grass has dried, yet the newly cut path. ...
Owners Manual
Page 10
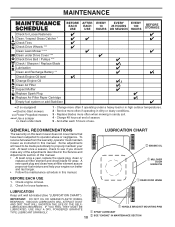
... SECTION Service more often when mowing in sandy soil. 4 - Check for wear. To receive full value from the warranty, operator must maintain mower as instructed in this manual. • At least once a year, replace the spark plug, clean or replace air filter element and...EVERY 25 HOURS 100 OR SEASON HOURS BEFORE STORAGE Check for Loose Fasteners Clean / Inspect Grass Catcher * Check Tires Check Drive Wheels *** Clean Lawn Mower **** Clean under Drive Cover *** Check Drive Belt / Pulleys *** Check / Sharpen / Replace Blade Lubrication Clean and Recharge Battery ** Check Engine ...
... SECTION Service more often when mowing in sandy soil. 4 - Check for wear. To receive full value from the warranty, operator must maintain mower as instructed in this manual. • At least once a year, replace the spark plug, clean or replace air filter element and...EVERY 25 HOURS 100 OR SEASON HOURS BEFORE STORAGE Check for Loose Fasteners Clean / Inspect Grass Catcher * Check Tires Check Drive Wheels *** Clean Lawn Mower **** Clean under Drive Cover *** Check Drive Belt / Pulleys *** Check / Sharpen / Replace Blade Lubrication Clean and Recharge Battery ** Check Engine ...

Owners Manual
Page 11
...engine manufacturer's service outlet. 11 Disconnect spark plug wire from turning when removing blade bolt. Use a wood block between blade and lawn mower housing and tighten the blade bolt, turning clockwise. • The recommended tightening torque is balanced. Be sure key in a horizontal position...8226; If lubricant is if service has been performed on the adapter. 3. Install the blade bolt with a file or on the mower. • To check blade balance, drive a nail into blade adapter and crankshaft. 5. An unbalanced blade will wear. Warranty repairs must be...
...engine manufacturer's service outlet. 11 Disconnect spark plug wire from turning when removing blade bolt. Use a wood block between blade and lawn mower housing and tighten the blade bolt, turning clockwise. • The recommended tightening torque is balanced. Be sure key in a horizontal position...8226; If lubricant is if service has been performed on the adapter. 3. Install the blade bolt with a file or on the mower. • To check blade balance, drive a nail into blade adapter and crankshaft. 5. An unbalanced blade will wear. Warranty repairs must be...

Owners Manual
Page 12
... the engine and after every 100 hours of your expected operating temperature. 7. Remove engine oil cap; CLEAN THE UNDERSIDE OF YOUR MOWER AFTER EACH USE. The engine oil capacity is not used for checking level. MAINTENANCE LUBRICATION Use only high quality detergent oil rated ... section of operation, whichever occurs first. SPARK PLUG Replace spark plug at least twice a season. CLEANING IMPORTANT: FOR BEST PERFORMANCE, KEEP MOWER HOUSING FREE OF BUILT-UP GRASS AND TRASH. CAUTION: Disconnect spark plug wire from engine, you check the oil level. If oil is empty...
... the engine and after every 100 hours of your expected operating temperature. 7. Remove engine oil cap; CLEAN THE UNDERSIDE OF YOUR MOWER AFTER EACH USE. The engine oil capacity is not used for checking level. MAINTENANCE LUBRICATION Use only high quality detergent oil rated ... section of operation, whichever occurs first. SPARK PLUG Replace spark plug at least twice a season. CLEANING IMPORTANT: FOR BEST PERFORMANCE, KEEP MOWER HOUSING FREE OF BUILT-UP GRASS AND TRASH. CAUTION: Disconnect spark plug wire from engine, you check the oil level. If oil is empty...

Owners Manual
Page 13
...all moving parts have completely stopped. 3. Release control bar and stop engine. 2. LAWN MOWER TO ADJUST CUTTING HEIGHT See "TO ADJUST CUTTING HEIGHT" in engine pulley and belt retainer of your mower, is provided to minimize the possibility that objects will be replaced. Remove drive cover. 2.... drive belt through hole in contact with plug. TO REPLACE DRIVE BELT (See Fig. 14) 1. Route the other end of the mower into the operator's mowing position. Reinstall belt keeper and spring. 7. SERVICE AND ADJUSTMENTS CAUTION: TO AVOID SERIOUS INJURY, BEFORE PERFORMING ANY SERVICE...
...all moving parts have completely stopped. 3. Release control bar and stop engine. 2. LAWN MOWER TO ADJUST CUTTING HEIGHT See "TO ADJUST CUTTING HEIGHT" in engine pulley and belt retainer of your mower, is provided to minimize the possibility that objects will be replaced. Remove drive cover. 2.... drive belt through hole in contact with plug. TO REPLACE DRIVE BELT (See Fig. 14) 1. Route the other end of the mower into the operator's mowing position. Reinstall belt keeper and spring. 7. SERVICE AND ADJUSTMENTS CAUTION: TO AVOID SERIOUS INJURY, BEFORE PERFORMING ANY SERVICE...
Owners Manual
Page 14
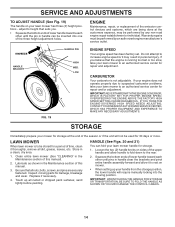
...adjustment. Warranty repairs must be inserted into the mowing position. If your engine does not operate properly due to suspected carburetor problems, take your lawn mower to the rear. 2. IMPORTANT: NEVERTAMPERWITHTHEENGINEGOVERNOR, WHICH IS FACTORY SET FOR PROPER ENGINE SPEED. Loosen the two (2) handle knobs on sides of the ... will require manually locking into one of the season or if the unit will not be used for 30 days or more. LAWN MOWER When lawn mower is to increase engine speed or it thoroughly, remove all nuts, bolts, screws, and pins are being done at the end of...
...adjustment. Warranty repairs must be inserted into the mowing position. If your engine does not operate properly due to suspected carburetor problems, take your lawn mower to the rear. 2. IMPORTANT: NEVERTAMPERWITHTHEENGINEGOVERNOR, WHICH IS FACTORY SET FOR PROPER ENGINE SPEED. Loosen the two (2) handle knobs on sides of the ... will require manually locking into one of the season or if the unit will not be used for 30 days or more. LAWN MOWER When lawn mower is to increase engine speed or it thoroughly, remove all nuts, bolts, screws, and pins are being done at the end of...

Owners Manual
Page 15
...engine or carburetor cleaner products in the fuel tank or permanent damage may reach an open flame or spark. CAUTION: Never store the lawn mower with clean engine oil. (See "ENGINE" in the tank inside a building where fumes may occur. • Use fresh fuel next season....cool before storing in fuel tank or storage container. Pull starter handle slowly a few times to gasoline in any enclosure. 15 IMPORTANT: NEVER COVER MOWER WHILE ENGINE AND EXHAUST AREAS ARE STILL WARM. Add stabilizer to distribute oil. 4. Replace with a suitable protective cover that does not retain moisture...
...engine or carburetor cleaner products in the fuel tank or permanent damage may reach an open flame or spark. CAUTION: Never store the lawn mower with clean engine oil. (See "ENGINE" in the tank inside a building where fumes may occur. • Use fresh fuel next season....cool before storing in fuel tank or storage container. Pull starter handle slowly a few times to gasoline in any enclosure. 15 IMPORTANT: NEVER COVER MOWER WHILE ENGINE AND EXHAUST AREAS ARE STILL WARM. Add stabilizer to distribute oil. 4. Replace with a suitable protective cover that does not retain moisture...
Owners Manual
Page 16
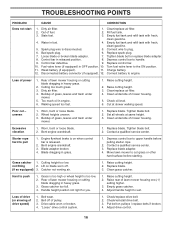
... before pulling starter rope. 2. uneven 1. Clean underside of power 1. Starter rope hard to push 1. Blade dragging in heavy grass. 2. Move lawn mower to cut - Cutting height too low. Hard to pull 1. Control bar in fuel. 4. Raise cutting height. 3. Cut at same height. 3....OFF position. 10. Blade adapter broken. 4. Grass is too high or wheel height is released. 2. Rear of grass, leaves and trash under mower. 1. Weak battery (if equipped). 11. Depress control bar to engine. Replace blade. 3. Check/reinstall drive belt. 3. Depress control bar ...
... before pulling starter rope. 2. uneven 1. Clean underside of power 1. Starter rope hard to push 1. Blade dragging in heavy grass. 2. Move lawn mower to cut - Cutting height too low. Hard to pull 1. Control bar in fuel. 4. Raise cutting height. 3. Cut at same height. 3....OFF position. 10. Blade adapter broken. 4. Grass is too high or wheel height is released. 2. Rear of grass, leaves and trash under mower. 1. Weak battery (if equipped). 11. Depress control bar to engine. Replace blade. 3. Check/reinstall drive belt. 3. Depress control bar ...

Owners Manual
Page 19
MODEL NUMBER 7021R (96143004600) - NO. 27 532 40 84-42 28 532 08 86-52 29 532 42 59-23 30 532 18 91-79 31 532 40 ..., Hex, with Lock Washer Insert 5/16-18 Baffle, Side Screw 12 x 5/8 KEY PART NO. Failure to do so could be hazardous, damage your lawn mower and void your warranty. PRODUCT NUMBER 961 43 00-46 KEY PART NO. inches. 1 inch = 25.4 mm IMPORTANT: Use only Original Equipment Manufacturer (O.E.M.) replacement parts...
MODEL NUMBER 7021R (96143004600) - NO. 27 532 40 84-42 28 532 08 86-52 29 532 42 59-23 30 532 18 91-79 31 532 40 ..., Hex, with Lock Washer Insert 5/16-18 Baffle, Side Screw 12 x 5/8 KEY PART NO. Failure to do so could be hazardous, damage your lawn mower and void your warranty. PRODUCT NUMBER 961 43 00-46 KEY PART NO. inches. 1 inch = 25.4 mm IMPORTANT: Use only Original Equipment Manufacturer (O.E.M.) replacement parts...
Owners Manual
Page 21
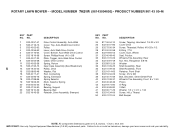
ROTARY LAWN MOWER - - MODEL NUMBER 7021R (96143004600) - NO. 24 817 06 04-10 25 532 40 07-83 26 532 75 06-34 28 812 00 00-58 29 532 18 ... Washer 1/2 x 1-1/2 x .134 Screw, Hi-Lo Thread Belt Keeper 21 NOTE: All component dimensions given in U.S. Failure to do so could be hazardous, damage your lawn mower and void your warranty. NO. 1 532 42 57-41 2 532 41 16-73 3 532 40 62-62 4 532 42 56-62 5 532 41 16-64...
ROTARY LAWN MOWER - - MODEL NUMBER 7021R (96143004600) - NO. 24 817 06 04-10 25 532 40 07-83 26 532 75 06-34 28 812 00 00-58 29 532 18 ... Washer 1/2 x 1-1/2 x .134 Screw, Hi-Lo Thread Belt Keeper 21 NOTE: All component dimensions given in U.S. Failure to do so could be hazardous, damage your lawn mower and void your warranty. NO. 1 532 42 57-41 2 532 41 16-73 3 532 40 62-62 4 532 42 56-62 5 532 41 16-64...

Owners Manual
Page 22
...Stick Edgers, Hedge Trimmers Lifetime Ignition Warranty (Parts Only). HUSQVARNA PRODUCT REGISTRATION INFORMATION & WARRANTY STATEMENT All Husqvarna products can be registered online at time of purchase.) 1 year N/A 30 Day Warranty Parts Only) Automatic Mower (1 Year Battery Warranty) 2 Years 1 Year 2 Years ...1 Year 90 Days 1 Year (K750 only) N/A 90 Days 90 Days N/A Snow Throwers † Pressure Washers † Generators (Husqvarna s warranty does not cover Engine & Generator...
...Stick Edgers, Hedge Trimmers Lifetime Ignition Warranty (Parts Only). HUSQVARNA PRODUCT REGISTRATION INFORMATION & WARRANTY STATEMENT All Husqvarna products can be registered online at time of purchase.) 1 year N/A 30 Day Warranty Parts Only) Automatic Mower (1 Year Battery Warranty) 2 Years 1 Year 2 Years ...1 Year 90 Days 1 Year (K750 only) N/A 90 Days 90 Days N/A Snow Throwers † Pressure Washers † Generators (Husqvarna s warranty does not cover Engine & Generator...
Parts List
Page 3
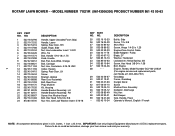
MODEL NUMBER 7021R (96143006300) PRODUCT NUMBER 961 43 00-63 KEY PART NO. Failure to do so could be hazardous, damage your lawn mower and void your warranty. NO. 1 532 18 62-96 2 532 19 72-02 3 532 40 54-16 4 532 19 47-88 5 532 13 20-04 6 ... Belt Keeper Grip, Handle, Foam Operator's Manual, English / French 3 NOTE: All component dimensions given in U.S. IMPORTANT: Use only Original Equipment Manufacturer (O.E.M.) replacement parts. ROTARY LAWN MOWER - - inches. 1 inch = 25.4 mm.
MODEL NUMBER 7021R (96143006300) PRODUCT NUMBER 961 43 00-63 KEY PART NO. Failure to do so could be hazardous, damage your lawn mower and void your warranty. NO. 1 532 18 62-96 2 532 19 72-02 3 532 40 54-16 4 532 19 47-88 5 532 13 20-04 6 ... Belt Keeper Grip, Handle, Foam Operator's Manual, English / French 3 NOTE: All component dimensions given in U.S. IMPORTANT: Use only Original Equipment Manufacturer (O.E.M.) replacement parts. ROTARY LAWN MOWER - - inches. 1 inch = 25.4 mm.

Parts List
Page 5
inches. 1 inch = 25.4 mm. IMPORTANT: Use only Original Equipment Manufacturer (O.E.M.) replacement parts. MODEL NUMBER 7021R (96143006300) PRODUCT NUMBER 961 43 00-63 KEY PART NO. Failure to do so could be hazardous, damage your lawn mower and void your warranty. NO. 1 532 43 10-01 2 532 43 16-38 3 532 43 22-86... Case Assembly (See Breakdown) Pulley, Drive Washer, Flat Rod, Connecting Spring, Extension Spring Selector Knob, Selector Spring E-Ring Bearing, Support KEY PART NO. ROTARY LAWN MOWER - - NO. 22 532 19 10-39 23 532 16 45-55 24 817 06 04-10 25 532 43 56-72 28 812 00 00...
inches. 1 inch = 25.4 mm. IMPORTANT: Use only Original Equipment Manufacturer (O.E.M.) replacement parts. MODEL NUMBER 7021R (96143006300) PRODUCT NUMBER 961 43 00-63 KEY PART NO. Failure to do so could be hazardous, damage your lawn mower and void your warranty. NO. 1 532 43 10-01 2 532 43 16-38 3 532 43 22-86... Case Assembly (See Breakdown) Pulley, Drive Washer, Flat Rod, Connecting Spring, Extension Spring Selector Knob, Selector Spring E-Ring Bearing, Support KEY PART NO. ROTARY LAWN MOWER - - NO. 22 532 19 10-39 23 532 16 45-55 24 817 06 04-10 25 532 43 56-72 28 812 00 00...


