

Owners Manual
Page 1
7021R Owner's Manual / 96143004600 / 2009-01 532 42 55-07 Rev. 1 12.22.08 BY Printed in U.S.A.
7021R Owner's Manual / 96143004600 / 2009-01 532 42 55-07 Rev. 1 12.22.08 BY Printed in U.S.A.
Owners Manual
Page 2
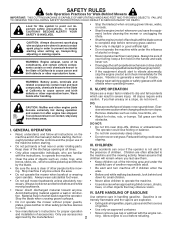
... vehicle components contain or emit chemicals known to the State of California to cause cancer and birth defects or other safety protective devices in the manual(s) before starting when setting up, transporting, adjusting or making repairs. never run - All slopes require extra caution. Be thoroughly familiar with side shields when operating...
... vehicle components contain or emit chemicals known to the State of California to cause cancer and birth defects or other safety protective devices in the manual(s) before starting when setting up, transporting, adjusting or making repairs. never run - All slopes require extra caution. Be thoroughly familiar with side shields when operating...
Owners Manual
Page 3
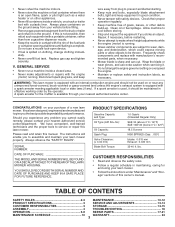
... and retain this lawn mower. Always observe the "SAFETY RULES". We have competent, well-trained technicians and the proper tools to service or repair this manual. The instructions will enable you cannot easily remedy, please contact your purchase of this is not possible, then refuel such equipment with a portable container, rather...
... and retain this lawn mower. Always observe the "SAFETY RULES". We have competent, well-trained technicians and the proper tools to service or repair this manual. The instructions will enable you cannot easily remedy, please contact your purchase of this is not possible, then refuel such equipment with a portable container, rather...

Owners Manual
Page 4
... are too stiff, hold them in handle can be tightened securely. To convert mower to operating position and squeeze the bottom ends of this manual. 4 Put grass catcher frame into one of carton and lay end panel down flat the factory with mower. 2. Cut down two...of those parts left unassembled for additional loose parts. To ensure safe and proper operation of this manual. Use the correct tools as necessary to upper handle. 4. ASSEMBLY Read these instructions and this manual in the parts bag. Your handles may be used as nuts, washers, bolts, etc., necessary...
... are too stiff, hold them in handle can be tightened securely. To convert mower to operating position and squeeze the bottom ends of this manual. 4 Put grass catcher frame into one of carton and lay end panel down flat the factory with mower. 2. Cut down two...of those parts left unassembled for additional loose parts. To ensure safe and proper operation of this manual. Use the correct tools as necessary to upper handle. 4. ASSEMBLY Read these instructions and this manual in the parts bag. Your handles may be used as nuts, washers, bolts, etc., necessary...
Owners Manual
Page 5
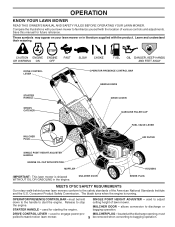
... understand their meaning. Consumer Product Safety Commission. OPERATOR PRESENCE CONTROL BAR - used to start the engine. DRIVE CONTROL LEVER - Save this manual for starting the engine. must pelled forward motion lawn mower. 5 be held down to the handle to engage power-pro- SINGLE POINT ...of lawn mower. Release to discharge or bagging operation. used to bagging operation. OPERATION KNOW YOUR LAWN MOWER READ THIS OWNER'S MANUAL AND SAFETY RULES BEFORE OPERATING YOUR LAWN MOWER. allows conversion to stop the engine. located at the discharge opening, must be ...
... understand their meaning. Consumer Product Safety Commission. OPERATOR PRESENCE CONTROL BAR - used to start the engine. DRIVE CONTROL LEVER - Save this manual for starting the engine. must pelled forward motion lawn mower. 5 be held down to the handle to engage power-pro- SINGLE POINT ...of lawn mower. Release to discharge or bagging operation. used to bagging operation. OPERATION KNOW YOUR LAWN MOWER READ THIS OWNER'S MANUAL AND SAFETY RULES BEFORE OPERATING YOUR LAWN MOWER. allows conversion to stop the engine. located at the discharge opening, must be ...
Owners Manual
Page 8
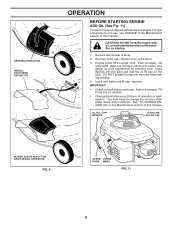
... thread the cap into the tube and rest the oil fill cap on dipstick. • Change the oil after every 25 hours of this manual. You may need to settle. Remove oil fill cap / dipstick from the muffler on oil fill cap/dipstick for checking level... oil to change the oil more often under dusty, dirty conditions. IMPORTANT: • Check oil level before each season. Engine holds 18.5 ounces of this manual. Fill to use . Pour oil slowly. Do not over fill engine with oil, or it will smoke heavily from oil fill spout. 3. OPEN...
... thread the cap into the tube and rest the oil fill cap on dipstick. • Change the oil after every 25 hours of this manual. You may need to settle. Remove oil fill cap / dipstick from the muffler on oil fill cap/dipstick for checking level... oil to change the oil more often under dusty, dirty conditions. IMPORTANT: • Check oil level before each season. Engine holds 18.5 ounces of this manual. Fill to use . Pour oil slowly. Do not over fill engine with oil, or it will smoke heavily from oil fill spout. 3. OPEN...
Owners Manual
Page 9
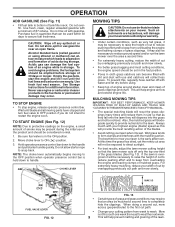
... leaving clumps of mulched grass. To prevent this, regularly hose catcher off any spilled oil or fuel. SEE "CLEANING" IN THE MAINTENANCE SECTION OF THIS MANUAL. • The special mulching blade will provide the best recutting action of grass and grass conditions may occur. Use fresh fuel next season. Mow north...
... leaving clumps of mulched grass. To prevent this, regularly hose catcher off any spilled oil or fuel. SEE "CLEANING" IN THE MAINTENANCE SECTION OF THIS MANUAL. • The special mulching blade will provide the best recutting action of grass and grass conditions may occur. Use fresh fuel next season. Mow north...
Owners Manual
Page 10
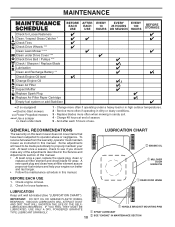
.... GENERAL RECOMMENDATIONS The warranty on this lawn mower does not cover items that have been subjected to clean under a heavy load or in this manual. A new spark plug and clean/new air filter element assure proper air-fuel mixture and help your unit. IMPORTANT: DO NOT OIL...under deck 1 - To receive full value from the warranty, operator must maintain mower as instructed in the Service and Adjustments section of this manual. MAINTENANCE BEFORE EACH USE AFTER EACH USE EVERY 10 HOURS EVERY EVERY 25 HOURS 100 OR SEASON HOURS BEFORE STORAGE Check for wear. Replace ...
.... GENERAL RECOMMENDATIONS The warranty on this lawn mower does not cover items that have been subjected to clean under a heavy load or in this manual. A new spark plug and clean/new air filter element assure proper air-fuel mixture and help your unit. IMPORTANT: DO NOT OIL...under deck 1 - To receive full value from the warranty, operator must maintain mower as instructed in the Service and Adjustments section of this manual. MAINTENANCE BEFORE EACH USE AFTER EACH USE EVERY 10 HOURS EVERY EVERY 25 HOURS 100 OR SEASON HOURS BEFORE STORAGE Check for wear. Replace ...

Owners Manual
Page 11
... remain in adapter and crankshaft keyway are aligned. 2. IF BOLT NEEDS REPLACING, REPLACE ONLY WITH APPROVED BOLT SHOWN IN THE REPAIR PARTS SECTION OF THIS MANUAL. LOCK WASHER DRIVE WHEELS Check rear drive wheels each time you do not recommend sharpening blade - BLADE CARE For best results, mower blade must be... is required, use it cannot come in good condition to the proper level at the customers expense, may be performed by the manufacturer of this manual. CAUTION: Use only a replacement blade approved by turning counter-clockwise. 5.
... remain in adapter and crankshaft keyway are aligned. 2. IF BOLT NEEDS REPLACING, REPLACE ONLY WITH APPROVED BOLT SHOWN IN THE REPAIR PARTS SECTION OF THIS MANUAL. LOCK WASHER DRIVE WHEELS Check rear drive wheels each time you do not recommend sharpening blade - BLADE CARE For best results, mower blade must be... is required, use it cannot come in good condition to the proper level at the customers expense, may be performed by the manufacturer of this manual. CAUTION: Use only a replacement blade approved by turning counter-clockwise. 5.

Owners Manual
Page 12
...or every season, whichever occurs first. Reconnect spark plug wire to avoid possible engine damage from mower or side of your engine manual. Tip lawn mower on its side as it cannot come in contact with API service classification SG-SL. Rock lawn mower... dipstick before starting the engine and after each five (5) hours of continuous use. Insert dipstick into a suitable container. derside of this manual. Service air cleaner more often under drive cover at the beginning of grass and trash. Water in engine can result in cold weather, and...
...or every season, whichever occurs first. Reconnect spark plug wire to avoid possible engine damage from mower or side of your engine manual. Tip lawn mower on its side as it cannot come in contact with API service classification SG-SL. Rock lawn mower... dipstick before starting the engine and after each five (5) hours of continuous use. Insert dipstick into a suitable container. derside of this manual. Service air cleaner more often under drive cover at the beginning of grass and trash. Water in engine can result in cold weather, and...

Owners Manual
Page 13
.... 7. NOTE: Always use factory approved belt to upright position. 5. retor down . 5. REAR DEFLECTOR The rear deflector, attached between the rear wheels of this manual. Remove engine pulley and belt from gearcase pulley. 4. Route the other end of the new drive belt through hole in the Operation section of your...
.... 7. NOTE: Always use factory approved belt to upright position. 5. retor down . 5. REAR DEFLECTOR The rear deflector, attached between the rear wheels of this manual. Remove engine pulley and belt from gearcase pulley. 4. Route the other end of the new drive belt through hole in the Operation section of your...
Owners Manual
Page 14
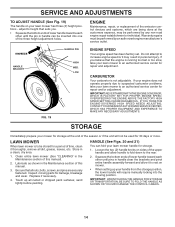
... not be used for 30 days or more. Inspect moving parts for repair and/or adjustment. If you . • Squeeze the bottom ends of this manual. 3. STORAGE Immediately prepare your lawn mower has three (3) height positions - SERVICE AND ADJUSTMENTS TO ADJUST HANDLE (See Fig. 19) The handle on mower. • When... or it thoroughly, remove all nuts, bolts, screws, and pins are being done at the end of the season or if the unit will require manually locking into one of this manual). 2. ENGINE SPEED Your engine speed has been factory set.
... not be used for 30 days or more. Inspect moving parts for repair and/or adjustment. If you . • Squeeze the bottom ends of this manual. 3. STORAGE Immediately prepare your lawn mower has three (3) height positions - SERVICE AND ADJUSTMENTS TO ADJUST HANDLE (See Fig. 19) The handle on mower. • When... or it thoroughly, remove all nuts, bolts, screws, and pins are being done at the end of the season or if the unit will require manually locking into one of this manual). 2. ENGINE SPEED Your engine speed has been factory set.

Owners Manual
Page 15
NOTE: Fuel stabilizer is an acceptable alternative in minimizing the formation of this manual). CYLINDER 1. Pull starter handle slowly a few times to reach the carburetor. Do not use engine or carburetor cleaner products in fuel tank or storage container. ...
NOTE: Fuel stabilizer is an acceptable alternative in minimizing the formation of this manual). CYLINDER 1. Pull starter handle slowly a few times to reach the carburetor. Do not use engine or carburetor cleaner products in fuel tank or storage container. ...
Owners Manual
Page 22
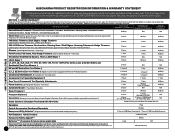
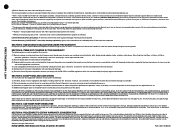
...Warranty - Parts Only) 2 Years 2 Years 90 Days Pole Pruners, Pole Saws, Pole Hedge Trimmers (Lifetime Ignition Warranty - Ask about Husqvarna s extended service plan! Lifetime Shaft Warranty. 2 Years 1 Year 90 Days 200 & 300 Series Trimmers, Brushcutters, Clearing Saws, Stick... product at www.usa.husqvarna.com quickly and easily regardless of their model year. RETAILER WARRANTY POLICY & PROCEDURE MANUAL EFFECTIVE JANUARY 1, 2009 SECTION 1: LIMITED WARRANTY Husqvarna Professional Products, Inc ("Husqvarna") warrants the original purchaser the Husqvarna branded product to which ...
...Warranty - Parts Only) 2 Years 2 Years 90 Days Pole Pruners, Pole Saws, Pole Hedge Trimmers (Lifetime Ignition Warranty - Ask about Husqvarna s extended service plan! Lifetime Shaft Warranty. 2 Years 1 Year 90 Days 200 & 300 Series Trimmers, Brushcutters, Clearing Saws, Stick... product at www.usa.husqvarna.com quickly and easily regardless of their model year. RETAILER WARRANTY POLICY & PROCEDURE MANUAL EFFECTIVE JANUARY 1, 2009 SECTION 1: LIMITED WARRANTY Husqvarna Professional Products, Inc ("Husqvarna") warrants the original purchaser the Husqvarna branded product to which ...
Owners Manual
Page 23
... by warranty. Should an operational problem or failure occur, the product should be delivered to an authorized Husqvarna retailer in the maintenance section of this warranty, the product believed to comply with the Owner s/Operator s manual or instruction sheet furnished by continued use habits; (2) Failure to obtain warranty service. all other rights...
... by warranty. Should an operational problem or failure occur, the product should be delivered to an authorized Husqvarna retailer in the maintenance section of this warranty, the product believed to comply with the Owner s/Operator s manual or instruction sheet furnished by continued use habits; (2) Failure to obtain warranty service. all other rights...
Parts List
Page 3
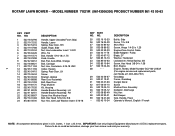
... at 1-800-426-7701) Grassbag Frame, Grassbag Danger Decal Screw Mulcher Door Assembly Deflector, Discharge Nut, Hex Belt Keeper Grip, Handle, Foam Operator's Manual, English / French 3 NOTE: All component dimensions given in U.S. ROTARY LAWN MOWER - - MODEL NUMBER 7021R (96143006300) PRODUCT NUMBER 961 43 00-63 KEY PART NO.
... at 1-800-426-7701) Grassbag Frame, Grassbag Danger Decal Screw Mulcher Door Assembly Deflector, Discharge Nut, Hex Belt Keeper Grip, Handle, Foam Operator's Manual, English / French 3 NOTE: All component dimensions given in U.S. ROTARY LAWN MOWER - - MODEL NUMBER 7021R (96143006300) PRODUCT NUMBER 961 43 00-63 KEY PART NO.


