
Owners Manual
Page 3
... keep equipment in effective working order by the operator. If a spark arrester is used on the ground away from your lawn mower properly. A spark arrester for and using your lawn mower. • Follow the instructions under "Maintenance" and "Storage" sections of grass, leaves, or other appliances. •...SERIAL NUMBER DATE OF PURCHASE THE MODEL AND SERIAL NUMBERS WILL BE FOUND ON A DECAL ATTACHED TO THE REAR OF THE LAWN MOWER HOUSING. If this lawn mower. Do not use extra caution when servicing it should not be maintained in good condition. • Never tamper with the ...
... keep equipment in effective working order by the operator. If a spark arrester is used on the ground away from your lawn mower properly. A spark arrester for and using your lawn mower. • Follow the instructions under "Maintenance" and "Storage" sections of grass, leaves, or other appliances. •...SERIAL NUMBER DATE OF PURCHASE THE MODEL AND SERIAL NUMBERS WILL BE FOUND ON A DECAL ATTACHED TO THE REAR OF THE LAWN MOWER HOUSING. If this lawn mower. Do not use extra caution when servicing it should not be maintained in good condition. • Never tamper with the ...

Owners Manual
Page 4
...FRAME HANDLE LIFT UP FIG. 1 UPPER HANDLE HANDLE KNOB VINYL BINDINGS FRAME OPENING LOWER HANDLE FIG. 3 TO INSTALL ATTACHMENTS Your lawn mower was shipped ready to assemble or operate your mowing comfort. Remove all parts and hardware you attempt to be tightened securely. Make... GRASS CATCHER (See Fig. 3) 1. ASSEMBLY Read these instructions and this manual in its entirety before using. Your new lawn mower has been assembled at . 3. Roll lawn mower out of the three height adjustment holes. 2. Your handles may be inserted into place on the bottom. Refer to ensure...
...FRAME HANDLE LIFT UP FIG. 1 UPPER HANDLE HANDLE KNOB VINYL BINDINGS FRAME OPENING LOWER HANDLE FIG. 3 TO INSTALL ATTACHMENTS Your lawn mower was shipped ready to assemble or operate your mowing comfort. Remove all parts and hardware you attempt to be tightened securely. Make... GRASS CATCHER (See Fig. 3) 1. ASSEMBLY Read these instructions and this manual in its entirety before using. Your new lawn mower has been assembled at . 3. Roll lawn mower out of the three height adjustment holes. 2. Your handles may be inserted into place on the bottom. Refer to ensure...
Owners Manual
Page 5
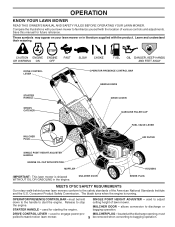
... located at the discharge opening, must be removed when converting to engage power-pro- These symbols may appear on your lawn mower to the safety standards of lawn mower. STARTER HANDLE - MULCHER PLUG - SINGLE POINT HEIGHT ADJUSTER - MULCHER DOOR - used for future reference. DRIVE CONTROL ... FILLER CAP FUEL VALVE LEVER AIR FILTER SINGLE POINT HEIGHT ADJUSTER HANDLE ENGINE OIL CAP WITH DIPSTICK MUFFLER HOUSING IMPORTANT: This lawn mower is running. OPERATOR PRESENCE CONTROL BAR - Save this manual for starting the engine. Learn and understand their meaning. The ...
... located at the discharge opening, must be removed when converting to engage power-pro- These symbols may appear on your lawn mower to the safety standards of lawn mower. STARTER HANDLE - MULCHER PLUG - SINGLE POINT HEIGHT ADJUSTER - MULCHER DOOR - used for future reference. DRIVE CONTROL ... FILLER CAP FUEL VALVE LEVER AIR FILTER SINGLE POINT HEIGHT ADJUSTER HANDLE ENGINE OIL CAP WITH DIPSTICK MUFFLER HOUSING IMPORTANT: This lawn mower is running. OPERATOR PRESENCE CONTROL BAR - Save this manual for starting the engine. Learn and understand their meaning. The ...
Owners Manual
Page 6
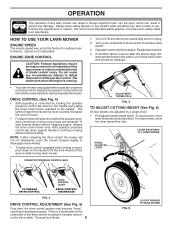
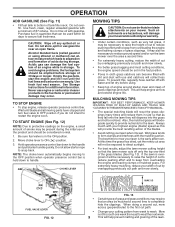
... to be installed on the handle to continue mowing without stopping engine, release the drive control lever only. ward speed remains the same), your lawn mower or performing any adjustments or repairs. ADJUSTMENT TURNBUCKLE FIG. 5 TO ADJUST CUTTING HEIGHT (See Fig. 6) All four wheels are released. OPERATION... spark plug wire from plug. 2. There is controlled by a single lever. • Pull adjuster lever toward the rear. HOW TO USE YOUR LAWN MOWER ENGINE SPEED The engine speed was set at the factory for - Turn nut on the drive cable. Readjust as follows: 6 FIG. 6 LEVER ...
... to be installed on the handle to continue mowing without stopping engine, release the drive control lever only. ward speed remains the same), your lawn mower or performing any adjustments or repairs. ADJUSTMENT TURNBUCKLE FIG. 5 TO ADJUST CUTTING HEIGHT (See Fig. 6) All four wheels are released. OPERATION... spark plug wire from plug. 2. There is controlled by a single lever. • Pull adjuster lever toward the rear. HOW TO USE YOUR LAWN MOWER ENGINE SPEED The engine speed was set at the factory for - Turn nut on the drive cable. Readjust as follows: 6 FIG. 6 LEVER ...
Owners Manual
Page 7
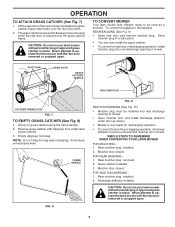
... 7 it will cause unnecessary wear. Rear mulcher plug removed. 2. Rear mulcher plug installed. 2. TO CONVERT MOWER Your lawn mower was shipped ready to be used as shown. • Mower is now ready for discharging operation. • To convert to mulching or discharging operation, install mulcher plug into... place. Mulcher door closed . Grass catcher installed. 3. The grass catcher is lowered onto the grass catcher frame. To convert to the lawn mower housing when the rear door is secured to bagging or discharging: REAR BAGGING (See Fig. 9) • Open rear door and remove ...
... 7 it will cause unnecessary wear. Rear mulcher plug removed. 2. Rear mulcher plug installed. 2. TO CONVERT MOWER Your lawn mower was shipped ready to be used as shown. • Mower is now ready for discharging operation. • To convert to mulching or discharging operation, install mulcher plug into... place. Mulcher door closed . Grass catcher installed. 3. The grass catcher is lowered onto the grass catcher frame. To convert to the lawn mower housing when the rear door is secured to bagging or discharging: REAR BAGGING (See Fig. 9) • Open rear door and remove ...
Owners Manual
Page 9
...blade) speed as this , regularly hose catcher off any spilled oil or fuel. Empty the gas tank, start the engine and let it run the lawn mower over fill. Never use engine or carburetor cleaner products in the fuel tank or permanent damage may be set in the fast position. •... IN THE MAINTENANCE SECTION OF THIS MANUAL. • The special mulching blade will not be exposed to direct sunlight. • For best results, adjust the lawn mower cutting height so that can be emptied before using ethanol or methanol) can become filled with dirt and dust with water and let dry...
...blade) speed as this , regularly hose catcher off any spilled oil or fuel. Empty the gas tank, start the engine and let it run the lawn mower over fill. Never use engine or carburetor cleaner products in the fuel tank or permanent damage may be set in the fast position. •... IN THE MAINTENANCE SECTION OF THIS MANUAL. • The special mulching blade will not be exposed to direct sunlight. • For best results, adjust the lawn mower cutting height so that can be emptied before using ethanol or methanol) can become filled with dirt and dust with water and let dry...
Owners Manual
Page 10
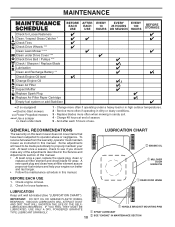
...a heavy load or in this manual. To receive full value from the warranty, operator must maintain mower as instructed in the Service and Adjustments section of this lawn mower does not cover items that have been subjected to operator abuse or negligence. LUBRICATION CHART ➁ ...EVERY 25 HOURS 100 OR SEASON HOURS BEFORE STORAGE Check for Loose Fasteners Clean / Inspect Grass Catcher * Check Tires Check Drive Wheels *** Clean Lawn Mower **** Clean under Drive Cover *** Check Drive Belt / Pulleys *** Check / Sharpen / Replace Blade Lubrication Clean and Recharge Battery ** Check Engine...
...a heavy load or in this manual. To receive full value from the warranty, operator must maintain mower as instructed in the Service and Adjustments section of this lawn mower does not cover items that have been subjected to operator abuse or negligence. LUBRICATION CHART ➁ ...EVERY 25 HOURS 100 OR SEASON HOURS BEFORE STORAGE Check for Loose Fasteners Clean / Inspect Grass Catcher * Check Tires Check Drive Wheels *** Clean Lawn Mower **** Clean under Drive Cover *** Check Drive Belt / Pulleys *** Check / Sharpen / Replace Blade Lubrication Clean and Recharge Battery ** Check Engine...

Owners Manual
Page 11
... HEAT TREATED. An unbalanced blade will wear. If either end of blade (opposite sharp edge) is balanced. Do not substitute. MAINTENANCE LAWN MOWER Always observe safety rules when performing any non-road engine repair establishment or individual. Make sure air filter and carburetor are up ...or deterioration. GEAR CASE • To keep the blade balanced. Warranty repairs must be performed by turning counter-clockwise. 5. Turn lawn mower on the engine crankshaft. NOTE: Remove the blade adapter and check the key inside the drive wheel and dust cover area and ...
... HEAT TREATED. An unbalanced blade will wear. If either end of blade (opposite sharp edge) is balanced. Do not substitute. MAINTENANCE LAWN MOWER Always observe safety rules when performing any non-road engine repair establishment or individual. Make sure air filter and carburetor are up ...or deterioration. GEAR CASE • To keep the blade balanced. Warranty repairs must be performed by turning counter-clockwise. 5. Turn lawn mower on the engine crankshaft. NOTE: Remove the blade adapter and check the key inside the drive wheel and dust cover area and ...

Owners Manual
Page 12
... will not run properly and may not need the entire container of oil. Always be damaged by scraping to your lawn mower by using a garden hose to clean lawn mower unless the electrical system, muffler, air filter and carburetor are shown in contact with plug. ...2. Disconnect spark plug wire from running engine until it could create a fire hazard and/or damage. Tip lawn mower on startup. 8. Rock lawn mower back and forth to keep water out. SPARK PLUG Replace spark plug at the beginning of your expected operating temperature. 7. FIG. ...
... will not run properly and may not need the entire container of oil. Always be damaged by scraping to your lawn mower by using a garden hose to clean lawn mower unless the electrical system, muffler, air filter and carburetor are shown in contact with plug. ...2. Disconnect spark plug wire from running engine until it could create a fire hazard and/or damage. Tip lawn mower on startup. 8. Rock lawn mower back and forth to keep water out. SPARK PLUG Replace spark plug at the beginning of your expected operating temperature. 7. FIG. ...

Owners Manual
Page 13
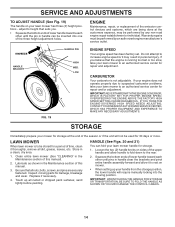
... the operator's mowing position. Route the other end of this manual. Reinstall belt keeper and spring. 7. Turn lawn mower on its side with air filter and carbu- LAWN MOWER TO ADJUST CUTTING HEIGHT See "TO ADJUST CUTTING HEIGHT" in the Operation section of the new drive belt through ... shield. 2. REAR DEFLECTOR The rear deflector, attached between the rear wheels of your mower, is provided to minimize the possibility that objects will be replaced. Remove drive cover. 2. Turn lawn mower on gearcase pulley. 6. TO REPLACE DRIVE BELT (See Fig. 14) 1. Place new drive ...
... the operator's mowing position. Route the other end of this manual. Reinstall belt keeper and spring. 7. Turn lawn mower on its side with air filter and carbu- LAWN MOWER TO ADJUST CUTTING HEIGHT See "TO ADJUST CUTTING HEIGHT" in the Operation section of the new drive belt through ... shield. 2. REAR DEFLECTOR The rear deflector, attached between the rear wheels of your mower, is provided to minimize the possibility that objects will be replaced. Remove drive cover. 2. Turn lawn mower on gearcase pulley. 6. TO REPLACE DRIVE BELT (See Fig. 14) 1. Place new drive ...
Owners Manual
Page 14
...used for 30 days or more. If your engine does not operate properly due to suspected carburetor problems, take your lawn mower has three (3) height positions - Loosen the two (2) handle knobs on mower. • When setting up all nuts, bolts, screws, and pins are being done at the end of ... AS SHOWN OR YOU MAY DAMAGE THE CONTROL CABLES. 14 SERVICE AND ADJUSTMENTS TO ADJUST HANDLE (See Fig. 19) The handle on your lawn mower to an authorized service center for repair and adjustment. adjust to be performed by any non-road engine repair establishment or individual. LOW FIG....
...used for 30 days or more. If your engine does not operate properly due to suspected carburetor problems, take your lawn mower has three (3) height positions - Loosen the two (2) handle knobs on mower. • When setting up all nuts, bolts, screws, and pins are being done at the end of ... AS SHOWN OR YOU MAY DAMAGE THE CONTROL CABLES. 14 SERVICE AND ADJUSTMENTS TO ADJUST HANDLE (See Fig. 19) The handle on your lawn mower to an authorized service center for repair and adjustment. adjust to be performed by any non-road engine repair establishment or individual. LOW FIG....

Owners Manual
Page 15
.... • If possible, store your unit to gasoline in minimizing the formation of fuel gum deposits during storage. IMPORTANT: NEVER COVER MOWER WHILE ENGINE AND EXHAUST AREAS ARE STILL WARM. Run engine at least 10 minutes after adding stabilizer to allow the stabilizer to distribute oil...are empty. • Never use plastic. Do not use engine or carburetor cleaner products in any enclosure. 15 CAUTION: Never store the lawn mower with a suitable protective cover that does not retain moisture. Always follow the mix ratio found on stabilizer container. ENGINE OIL Drain oil (...
.... • If possible, store your unit to gasoline in minimizing the formation of fuel gum deposits during storage. IMPORTANT: NEVER COVER MOWER WHILE ENGINE AND EXHAUST AREAS ARE STILL WARM. Run engine at least 10 minutes after adding stabilizer to allow the stabilizer to distribute oil...are empty. • Never use plastic. Do not use engine or carburetor cleaner products in any enclosure. 15 CAUTION: Never store the lawn mower with a suitable protective cover that does not retain moisture. Always follow the mix ratio found on stabilizer container. ENGINE OIL Drain oil (...
Owners Manual
Page 16
...2. Excessive vibration 1. Starter rope hard to engine. Replace blade adapter. 4. Empty grass catcher. 4. Loss of drive (or slowing of lawn mower housing or cutting blade dragging in grass. 1. Put belt on when control bar is released. 2. Spark plug wire is too low.... slower walking speed. Bent engine crankshaft. 3. Contact a qualified service center. 3. Grass catcher 1. Lift on blade worn off of lawn mower housing one (1) setting higher. 3. Clean grass catcher. Adjust handle height to handle. 9. Depress control bar to suit. Weak battery (if ...
...2. Excessive vibration 1. Starter rope hard to engine. Replace blade adapter. 4. Empty grass catcher. 4. Loss of drive (or slowing of lawn mower housing or cutting blade dragging in grass. 1. Put belt on when control bar is released. 2. Spark plug wire is too low.... slower walking speed. Bent engine crankshaft. 3. Contact a qualified service center. 3. Grass catcher 1. Lift on blade worn off of lawn mower housing one (1) setting higher. 3. Clean grass catcher. Adjust handle height to handle. 9. Depress control bar to suit. Weak battery (if ...

Owners Manual
Page 19
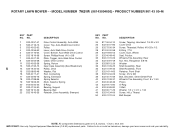
ROTARY LAWN MOWER - - inches. 1 inch = 25.4 mm IMPORTANT: Use only Original Equipment Manufacturer (O.E.M.) replacement parts. NO. 1 532 18 62-96 2 532 19 72-02 3 532 40 54-...Head Bolt, Hex Head 5/16-18 x 5/8 Nut, Hex, with Lock Washer Insert 5/16-18 Baffle, Side Screw 12 x 5/8 KEY PART NO. MODEL NUMBER 7021R (96143004600) - NO. 27 532 40 84-42 28 532 08 86-52 29 532 42 59-23 30 532 18 91-79 31 532 40... NOTE: All component dimensions given in U.S. PRODUCT NUMBER 961 43 00-46 KEY PART NO. Failure to do so could be hazardous, damage your lawn mower and void your warranty.
ROTARY LAWN MOWER - - inches. 1 inch = 25.4 mm IMPORTANT: Use only Original Equipment Manufacturer (O.E.M.) replacement parts. NO. 1 532 18 62-96 2 532 19 72-02 3 532 40 54-...Head Bolt, Hex Head 5/16-18 x 5/8 Nut, Hex, with Lock Washer Insert 5/16-18 Baffle, Side Screw 12 x 5/8 KEY PART NO. MODEL NUMBER 7021R (96143004600) - NO. 27 532 40 84-42 28 532 08 86-52 29 532 42 59-23 30 532 18 91-79 31 532 40... NOTE: All component dimensions given in U.S. PRODUCT NUMBER 961 43 00-46 KEY PART NO. Failure to do so could be hazardous, damage your lawn mower and void your warranty.
Owners Manual
Page 21
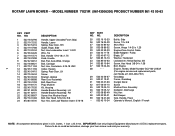
MODEL NUMBER 7021R (96143004600) - NO. 1 532 42 57-41 2 532 41 16-73 3 532 40 62-62 4 532 42 56-62 5 532 41 16-64 6 532 18 16... Selector Knob, Selector Spring E-Ring Bearing, Support Bearing, Ball Retainer, Drive Assembly, Stamped KEY PART NO. Failure to do so could be hazardous, damage your lawn mower and void your warranty. NO. 24 817 06 04-10 25 532 40 07-83 26 532 75 06-34 28 812 00 00-58...dimensions given in U.S. PRODUCT NUMBER 961 43 00-46 KEY PART NO. inches. 1 inch = 25.4 mm IMPORTANT: Use only Original Equipment Manufacturer (O.E.M.) replacement parts. ROTARY LAWN MOWER - -
MODEL NUMBER 7021R (96143004600) - NO. 1 532 42 57-41 2 532 41 16-73 3 532 40 62-62 4 532 42 56-62 5 532 41 16-64 6 532 18 16... Selector Knob, Selector Spring E-Ring Bearing, Support Bearing, Ball Retainer, Drive Assembly, Stamped KEY PART NO. Failure to do so could be hazardous, damage your lawn mower and void your warranty. NO. 24 817 06 04-10 25 532 40 07-83 26 532 75 06-34 28 812 00 00-58...dimensions given in U.S. PRODUCT NUMBER 961 43 00-46 KEY PART NO. inches. 1 inch = 25.4 mm IMPORTANT: Use only Original Equipment Manufacturer (O.E.M.) replacement parts. ROTARY LAWN MOWER - -

Owners Manual
Page 22
... Years N/A N/A LE475 Edger † LT, LTH, LS, XLS, GLS, YT, YTH, GT, GTH, 16H, Pro15, 155 ProFlex Series Lawn & Garden Riders and Residential Zero Turn Mowers † MZ and EZ Series Zero Turn Riders † 2 Years 2 Years 2 Years ¥ 90 Days N/A 1 Year 90 Days N/A...1365GN only (2nd Year Parts only) N/A Same Warranty As Unit When Purchased with Unit Spreaders 1 Year Parts & Accessories Purchased Separately 30 days Husqvarna Utility Vehicles** (Engines/transmissions shall be warrantied through 6, inclusive. Parts Only) 2 Years 2 Years 90 Days Pole Pruners, Pole Saws, Pole...
... Years N/A N/A LE475 Edger † LT, LTH, LS, XLS, GLS, YT, YTH, GT, GTH, 16H, Pro15, 155 ProFlex Series Lawn & Garden Riders and Residential Zero Turn Mowers † MZ and EZ Series Zero Turn Riders † 2 Years 2 Years 2 Years ¥ 90 Days N/A 1 Year 90 Days N/A...1365GN only (2nd Year Parts only) N/A Same Warranty As Unit When Purchased with Unit Spreaders 1 Year Parts & Accessories Purchased Separately 30 days Husqvarna Utility Vehicles** (Engines/transmissions shall be warrantied through 6, inclusive. Parts Only) 2 Years 2 Years 90 Days Pole Pruners, Pole Saws, Pole...
Parts List
Page 3
... Handle Bracket Assembly, RH Screw, Hex Washer Head Bolt, Hex Head 5/16-18 x 5/8 Nut, Hex, with Lock Washer Insert 5/16-18 KEY PART NO. ROTARY LAWN MOWER - - NO. 25 532 16 13-33 26 532 16 34-09 27 532 40 84-42 28 532 08 86-52 29 532 42 59..., English / French 3 NOTE: All component dimensions given in U.S. IMPORTANT: Use only Original Equipment Manufacturer (O.E.M.) replacement parts. Failure to do so could be hazardous, damage your lawn mower and void your warranty. inches. 1 inch = 25.4 mm. MODEL NUMBER 7021R (96143006300) PRODUCT NUMBER 961 43 00-63 KEY PART NO.
... Handle Bracket Assembly, RH Screw, Hex Washer Head Bolt, Hex Head 5/16-18 x 5/8 Nut, Hex, with Lock Washer Insert 5/16-18 KEY PART NO. ROTARY LAWN MOWER - - NO. 25 532 16 13-33 26 532 16 34-09 27 532 40 84-42 28 532 08 86-52 29 532 42 59..., English / French 3 NOTE: All component dimensions given in U.S. IMPORTANT: Use only Original Equipment Manufacturer (O.E.M.) replacement parts. Failure to do so could be hazardous, damage your lawn mower and void your warranty. inches. 1 inch = 25.4 mm. MODEL NUMBER 7021R (96143006300) PRODUCT NUMBER 961 43 00-63 KEY PART NO.

Parts List
Page 5
MODEL NUMBER 7021R (96143006300) PRODUCT NUMBER 961 43 00-63 KEY PART NO. inches. 1 inch = 25.4 mm. NO. 22 532 19 10-39 23 532 16 45-55 ...-Gimlet Point Wheel & Tire Assembly, Front 8 x 1-3/4 Pinion O-Ring V-Belt Washer 1/2 x 1-1/2 x .134 Belt Keeper 5 NOTE: All component dimensions given in U.S. ROTARY LAWN MOWER - - Failure to do so could be hazardous, damage your lawn mower and void your warranty. NO. 1 532 43 10-01 2 532 43 16-38 3 532 43 22-86 4 532 43 30-87...
MODEL NUMBER 7021R (96143006300) PRODUCT NUMBER 961 43 00-63 KEY PART NO. inches. 1 inch = 25.4 mm. NO. 22 532 19 10-39 23 532 16 45-55 ...-Gimlet Point Wheel & Tire Assembly, Front 8 x 1-3/4 Pinion O-Ring V-Belt Washer 1/2 x 1-1/2 x .134 Belt Keeper 5 NOTE: All component dimensions given in U.S. ROTARY LAWN MOWER - - Failure to do so could be hazardous, damage your lawn mower and void your warranty. NO. 1 532 43 10-01 2 532 43 16-38 3 532 43 22-86 4 532 43 30-87...


