
Owners Manual
Page 2
...Operation 6 Operation 7-10 Maintenance Schedule 11 Maintenance 11-13 Service and Adjustments 14-15 Storage 15-16 Troubleshooting 16-17 Repair Parts 34-38 SAFETY RULES IMPORTANT: This cutting machine is generally a warning of trouble. • Alwayswearsafetygogglesorsafetyglasses with side shields when... the self-propelled mechanism or drive clutch on a slope, do not mow it cannot anyone enters the area. 2 you parts become extremely hot during operation and remain hot after handling. portant safety precautions. BECOME ALERT!!! hind before cleaning the mower or...
...Operation 6 Operation 7-10 Maintenance Schedule 11 Maintenance 11-13 Service and Adjustments 14-15 Storage 15-16 Troubleshooting 16-17 Repair Parts 34-38 SAFETY RULES IMPORTANT: This cutting machine is generally a warning of trouble. • Alwayswearsafetygogglesorsafetyglasses with side shields when... the self-propelled mechanism or drive clutch on a slope, do not mow it cannot anyone enters the area. 2 you parts become extremely hot during operation and remain hot after handling. portant safety precautions. BECOME ALERT!!! hind before cleaning the mower or...
Owners Manual
Page 3
...lose footing or balance. • Do not trim excessively steep slopes. • Do not mow on other authorized service center (See the REPAIR PARTS section of another responsible adult. • Be alert and turn machine off if children enter the area. • Before and while walking backwards...of slopes: never up and down for small children. • Never allow objects to be used , it on the ground away from your nearest Husqvarna or other appliances. • Never fill containers inside a closed area. • Never make wheel height adjustments while the engine is equipped ...
...lose footing or balance. • Do not trim excessively steep slopes. • Do not mow on other authorized service center (See the REPAIR PARTS section of another responsible adult. • Be alert and turn machine off if children enter the area. • Before and while walking backwards...of slopes: never up and down for small children. • Never allow objects to be used , it on the ground away from your nearest Husqvarna or other appliances. • Never fill containers inside a closed area. • Never make wheel height adjustments while the engine is equipped ...
Owners Manual
Page 4
...abuse is not covered under warranty. or: (4) Additional damage to parts or components due to facilitate post-sale service. Proof of material due to ultraviolet light; (3) Lawn and garden attachments are not covered by Husqvarna; (3) Alterations or modifications that the Warranty Registration Card ... the customer's original purchase for parts or labor if a component fails because of the protective apparel/boot is not covered under warranty. REPAIR OR REPLACEMENT AS PROVIDED UNDER THIS WARRANTY IS THE EXCLUSIVE REMEDY OF THE PURCHASER. HUSQVARNA SHALL NOT BE LIABLE FOR ANY...
...abuse is not covered under warranty. or: (4) Additional damage to parts or components due to facilitate post-sale service. Proof of material due to ultraviolet light; (3) Lawn and garden attachments are not covered by Husqvarna; (3) Alterations or modifications that the Warranty Registration Card ... the customer's original purchase for parts or labor if a component fails because of the protective apparel/boot is not covered under warranty. REPAIR OR REPLACEMENT AS PROVIDED UNDER THIS WARRANTY IS THE EXCLUSIVE REMEDY OF THE PURCHASER. HUSQVARNA SHALL NOT BE LIABLE FOR ANY...
Owners Manual
Page 6
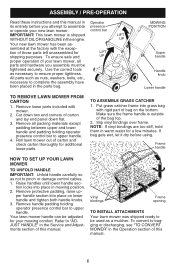
... of bag on lower handle and tighten both handle knobs. 3. TO ASSEMBLE GRASS CATCHER 1. tion locks into grass bag with rigid part of your new lawn mower. MOWING POSITION Upper handle Handle knob Lower handle TO REMOVE LAWN MOWER FROM CARTON 1. Slip vinyl bindings over...nuts, washers, bolts, etc., necessary to "ADJUST HANDLE" in the Service and Adjustments section of those parts left unassembled for additional loose parts. tion of this manual. 6 Remove all parts and hardware you attempt to pinch or damage control cables. 1. Make sure the frame handle is shipped...
... of bag on lower handle and tighten both handle knobs. 3. TO ASSEMBLE GRASS CATCHER 1. tion locks into grass bag with rigid part of your new lawn mower. MOWING POSITION Upper handle Handle knob Lower handle TO REMOVE LAWN MOWER FROM CARTON 1. Slip vinyl bindings over...nuts, washers, bolts, etc., necessary to "ADJUST HANDLE" in the Service and Adjustments section of those parts left unassembled for additional loose parts. tion of this manual. 6 Remove all parts and hardware you attempt to pinch or damage control cables. 1. Make sure the frame handle is shipped...
Owners Manual
Page 12
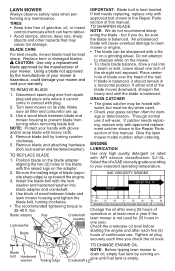
...viscosity grade according to sharpen while on the blade adapter aligning the two (2) holes in the blade with approved replacement catcher shown in the Repair Parts section of your expected operating temperature. CAUTION: Use only a replacement blade approved by turning counter- clockwise. 5. Position blade on the mower....hazardous, could damage your mower and void your hands with gloves and/or wrap blade with approved bolt shown in the Repair Parts section of wood between blade and mower housing to prevent blade from spark plug and place wire where it should remain in one...
...viscosity grade according to sharpen while on the blade adapter aligning the two (2) holes in the blade with approved replacement catcher shown in the Repair Parts section of your expected operating temperature. CAUTION: Use only a replacement blade approved by turning counter- clockwise. 5. Position blade on the mower....hazardous, could damage your mower and void your hands with gloves and/or wrap blade with approved bolt shown in the Repair Parts section of wood between blade and mower housing to prevent blade from spark plug and place wire where it should remain in one...
Owners Manual
Page 14
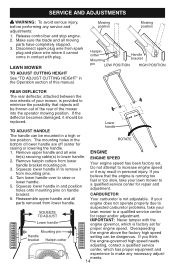
...experience to a qualified service center for Mounting pin Handle bracket Hairpin cotter proper engine speed. Reassemble upper handle and all moving parts have completely stopped. 3. Disconnect spark plug wire from mounting pins. 4. Remove hairpin cotters from lower handle. Overspeeding the engine above the...and place wire where it should be thrown out of the rear of this manual. CARBURETOR 6. Make sure the blade and all parts removed from lower handle bracket mounting pin. 3. Squeeze lower handle in the ROTATE bottom of lower handle are off center for ...
...experience to a qualified service center for Mounting pin Handle bracket Hairpin cotter proper engine speed. Reassemble upper handle and all moving parts have completely stopped. 3. Disconnect spark plug wire from mounting pins. 4. Remove hairpin cotters from lower handle. Overspeeding the engine above the...and place wire where it should be thrown out of the rear of this manual. CARBURETOR 6. Make sure the blade and all parts removed from lower handle bracket mounting pin. 3. Squeeze lower handle in the ROTATE bottom of lower handle are off center for ...
Owners Manual
Page 15
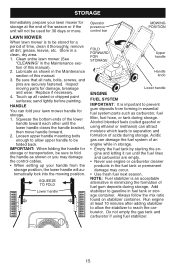
... bolts enough to allow the stabilizer to reach the carburetor. Acidic gas can damage the fuel system of an engine while in essential fuel system parts such as carburetor, fuel filter, fuel hose, or tank during storage. Run engine at the end of the season or if the unit will... automatically lock into the mowing position. Inspect moving parts for damage, breakage and wear. Touch up your handle from forming in storage. • Empty the fuel tank by starting the engine and letting it...
... bolts enough to allow the stabilizer to reach the carburetor. Acidic gas can damage the fuel system of an engine while in essential fuel system parts such as carburetor, fuel filter, fuel hose, or tank during storage. Run engine at the end of the season or if the unit will... automatically lock into the mowing position. Inspect moving parts for damage, breakage and wear. Touch up your handle from forming in storage. • Empty the fuel tank by starting the engine and letting it...
Owners Manual
Page 16
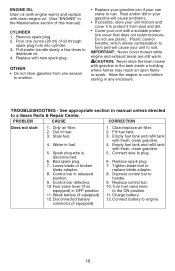
... tank with gasoline in any enclosure. Replace spark plug. 7. Charge battery. 12. Pour one season to another. • Replace your gasoline can starts to a Sears Parts & Repair Center. OTHER • Do not store gasoline from dust and dirt. • Cover your can if your unit with new spark plug. See appropriate...
... tank with gasoline in any enclosure. Replace spark plug. 7. Charge battery. 12. Pour one season to another. • Replace your gasoline can starts to a Sears Parts & Repair Center. OTHER • Do not store gasoline from dust and dirt. • Cover your can if your unit with new spark plug. See appropriate...
Owners Manual
Page 18
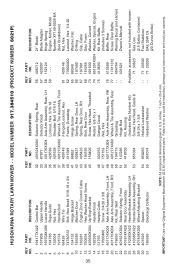
...be hazardous, damage your lawn mower and void your warranty. NO. NO. inches. 1 inch = 25.4 mm IMPORTANT: Use only Original Equipment Manufacturer (O.E.M.) replacement parts. DESCRIPTION 1 194177X422 Control Bar 2 197808 Upper Handle 3 169708X498 Lower Handle 4 194788 Rope Guide 5 132004 Nut, Hex 6 191574 Handle Bolt 7 66426 Wire ... Key Number 46) 53 851084 Screw, Hex Head, Grade 8 3/8-24 x 1-3/8 54 850263 Helical Lockwasher 55 851074 Hardened Washer KEY PART NO. MODEL NUMBER 917.384510 (PRODUCT NUMBER 6021P) 35 KEY PART NO. HUSQVARNA ROTARY LAWN MOWER - -
...be hazardous, damage your lawn mower and void your warranty. NO. NO. inches. 1 inch = 25.4 mm IMPORTANT: Use only Original Equipment Manufacturer (O.E.M.) replacement parts. DESCRIPTION 1 194177X422 Control Bar 2 197808 Upper Handle 3 169708X498 Lower Handle 4 194788 Rope Guide 5 132004 Nut, Hex 6 191574 Handle Bolt 7 66426 Wire ... Key Number 46) 53 851084 Screw, Hex Head, Grade 8 3/8-24 x 1-3/8 54 850263 Helical Lockwasher 55 851074 Hardened Washer KEY PART NO. MODEL NUMBER 917.384510 (PRODUCT NUMBER 6021P) 35 KEY PART NO. HUSQVARNA ROTARY LAWN MOWER - -

Owners Manual
Page 21
... KEY NO. Retainer, Valve Spring 129 - - - Pivot, Rocker Arm 131 - - - Camshaft Assembly 38 KOHLER 4-CYCLE ENGINE MODEL NUMBER XT149-0026-EA KEY PART NO. Seal, Oil 128 - - - Fan, Flywheel (Plastic) 136 14 219 07-s Brake Assembly, Carburetor Side (Includes Brake Lever, Brake Spring, Flange Nuts,...Kill Lead, Screw, Kill Switch, Brake Bracket, Brake Lever Washer and Brake Lever Rivet) 153 14 237 05-s Clamp, Hose 154 - - - PART DESCRIPTION 1 14 165 01-s Starter, Recoil (Includes Key Numbers 2 and 3, Recoil Housing, Recoil Bushing, Recoil Guide Plate, Recoil Springs, Recoil Pulley,...
... KEY NO. Retainer, Valve Spring 129 - - - Pivot, Rocker Arm 131 - - - Camshaft Assembly 38 KOHLER 4-CYCLE ENGINE MODEL NUMBER XT149-0026-EA KEY PART NO. Seal, Oil 128 - - - Fan, Flywheel (Plastic) 136 14 219 07-s Brake Assembly, Carburetor Side (Includes Brake Lever, Brake Spring, Flange Nuts,...Kill Lead, Screw, Kill Switch, Brake Bracket, Brake Lever Washer and Brake Lever Rivet) 153 14 237 05-s Clamp, Hose 154 - - - PART DESCRIPTION 1 14 165 01-s Starter, Recoil (Includes Key Numbers 2 and 3, Recoil Housing, Recoil Bushing, Recoil Guide Plate, Recoil Springs, Recoil Pulley,...

Owners Manual
Page 23
... home appliances and items like vacuums, lawn equipment, and electronics, call or go on-line for the nearest Sears Parts and Repair Center. 1-800-488-1222 Anytime, day or night (U.S.A. For the replacement parts, accessories and owner's manuals that you need to do-it ! For Sears professional installation of Sears Brands, LLC...
... home appliances and items like vacuums, lawn equipment, and electronics, call or go on-line for the nearest Sears Parts and Repair Center. 1-800-488-1222 Anytime, day or night (U.S.A. For the replacement parts, accessories and owner's manuals that you need to do-it ! For Sears professional installation of Sears Brands, LLC...


