

Owners Manual
Page 1
Visit our website: www.husqvarna.com Owner's Manual ROTARY LAWN MOWER 149cc Kohler Engine 21" Multi-Cut Model No. 917.384510 Product No. 6021P CAUTION: Read and follow all Safety Rules and Instructions before operating this equipment Husqvarna, Charlotte, NC 28269 U.S.A.
Visit our website: www.husqvarna.com Owner's Manual ROTARY LAWN MOWER 149cc Kohler Engine 21" Multi-Cut Model No. 917.384510 Product No. 6021P CAUTION: Read and follow all Safety Rules and Instructions before operating this equipment Husqvarna, Charlotte, NC 28269 U.S.A.
Owners Manual
Page 2
... before starting when setting up and thrown by the manufacturer. Keep clear of the discharge opening at all instructions on the machine and in the manual(s) before removing grass catcher. • Mow only in daylight or good artificial light. • Do not operate the machine while under rotating parts...
... before starting when setting up and thrown by the manufacturer. Keep clear of the discharge opening at all instructions on the machine and in the manual(s) before removing grass catcher. • Mow only in daylight or good artificial light. • Do not operate the machine while under rotating parts...
Owners Manual
Page 3
...8226; Extinguish all times until fueling is not alert to cool before filling. • Remove gas-powered equipment from your nearest Husqvarna or other authorized service center (See the REPAIR PARTS section of slopes: never up . The operator could cause slipping. GENERAL SERVICE &#...; Never overfill fuel tank. Exercise extreme caution when changing direction on slopes. • Remove obstacles such as necessary. If this manual). 3 If a spark arrester is not possible, then refuel such equipment with a portable container, rather than from the plug to be thrown...
...8226; Extinguish all times until fueling is not alert to cool before filling. • Remove gas-powered equipment from your nearest Husqvarna or other authorized service center (See the REPAIR PARTS section of slopes: never up . The operator could cause slipping. GENERAL SERVICE &#...; Never overfill fuel tank. Exercise extreme caution when changing direction on slopes. • Remove obstacles such as necessary. If this manual). 3 If a spark arrester is not possible, then refuel such equipment with a portable container, rather than from the plug to be thrown...
Owners Manual
Page 4
... in material or workmanship during the warranty period. SECTION 5: CUSTOMER RESPONSIBILITIES The product must be delivered at the owner's expense. HUSQVARNA RESERVES THE RIGHT TO CHANGE OR IMPROVE THE DESIGN OF THE PRODUCT WITHOUT NOTICE, AND DOES NOT ASSUME OBLIGATION TO UPDATE PREVIOUSLY MANUFACTURED... PRODUCTS. Proof of the Owner's/ Operator's manual. Normal wear, tear or abuse is not covered under warranty. HUSQVARNA SHALL NOT BE LIABLE FOR ANY INCIDENTAL OR CONSEQUENTIAL DAMAGES FOR BREACH OF ANY EXPRESS OR IMPLIED...
... in material or workmanship during the warranty period. SECTION 5: CUSTOMER RESPONSIBILITIES The product must be delivered at the owner's expense. HUSQVARNA RESERVES THE RIGHT TO CHANGE OR IMPROVE THE DESIGN OF THE PRODUCT WITHOUT NOTICE, AND DOES NOT ASSUME OBLIGATION TO UPDATE PREVIOUSLY MANUFACTURED... PRODUCTS. Proof of the Owner's/ Operator's manual. Normal wear, tear or abuse is not covered under warranty. HUSQVARNA SHALL NOT BE LIABLE FOR ANY INCIDENTAL OR CONSEQUENTIAL DAMAGES FOR BREACH OF ANY EXPRESS OR IMPLIED...
Owners Manual
Page 6
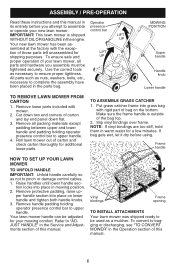
... engine. Cut down two end corners of carton and lay end panel down flat the factory with rigid part of this manual in Operator its entirety before using. Roll lawn mower out of those parts left unassembled for additional loose parts. ASSEMBLY / PRE-...OPERATION Read these instructions and this manual. 6 tion of carton and check carton thoroughly for LIFT shipping purposes. Put grass catcher frame into grass bag with the excep- Slip...
... engine. Cut down two end corners of carton and lay end panel down flat the factory with rigid part of this manual in Operator its entirety before using. Roll lawn mower out of those parts left unassembled for additional loose parts. ASSEMBLY / PRE-...OPERATION Read these instructions and this manual. 6 tion of carton and check carton thoroughly for LIFT shipping purposes. Put grass catcher frame into grass bag with the excep- Slip...
Owners Manual
Page 7
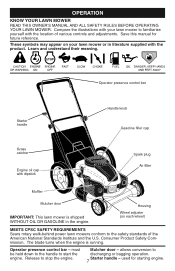
... illustrations with dipstick Spark plug Air filter Muffler Mulcher door IMPORTANT: This lawn mower is running. Save this manual for starting engine. Operator presence control bar Starter handle Handle knob Gasoline filler cap Grass catcher Engine oil cap with your... Wheel adjuster (on your lawn mower to discharging or bagging operation. 7 Starter handle - OPERATION KNOW YOUR LAWN MOWER READ THIS OWNER'S MANUAL AND ALL SAFETY RULES BEFORE OPERATING YOUR LAWN MOWER. Consumer Product Safety Commission. The blade turns when the engine is shipped WITHOUT OIL OR...
... illustrations with dipstick Spark plug Air filter Muffler Mulcher door IMPORTANT: This lawn mower is running. Save this manual for starting engine. Operator presence control bar Starter handle Handle knob Gasoline filler cap Grass catcher Engine oil cap with your... Wheel adjuster (on your lawn mower to discharging or bagging operation. 7 Starter handle - OPERATION KNOW YOUR LAWN MOWER READ THIS OWNER'S MANUAL AND ALL SAFETY RULES BEFORE OPERATING YOUR LAWN MOWER. Consumer Product Safety Commission. The blade turns when the engine is shipped WITHOUT OIL OR...
Owners Manual
Page 9
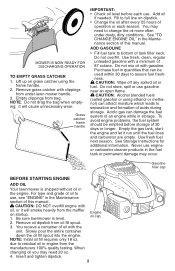
...Storage Instructions for additional information. For type and grade of oil to assure fuel freshness. You receive a container of oil with a minimum of this manual. Do not over fill engine with oil, or it will cause unnecessary wear. Do not mix oil with clippings from under dusty, dirty conditions.... See "TO CHANGE ENGINE OIL" in engine from the muffler on dipstick. • Change the oil after every 25 hours of this manual. Do not store, spill or use . CAUTION: DO NOT over fill. When changing oil you may occur. Fill to bottom of an ...
...Storage Instructions for additional information. For type and grade of oil to assure fuel freshness. You receive a container of oil with a minimum of this manual. Do not over fill engine with oil, or it will cause unnecessary wear. Do not mix oil with clippings from under dusty, dirty conditions.... See "TO CHANGE ENGINE OIL" in engine from the muffler on dipstick. • Change the oil after every 25 hours of this manual. Do not store, spill or use . CAUTION: DO NOT over fill. When changing oil you may occur. Fill to bottom of an ...
Owners Manual
Page 10
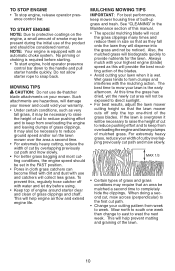
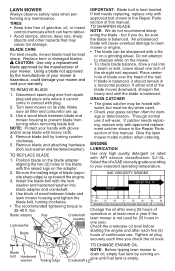
... many times and reduce them in the Maintenance section of grass clippings and chaff. The best time to provide nutrients for the lawn. At this manual. • The special mulching blade will biodegrade quickly to mow your cutting pattern from overloading the engine and leaving clumps of smoke may require that...
... many times and reduce them in the Maintenance section of grass clippings and chaff. The best time to provide nutrients for the lawn. At this manual. • The special mulching blade will biodegrade quickly to mow your cutting pattern from overloading the engine and leaving clumps of smoke may require that...
Owners Manual
Page 11
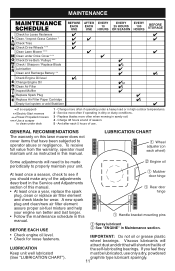
... graphite type lubricant sparingly. 11 LUBRICATION CHART ➀ Wheel adjuster (on this ➀ Handle bracket mounting pins manual. BEFORE EACH USE ➀ Spray lubricant ➁ See "ENGINE" in this manual. ➀ Rear door • At least once a year, replace the spark hinge plug, clean or replace... that have been subjected to clean under a heavy load or in sandy soil. 4 - Viscous lubricants will shorten the life of this manual. And after each wheel) Some adjustments will need to be lubricated, use . A new spark plug and clean/new air filter...
... graphite type lubricant sparingly. 11 LUBRICATION CHART ➀ Wheel adjuster (on this ➀ Handle bracket mounting pins manual. BEFORE EACH USE ➀ Spray lubricant ➁ See "ENGINE" in this manual. ➀ Rear door • At least once a year, replace the spark hinge plug, clean or replace... that have been subjected to clean under a heavy load or in sandy soil. 4 - Viscous lubricants will shorten the life of this manual. And after each wheel) Some adjustments will need to be lubricated, use . A new spark plug and clean/new air filter...
Owners Manual
Page 12
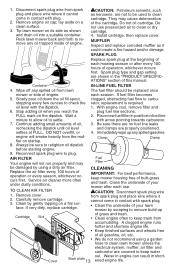
...and attaching hardware (bolt, lock washer and hardened washer). lbs. Do not attempt to drain oil, empty fuel tank by the manufacturer of this manual. GRASS CATCHER • The grass catcher may cause tire damage. Give the lawn mower model number when ordering. Use a wood block between ...CHANGE ENGINE OIL NOTE: Before tipping lawn mower to sharpen while on the blade adapter aligning the two (2) holes in one inch of this manual. Using a blade not approved by running enCrankshaft 12gine until the blade is empty. NOTE: Protect your mower. Remove blade bolt by the...
...and attaching hardware (bolt, lock washer and hardened washer). lbs. Do not attempt to drain oil, empty fuel tank by the manufacturer of this manual. GRASS CATCHER • The grass catcher may cause tire damage. Give the lawn mower model number when ordering. Use a wood block between ...CHANGE ENGINE OIL NOTE: Before tipping lawn mower to sharpen while on the blade adapter aligning the two (2) holes in one inch of this manual. Using a blade not approved by running enCrankshaft 12gine until the blade is empty. NOTE: Protect your mower. Remove blade bolt by the...
Owners Manual
Page 13
... level settles at the beginning of engine. A clogged engine runs hotter and shortens engine life. • Keep finished surfaces and wheels free of this manual. CAUTION: Petroleum solvents, such as shown and drain oil into a suitable container. Clean by using a garden hose to keep mower housing free of operation, whichever...
... level settles at the beginning of engine. A clogged engine runs hotter and shortens engine life. • Keep finished surfaces and wheels free of this manual. CAUTION: Petroleum solvents, such as shown and drain oil into a suitable container. Clean by using a garden hose to keep mower housing free of operation, whichever...
Owners Manual
Page 14
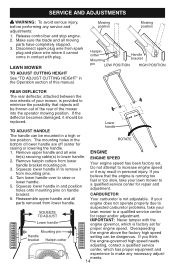
... handle. 1. Your carburetor is factory set . Reassemble upper handle and all moving parts have completely stopped. 3. Squeeze lower handle in the ROTATE bottom of this manual. LAWN MOWER TO ADJUST CUTTING HEIGHT See "TO ADJUST CUTTING HEIGHT" in and position holes onto mounting pins on handle bracket. Do not attempt to...
... handle. 1. Your carburetor is factory set . Reassemble upper handle and all moving parts have completely stopped. 3. Squeeze lower handle in the ROTATE bottom of this manual. LAWN MOWER TO ADJUST CUTTING HEIGHT See "TO ADJUST CUTTING HEIGHT" in and position holes onto mounting pins on handle bracket. Do not attempt to...
Owners Manual
Page 15
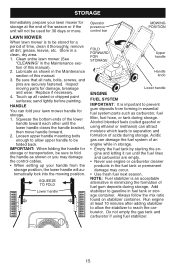
Lubricate as shown in the Maintenance section of this manual. 3. Replace if necessary. 4. Loosen upper handle mounting bolts enough to allow the stabilizer to reach the carburetor. IMPORTANT: When folding the handle for storage or ... moisture which leads to separation and formation of fuel gum deposits during storage. Clean entire lawn mower (See "CLEANING" in the Maintenance section of this manual). 2. Inspect moving parts for storage. 1. SQUEEZE TO FOLD Lower handle Operator presence control bar MOWING POSITION FOLD FORWARD FOR STORAGE Upper handle Handle knob Lower...
Lubricate as shown in the Maintenance section of this manual. 3. Replace if necessary. 4. Loosen upper handle mounting bolts enough to allow the stabilizer to reach the carburetor. IMPORTANT: When folding the handle for storage or ... moisture which leads to separation and formation of fuel gum deposits during storage. Clean entire lawn mower (See "CLEANING" in the Maintenance section of this manual). 2. Inspect moving parts for storage. 1. SQUEEZE TO FOLD Lower handle Operator presence control bar MOWING POSITION FOLD FORWARD FOR STORAGE Upper handle Handle knob Lower...
Owners Manual
Page 16
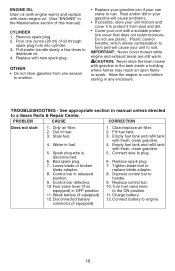
... control bar to the ON position. 11. Pull starter handle slowly a few times to plug. 6. Water in the Maintenance section of this manual). Control bar defective. 10. Fill fuel tank. 3. Empty fuel tank and refill tank with new spark plug. Connect wire to ...Center. See appropriate section in released position. 9. PROBLEM CAUSE CORRECTION Does not start 1. Spark plug wire is disconnected. 6. Control bar in manual unless directed to another. • Replace your gasoline can starts to cool before storing in the tank inside a building where fumes may reach...
... control bar to the ON position. 11. Pull starter handle slowly a few times to plug. 6. Water in the Maintenance section of this manual). Control bar defective. 10. Fill fuel tank. 3. Empty fuel tank and refill tank with new spark plug. Connect wire to ...Center. See appropriate section in released position. 9. PROBLEM CAUSE CORRECTION Does not start 1. Spark plug wire is disconnected. 6. Control bar in manual unless directed to another. • Replace your gasoline can starts to cool before storing in the tank inside a building where fumes may reach...
Owners Manual
Page 18
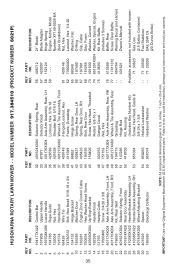
... Wheel Adjusting Bracket 30 401629 Spacer 31 185595 Discharge Deflector KEY PART NO. NO. MODEL NUMBER 917.384510 (PRODUCT NUMBER 6021P) 35 KEY PART NO. inches. 1 inch = 25.4 mm IMPORTANT: Use only Original Equipment Manufacturer (O.E.M.) replacement parts. DESCRIPTION 32... (Includes 3 Screws) 76 410589 Baffle, Rear 77 17411312 Screw, Rear Baffle - - 404764 Warning Decal (not shown) - - 431621 Owner's Manual Available accessories not included with mower: - - 71 33623 Gas Can (2.5 Gallon Container) - - 71 33500 Fuel Stabilizer - - 71 33000 SAE 30W Oil ...
... Wheel Adjusting Bracket 30 401629 Spacer 31 185595 Discharge Deflector KEY PART NO. NO. MODEL NUMBER 917.384510 (PRODUCT NUMBER 6021P) 35 KEY PART NO. inches. 1 inch = 25.4 mm IMPORTANT: Use only Original Equipment Manufacturer (O.E.M.) replacement parts. DESCRIPTION 32... (Includes 3 Screws) 76 410589 Baffle, Rear 77 17411312 Screw, Rear Baffle - - 404764 Warning Decal (not shown) - - 431621 Owner's Manual Available accessories not included with mower: - - 71 33623 Gas Can (2.5 Gallon Container) - - 71 33500 Fuel Stabilizer - - 71 33000 SAE 30W Oil ...

Owners Manual
Page 23
in your home or ours! For the replacement parts, accessories and owner's manuals that you need to do-it ! of home appliances and items like vacuums, lawn equipment, and electronics, call or go on a product serviced by Sears: 1-...
in your home or ours! For the replacement parts, accessories and owner's manuals that you need to do-it ! of home appliances and items like vacuums, lawn equipment, and electronics, call or go on a product serviced by Sears: 1-...


